teri andersen

+ Follow
since Oct 03, 2022
Merit badge: bb list bbv list
For More
Inland Northwest Zone 6b
Apples and Likes
Apples
Total received
In last 30 days
0
Forums and Threads

Recent posts by teri andersen

KA> Some details from Teri's husband, Kurt...

Peter van den Berg wrote:Let me guess a few things. The ceiling is mortared in, so there's a rigid connection between bell walls and ceiling. This is asking for trouble, this connection should be done with flexible material, a strip of superwool or braided glass rope for example. The ceiling tends to expand a lot more than the walls so the mortar between those run a fair chance to crack badly.


KA> Yes. I had seen various builds from people which had mortared over the top of a layer of firebricks supported on angle iron cross pieces. And yes, it did crack badly which is why the new picture from Teri shows a cement backerboard sitting on top of a 3/4" fiberglass insulating rope.

Peter van den Berg wrote:The same goes for the connection between the firebox/cooking plate and the bell, or tower, whatever term you prefer. The hotter steel of the cooking plate will expand a lot more than the bricks of the bell so this connection should be flexible as well. Even the bricks of the firebox' sides could be getting hotter than those of the bell, causing similar problems. Replacing those connections by a glass rope should solve most if not all of this.


KA> I had used dry-stack firebrick pieces originally between the cast iron plate over the firebox and the smoke seepage started coming out around those after about 10 days. As a stop-gap measure, I laid in some fiberglass insulating rope held in place with other firebrick fragments until we stop using the stove on a daily basis and I can pull out the loose firebricks and plug the fiberglass or superwool instead into that gap.

KA> The firebox itself floats within the bell on an iron frame and is insulated with superwool around it (bottom and both sides). The door is attached with rods that run to an iron frame on the back end of the firebox assembly (h/t to Tom Rubino for the idea and the door!)

Peter van den Berg wrote:

teri andersen wrote:2. We put in the temp gauge which he tells me reads between 150 & 175 regularly.


I'm assuming this is in Fahrenheit. The 150 ºF is too low when read while the heater is at full bore. Condensation temperature is something between 100 and 130 ºF, so your lowest reading is dangerously close. Running at full bore, this temperature reading should be 200 ºF since at the top of the chimney it will be lower than that. Maybe, just maybe, the chimney is too cramped...


KA> Yes, that's °F as you surmised. We've only gotten the temperature over 200°F a couple of times and to do so we had to reload the batchbox once or twice after the existing wood burned down to a few remaining inches of coals. I don't know what portion of the 6" probe is sensitive to the temperature (it's a deep fry thermometer and about 1.5" is outside of the chimney entirely so the tip should be pretty close to center of flow).

Peter van den Berg wrote:The proper way to connect stove pipes is with the crimps down, so water will stay inside the heater. But... the first pipe isn't properly done, the second one connects over instead of in the first one with black and stinky smudges on the well-done masonry as the result. The clean-out hatch is a similar case, the hatch is much colder than the brick around it so inside the hatch the vapor will condense and drips out. Filling that hatch with rockwool usually solves this.


KA> Yes, I knew how the pipes were supposed to be assembled, but I was trying to minimize cuts. If I could find some black metal tape (like aluminum duct tape), I'd use that to seal off the pipes.  Putting superwool into the cleanout hole is a great idea which I'll do.

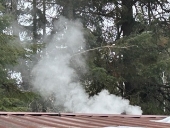
Peter van den Berg wrote:Provided there aren't any other higher roofs nearby this should be sufficient although the chimney as a whole could be longer. In my home country standard minimum length of a chimney should be around 16', just to give an idea.


KA> The total vertical height of the chimney, from intake (about 6" off the floor within the stratification chamber) to the vent is about 15'. Of that, about 6' extends above the roof line and 3' of that is above the roof peak.

KA> The batchbox is sized for 7" with primary and secondary air accordingly (based on the numbers from batchrocket.eu). The burn chamber at the base of the riser is not insulated on the sides, but the riser itself is 8" internally (instant riser built from 10" diameter duct and 1" superwool liner per suggestion from Tom Rubino). The rest of the system (bell and stratification chamber) has an ISA in the range specified for a 7" system leading to an 8" diameter chimney that reduces to 6" in order to connect to the existing through ceiling chimney for the last ~8' of rise.
1 year ago

Mike Haasl wrote:

Peter van den Berg wrote:

teri andersen wrote:2. We put in the temp gauge which he tells me reads between 150 & 175 regularly.


I'm assuming this is in Fahrenheit. The 150 ºF is too low when read while the heater is at full bore. Condensation temperature is something between 100 and 130 ºF, so your lowest reading is dangerously close. Running at full bore, this temperature reading should be 200 ºF since at the top of the chimney it will be lower than that. Maybe, just maybe, the chimney is too cramped...


Just to check, Teri, is that a surface mount thermometer?  It looks like it.  So it's measuring the temperature of the metal pipe.  Peter, I think you wanted to know the temperature in the middle of the pipe?  Maybe you saw Teri's thermometer and adjusted your temperature suggestions accordingly and my post isn't needed.  But I figured I'd mention it in case there's a misunderstanding regarding how the temp is measured.


Mike, this is an internal reading - hard to tell in the picture but it is close to the inside center of the pipe airflow.
1 year ago
UPDATE: it's been a few weeks now

1. We have filled many tiny holes to keep the smoke inside instead of outside but then my husband found that the entire ceiling was cracking all the way around so he put down another layer of fire board with cord around the edge.  A little later I found that the bricks were getting discolored at the place where the firebox meets the tower so he put a pile of what you can see in the picture there to keep smoke inside until a real fix can be made when not in constant use.  I know I am using wrong terminology, sorry to engineers everywhere.  Now there is no smoke smell in the house except occasionally when the door is opened during a burn - yippee!

2. We put in the temp gauge which he tells me reads between 150 & 175 regularly.

3.  I discovered today the strange black drippy stuff in the pictures.  At first burn we had lines of it coming in on the pipe & when I touched it it was watery.  We assumed that it was snow melting back into the pipe from not having a fire for so long with snow buildup on the roof.  These weeks later there are many dry lines & pudding as you can see.  Not sticky but should definitely not be snow melt anymore!!  Any ideas as to what this could be & why?  You can see if you look closely at the whole pipe picture it is all over the pipe.  And how can it possibly be on the floor at the cleanout?

PS: I checked & the pipe on the roof is 3'+
1 year ago

Glenn Herbert wrote:Concerning the odor issues, US building code for masonry heaters mandates a double shell for precisely the point of controlling tiny leaks in the inner shell. If a hairline crack develops that could allow some partially combusted gases to escape, the outer shell will keep almost all of that from being able to escape into the room.


There is a double wall but that is only the top tan bricks - top third?  We are still looking for & filling tiny escape points on the flat top.  Maybe just a full re-slather would be easiest but the smokey smell is certainly dissipating as we go through this first week of fires.

We are also going to place decorative tiles from the red brick to the top this summer once we are sure things are working properly and no rebuilding needs to occur and the stove is dormant for the season.  This will add additional sealing to 3 sides at least.
1 year ago

Glenn Herbert wrote:If the chimney top is only 2' above the roof at its exit, I think you will benefit from raising it. Common US building code is for the top of a chimney to be at least 2' higher than any roof within 10', and 3' higher than the roof at its exit point.


Thank you for the info!  The chimney was professionally installed along with the Kuma, so followed all the regs of the day 15 yrs ago. For the photo above, I am standing at floor level and the wrong side of the sunroom to show the chimney itself.  When we refit the roof exit this summer would be easy to lift it a foot.
1 year ago
Thank you!  This helps me a lot.  My husband corrected me slightly - or I failed to hear it along the way (he's an engineer & I don't always understand).  

The batchbox is a 7" system, the larger pipe is the 8" & does reduce at the top to the 6" because it is winter & he did not want to do any roof work so maybe will fix that in the drier part of the summer (plus I guess it's going to be very spendy).  The photo does not show the part of the roof the chimney is actually sitting on but there is 2' height on it.

Also, he re-sealed some of the top & the smokey smell is reduced somewhat.  I hope that it will disappear altogether after more use but we are very happy with it so far!

There does not seem to be any back flushing of smoke from the door like what happens when the pipe is crusted over with soot from years past with the Kuma.  I really enjoyed watching the secondary burn on the Kuma but Tom from dragontechrmh made us a super spiffy door that I am very glad to have!
1 year ago
My husband got our 8" batchbox finished after a 4 month build!  yay!!  We have had this operational for about 4 days now and the temps outside have warmed up above freezing during the day but drop overnight.  Too bad we missed the single digit weather to see how well this will work for us.  For now though, what seems to be working for us is 3x/day single load burns.  This seems to keep us very comfortable (above 70) with current outside temps.  FYI, we took out a Kuma stove to build this & we burn red fir (birch when we can get it but not this year).

But now I have questions...  

We have smokey smells in the house on every burn.  We did find a tiny leak at the top which was fixed on day 2 so the eye burning smokiness is gone but the smell persists. Is this just the way it is going to be?  

I thought that the burn was supposed to be so clean that no smoke comes from the chimney but as you can see - there is something coming out up there.  And such a clean burn is not supposed to leave ash in the burn box but we have a bit ash (enough to need cleaning out at some point) so I can only assume that we are not burning hot enough? or long enough? or...

This definitely takes less tending & wood overall but not 1/10 for sure!  I won't be able to tell just how much savings on wood until end of a month or more but I would guess about half what the Kuma used as we kept it running about 20+ hrs a day.  It sure is nice to just load it, start it & leave it!

Thanks!!
1 year ago
Yes, I am not good midnight stuff - I read the 25th & assumed it was thru Friday night, my bad.  Thanks though!!
2 years ago
Maybe I'm not doing something correctly, but I am not seeing how this is free.  When I click a link it takes me to the page where I can purchase & when I click to purchase it takes me to the 'give me your card information' page.  :-0  I do see that others have enjoyed the content - would love to be able to watch one today on the care & feeding!  Thanks peeps & I hope your turkey day was as wonderful as ours!
2 years ago
Cathy, bait can be purchased at most hardware or feed & farm stores in the pest section.
2 years ago