

|

|
|
|
|
I tried to upscale to a 7"/175mm size.
Using a Base value of 12.66mm, Internal Surface Area (ISA) ideally 7,2m².
My current design has 8,24 m² ISA (excluding the sides that face interior house walls), but by playing with the main bell height I will hope to come closer to the 7,2m².
Questions
#1 Foundation and floor construction:
Do I need an extra slab of concrete and insulation as a base for the RMH?
I guess the primary need would be insulation, since the foundation is already suited for the heavy weight.
As a precaution I will definitely provide extra support in the basement beneath the main bell.
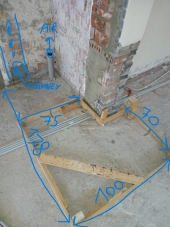
The floor construction (see sketchup) consists of concrete slabs. (steel reinforced), a layer of 6 cm PUR (polyurethane) and finally a layer of 6-8 cm cement base-floor with a ceramic tile as finish.
All floor has this construction except for the odd-shaped area where I planned my RMH, where I now planned my main bell. that area has no PUR, and 12-14cm of cement base-floor that should be well capable of holding the weight.
The rest of the floor contains heat-piping. except for the part below and between the RMH and the chimney.
Should I insulate between the bench bell and the floor? The heat-pipes are about 5 cm deep (1cm tile, 4cm cement basefloor). What temperatures will reach the pipes, could this be an issue without insulating? I I'm not mistaken they can handle 95°C.
#2 Chimney:
2a) The existing chimney is a brick and mortar, lined with cement. internal dimensions are 24x29cm/9,5x11,4”, length 5.5m/18ft. (rough estimate) useful as is for a 7" system? I know a flue pipe would be better but this may be fine? The previous fireplace had a 200mm flue pipe of 1m into this chimney.
2b) Do I need a bypass for cold starts?
#3 Interior wall Insulation
The main bell will be as close as possible up against a interior wall of plastered brick and mortar.
Do i need to insulate between the bell and this wall or just consider it as extra mass?
Perhaps leave a small air gap, place a metal heat shield or insulate some way.
In the design I left a small air gap of 1 cm. I don’t mind some heat to go into this wall since it’s an interior wall and it’s basically a brick and mortar pillar supporting the ceiling. I don’t expect much heat loss here.
#5 Core And Bell
If anyone could check, are the dimensions of the core and bench ok for proper "air/gas" flow to the chimney?
Cristobal Cristo wrote:
Is it an open space or just one floor of the house with interior walls?
thomas rubino wrote:Excellent Job, Cedric!
In one photo, you show a plate blocking off the riser port?
Why? What was its purpose?