I am working on my garden plan for this year, and would welcome friendly feedback on parts of my plan I could improve to make the work easier and/or care for my local landscape better.
Assumptions and goals:
Since about 2019 I've been on a journey toward growing a complete diet using:
renewable energy in the form of human labour and biofuels - as opposed to fossil fuels or electricity; preferably not using animal traction eithertools that can be built and maintained locally using non-industrial technologieslocal nutrients - not importing fertilizers or organic matter from off this patch of land land (the local complexity is using hay mulch from the land beside the garden, a practice I want to keep modifying so I can be confident in the long-tern health of that soil)genetics that can be maintained locally - seed and other propagules
For me, aiming for a complete diet means, breadth, quantity, and length. Breadth: enough variety in all the "food groups" for my health, resilience against specific crop failures, and culinary interest. Quantity: sufficient volume of food to support my body in the work I ask of it (not obtaining other food to supplement). To the point of "enough," for now I'm imagining a 1:1 worker to eater ratio, although I'd like to become more efficient to the point that its practical and not drudgerous for one person to support several. Length: this breadth and quantity spread over the full year, with no seasons of deficiency.
This means techniques have to be efficient so I can grow enough and have time and energy left over to do everything else in my life. I don't have a paid job, but do have plenty of other things to do. And I like to rest sometimes!
I've come a long way on this journey already and have a long way to go.
Specifics of my context:
My focus for now is on an annual garden, soft fruits like currants and raspberries, and apples and black walnuts (since they're already established and bearing). And oyster mushrooms, sun-dried for vitamin D. Those tree crops are significant, but still less than 10% of my total food, so this post is focused on the garden, since that's where the vast majority of my food comes from for now.
I've worked with others on planting a lot more fruit and nut trees; hopefully in years to come they will be a significant food source which could displace some (most?) of the annuals.
I am leaning away from including animals in my agriculture, although I may do some hunting for small game like groundhogs and rabbits that eat my crops.*
I lean toward foods that are easy to store under the above assumptions, since more than half the year I'm mostly eating stored food. This means passive storage (grains, pulses, squash, aliums), root cellaring (roots/tubers/kohlrabi), lacto-fermented veggies (can just go in the root cellar), and drying (over the woodstove, in the sun, or maybe a solar dehydrator). I want to avoid canning and freezing since they use technologies that I'd rather avoid and are energy-intensive.
The land I'm working on is in SW Ontario, Canada. Edge of zone 4/5. Frost around the end of May and end of September, give or take a few weeks. Usually plenty of rain; patterns are shifting, so I can't tell you when for sure.
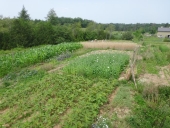
I took last year away from gardening, so I don't have an established garden spot. There's a mix of soil types around, but I'm hoping to garden on a patch that's loamish with stones. Well-drained. Okay organic matter. It's flat enough that I'm really worried about following contour or terracing. Currently hay field with a mix of grasses, alfalfa, and clover.
Here's my garden plan so far for this year.
In the map tab, each cell represents a bed 3'x25'. In theory there's an 18" path between each bed. Beds are grouped into blocks of four beds side-by-side, which I call a block. A lot of staple crops like dry peas or amaranth are just planted right across the block, not really leaving paths. This covers more soil and increases yield for crops that don't need to be accessed much between planting and harvest.
Th colours represent rotation slots. The idea is that each row of colour moves up one slot (and the top row goes to the bottom) each year. (And the split part in yellow/green flips back and forth so each bit of garden sees both).
Areas are based on a couple years of data on yields in these conditions (or worse), and my estimate of my dietary preferences and needs for all these foods. See the crop chart tab. I'm pretty sure it's a varied enough diet to cover all the vitamins, except perhaps B12. I'm using standard dietary data (mostly USDA) to calculate if I'm roughly on the right track in terms of enough calories and protein (see the staple comparisons tab). With my current plan, both are a little low for my estimation of needs (late-20s male, 165lbs, quite active). But I haven't put in data for a lot of the vegetables and fruits and any small game I hunt, and these estimates are probably conservative anyhow, so I think it's about right. I realize that many people believe good gardening practices make more nutrient-dense food. Could be. In that case, hopefully I'll have plenty. If it's not enough, I can increase scale a bit in future years.
Question #1:
How to convert the hay field into garden?
I'm looking at about 1/4 acre. Remember, I don't want to import a tonne of compost or cardboard or anything else. I can use mulch, but only as much as I can practically cut with a scythe. I can flip sod with a shovel, but as I recall from other years it's about 6 hours/block (=144 hours), and I don't like that much tillage if it can be avoided anyhow.
My best idea for now is discouraging the sod with a combination of eye-hoe and stirrup wheelhoe - basically shallow tillage. Then plant, and mulch what I can as the season progresses. Still more tillage than I'd prefer. Other ideas?
Based on a few others years in this spot, if I keep after the weeds and mulching, this soil seems to be pretty manageable with relatively little tillage the year after breaking sod.
Question #2:
What opportunities do you see for intercropping?
I haven't done a whole lot of intercropping in the past. Things which I know have work for me that I want to do again are:
dry beans on dry corn (low yield, but it's a bonus)dry beans on amaranthdry peas on dry favas (maybe, sometimes)basil under tomatoes
Looking at what I hope to grow and the constraints of my rotation, what other intercrops could I do? I want suggestions with some evidence that they are beneficial (your experience or someone else's documentation).
Question #3:
What opportunities do you see for cover cropping? Remember, I want to be able to produce any cover crop seed myself. I prefer cover crops that don't compete with my food supply if possible. For example, if I use rye or buckwheat and don't harvest it, that's basically more food I need to grow. Whereas extra radish seed doesn't "cost" too much to grow.
Question #4:
Do you have ideas for rearranging my layout that you think would be beneficial? Or are you curious why I'm putting things where I am?
Question #5:
Are there other crops that I'm not planning to grow that you really like growing and eating and would recommend?
*Non-ruminants tend to eat enough human-quality food that it doesn't seem worthwhile to keep them. I'm not interested in importing feed. Exceptions I haven't explored that I'm curious about are rabbits, insect larvae, and fish. I'd welcome links to resources on how to raise these within the assumptions described above.
Ruminants certainly have a potential role in filling a niche in the landscape different from humans and providing many benefits. I've worked with goats and cattle, and have helped others a bit with sheep. I have experience with butchering, milking and dairy processing, and a bit of experience with making hay by hand for winter feed. The work is fine, but it's not my preferred way to live if I don't have to. Gardening foods to take the role of staples from animals seems easier and more flexible overall to me at this point. I'm still wondering about fibre for clothing, particularly winter, though.