Here's a very small, very cheap threshing machine my brother and I built.
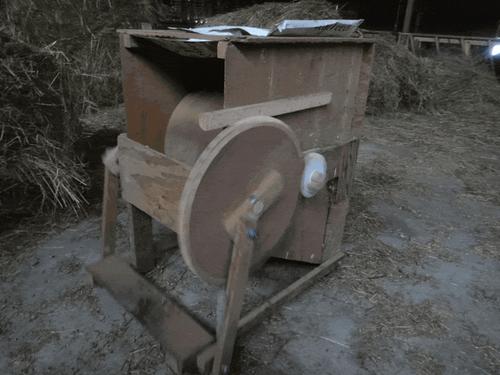
Three big design goals were making it:
relatively compact and not too heavyleg powered (treadle), and as wooden as possible both to make it very low embodied energy and easy to make with simple tools
Unpowered tools, in our case. Hand saws, planes, brace and bits, pole lathe, shaving horse/drawknife.
The metal involved is a few bolts/washer/nuts and wood screws.
The shafts are wood and run in wooden "bearing blocks" that got an application of mineral oil (Got ideas for non-FF alternatives? I wonder if food oils/fats would get rats gnawing on it). These blocks could be easily replaced when they wear out.
.JPG)
The drivetrain is wooden gears, the big one a piece of MDF and the small one two layers of cross-laminated hardwood (MDF will just split at that size). They've lasted for a full gardening season, but I don't know how long they'll be good for.
We built this thresher after having tried
Lu Yoder's bike thresher design (which, wonderfully, is available for free!). Skip this paragraph if you're not interested in what we didn't love about it. Probably most of the deficiencies we experienced were due to our execution of it (I tried to use a leather flat belt drive on wooden pulleys that kept slipping, and the bike was geared too low so you had to peddle real fast...). But we also found the whole thing was just really big and heavy - not very practical to take to the field - and straw would wrap on the small central shaft, clogging it up. Also, having the screen in the bottom is a nice idea, but just resulted in lots of junk piling up and needing to be cleaned out to often. Better to just have continuous flow-through and separate it later.
So we were imagining making something much more compact (hence the switch to treadle - it's also just so much simpler, more appropriate for a scratch-building rather than salvage paradigm), with a big drum instead of a small shaft to avoid wrapping, and open/no screen.
A lot of the inspiration was
this Japanese rice thresher. Turning that into wood.
The business end of the thresher is a drum made of eight boards stuck full of stubby peggs. You hold sheaves of grain, soybeans plants, or heads of amaranth against the pegs as they spin away from you. You can also pour picked pods of dry legumes through a hole in the top while the front opening is covered. Either way, the pegs whack the seeds out, which then fall down to the slanted bottom and slide out the back onto a tarp or swept floor. They'll whack your fingers if you get too close, which could break them, but at least won't take off an arm like a tractor-powered machine. Don't get to close, and let go if it suddenly grabs what you're threshing.
The drum is affixed to the rear shaft. The gears are on the right side. The rear shaft has a small gear that meshes with a big gear that's on the front shaft. When the big gear spins, it makes the small one spin 3 1/2 times faster. It's important that you ONLY TREADLE WHEN THERE'S A SAFETY SHIELD THAT COVERS THE GEARS. You could crush a finger in a hurry.
The front shaft is attached with crank arms and connector rods to a treadle that sticks out the front of the thresher. The treadle is supported and drives the front shaft on both sides so that it doesn't need to be particularly rigid against torsion.
It does kind of spray grain everywhere out the front, but it can't be much more closed in or it gets in the way of your knee or your eyes. A tarp or a well-swept floor does the trick to catch what does get sprayed around.
That's it. After threshing, you need some way to separate the crop from all the chaff and bits of stem that got pulled through. A fanning mill is a great human-powered option that's well-matched in terms of scale. Wind winnowing also works.
A few construction details:
Pegs: 1" thick; 5 or 6 pegs per board over the middle foot or so.Drum: each end is made of a stack of four boards, pinned together with a bolt to keep them evenly spaced, and screwed onto the rear shaft.Shafts: 1 1/2" dowel (turned on a pole lathe).Gears: Size determined by size of drum in order for pegs to clear front shaft. I used Matthias Wandel's online gear template generator (https://woodgears.ca/gear_cutting/template.html) with settings of: 42mm tooth spacing, 16 degree contact angle, and 10 teeth for the small, 36 teeth for the large. I actually did them one at a time (not "gear 1" and "gear 2") so that I could just make 4 copies of the large gear printout and stick them together, each sheet covering 9 of the teeth. You could instead buy the full program (https://woodgears.ca/gear/) that lets you print multi-sheet layouts and use a number of teeth that's not a multiple of 4 if you like. I reinforced the MDF gear teeth with a coat of wood glue on the faces. The gears are affixed using a wooden block screwed to the face of the gear and a flat on the side of the shaft. A #8 screw will break with use; maybe a #10 will do it? I think just screwing through the gear on an angle would split out of the gear eventually.Tie rods/cranks: use some washers and leave the nuts a bit loose to keep faces from rubbing. Use locknuts or doubled nuts to keep them from loosening/tightening over time. This could all be swapped for wood pivots.To get the gears running with minimum play and without pressure, the right-side bearing block for the front shaft slides in a pocket that's longer than it, with tension adjusted by a bolt that presses on it through a block from the front.
If anyone wants more dimensions or construction details, let me know. Most of it was pretty improvised around the critical dimensions, and if you're handy enough to build it, you can likely improvise just fine too! If not, though, just ask.


 10
10


![[Thumbnail for thresher-spinning.gif]](/t/361585/a/276351/thresher-spinning.gif "Filename: thresher-spinning.gif
Description:")
![[Thumbnail for thresher-wooden-bearing-(cover-plate-removed).JPG]](/t/361585/a/276352/thresher-wooden-bearing-(cover-plate-removed).JPG "Filename: thresher-wooden-bearing-(cover-plate-removed).JPG
Description:")

![[Thumbnail for treadle-thresher.JPG]](/t/361585/a/276354/treadle-thresher.JPG "Filename: treadle-thresher.JPG
Description:")
![[Thumbnail for Treadle-Thresher_colour.png]](/t/361585/a/293346/Treadle-Thresher_colour.png "Filename: Treadle-Thresher_colour.png
Description:")
![[Thumbnail for Treadle-Thresher-Drum-Details.png]](/t/361585/a/293347/Treadle-Thresher-Drum-Details.png "Filename: Treadle-Thresher-Drum-Details.png
Description:")


