gift
Willie Smits: Village Based Permaculture Approaches in Indonesia (video)
will be released to subscribers in: soon!

Hamish McFadden

+ Follow
since Apr 10, 2026
Merit badge: bb list bbv list
For More
Apples and Likes
Apples
Total received
In last 30 days
8
Forums and Threads

Recent posts by Hamish McFadden

Hi all,

Now, there's a lot going on in the tech industry beside A.I. Microsoft's Windows 11 is scaring off the French Government, and (quite ironically) even the Chinese Government, because of concerns regarding data harvesting and lack of privacy. Even HP and other laptop manufacturers are switching the default operating system (OS) away from Windows to other operating systems. Not necessarily for privacy concerns, but because of the low margins on cheaper laptops and a surprisingly high return rate by people not enthralled with Microsoft's ongoing subscription model. Even Adobe is coming under fire for the cost of subscriptions, it's use of people's personal photos/works to train their A.I. without permission, and several other justifiable concerns with their industry-standard software.

Also, Microsoft's forced "TPM chip requirement" for Windows 11 late last year meant potentially millions of computers that were otherwise perfectly fine for the task, either ended up as e-waste or encouraged hacks to get around the issue. I hacked my old desktop PC with more than enough performance for Windows 11.. and it worked, but monitoring the network traffic on my home router told me a lot of data was going to Microsoft. So I keep it around as a backup PC system, but I have a second OS on that machine which runs my day-to-day tasks.

So what can we do as users of computers, to keep functional computers in a usable state, and saving money at the same time?

Use free software!

I used to work as an IT guy in a local university, and the one thing I can tell you, is that universities are very budget conscious when it comes to their tech. Students on a budget using older computers, academics that are waiting for the grant money to come in, even bespoke projects in remote, limited electrical power situations...  that would never work reliably enough using commercial software were great cases for trying the free stuff.

So if you want to see how far you can go with free software, I have a page listing my favourite free apps, what they're used for (or their commercial equivalents), I've used many of these applications for decades in both my workplaces and at home, and many have come a long way in the last couple of years. Most of these apps run on Windows, Mac OS and Linux, and a few run on Apple/Android mobile devices as well. So without further ado:

https://waywardham.net/index.php/tech/i-t-and-computing/120-free-software-for-almost-every-occasion

All of my links are to the official app web sites, so you get them straight from the source. I just make free recommendations on my site because I get hounded at social events otherwise, and this way I can say "go there and see what you like, there's no subscriptions or licensing costs to worry about, so why not, right?".

I hope it helps!
Hamish
4 days ago
Hi all,

I've seen it used as a late additive to replace salt+water in some sourdough bread recipes. I think it was in a book called "The Miller's Daughter" by Emma Zimmerman. I tried her "Rugbrød" recipe (it's the last recipe in the entire book) and frankly... it didn't go so well, but that wasn't the brine's fault.

I think the pickle brine would work well with a flour-based bread.

Anyway, just some food for thought! (pun intended)
Hamish.
4 days ago
I got a laugh at my PDC course when I said:

I like living on the edge, that's where the garden is most productive, where I do most of my best work, and judging by my face... the most berry consumption too.  :~)

Hamish.
Hi all,

I agree with most of what the others have been suggesting. Yes you can carve it, and my better half and I used the overhanging branches from our apricot and cherry trees to teach ourselves how to start carving wooden spoons. From the outset we had diverging "spoon carving strategies".

My better half: She made a small spoon with a reasonably nice piece of wood from the outset.

My insane approach: I basically looked at the conventional wisdom of choosing a nice piece of wood, and intentionally ignored it. Not because I "knew better" (because I didn't), but I wanted to see just how difficult wood with knots, and the pith was to carve.... I looked at it as a "real world experience on what not to do" so I could learn to identify the issues and adapt if I ever needed to. As far as I was concerned, it was free wood, so why not?

My first two carving experiences were extremely different from one another, in terms of wood used.

1. The first (ladle) was knotty, pith-ridden green apricot.
2. The second (spatula)  was aged, fully dried and extremely hard ironbark timber from a 100 year old railway sleeper offcut.


Meanwhile, my better half quickly found that hand carving things was too painful for her, so she was using power tools to carve/sand, and she used apricot and a cherry wood exclusively.... in the same time that I carved the two above, she had carved this:


It's really funny, she's the bigger spoon carver of the both of us... but I think I'm the slightly more patient carver.

That said... going beyond carving cherry wood....

For any serious barbecue fans out there, or food smoking gurus, fruit woods are some of the most prized woods to make smoking chips out of, after the usual Mesquite/Hickory/Old wine barrel options.

Here's my cold smoker being used to smoke spices and seasonings....


Here I've labelled which woods I've smoked with, and how long:


I sometimes sell them in a local craft shop for some extra money....


They were so popular I got a phone call from the shop pleading to make more... so I may have gone a little overboard...


The image above was just one of three boxes of smoked spices I made... They make great gifts to foodies, and are great finishing salts. That said, if you use them in the cooking phases, the smokiness is almost completely lost.

Anyway, that's what our household uses cherry woods for!


All the best in your cherry wood endeavours!

Ham.
1 week ago
Hi everyone!

Anyone here a bit of a DIYer? Well for those who are (or know someone who is) will know that scrap wood is an ongoing battle in the shed/workshop. I've been working on a complete internal rebuild of our garage/workshop and I've been deciding on what to do with my scrap piles.

The problem with scrap is that it's often too small to be immediately useful, and it's often kept around because "it might be useful.... someday". However, then it builds up in those sections of the workshop/shed that we dare not speak about...  and it takes up space, and it gathers dust, insects, and other mess... and pretty soon... you have a lot of mess.

So I started doing something... a little odd.... whenever I had 20-30mins between other tasks.

1. I'd go and look at my scrap pile, and sort it into piles of equivalent thickness. If the edges aren't straight, I'd fix that on my table saw.
2. I'd find two of my larger pieces from each pile, then biscuit join them (They're so much cheaper for those not obsessed with the Festool Domino system) and glue them together, clamping them straight with panel clamps wherever possible.
3. I'd repeat step 2 and make multiple panels by adding one piece at a time and clamping them up.
4. The next day, I'd find the next smallest piece from each pile and add one piece to each panel.

Repeat this for just 30 minutes a day each day for a week or two, and you won't have scrap anymore, you'll have usable panels. Trim them to usable shapes, give it a quick sand and they're ready for use. You'll be amazed how much less space one contiguous panel of wood takes up compared to many small ones!

What to do with all that scrap? Well this happened organically...

My better half is a pro graphic designer and photographer specialising in architectural design/numerous environmental projects/wildlife/numerous major events of all types. When she has big jobs coming up every flash, camera, drone, torch, phone, microphone, field recorder, comes out and needs charging.. and the house descends into "charging chaos".

We needed a charging station that could provide storage for batteries and related cabling, run every charger necessary, and do it around a speaker, next to a fridge, and in a space that's no more than 28cm deep, 70cm wide, and 185cm high. (11" x 28" x 73")  

THE SCRAP WOOD CHALLENGE

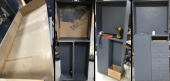
I'm not going to describe everything I did, but if a picture's worth a thousand words... How about four?


When the scrap bits were too small to make into larger panels, I turned them into drawers!


Once that was done, I started working on the electrical...


And the near-final result....


Ok, there's only 12 chargers shown here, but we can add the rest (even all at once) if needed.

Now let's take note of how "scrappy" this project really was....

- That power switch in the bottom right, was scrounged from a house about to be demolished (I had permission).
- There are three 8 socket power boards, that were salvaged from a decommisioned server room several years ago. You can see the plugs in the recesses behind the two middle shelves, and the one at the top for the "wall wart" chargers.
- Those lights were salvaged from failed six-LED strip system where the transformer blew up. (I replaced with a 15W DIN rail 12V DC power supply I had from my old 3D printer enclosure.
- The RCBO (circuit breaker) in the top right, and power monitor were spares from an old project where the client skipped town without paying...
- I used the last of a 20L vat of PVA glue about 5 years out of date to assemble the panels from my scrap.
- The paint was left over from my new 3D printer enclosure.
- Most of the wiring was also left over from my new 3D printer enclosure build or CNC control box wiring job.
- I salvaged six rare Earth magnets from some old hard drives, and they stick the whole station to the fridge to avoid tipping. Each one has about 10Kg of attractive force at point blank range, so it'd take a lot to tip it over. The 28Kg speaker in the bottom also helps to stabilise the whole unit.
- The drawer runners were 3D printed using left-over spools that would have been difficult to use in larger projects.. so I cleared out about 8 near-empty spools of filament there too.

I admit I had to buy:

- some heat shrink, ($6 on Ali Express)
- about half of the drawer handles, ($12 at Bunnings)
- the cable clips to hold the back-side wiring in place, ($9 from Ali Express)
- two paint rollers, ($4 Ali Express)
- the adjustable shelf pins, ($12 Ali Express)
- the two "circuit breaker boxes" ($30 from Bunnings/Ali Express)
- a new spool of solder, ($35 Ali Express), and
- the screws used here and there. ($12)


Everything else was salvaged, repurposed, or were unused from other projects.

Let's talk about audio...

If there are any audio mavens out there cringing that I put a speaker in a box, relax. These are front firing ported speakers. If the ports were on the back or if they had side-facing radiators.. sure that would be bad.... but this is a relatively rare type of speaker and it works well.

And the result?

The mess is gone, no one is tempted to unplug my gear anymore, I cleaned up the scrap pile in the workshop, used a bunch of esoteric stuff laying about my workshop, and if anyone needs to find another charger, a battery, a charging cable, or an adaptor to recharge... they're all in drawers.

It may sound a little Lord of the Rings/nerdy....

"...One spot to charge all phones and in the station find them...."


You have no idea how many times I was asked "Have you seen my phone?" when chargers were literally everywhere in the house. It's nice not to worry about it now. Now we can discuss important things like "what steak do I want for dinner?"

Final notes:


Would I recommend gluing scrap wood together to make panels when new MDF and plywood sheets only cost $43-$65 new?

Not if you're in a hurry! That said...

It's not actually that time consuming to join scrap wood pieces together. Simply add a piece to each panel you have, morning and night each day while listening to your favourite music.... and you'll have some good panels within a week. Naturally, there's some cost in glue and biscuits, but I basically saved myself from buying three 2400x1200mm MDF sheets... (worth about $130 Australian) by using $30 of biscuits, an old tub of gap filler (maybe $10) about $20 of glue, $8 worth of sanding disks and some patience. That's a little less than $60 saved...in just the wood.

Sure, it's not going save huge amounts money or offer the fastest result... but you just made something useful from materials that'd end up in landfill otherwise.

If I had to buy all the electrical components.. that'd be expensive. However, it's hard to say "It's too expensive".. because there's nothing like this in any shop I know of. I had a bespoke problem and I needed to make something "weird" to suit. If I had to pay a professional joiner, and then electrician to do all the work (don't worry, it's checked out by my sparky buddy) it would cost thousands. In total, I think I dropped $120 ish.

I know I'm not a "fine" wood worker, but everyone here is happy with the results.. and I'm satisfied with that.

All the best in your bespoke, scrap-wood, and/or oddball projects!
Ham.
1 week ago
Hi everyone,

I hope you're all well. Now, I know most of you have their own bread baking book libraries and family recipes. However, through a rather strange chain of events when someone made the mistake of asking my opinion re: "The bread making books that I find most useful".... well, a lot of stuff happened.

So I did what any hobbyist bread baker would do, I wrote a few thoughts/opinions on the ones I had. That seems simple enough, right? However, I figured that would only help a couple of people, so I started posting my reviews on online booksellers. Unbeknownst to me, they had a competition for "best reviews of the month" and apparently I generated quite a bit of traffic. I had no idea until I got this in my inbox:

Congratulations harmo, 142,136 people have read your reviews! In addition, 156 people liked your reviews. Well done!


So I found myself the winner of three hefty book vouchers, so I did the next logical step.... buy more bread books... usually the ones that were well regarded but I simply couldn't get from the library anytime in the next 6-10 months.

Well anyway, things.. kinda snowballed from there....

So can I humbly share my list of reviewed books with you? I've put this much effort in, and I thought "Hey, someone out there might find it useful, right?"

Fair warning though... I may have gone a little more in-depth than some of the other reviews you might have read. Please feel free to get a snack, a tasty beverage, put some nice music on and just casually browse around!


If you or someone you know might be interested, please feel free to share this link. It's just my personal site and I make no money whatsoever on it.

https://waywardham.net/index.php/foodie-forays/bread-making-book-reviews

I hope this helps someone out there!

Hamish (a.k.a: "Ham")
1 week ago