• Post Reply Bookmark Topic Watch Topic
  • New Topic
permaculture forums growies critters building homesteading energy monies kitchen purity ungarbage community wilderness fiber arts art permaculture artisans regional education skip experiences global resources cider press projects digital market permies.com pie forums private forums all forums
this forum made possible by our volunteer staff, including ...
master stewards:
  • Nancy Reading
  • Carla Burke
  • r ranson
  • John F Dean
  • paul wheaton
  • Pearl Sutton
stewards:
  • Jay Angler
  • Liv Smith
  • Leigh Tate
master gardeners:
  • Christopher Weeks
  • Timothy Norton
gardeners:
  • thomas rubino
  • Jeremy VanGelder
  • Maieshe Ljin

diy incubator: wins, fails, progress

 
Posts: 20
Location: portlandia, oregon. zone 8b
11
2
hugelkultur chicken pig
  • Likes 3
  • Mark post as helpful
  • send pies
    Number of slices to send:
    Optional 'thank-you' note:
  • Quote
  • Report post to moderator
My husband and I decided to dive right into the deep end of egg hatching by building and programming our own incubator for our first hatch. We didn't just buy a thermostat and hook it up to our heat source and fan to control the temperature. Nope. Husband literally programmed a Raspberry Pi to turn a ceramic heat lamp and fan on and off at specific set points to maintain a consistent internal temperature of 99.5*F within the incubator. (If you're specifically interested in this code, I'm sure I can get that from him.) We popped a dozen fertilized Black Copper Marans and Azure Egger eggs from Alchemist Farm (in CA) in there this morning.

Risky? Sure. But he promised that if the incubator failed and killed the eggs, he'd buy me new ones plus a commercial incubator to make up for it.

The incubator is a little on the ghetto-fabulous side right now as this is functionally a very expensive prototype. But I thought I'd share our progress and data, and when we make improvements later this year (potentially for a meat chicken hatch or maybe more layers) will update with more pictures and information. (Of course, our eggs could fail to develop and then this would be a big failure -- but negative results are important too.)

One of the big benefits of building and programming the incubator ourselves was extreme control and logging of the temperature inside the incubator, and being able to get our temperature swings down to about 1.6* around our 99.5*F target. Temp log included in the images below.

Really basic build info
We built the incubator frame with 1/2" plywood and added a single layer of foam insulation to the inside on all surfaces. We cut out a gap for the fan and fan motor and drilled some holes for ventilation and wiring. Our original lid was just sat flush on the top of the box, but I could feel heat escaping from the sides, so I whacked together a lid that has overhang on each side and drops down into the box to leave fewer gaps between the edges of the insulation.

The heat source is a black 100w MAYKEY ceramic heat lamp. We experimented with using heating cartridges at first, but they got insanely hot and were not appropriate for this purpose. The ones we got were designed to be in a snug fit with some kind of metal to conduct the heat away from the cartridges rapidly. With them just heating the air, they ended up overheating their own component parts and breaking up rapidly.

The fan is just a little plastic fan attached to a 12v motor that is connected to a 5v outlet on the Raspberry Pi. It's running pretty low, but moves enough air around to speed heating.

We put the eggs on a platform above two bricks. The platform is made from a cooling rack with that cushy shelf cover underneath it, with a little rim around the edge to prevent eggs or chicks from falling if the incubator gets bumped.

What worked and what didn't
We played around A LOT with different incubator layouts and bulb/fan cycles to get the best heat cycles. Ideally we wanted something that averaged between 99*F and 100*F, without going above 103*F or below 97*F.

What worked
- Placing the water sources directly underneath the ceramic lamp increased humidity into an acceptable range (45%-55%). We also needed quite a few sponges to achieve this number.
- Having the fan cycle on a delay from the heating lamp (it kicks on 1 minute after and stays on 2.5 minutes after) evened out the temperature of the incubator and reduced carry-over heating.

I also think that adding bricks (we used 6) was critical to reducing temperature swings in the incubator, but we never did any tests without bricks. We changed too many things while we were adding bricks that it's hard to say what these contributed individually, but the prevailing wisdom about heat sinks supports this idea.

What did not work
- Bricks directly under the heating element absorbed way too much radiant heat and resulted in an incubator that got hotter and hotter and hotter. We abandoned this layout in our early trials and moved them to the far end of the incubator, and finally to underneath the pyrex water dish (insulating them from the heating bulb).
- Vents directly behind the fan drew in too much cold air and we could not get the humidity up. Our air is really dry here,  We figured that opening and closing the incubator 5 times a day to turn the eggs would introduce enough additional oxygen for them to stay alive without a constant draw of fresh (cold, dry) air from the outside. Also, it's not air tight.
- The cartridge heater -- as mentioned above.
- Personally -- there are no windows!!! I love staring at my projects (eggs, seeds, etc.) so this is a huge negative for me. Our next lid build will include a double insulated window pane. But then we'll also need a light source inside the incubator (the ceramic bulb doesn't emit visible light).

(ahem, continued)

Other notes
- Thermal read of the bricks after opening the incubator had them around 95*F. Our IR gun isn't the most accurate, but it's good to know that they won't have the opportunity to cook the eggs if the eggs do end up directly over them.
- We created a fake egg (aka the "fegg") to test how egg temperature would track incubator temperature during testing. It's a good thing we did, because the two thermometers we used had pretty different readings once we got up to temps in the 90s (F). The fegg allowed us to figure out which thermometer was going to keep egg temperature closer to 100*F. We're leaving the fegg in as insurance against any other thermometer issues. We read fegg temperature with a DOT oven probe thermometer.
- It took the incubator about 55 minutes to come back up to temp after adding 12 room-temperature eggs.

Temperature & humidity logs
Temperature this morning has stabilized at 99.5*F. The low is 98.8*F and the high is 100.3*F. I'm very happy with a 1.6*F range of temperatures (though I imagine eggs are resilient to swings bigger than this.)

The heating cycles occurs over about 6 minutes, with the bulb turned on for about 60% of the time.

The hygrometer isn't working right now (WHAT), but when we get the new one installed I'll update with a humidity log.

I'd be happy to chat about how we could improve and streamline the incubator for the next go around (or even little things we could adjust on this run!).
2019-02-22.png
[Thumbnail for 2019-02-22.png]
Heating cycles. Red dots are heat lamp on, black dots are heat lamp off.
IMG_20190222_075034.jpg
[Thumbnail for IMG_20190222_075034.jpg]
Exterior of the incubator.
IMG_20190222_075112.jpg
[Thumbnail for IMG_20190222_075112.jpg]
Interior layout of incubator with the fegg.
IMG_20190222_085903.jpg
[Thumbnail for IMG_20190222_085903.jpg]
Closeup of the fegg while I load (r)eggs.
IMG_20190222_090030.jpg
[Thumbnail for IMG_20190222_090030.jpg]
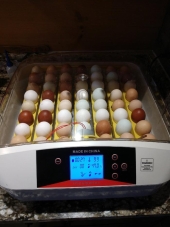
Fully loaded incubator.
 
gardener
Posts: 3073
Location: Central Texas zone 8a
818
2
cattle chicken bee sheep
  • Likes 2
  • Mark post as helpful
  • send pies
    Number of slices to send:
    Optional 'thank-you' note:
  • Quote
  • Report post to moderator
Store bought incubators are relatively inexpensive.  The only "tweek" i have done is zero'ing in the temps on them. I insert a meat thermometer to verify the actual temp vs the incubators displayed temp, then start adjusting the temp setting until the meat thermometer shows the temp i want. I got a much higher success rate after doing this. Like a 100% success rate after this, compared to 60% or less before.
 
wayne fajkus
gardener
Posts: 3073
Location: Central Texas zone 8a
818
2
cattle chicken bee sheep
  • Mark post as helpful
  • send pies
    Number of slices to send:
    Optional 'thank-you' note:
  • Quote
  • Report post to moderator
The pics were slow to load. Did you resize them to under 700?  I think thats a requirement.
 
pollinator
Posts: 3756
Location: 4b
1358
dog forest garden trees bee building
  • Likes 2
  • Mark post as helpful
  • send pies
    Number of slices to send:
    Optional 'thank-you' note:
  • Quote
  • Report post to moderator
I made mine from a styrofoam cooler.  I used a cheapo thermostat from China that I got on Amazon, I believe for four dollars.  I used the socket and wiring from an old floor lamp, made a hole in the side of the cooler and screwed in a regular incandescent bulb from the inside.  The socket was just a snug fit to hold it, but I used a wire coat hanger to reinforce it by wrapping it around the base of the bulb and bending it up over the side of the cooler before putting the lid back on.  The thermostat turns the light bulb on and off depending on the temperature.  I made small holes in the lid for some airflow.  I was going to use an old computer fan hooked to a battery to circulate air, but didn't find it necessary.  Total prince was the $4 for the thermostat.  The rest of the parts were scrounged from various places and all were on hand when I built the incubator.  It isn't the prettiest thing, but the cheapest incubator at Tractor Supply is $57.00.  I'm certain mine works just as well.
 
pollinator
Posts: 1345
Location: Virginia USDA 7a/b
356
4
hugelkultur forest garden hunting chicken food preservation bee
  • Likes 1
  • Mark post as helpful
  • send pies
    Number of slices to send:
    Optional 'thank-you' note:
  • Quote
  • Report post to moderator
Super cool project! Are the eggs rotated or not? We have a friend with tons of guineas, and they are tricky to hatch, but sometimes they find eggs before the black snakes get them, I am interested if this works, we rotted a whole clutch last year in a cheap incubator which made me sad.

Thanks for posting this!
 
n murray
Posts: 20
Location: portlandia, oregon. zone 8b
11
2
hugelkultur chicken pig
  • Likes 1
  • Mark post as helpful
  • send pies
    Number of slices to send:
    Optional 'thank-you' note:
  • Quote
  • Report post to moderator

Tj Jefferson wrote:Super cool project! Are the eggs rotated or not? We have a friend with tons of guineas, and they are tricky to hatch, but sometimes they find eggs before the black snakes get them, I am interested if this works, we rotted a whole clutch last year in a cheap incubator which made me sad.

Thanks for posting this!


Thanks Tj! I got shipped eggs and currently a lot of wisdom suggests to set shipped eggs without rotating them for 48 hours. Starting tomorrow morning, I will rotate by hand 5x a day. We are working on developing an automatic rotater. Actually, basically a roller -- imagine the eggs being on top of those (kinda gross) warm hot dog rollers that you see at the fair. They'd be rolled over constantly throughout the day, aiming for about 24 slow rotations over 24 hours. (There are some papers backing up this rotation rate, I can share if you are interested.)

This honestly wasn't hard to build, and the ability to micro-control, tinker, and log the temp is really fun for me. You can definitely sub in a high quality thermostat for the home-programmed Raspberry Pi and get excellent results (as many people have already done!).

wayne fajkus wrote:Store bought incubators are relatively inexpensive.  The only "tweek" i have done is zero'ing in the temps on them. I insert a meat thermometer to verify the actual temp vs the incubators displayed temp, then start adjusting the temp setting until the meat thermometer shows the temp i want. I got a much higher success rate after doing this. Like a 100% success rate after this, compared to 60% or less before.


Wayne, you're right. Storebought incubators aren't all that expensive. But we built this because we really wanted to, and because our data-nerd hearts love the logging capabilities of home-building. However, it sounds like a tweak like you made, using a more accurate thermometer to validate your store-bought incubator, is an excellent way to improve hatch success.
 
Posts: 38
3
forest garden
  • Mark post as helpful
  • send pies
    Number of slices to send:
    Optional 'thank-you' note:
  • Quote
  • Report post to moderator
I tried a cheap incubator “little giant “
It seemed to work pretty good.
https://youtu.be/N1Xyc7-9NCc
 
What are your superhero powers? Go ahead and try them on this tiny ad:
permaculture and gardener gifts (stocking stuffers?)
https://permies.com/wiki/permaculture-gifts-stocking-stuffers
reply
    Bookmark Topic Watch Topic
  • New Topic