• Post Reply Bookmark Topic Watch Topic
  • New Topic
permaculture forums growies critters building homesteading energy monies kitchen purity ungarbage community wilderness fiber arts art permaculture artisans regional education skip experiences global resources cider press projects digital market permies.com pie forums private forums all forums
this forum made possible by our volunteer staff, including ...
master stewards:
  • Carla Burke
  • Nancy Reading
  • John F Dean
  • r ranson
  • Jay Angler
  • paul wheaton
stewards:
  • Pearl Sutton
  • Leigh Tate
  • Devaka Cooray
master gardeners:
  • Christopher Weeks
  • Timothy Norton
gardeners:
  • thomas rubino
  • Matt McSpadden
  • Jeremy VanGelder

grommets in greenhouse plastic for attaching to wood?

 
pollinator
Posts: 1760
Location: Denver, CO
124
  • Likes 1
  • Mark post as helpful
  • send pies
    Number of slices to send:
    Optional 'thank-you' note:
  • Quote
  • Report post to moderator
I have a very strong greenhouse plastic with an embedded cord scrim. In fact, it is so tough that when I tried to pull it away from a staple, it wouldn't tear around the staple.

My greenhouse is built of metal hoops with wooden end walls, and the plastic is pulled tight around the edge of the wood and then stapled to it. Right now, I've got trim boards nailed over the wood to hide and strengthen the plastic edge.

The plastic is coming to the end of its lifespan, and I want to attach it differently next time, so that it can be easily removed and replaced.

What if I put small plastic grommets through the edge of the plastic and then drove large headed nails through them into the wood? Do you think this would work?

The way the structure is built I can't easily use wiggle wire channels.

 
Posts: 19
Location: Texas hilll country
6
bike solar greening the desert
  • Likes 4
  • Mark post as helpful
  • send pies
    Number of slices to send:
    Optional 'thank-you' note:
  • Quote
  • Report post to moderator
I have a plastic covered wood frame green house. I've settled on screw fastened wood strips. I roll the plastic over a few times at the edges and then poke the screws through the wood strip and then through the plastic roll. I find i can back the screws out and re-adjust for final placement of the plastic to minimize wrinkles and such. I also use the wood strips and screws on the supports down the top and sides by just going right through the plastic . This keeps it from 'ballooning' in the wind which will destroy it in wind storms before winters over. If you have a metal frame i don't know what you'd do there. maybe tension alone could be enough.
I've been meaning to take pictures of how i fasten my plastic. when it comes to these sorts of things pictures are a lot better at explaining.
 
master steward
Posts: 6999
Location: southern Illinois, USA
2556
goat cat dog chicken composting toilet food preservation pig bee solar wood heat homestead
  • Likes 1
  • Mark post as helpful
  • send pies
    Number of slices to send:
    Optional 'thank-you' note:
  • Quote
  • Report post to moderator
Hi Gilbert,

I have had mixed success using metal grommets and 6 mil plastic that has been overlapped at the edges.   It seems that maybe 1 in 3 rip out.  This may simply mean that I need to put in more grommets.
 
master pollinator
Posts: 4992
Location: Due to winter mortality, I stubbornly state, zone 7a Tennessee
2135
6
forest garden foraging books food preservation cooking fiber arts bee medical herbs
  • Likes 3
  • Mark post as helpful
  • send pies
    Number of slices to send:
    Optional 'thank-you' note:
  • Quote
  • Report post to moderator
Just thought I would pop in to mention that with woven fabrics, the smaller size called eyelets are very difficult to make work, they pull loose with much tension. I believe they would behave similarly with plastic. It is just too small of an area for the metal to encase the edges.

The grommets have done well for me in any of the sizes with woven fabric, and 10 and 12 gauge clear plastic, though there was very little wind pressure on any of my applications.
 
pollinator
Posts: 403
Location: Missoula, MT
170
  • Likes 5
  • Mark post as helpful
  • send pies
    Number of slices to send:
    Optional 'thank-you' note:
  • Quote
  • Report post to moderator

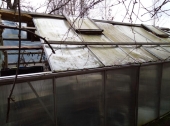
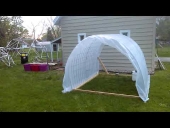
R Draft wrote:screw fastened wood strips


This is what I use on mine. I made the strips on the table saw by ripping some 2x4s into quarter-inch thick strips.

When putting on the plastic, leave about 2 inches of extra plastic sticking out over the edges. Put on the first strip with a few screws through it, then fold the plastic back over the first strip and then screw down a second strip over top of that, with screws every 12 or 18 inches.

It has worked great for me so far after 4 years and a couple of 100mph wind storms.  
 
gardener
Posts: 5174
Location: Cincinnati, Ohio,Price Hill 45205
1011
forest garden trees urban
  • Likes 2
  • Mark post as helpful
  • send pies
    Number of slices to send:
    Optional 'thank-you' note:
  • Quote
  • Report post to moderator
I have friend who builds domes, and uses grommets in the plastic covering.
He melts his holes, which mitigates tearing.
He also adds two fender washers in between, to spread  the forces out.
 
Posts: 121
Location: Ohio
28
rabbit chicken homestead
  • Likes 2
  • Mark post as helpful
  • send pies
    Number of slices to send:
    Optional 'thank-you' note:
  • Quote
  • Report post to moderator
I have a rabbit hutch that has plastic tarps for inclement weather that attach this way. I screwed some tiny eyehooks in and the grommets pop over the eyehooks and hold fast even in some pretty rough storms. Of course there's an awfully solid structure under them which helps.
 
gardener
Posts: 2518
Location: Ladakh, Indian Himalayas at 10,500 feet, zone 5
838
trees food preservation solar greening the desert
  • Likes 1
  • Mark post as helpful
  • send pies
    Number of slices to send:
    Optional 'thank-you' note:
  • Quote
  • Report post to moderator
We heat our houses with seasonally attached greenhouses, putting them on in October and removing them in May. We used to use long thin strips of wood, rolled in and then simply nailed. After a few seasons of removing and attaching, the nail holes would become problematic. If you are not removing and reattaching the plastic every year, I think that system, using screws instead of nails, would be very good. Now on newer greenhouses, like at my private house, we are using the wiggle wire channels, which still damage the plastic, but not as much.

For the bottom edge, we like simply burying the plastic in a small trench. It doesn't take much, about 6 to 12 inches deep and wide, and holds in even severe wind. It doesn't damage the plastic, and is easy for maximizing tension after attaching the top edge.

For edges that are close to horizontal and if the structure allows, small sandbags are nice.
 
R Draft
Posts: 19
Location: Texas hilll country
6
bike solar greening the desert
  • Mark post as helpful
  • send pies
    Number of slices to send:
    Optional 'thank-you' note:
  • Quote
  • Report post to moderator
Hello All ... I had a thought about an alternative to hold down plastic sheet. If you use a pebble or small rock about the size of a coin and push it up into the underside of the plastic the 'bump' can be bound with a small cord and tied off leaving a quite secure fastening point not at risk of tearing out under load . If a mounting point was had nearby then the cords could be tied off wherever necessary to achieve your easily replaceable effect.

The fellow in this video gives a good visual demonstration on how it works... https://www.youtube.com/watch?v=z_R0gEDZhAI
 
pollinator
Posts: 2339
Location: Denmark 57N
598
fungi foraging trees cooking food preservation
  • Mark post as helpful
  • send pies
    Number of slices to send:
    Optional 'thank-you' note:
  • Quote
  • Report post to moderator

R Draft wrote:Hello All ... I had a thought about an alternative to hold down plastic sheet. If you use a pebble or small rock about the size of a coin and push it up into the underside of the plastic the 'bump' can be bound with a small cord and tied off leaving a quite secure fastening point not at risk of tearing out under load . If a mounting point was had nearby then the cords could be tied off wherever necessary to achieve your easily replaceable effect.

The fellow in this video gives a good visual demonstration on how it works... https://www.youtube.com/watch?v=z_R0gEDZhAI


I've done this when the plastic has broken It's quite hard to get it set up as there's very little give in the plastic but once you manage it works well, you can use anything as the "rock" it just has to be non compressible.
 
Are you okay? You look a little big. Maybe this tiny ad will help:
permaculture and gardener gifts (stocking stuffers?)
https://permies.com/wiki/permaculture-gifts-stocking-stuffers
reply
    Bookmark Topic Watch Topic
  • New Topic