• Post Reply Bookmark Topic Watch Topic
  • New Topic
permaculture forums growies critters building homesteading energy monies kitchen purity ungarbage community wilderness fiber arts art permaculture artisans regional education skip experiences global resources cider press projects digital market permies.com pie forums private forums all forums
this forum made possible by our volunteer staff, including ...
master stewards:
  • Nancy Reading
  • Carla Burke
  • r ranson
  • John F Dean
  • paul wheaton
  • Pearl Sutton
stewards:
  • Jay Angler
  • Liv Smith
  • Leigh Tate
master gardeners:
  • Christopher Weeks
  • Timothy Norton
gardeners:
  • thomas rubino
  • Jeremy VanGelder
  • Maieshe Ljin

Development of a compact batchrocket core.

 
gardener
Posts: 1054
Location: +52° 1' 47.40", +4° 22' 57.80"
447
woodworking rocket stoves wood heat
  • Likes 9
  • Mark post as helpful
  • send pies
    Number of slices to send:
    Optional 'thank-you' note:
  • Quote
  • Report post to moderator
After a generous pause, I picked up development again. This post is just about one aspect, the air inlet. The main and also only inlet is, compared to system size, about 42%. This run is done with the inlet restricted to 27.7%. That's a little bit less than the gross section area of both the rectangular tubes of the door posts together. Still, it is a wide slit, 160 mm (6.3") wide to be precise.


It looks a bit rough and it is, though good enough for the experiment. One effect could be that the burn is slowed down a bit. But on the other hand, very low oxygen levels could be reached earlier, with overfuelling as a consequence. In order to promote the likelyhood of such a situation, very dry (8.5%!) soft wood was used.


Every testrun is started from cold so all burns are comparable with each other. It came up rather slow, door was closed at the 11 minutes mark. Oxygen level went very low, past the "better to stay above" level. The burn got unstable as can be seen, but no sign of overfuelling nor thermal runaway.


Looks positive, next run probably with some pallet bobbins and the air inlet not as a slit but as a rectangle, roughly 1 to 3 ratio I'd think.
 
Posts: 43
12
  • Likes 4
  • Mark post as helpful
  • send pies
    Number of slices to send:
    Optional 'thank-you' note:
  • Quote
  • Report post to moderator
Just starting to sift through this thread.....very fascinating stuff and really gets your mind thinking. I'm looking forward to learning as much as I can about this, in my pursuit for the most suitable and efficient woodstove/oven for self reliant living. Very interested in this design and how it could be implemented for my application.
 
Peter van den Berg
gardener
Posts: 1054
Location: +52° 1' 47.40", +4° 22' 57.80"
447
woodworking rocket stoves wood heat
  • Likes 6
  • Mark post as helpful
  • send pies
    Number of slices to send:
    Optional 'thank-you' note:
  • Quote
  • Report post to moderator
On Februari 3rd and 4th a testrun was done on both days. Both failed miserably, not because of the dreaded overfueling but due to the Testo software on my old(ish) laptop froze solid instead. Both occasions the data was lost and the Testo 300's vacuum pump kept running, even when switched off. So the tedious chore of taking six Torx 1 screws out and disconnecting the battery's jumper from the main board with long-nosed pliers had to be performed twice.

The testrun on Februari 4 looked quite good though, for the first 8 minutes, that is. The CO was decending in an early stage and from the 4th minute onwards both CO and O² lines moved congruently real nice.


Another attempt has been done on Februari 6th, hoping for the best. The Acer netbook is really old, bought in the same year, 2009, as the now defunct Testo 330-2. It is still running on Windows 7, never had any updates since 2011 because I switched the wifi off in order to keep it from updating while I was running a test (very annoying!). It might be too slow for the recent Testo software although Windows 7 is specified as the lowest version to run it on. I have to think it over to buy a new or refurbished laptop of somewhat more recent make.

However, the test went well, despite unfavorite circumstances like wind 6/7 Bft with strong gusts upto 8 Bft. The load consisted of small softwood planks only, fairly compact stacked for this occasion. Also visable is the restricted air inlet, 30% of chimney csa and 3 to 1 width/heigth proportions.


The test itself wasn't as nerve wracking like some others, surprisingly enough. The lines shows how frequently the gusts were coming but both the CO and O² lines didn't make any less favorite jumps. End temperature went too high for my liking, also reflected by the lower efficiency. The barrels are somewhat too small for this core, or the exhaust opening could be placed lower.


Not bad at all, we are going along quite well so far. I think another testrun is required, during calmer wind circumstances, just to check whether the air inlet wouldn't be too cramped now.
 
rocket scientist
Posts: 6320
Location: latitude 47 N.W. montana zone 6A
3193
cat pig rocket stoves
  • Likes 9
  • Mark post as helpful
  • send pies
    Number of slices to send:
    Optional 'thank-you' note:
  • Quote
  • Report post to moderator
Peter;  Thank You!
This is fascinating watching your development process!
I am excited that you seem to be closing in on a final stable design!
I have a "stock" 6" batch running into an 8" piped mass in our studio/greenhouse that works famously.
I have a 7" Batch with a Double barrel brick bell in my auto shop that also does an outstanding job of bringing an uninsulated leaky shop up to working temperatures!

I have been delaying building a batch in our home for a variety of reasons.
Most of those reasons have now worked themselves out and I have been slowly collecting supplies to finally build a 6" batch & double skin bell indoors.
Being able to build a compact core with a short riser would allow me much greater flexibility in shaping the bell to fit our 100-year-old home better.
My hope is that you will finalize your design this year and I  can reproduce it in our home.

Again Thank You, for freely sharing all of your research and developments with the world.
Indeed, you are a Master builder and I am honored to be allowed to "quietly sit" at your bench and learn!


Peter van den Berg
gardener
Posts: 1054
Location: +52° 1' 47.40", +4° 22' 57.80"
447
woodworking rocket stoves wood heat
  • Likes 6
  • Mark post as helpful
  • send pies
    Number of slices to send:
    Optional 'thank-you' note:
  • Quote
  • Report post to moderator
Thanks for the compliments Thomas, you sound like a true fan of batchrocket heaters.

It's always good to hear from other people who use my designs. I know, it's fairly certain that those heaters do what is promised by now, but on the other hand it's a pleasure to see such positive comments from half a world away.
 
rocket scientist
Posts: 175
Location: Sangre de Cristo Mountains, CO - Lat 38°14' - Zone 5b
130
hunting earthworks solar wood heat rocket stoves homestead
  • Likes 4
  • Mark post as helpful
  • send pies
    Number of slices to send:
    Optional 'thank-you' note:
  • Quote
  • Report post to moderator
Peter... echoing the thanks from Thomas. Your hard work, continuing development, and information sharing is really appreciated. Also, your posted comments and guidance on my current build is super helpful. Once I complete my double-skin batch rocket I will begin planning my next build in which I hope to use the design parameters resulting from your current research. A million thanks!
 
Posts: 1
  • Likes 3
  • Mark post as helpful
  • send pies
    Number of slices to send:
    Optional 'thank-you' note:
  • Quote
  • Report post to moderator

Glenn Littman wrote:Peter... echoing the thanks from Thomas. Your hard work, continuing development, and information sharing is really appreciated.


Agreed. Thank you
 
Peter van den Berg
gardener
Posts: 1054
Location: +52° 1' 47.40", +4° 22' 57.80"
447
woodworking rocket stoves wood heat
  • Likes 3
  • Mark post as helpful
  • send pies
    Number of slices to send:
    Optional 'thank-you' note:
  • Quote
  • Report post to moderator

Glenn Littman wrote:Peter... echoing the thanks from Thomas. Your hard work, continuing development, and information sharing is really appreciated. Also, your posted comments and guidance on my current build is super helpful. Once I complete my double-skin batch rocket I will begin planning my next build in which I hope to use the design parameters resulting from your current research. A million thanks!


Again such a big compliment! This is a really good one, I'll put a nice frame around it and hang it opposite my bed.
(Not meant to be sarcastic, more tongue-in-cheek instead.)
 
Peter van den Berg
gardener
Posts: 1054
Location: +52° 1' 47.40", +4° 22' 57.80"
447
woodworking rocket stoves wood heat
  • Likes 3
  • Mark post as helpful
  • send pies
    Number of slices to send:
    Optional 'thank-you' note:
  • Quote
  • Report post to moderator
Another testrun done, six days ago. Yes, I know, it's a bit late but here it is. Configuration the same as last time, fuel softwood planks again. Only difference: windforce 2 beaufort instead of 6/7 Bft last time.


Fire development went slow(ish), at 20 minutes into the burn the afterburner was on the verge of popping off. But another part of the load catched fire shortly after and it went back to brisk business again. Altogether, I fully expect this core would be able to handle larger pieces of fuel quite well.


Although the bump in the CO line don't look nice, the numbers are quite good.
Averages: O² 13.03%, eff. 87.23%, CO 702.1 ppm, Tr 140 ºC.
It looks like the burns in this core remain stable now for almost all situations. Noteworthy though, the overall efficiency don't show much fluctuation through the whole range of test results.

Perhaps I might do another testrun before weekend, I recieved a newer laptop from a member of the Dutch Ecologie Forum. The temptation to try this out is surely around the corner. Coming weekend I am off to Belgium, attending a workshop, making sure noses are all in the same direction. One could call it conducting a workshop, but  probably this is too strong a term.

During this workshop the first implementation of a bell construction under a concrete staircase powered by an upscaled Shorty core will be built. I'll be busy with taking pictures as well, of course, some will appear here as well.
 
Peter van den Berg
gardener
Posts: 1054
Location: +52° 1' 47.40", +4° 22' 57.80"
447
woodworking rocket stoves wood heat
  • Likes 7
  • Mark post as helpful
  • send pies
    Number of slices to send:
    Optional 'thank-you' note:
  • Quote
  • Report post to moderator
The Belgium workshop has been completed about two weeks ago. The last 1.5 days I happened to be the only one there with experience in masonry work. Sufficient to say, I was completely knackered when I got home. I slept half of the days for the next week and I am still not fully recovered. Getting feeling better now, it's about time. Loss of energy is the fate when one is approaching 80 years of age...

But... I learned some new things!
For one, the required refractory slabs weren't all there. I used a trick I just learned from Glenn Littman, he's publishing his build on the permies forum. This is a way to use a steel support structure filled with firebricks only, to create a flat surface to build the core on. Thanks Glenn!


The second novelty was the very first upscaled (from 5" to 7") Shorty core. It worked after some insistence, so there's a real chance also this variant is fully scalable. And a second "B":  the bare core worked without a chimney of any kind. The picture shows the core, all around lots of water vapor, but the exhaust opening doesn't show any smoke.


To round it off, the whole of the construction is what in Austria is called 'a triple skin heater'. The core is the first skin, the single skin bell around it is the second, and the masonry-and-lintel staircase around it is the third skin. On only one side (the front) the third skin is following the shape of the second one. Everywhere else, on the sides, rear end and top, the third skin is 10 to 50 cm (4" to 1/2 a yard) or more away from the actual bell.
No picture to show this, sorry, the staircase is still in building phase at this time.
 
thomas rubino
rocket scientist
Posts: 6320
Location: latitude 47 N.W. montana zone 6A
3193
cat pig rocket stoves
  • Likes 6
  • Mark post as helpful
  • send pies
    Number of slices to send:
    Optional 'thank-you' note:
  • Quote
  • Report post to moderator
Peter;
This is excellent news!
Being able to scale this design is the icing on the cake!
I am looking forward to you finalizing this.
So that I may build outdoors to learn and then move it indoors to finally replace my home-built box stove.
 
Glenn Littman
rocket scientist
Posts: 175
Location: Sangre de Cristo Mountains, CO - Lat 38°14' - Zone 5b
130
hunting earthworks solar wood heat rocket stoves homestead
  • Likes 6
  • Mark post as helpful
  • send pies
    Number of slices to send:
    Optional 'thank-you' note:
  • Quote
  • Report post to moderator

Peter van den Berg wrote:But... I learned some new things!
For one, the required refractory slabs weren't all there. I used a trick I just learned from Glenn Littman, he's publishing his build on the permies forum. This is a way to use a steel support structure filled with firebricks only, to create a flat surface to build the core on. Thanks Glenn!


Thank you for the recognition Peter but to be honest this was actually a combination of inspiration from your cast bell heater from 2015 where the cast core was sitting on a steel stand along with a collaborative discussion I had with Thomas Rubino when I was in the design phase.

Like Thomas, I'm also excited to watch your development here closely. I hate to get ahead of myself since I am still in construction mode on heater #1, but I will be building #2 heater this summer to replace a Jotul wood stove.
 
Peter van den Berg
gardener
Posts: 1054
Location: +52° 1' 47.40", +4° 22' 57.80"
447
woodworking rocket stoves wood heat
  • Likes 5
  • Mark post as helpful
  • send pies
    Number of slices to send:
    Optional 'thank-you' note:
  • Quote
  • Report post to moderator
Some hardwood was still lying around beside the heater, waiting for a test. After splitting one piece and measuring the split face, it read 12.5% moist. OK then, it's ready for running a hardwood test!
Officially, the heater should be on operating temperature first, so I did half a load of softwood. This was measured, more because it did grow to a habit to do that on every occasion.
The resulting diagram looked nice but not overly so, fire development might be too quick.


After an hour the glow bed was far down enough to scoop it all out and build a new fire in the hot firebox.


This went very well, looked really nice. But... at about 42 minutes into the burn the software crashed once again. The data couldn't be recovered, by the time all was up and running again the burn was already in its tailout.


A very nice tailout, though. Now that I had a glowing bed of coals and some pieces of hardwood left, what to do with it? I decided to do a refill test, so after an hour or so it was down enough. I shove the coals to the back and added the pieces against it, not directly on top. It catched fire within a minute and produced one of the most beautiful fires I've seen so far in this development model.


In order to prevent losing all the data again, I took some snapshots of the laptop screen, here's one.


The complete run was as good as I'd hoped for, averages O² 13.64%, eff. 84.01%, CO 543.6 ppm, Tr 156.67 ºC. The only proviso according to the EU rules: it didn't last long enough, as 40 minutes is the minimum. Bigger logs and some more could be the remedy to that.


During the week following this event, I felt the urge for a final test run using my regular fuel, softwood scraps from pallets. One full load, reasonably tight stacked, lit on top, wind force 2 Bft. It went very well, CO bump at the beginning is there because of a cold start. But for the rest of it: an example of what a well-behaving stove should do.
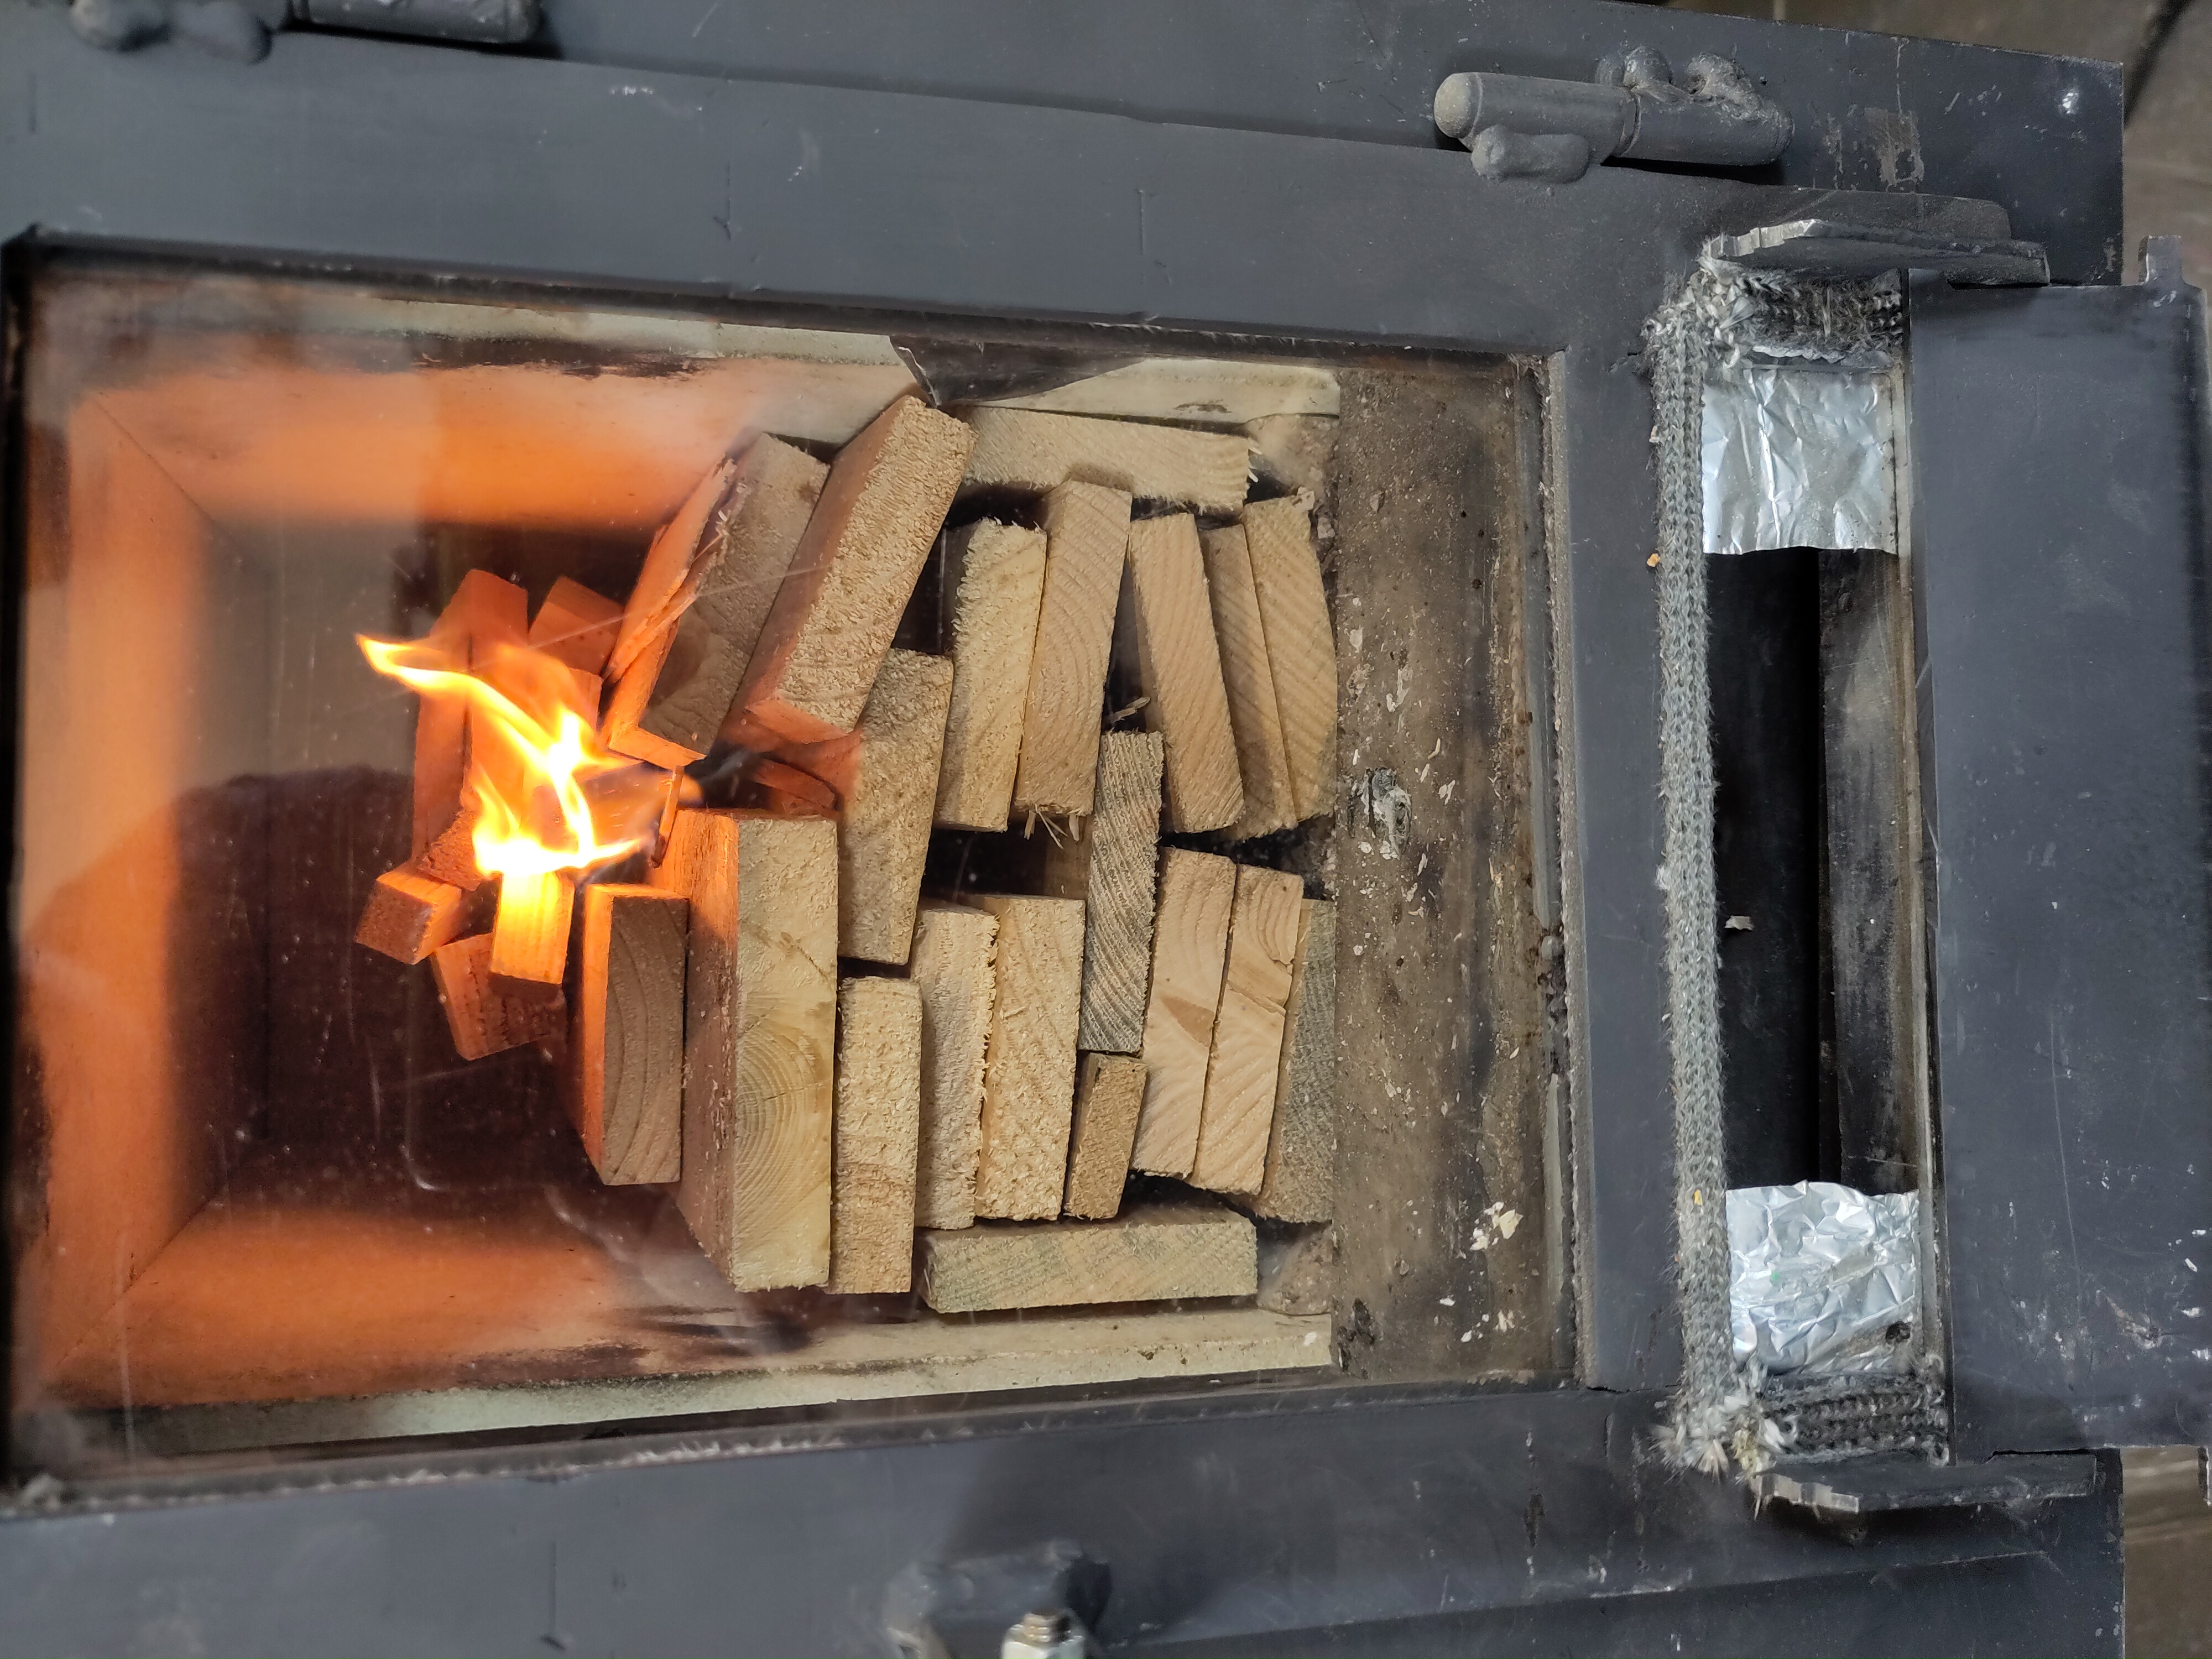
Here's the load:


And here's the resulting diagram:


Averages for this burn: O² 12.1%, eff. 88.57%, CO 434.2 ppm, Tr 177.1 ºC. Mark that the CO is below 500 ppm for the duration of 40 minutes. Very good for a burn of just 60 minutes!
I'd think this is a good moment to call the development over and done, as far as I am concerned. The Loam Freemanship in the north of the Netherlands wants to build an upscaled one as a test bed, a 200 mm or 8" system, built as a sidewinder. For me, that would mean making a drawing and go up north if and when it is completed. I am very curious what the results would be!

Making drawings is what I planned to do next anyway, in order to publish them here (and there).
 
Rocket Scientist
Posts: 1809
Location: Kaslo, BC
525
building solar woodworking rocket stoves wood heat greening the desert
  • Likes 5
  • Mark post as helpful
  • send pies
    Number of slices to send:
    Optional 'thank-you' note:
  • Quote
  • Report post to moderator

 I decided to do a refill test, so after an hour or so it was down enough. I shove the coals to the back and added the pieces against it, not directly on top. It catched fire within a minute and produced one of the most beautiful fires I've seen so far in this development model


Is this how you recommended refueling a batchbox Peter?
When I had mine, I would just lay the pieces of wood on top of the coals.
 
The harder I work, the luckier I get. -Sam Goldwyn tiny ad:
Rocket Mass Heater Jamboree And Updates
https://permies.com/t/170234/Rocket-Mass-Heater-Jamboree-Updates
reply
    Bookmark Topic Watch Topic
  • New Topic