• Post Reply Bookmark Topic Watch Topic
  • New Topic
permaculture forums growies critters building homesteading energy monies kitchen purity ungarbage community wilderness fiber arts art permaculture artisans regional education skip experiences global resources cider press projects digital market permies.com pie forums private forums all forums
this forum made possible by our volunteer staff, including ...
master stewards:
  • Nancy Reading
  • Carla Burke
  • r ranson
  • John F Dean
  • paul wheaton
  • Pearl Sutton
stewards:
  • Jay Angler
  • Liv Smith
  • Leigh Tate
master gardeners:
  • Christopher Weeks
  • Timothy Norton
gardeners:
  • thomas rubino
  • Jeremy VanGelder
  • Maieshe Ljin

Cobbling up a workshop heater. With cooktop, and oven, 4 tons mass. 220mm batch.

 
gardener
Posts: 3471
Location: Southern alps, on the French side of the french /italian border 5000ft elevation
194
  • Mark post as helpful
  • send pies
    Number of slices to send:
    Optional 'thank-you' note:
  • Quote
  • Report post to moderator

Graham Chiu wrote:That's a pretty thick pizza stone. How long does it take to transfer the heat from the underside to the cooking side?


Don't know yet. And the heat riser doesn't exit under the stone.

I received my new thermometer yesterday. So i thought i would give it a try.  But i bet i can't cook until temps drop. I still had 20C° something in the sun today!

But by the time i do two or three fires a day. You bet that it will be pizza land!
 
pollinator
Posts: 637
Location: Wellington, New Zealand
15
  • Mark post as helpful
  • send pies
    Number of slices to send:
    Optional 'thank-you' note:
  • Quote
  • Report post to moderator
Isn't the top of the riser made of steel, and the pizza stone is sitting on top of that?
 
Satamax Antone
gardener
Posts: 3471
Location: Southern alps, on the French side of the french /italian border 5000ft elevation
194
  • Mark post as helpful
  • send pies
    Number of slices to send:
    Optional 'thank-you' note:
  • Quote
  • Report post to moderator

Graham Chiu wrote:Isn't the top of the riser made of steel, and the pizza stone is sitting on top of that?


The top of the riser (snorkel) is a gas bottle(or canister) lined with superwool. The refractory slab sits on that and on a ledge i've welded  at the door frame.  And is free between the tangent an,d the bell's walls.


I would have loved to have the riser to the right, and as tall as it was before.


But i didn't think at all about making a oven this way, till 3 or 4 years after the build.


I might cut a strip of gas bottle, to tack opposite of the snorkel, to force the gases up a bit more.
 
Satamax Antone
gardener
Posts: 3471
Location: Southern alps, on the French side of the french /italian border 5000ft elevation
194
  • Likes 2
  • Mark post as helpful
  • send pies
    Number of slices to send:
    Optional 'thank-you' note:
  • Quote
  • Report post to moderator
 
Posts: 140
1
  • Mark post as helpful
  • send pies
    Number of slices to send:
    Optional 'thank-you' note:
  • Quote
  • Report post to moderator
Cool image!  

Makes me wonder about a port on the left to even out the oven temps.very nice monster you have created!
 
Satamax Antone
gardener
Posts: 3471
Location: Southern alps, on the French side of the french /italian border 5000ft elevation
194
  • Mark post as helpful
  • send pies
    Number of slices to send:
    Optional 'thank-you' note:
  • Quote
  • Report post to moderator

ronald bush wrote:Cool image!  

Makes me wonder about a port on the left to even out the oven temps.very nice monster you have created!


I find the oven  way too hot sometimes. So i don't know.
 
Satamax Antone
gardener
Posts: 3471
Location: Southern alps, on the French side of the french /italian border 5000ft elevation
194
  • Likes 1
  • Mark post as helpful
  • send pies
    Number of slices to send:
    Optional 'thank-you' note:
  • Quote
  • Report post to moderator
So, about a month ago or so, I did an experiment.

I have a metal lathe. And sometimes do heat and shrink assemblies. I had just discovered that the thermal camera on my phone goes up to 400c°.

So I shrunk the splined sleeve in the freezer.  Heated the sprocket in the oven.  And here is what it looks like.

The sprocket came out of the oven with a nice blued finish. Which is nice too.
flir_20200325T193214.jpg
[Thumbnail for flir_20200325T193214.jpg]
IMG_20200327_200143.jpg
[Thumbnail for IMG_20200327_200143.jpg]
 
Satamax Antone
gardener
Posts: 3471
Location: Southern alps, on the French side of the french /italian border 5000ft elevation
194
  • Likes 1
  • Mark post as helpful
  • send pies
    Number of slices to send:
    Optional 'thank-you' note:
  • Quote
  • Report post to moderator
Well, idin't clean up in spring. Firebox full of ashes, pipes most certainly caked with fly ash.

10C° outside, 17/18C° inside. Real dry ofcuts of my work.

It started without a glitch. No smokeback nothing.
 
Satamax Antone
gardener
Posts: 3471
Location: Southern alps, on the French side of the french /italian border 5000ft elevation
194
  • Likes 1
  • Mark post as helpful
  • send pies
    Number of slices to send:
    Optional 'thank-you' note:
  • Quote
  • Report post to moderator


New thermometer between snorkel heat riser, and oven.
 
Satamax Antone
gardener
Posts: 3471
Location: Southern alps, on the French side of the french /italian border 5000ft elevation
194
  • Likes 6
  • Mark post as helpful
  • send pies
    Number of slices to send:
    Optional 'thank-you' note:
  • Quote
  • Report post to moderator
Modified the stove again. Laid some firebricks on the whole front of the "barrel" To cut a bit of direct heat.

And the final answer is, yes you can make pizza in my rocket.


IMG_20201126_202701.jpg
[Thumbnail for IMG_20201126_202701.jpg]
IMG_20201126_204210.jpg
[Thumbnail for IMG_20201126_204210.jpg]
IMG_20201126_202648.jpg
[Thumbnail for IMG_20201126_202648.jpg]
 
Satamax Antone
gardener
Posts: 3471
Location: Southern alps, on the French side of the french /italian border 5000ft elevation
194
  • Mark post as helpful
  • send pies
    Number of slices to send:
    Optional 'thank-you' note:
  • Quote
  • Report post to moderator
Well  everybody.

I have to admit, i have made a mistake. The first hit of proper winter has come, the last few days. Snow is falling outside.


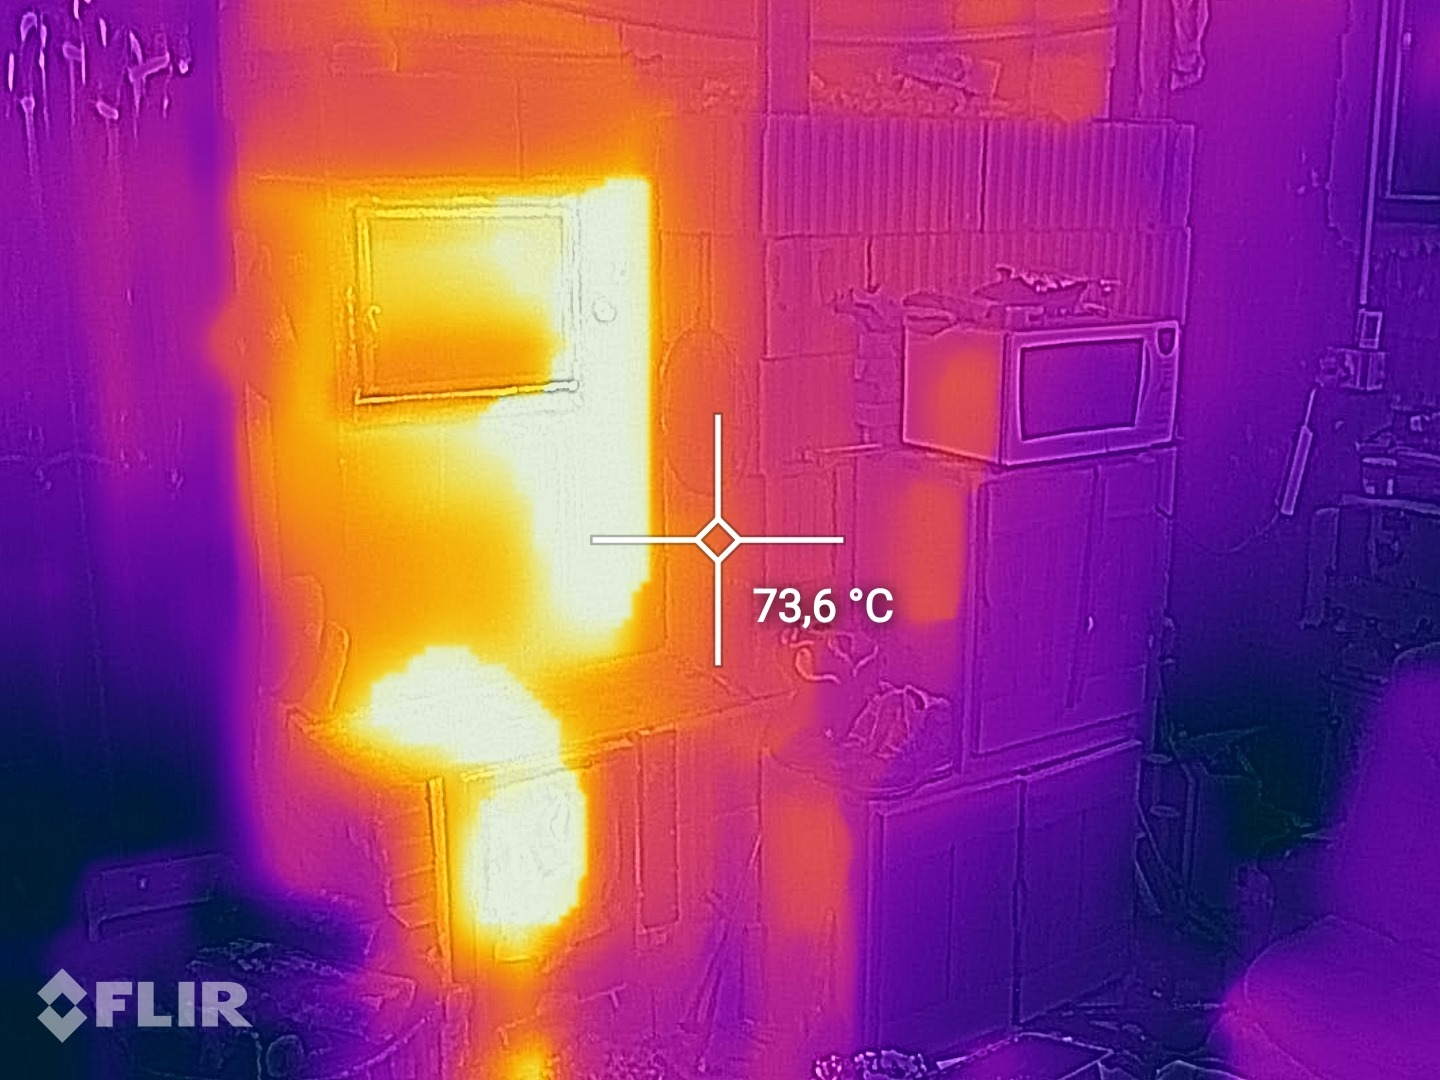
If you look at this photo, you can see a very hot stripe next to the oven door on the right, going down to the cooking plate. I wanted to get rid of that "direct heat" feature, to stop overheating the flat.
So i piled firebricks in the  "barrel"  against the square exterior of the heat riser. To stop hot gases to come to the left, you can already see the divide on the photo above, before the modification. I have a gap of about 2 inches, between riser and front of the "barrel" So it was heating a bit less.

The result of this, i have lost 5c°  in the flat at night. And the next morning, i'm down something like 2c° or 3c° In the evening, i'm down to a rather even 17c°/18c°

And my chimney temp, next to the mass is about 40c° hotter on average.

The future plan, remove some of those bricks. To get back some direct heat. Prepare for the  Upstairs mass piping. I'm struggling finding some stainless 20cm single wall pipes and elbows. To pipe the upstairs mass.
 
Satamax Antone
gardener
Posts: 3471
Location: Southern alps, on the French side of the french /italian border 5000ft elevation
194
  • Likes 1
  • Mark post as helpful
  • send pies
    Number of slices to send:
    Optional 'thank-you' note:
  • Quote
  • Report post to moderator
Yeeehhh hhhhaaaaa!!!

But i admit i have a problem.

700C° or so in the oven, that's a first. -19C° this morning only -10C° at the time of the pic.


But my beams above the stove are cooking. It is said that wood can auto ignite at around 68C°, when well cooked.


But my beams and floor above are, on the edge, at about 130/150C°

The smell of cooking wood is present too. That is shit scary.

Anybody has an idea?

Sorry to other staff, but i'll start another thread about just that. To get more coverage.
IMG_20210111_193631.jpg
[Thumbnail for IMG_20210111_193631.jpg]
IMG_20210111_225413.jpg
[Thumbnail for IMG_20210111_225413.jpg]
flir_20210111T213307.jpg
[Thumbnail for flir_20210111T213307.jpg]
flir_20210111T225447.jpg
[Thumbnail for flir_20210111T225447.jpg]
 
master pollinator
Posts: 4988
Location: Canadian Prairies - Zone 3b
1351
  • Likes 2
  • Mark post as helpful
  • send pies
    Number of slices to send:
    Optional 'thank-you' note:
  • Quote
  • Report post to moderator
Hmm. Some reworking is in order. Way too close to the ceiling for my comfort. Heat shields needed!

The thing about wood is that every time it is heated past a certain temperature, it starts to carbonize a little. And over time, its ignition temperature decreases, and then one day ...

 
Satamax Antone
gardener
Posts: 3471
Location: Southern alps, on the French side of the french /italian border 5000ft elevation
194
  • Mark post as helpful
  • send pies
    Number of slices to send:
    Optional 'thank-you' note:
  • Quote
  • Report post to moderator
I know Douglas. It is not too close. But the bricks behind are hollow bricks. And the heat from the "barell's" back, which is in contact with those; rises up in the bricks.

The first step, I think, would be to drill holes in every  cell of the bricks,  nearly all the way through. On the backside. So the heat escapes on the cold workshop side.

And may be in spring, I will shutter and pour concrete in there. If the temporary fix doesn't work.

But if anybody has some other ideas. Please tell me.
 
Graham Chiu
pollinator
Posts: 637
Location: Wellington, New Zealand
15
  • Likes 1
  • Mark post as helpful
  • send pies
    Number of slices to send:
    Optional 'thank-you' note:
  • Quote
  • Report post to moderator
Can't you just cover the rafters with the ceramic fibre blanket as a temporary fix?
 
Satamax Antone
gardener
Posts: 3471
Location: Southern alps, on the French side of the french /italian border 5000ft elevation
194
  • Mark post as helpful
  • send pies
    Number of slices to send:
    Optional 'thank-you' note:
  • Quote
  • Report post to moderator

Graham Chiu wrote:Can't you just cover the rafters with the ceramic fibre blanket as a temporary fix?


Nope, this is the wall overheating.

Have you seen the thermometer?

That's about 700c°
 
Douglas Alpenstock
master pollinator
Posts: 4988
Location: Canadian Prairies - Zone 3b
1351
  • Likes 3
  • Mark post as helpful
  • send pies
    Number of slices to send:
    Optional 'thank-you' note:
  • Quote
  • Report post to moderator
Metal heat shields are entirely effective, and install quickly.

Added: think steel or aluminum roofing, in ribbed sheets. Make sure there is a good space from the wall, and a gap below for upward convection flow and cooling.
 
Graham Chiu
pollinator
Posts: 637
Location: Wellington, New Zealand
15
  • Likes 1
  • Mark post as helpful
  • send pies
    Number of slices to send:
    Optional 'thank-you' note:
  • Quote
  • Report post to moderator
I have a metal heat shield on my ceiling, and asbestos-lined walls around the fireplace.
 
Rocket Scientist
Posts: 4526
Location: Upstate NY, zone 5
574
5
  • Likes 3
  • Mark post as helpful
  • send pies
    Number of slices to send:
    Optional 'thank-you' note:
  • Quote
  • Report post to moderator
I think your idea of drilling holes at top and bottom of the hollow tile wall on the workshop side to vent excess heat is a good one for quick relief.

The infrared photos are not clear as to where they fit in the regular photo. Is it the beam at the back touching the tile wall that is overheating? Other beams? It would really help if you could add numbers on the regular photo to show where the hot temperatures were recorded.

I would also add a heat shield above the heater with lots of airspace between it and the ceiling beams. The wall may be conducting heat, but there will also be heat radiating and convecting from the top of the heater.
 
Glenn Herbert
Rocket Scientist
Posts: 4526
Location: Upstate NY, zone 5
574
5
  • Likes 2
  • Mark post as helpful
  • send pies
    Number of slices to send:
    Optional 'thank-you' note:
  • Quote
  • Report post to moderator
By the way, I'm sure you know this, but hollow tiles I have seen have multiple rows of chambers, and you would need to drill through all of the partitions to allow the closest chamber to the heater to be vented, along with the rest of them.

Rereading, you did specify "nearly all the way through", so you and anyone following the thread for advice will be good to go.
 
Glenn Herbert
Rocket Scientist
Posts: 4526
Location: Upstate NY, zone 5
574
5
  • Likes 1
  • Mark post as helpful
  • send pies
    Number of slices to send:
    Optional 'thank-you' note:
  • Quote
  • Report post to moderator
I have figured out the second IR photo, with the dark silhouettes of pipes running across the top. The 146.9C reading is on the surface of the wall just below the beam. The exposed beam is considerably cooler, but the back of the beam in contact with the wall would be as hot as the wall. I think quick action is advisable.
 
Satamax Antone
gardener
Posts: 3471
Location: Southern alps, on the French side of the french /italian border 5000ft elevation
194
  • Likes 1
  • Mark post as helpful
  • send pies
    Number of slices to send:
    Optional 'thank-you' note:
  • Quote
  • Report post to moderator

Glenn Herbert wrote:I have figured out the second IR photo, with the dark silhouettes of pipes running across the top. The 146.9C reading is on the surface of the wall just below the beam. The exposed beam is considerably cooler, but the back of the beam in contact with the wall would be as hot as the wall. I think quick action is advisable.


Yes, exactly. The beam is at risk. I have asked a mate of mine,; how much it  would cost to make that wall, with full concrete blocks. I guess he'll pop around tomorrow. I'm cooking a boar's shoulder "ham", right now.  And the temps are far cooler around the beam, for the moment.  Yesterday was very cold for the place i live in. And i might have overheated the wall. But i don't want to be in that situation again. So, yes, quick action is required.
 
Glenn Herbert
Rocket Scientist
Posts: 4526
Location: Upstate NY, zone 5
574
5
  • Likes 1
  • Mark post as helpful
  • send pies
    Number of slices to send:
    Optional 'thank-you' note:
  • Quote
  • Report post to moderator
I think it would be fairly easy to cut into the tops of those hollow tiles and pour thin grout into the cavities to fill them. The question is whether that would prevent the wall from getting hot above the heater level. I am not sure of the answer.
 
Satamax Antone
gardener
Posts: 3471
Location: Southern alps, on the French side of the french /italian border 5000ft elevation
194
  • Mark post as helpful
  • send pies
    Number of slices to send:
    Optional 'thank-you' note:
  • Quote
  • Report post to moderator

Glenn Herbert wrote:I think it would be fairly easy to cut into the tops of those hollow tiles and pour thin grout into the cavities to fill them. The question is whether that would prevent the wall from getting hot above the heater level. I am not sure of the answer.


Yes Glen, it would. Since, here convection is the problem. I have may be 50/60 cm between the stove top and the beam, the wall is only 20. So heat would travel faster to the other side, than up. I ran it today, without problems. It's gone hotter outside. And with three burns, it's too hot in the flat! It was really cold the last few days. Hence, me pushing it, and having problems.
 
Glenn Herbert
Rocket Scientist
Posts: 4526
Location: Upstate NY, zone 5
574
5
  • Mark post as helpful
  • send pies
    Number of slices to send:
    Optional 'thank-you' note:
  • Quote
  • Report post to moderator
I think if you want to get more heat to the workshop side, filling the tile cores all the way to the floor would be helpful, so there would be no more air spaces to insulate the wall.
If you only want to prevent heat rising in the cores, you could stuff the cores with rags or something... umm, maybe something noncombustible ... and only need a small amount of grout above the level of the heater top.
 
Graham Chiu
pollinator
Posts: 637
Location: Wellington, New Zealand
15
  • Mark post as helpful
  • send pies
    Number of slices to send:
    Optional 'thank-you' note:
  • Quote
  • Report post to moderator

Satamax Antone wrote:Modified the stove again. Laid some firebricks on the whole front of the "barrel" To cut a bit of direct heat.

And the final answer is, yes you can make pizza in my rocket.


So that's a black oven?
 
Satamax Antone
gardener
Posts: 3471
Location: Southern alps, on the French side of the french /italian border 5000ft elevation
194
  • Mark post as helpful
  • send pies
    Number of slices to send:
    Optional 'thank-you' note:
  • Quote
  • Report post to moderator

Glenn Herbert wrote:I think if you want to get more heat to the workshop side, filling the tile cores all the way to the floor would be helpful, so there would be no more air spaces to insulate the wall.
If you only want to prevent heat rising in the cores, you could stuff the cores with rags or something... umm, maybe something noncombustible :)... and only need a small amount of grout above the level of the heater top.

 Yes Glen, that's another option. I guess, full concrete blocks could be the solution, or shuttering blocks. Or pouring a big lintel, if i want to keep it insulated a bit.

Graham Chiu wrote:

Satamax Antone wrote:Modified the stove again. Laid some firebricks on the whole front of the "barrel" To cut a bit of direct heat.

And the final answer is, yes you can make pizza in my rocket.


So that's a black oven?


Yep, black oven. I love it.
 
Satamax Antone
gardener
Posts: 3471
Location: Southern alps, on the French side of the french /italian border 5000ft elevation
194
  • Likes 1
  • Mark post as helpful
  • send pies
    Number of slices to send:
    Optional 'thank-you' note:
  • Quote
  • Report post to moderator
Look at the smoke from the sausages.

The speed of it. That's the draft of my stove with the black oven's door open!

 
Could you hold this kitten for a sec? I need to adjust this tiny ad:
Binge on 17 Seasons of Permaculture Design Monkeys!
http://permaculture-design-course.com
reply
    Bookmark Topic Watch Topic
  • New Topic