• Post Reply Bookmark Topic Watch Topic
  • New Topic
permaculture forums growies critters building homesteading energy monies kitchen purity ungarbage community wilderness fiber arts art permaculture artisans regional education skip experiences global resources cider press projects digital market permies.com pie forums private forums all forums
this forum made possible by our volunteer staff, including ...
master stewards:
  • Nancy Reading
  • Carla Burke
  • r ranson
  • John F Dean
  • paul wheaton
  • Pearl Sutton
stewards:
  • Jay Angler
  • Liv Smith
  • Leigh Tate
master gardeners:
  • Christopher Weeks
  • Timothy Norton
gardeners:
  • thomas rubino
  • Jeremy VanGelder
  • Maieshe Ljin

New Earthship-Inspired Design

 
Posts: 20
  • Mark post as helpful
  • send pies
    Number of slices to send:
    Optional 'thank-you' note:
  • Quote
  • Report post to moderator
Hey all,

I am new here, but not new to Earthships. I have been in love with the Earthship concept for a long time now, but have noticed some things that could use a bit of tweaking with current Earthship design. I detailed everything on a GoFundMe page, but please don't think I am advertising this to get donations. I really want to spread the word and don't expect my donation page to succeed at all (maybe a future one I will do for real, but right now I just want to get the word out).

https://www.gofundme.com/new-earthship-sustainable-housing

Please take a look at all the information I have posted there and then discuss here. I am basically looking for input on the functionality, efficiency and cost-effectiveness of the design.

Anyone who has already built an Earthship, I would love to pick your brain. I want to know things like "how much was the budget?", "how many square feet?", "what were the hardest parts of construction?" and "what would you do differently?".

I have already forseen some problems with Earthship Biotecture, such as using tires for the walls. Recycling tires is not a big problem anymore. We grind up tires and use them at playgrounds and to pave roads. 90% of the tires in our landfills have been recycled. For the average person, finding the tires and transporting them to the build site is practically impossible. Also, tires decompose over time. It may take 50-80 years, but as they decompose they release toxic gas, not to mention the loss in structural integrity as they decay (don't want a roof falling on your grandchild's head in a few decades now do we?).

Building rammed earth walls using a simple mobile form is much easier. A pneumatic tamper can be used. Conduit and plumbing can be built into the walls. Walls are now perfectly straight and square like a modern house. There are so many benefits to getting rid of the tires while the only benefit for using them was that they were recycled material and you are supposedly "saving the planet". They are already being recycled so no point in bringing the junk into your home. Same with cans and bottles. The cans and bottles were accumulated for you to use in your Earthship, so why couldn't they have simply been dropped off at a recycling center to be turned into useful items again instead of wasting space inside your walls? Because they look pretty? What looks pretty to you may not to someone you may want to sell to in the future. There are plenty of Earthships on the market now and I don't see them all selling for the prices the owners want because it was built to their custom liking and their taste may not coincide with everyone else. My design gives a more generic feel to the house, which will fit a much wider variety of consumer.

I saw problems with using whole felled trees for the roof. Not everyone will have trees available on their land, or even the correct trees of the correct height. Buying whole trees or very large beams is extremely expensive. Roof trusses are pre-fabricated, mass produced and easy to transport. They come in the exact length that you need for any housing project. They add an attic to your home, which allows for easy installation and maintenance of utilities and adds storage space. Attics allow for central air to be added as supplemental temperature control. My design would create 2 attics for the house using roof trusses and it also uses roof trusses for the greenhouse.

These issues are also explained on the GoFundMe page plus others. Please read through it to see why I made the changes I did.

Working on turning my floor plan into a 3D model. Every piece will be accounted for in the 3D rendering; Every 2x4, every piece of conduit, every individual concrete tank, air ventilation, plumbing, etc. The floor plans already rough out where most of those will go, but the 3D model will show exact placements.

Thanks,
John
 
John Eklund
Posts: 20
  • Likes 1
  • Mark post as helpful
  • send pies
    Number of slices to send:
    Optional 'thank-you' note:
  • Quote
  • Report post to moderator
My latest 3D model. Got rid of the sloped roof which saves a ton of lumber. The slope made large gaps in the roof near the peaks, I knew this would happen, but it was much worse than anticipated (still could deal with it since the roof will have stucco applied, so spanning a 3" gap isn't too difficult). Will have gutters carry the water to the tanks and create a slope in the center using stucco to make sure there is no sitting water on the roof. Check it out, it is really taking shape now.


Let me know what you think. Any and all criticism is welcome as it will only help work out all the minor details I may be missing.

Link to my pricing sheet: Price Estimate

This is also found on the GoFundMe page, but thought I'd add another shortcut here for quick reference. Let me know if you see anything wrong with the prices. These are mostly bulk prices except for the specific items such as appliances and utilities.

Thanks,
John
 
John Eklund
Posts: 20
  • Mark post as helpful
  • send pies
    Number of slices to send:
    Optional 'thank-you' note:
  • Quote
  • Report post to moderator
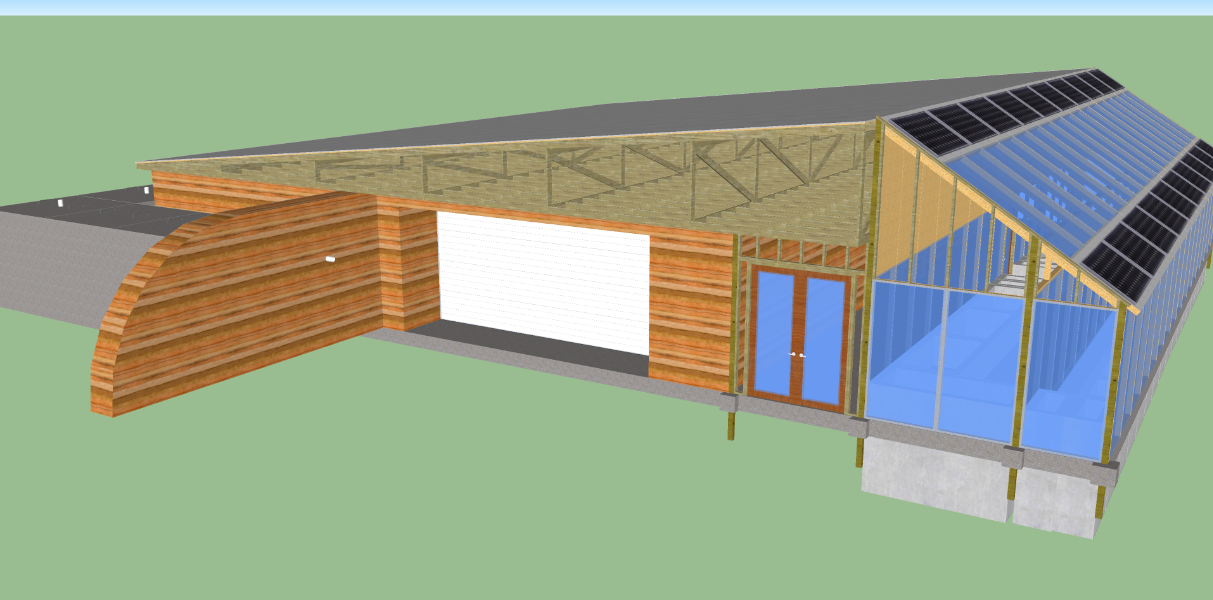
My latest 3D model.


French Doors, Garage Door and you can see a pipe for the Pure Distilled Water overflow so you would be able to store any excess water for future use or to sell.


Water Cisterns all connected by 4-in PVC at the bottom of each tank. The 3 tanks on the west side of the house will store Pure Distilled Water and remain separate from the other tanks by capping off each end of the PVC that connects the tanks. I connected all tanks so each homeowner would be able to decide how to allocate their water. Some homeowners may not even bother to build Solar Stills and use all tanks for rain water. Still need to add the overflow for the rain water tanks which will flow right into the greenhouse so the plants are watered with the overflow.


Foundation. You can see I have some posts set into the foundation. These are to attach the greenhouse windows and make them extremely sturdy. The Slab Floor is 6-in thick and the Grade Beam is 1-ft thick. This will sit on a rubble trench with proper drainage right into the septic leech field.

Not sure if anyone is reading this thread, but I will continue to keep posting updates and then provide the Google SketchUp file when completed so that anyone would be able to build this for themselves. I will also provide a step-by-step guild to the building process including how much money would be needed for each stage of the project. This 3D model includes every detail so far, down to the individual 2x4.

John
 
Rocket Scientist
Posts: 4527
Location: Upstate NY, zone 5
574
5
  • Likes 1
  • Mark post as helpful
  • send pies
    Number of slices to send:
    Optional 'thank-you' note:
  • Quote
  • Report post to moderator
Interesting concept. I see one thing that would considerably simplify construction and future maintenance: the greenhouse/corridor roof with its double pitch means major crickets would be required where the two trusses butt up to it. Making that roof a single slope with the ridge equal to the truss ridges would eliminate failure points, and you would have only the gutter between trusses to deal with instead of multiple intersecting gutters.
 
John Eklund
Posts: 20
  • Mark post as helpful
  • send pies
    Number of slices to send:
    Optional 'thank-you' note:
  • Quote
  • Report post to moderator

Glenn Herbert wrote:Interesting concept. I see one thing that would considerably simplify construction and future maintenance: the greenhouse/corridor roof with its double pitch means major crickets would be required where the two trusses butt up to it. Making that roof a single slope with the ridge equal to the truss ridges would eliminate failure points, and you would have only the gutter between trusses to deal with instead of multiple intersecting gutters.


Thank you so much for your response. The greenhouse roof is definitely a part of my design I have had some trouble tying back into the main structure. You mentioned crickets, and at first I thought you meant insects since I had no clue of the terminology, but after a quick search I do realize that these would be needed for my current design. Two very large ones would need to be constructed to channel the water to flow into either of the three rainwater collection points. As you mentioned, this would not be simple construction (one of the most difficult parts of the entire build, honestly) which is why I currently have nothing in place on my design.

One of my original designs did incorporate a single slope for the greenhouse roof, but I have moved to double pitch ever since adding the 4-seasons room (the corridor between greenhouse and house, also not entirely sure I can call that a 4-seasons room) for additional buffer between the greenhouse and the house (have to limit the heat and humidity that could possibly enter the home). I could change the slope, but then the angle of the solar panels would be less efficient or require more construction for mounting to match the correct angle.

I will have to dabble with a few large cricket designs and see if anything can be constructed in a fairly simple manner. This will require cutting a lot of wood regardless and that is definitely one thing my design has been trying to avoid (most of it is built without needing to cut standard-sized building materials and if a cut is needed, I tried to keep it simple). Tying these crickets in with the "middle gutter" would also be difficult as I still have to create a slope there. I was planning to create a slope with stucco, but not sure how realistic that is. What would be the best way to guarantee drainage for the gutter between the trusses?

More renderings to come soon.

Thanks,
John

Edit: Been just staring at the spots where the crickets are needed and I am drawing a blank. I am only reluctant to remove that corridor simply because the main house has no windows and I wanted to include an area where one could relax and enjoy the views provided by windows. Also, for the above mentioned heat and humidity control, but the 4-ft thick rammed earth wall should hopefully be enough to combat that as long as my greenhouse is properly ventilated. Without the corridor, the single sloped roof over the greenhouse will almost perfectly match the height of the roof ridge on the house. Going to split this into two separate designs and come back to the cricket build-out later.
 
John Eklund
Posts: 20
  • Likes 1
  • Mark post as helpful
  • send pies
    Number of slices to send:
    Optional 'thank-you' note:
  • Quote
  • Report post to moderator
For the crickets, would something like this work?


Since I plan to concrete the entire roof, I was thinking some sort of fabric/tarp can be molded to become the crickets. Dip the fabric into some latex concrete and place it onto a few supports to keep it in place until it dries, then waterproof with plastic sheets and add the standard 3 coats of concrete (not sure if waterproofing would be necessary if original fabric/tarp used is waterproof, but better safe than sorry). I know this will not be able to support any weight, so no standing on it, but I'm sure it would do the trick in managing water flow.

Some pics of how I plan to concrete the rest of the roof. Make some stucco and smooth it into place.


Since the back of the house is buried, I hopefully won't need to pump up pre-mixed stucco to the roof. I will be able to wheel it on over with a little makeshift ramp from the back of the house to the roof.


Concrete roofs sure do look pretty when they are completely smooth. Hopefully I can mix and smooth into place quick enough to guarantee a single smooth layer. I plan on having two concrete mixers (the small portable 5+ cubic foot ones) so that as one is being used to place onto the roof another batch can be mixing. The roof will need roughly 300 cubic feet of concrete to get the 7/8" standard thickness for applying concrete to wood (3-coat system 3/8" scratch coat, 3/8" brown coat and 1/8" finish coat). That will require 60 loads of concrete if using 5 cubic foot concrete mixers, quite a bit of mixing.

Hope this quick fix is realistic.

Thanks,
John

Edit: Updated my 3D model to include 2 variations of crickets.


If the fabric/tarp idea works, then it would look like this. No need to worry about standing on them being at that angle, but don't think of leaning on them.


If fabric/tarp idea does not work, the roof will need standard crickets similar to this.
 
  • Likes 1
  • Mark post as helpful
  • send pies
    Number of slices to send:
    Optional 'thank-you' note:
  • Quote
  • Report post to moderator
Hi John, I really like your ideas and changes to the Earthship designs. I have been looking at them (Earthships) for quite a while as part of my overall planning to build an off-grid home for my family. I do, however, have some other ideas I am thinking of implementing in my future home, mainly related to the greenhouse and growing most, if not all of my family's food needs. How do you plan to utilize the greenhouse in your designs?

Also, can you share a bit more about the Rammed Earth Wall forms and the method you use to pressurize them?

Do you plan to treat somehow the human waste compost before introducing it in the greenhouse?
 
John Eklund
Posts: 20
  • Mark post as helpful
  • send pies
    Number of slices to send:
    Optional 'thank-you' note:
  • Quote
  • Report post to moderator

Georgi Pepelyankov wrote:Hi John, I really like your ideas and changes to the Earthship designs. I have been looking at them (Earthships) for quite a while as part of my overall planning to build an off-grid home for my family. I do, however, have some other ideas I am thinking of implementing in my future home, mainly related to the greenhouse and growing most, if not all of my family's food needs. How do you plan to utilize the greenhouse in your designs?

Also, can you share a bit more about the Rammed Earth Wall forms and the method you use to pressurize them?

Do you plan to treat somehow the human waste compost before introducing it in the greenhouse?


Hi Georgi,

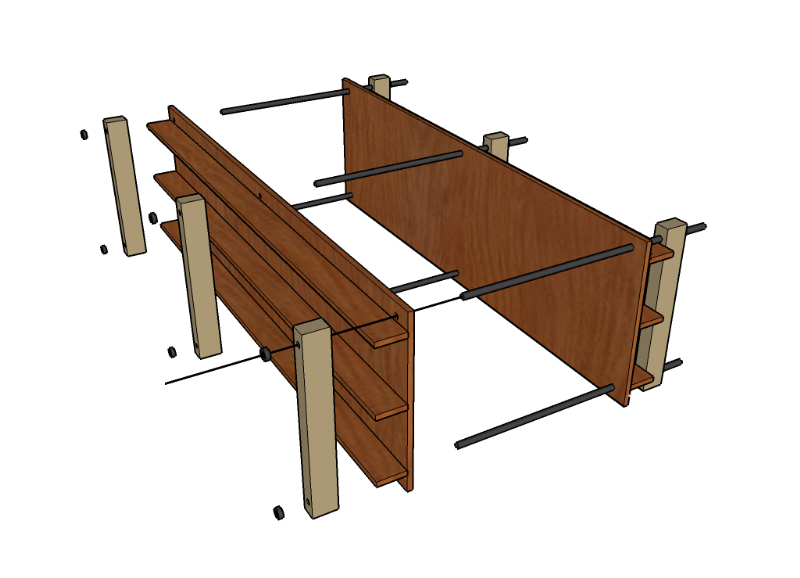
Thanks for taking interest in my project. The Rammed Earth Wall forms are based on a design I found, see images below. I took that design and modified it to be able to create wall segments of multiple lengths whether it is to start a new wall, continue extending an existing wall, turn a corner or make a "T" (turning and "T" are the same).


Ignore these measurements as my new form design will use whole 4'x8'x3/4" OSB/plywood.


I will be using 6-ft threaded rods so the form is capable of making 4-ft thick walls.


The current measurements show the wall segment lengths. Bottom measurements represent new wall segments while the top measurements represent extending a wall and right above those measurements, at the very top, represent the corner/"T" wall segments.

Based on this wall form, I was able to create the order, length and direction in which one should build the walls.

As for the greenhouse, the goal is to be able to grow enough produce to support a family of 4. I am still researching on what to plant and how to plant it. There are many techniques that allow you to plant crops extremely close to maximize the efficiency of the greenhouse. There are also harvesting techniques that will allow your plants to remain full-grown while they keep producing new fruits and vegetables (not all plants can do this).

The sewage system works almost identical to current Earthship design. I have, however, designed a custom septic tank that will separate solid waste from liquid waste. It will store the solid waste in a smaller section, with easier access and removable bucket of some sort. This is so the homeowner can easily maintain the septic tank (much longer periods between full cleaning, which requires the tank to be pumped out) as well as giving the homeowner the option to compost their waste (separately from regular compost for at least 1 year before mixing with regular compost). The design also calls for Urine Diverting Toilets since the majority of nutrients in human waste is contained in the urine. The urine will travel to a greywater distribution tank so that it is diluted before being fed to the plants in the greenhouse (concentrated urine will nutrient burn your plants).

Main differences between my design and an Earthship, in terms of water usage, are the addition of an automated Solar Still, to continually create Pure Distilled Water for drinking and cooking (eliminates need for any filtration system, but you do have to clean the Solar Still regularly), using urine to water the plants and the solid separating septic tank. Another difference may be that I also added an outside garden that I call the "Poop Garden" which gets watered with treated septic water. I recommend no edibles be grown there, only nice smelling flowers so you can use the oils to create hygiene products and such.

So, the overall flow is still the same as the Earthship. Rainwater is gravity fed into cisterns behind the house, a pump moves the water to a pressurized tank inside the house (a separate pump delivers water to the Solar Still, but is controlled by water level of the still), you use the water in shower/sinks, greywater and urine combine in a greywater distribution tank for dilution, greywater/urine mixture moves to greenhouse to water all plants inside, treated greywater collects in another greywater tank to be pumped into a greywater pressurized tank, pressurized greywater fills your toilets, a full flush (urine diverting toilets use a double flush) will take your waste to the septic tank for treatment, treated sewage water goes to your outside "Poop Garden" to feed the flowers, then any leftover water will run to the septic leech field. Water from Solar Still will be gravity fed into designated distilled cisterns (I designed the cisterns so they are all connected through use of PVC piping near the bottom of each tank and these pipes can be capped off to create separation between rainwater tanks and distilled water tanks. My design shows 3 tanks designated for distilled water, but the homeowner can modify this by moving the caps) where it will be pumped into a pressurized tank. All pressurized tanks will be located in the utility closet that will be built in the garage.

Sorry, went on a typing rampage, but provided as much information as I could. This GoFundMe page contains more details and pictures as well. Don't worry, I'm not looking for donations, just happens to be where I put a lot of information.

Hope this helps paint a detailed picture. Future update on my 3D model will include all plumbing, HVAC, electrical and ethernet.

Thanks,
John

Edit: Figured I would toss in my latest rendering. Includes the concrete roof, my makeshift crickets and "gutter" between the roof trusses. Also forgot to mention that the greywater will go through a mycofiltration system (fungal filter), to eliminate harsh chemicals and capture salts, before moving on to the greenhouse.

 
Glenn Herbert
Rocket Scientist
Posts: 4527
Location: Upstate NY, zone 5
574
5
  • Likes 1
  • Mark post as helpful
  • send pies
    Number of slices to send:
    Optional 'thank-you' note:
  • Quote
  • Report post to moderator
Instead of a shed roof sloping north over the corridor, how about a long skinny gable roof? That shed roof, with skylights, will get zero direct sun all winter. If it was gabled, the south side of the gable surface could have skylights that would let sun shine on the back wall of the corridor. Then the only cricket you would need would be the long middle gutter. You could just add a slightly sloped shed-type roof between the main gables to direct water to the north end. It could be full width from ridge to ridge and up to the back edge of the corridor roof, tapering like a triangle as it heads to the north end. This would just require purlins spanning between the main trusses, very simple framing.
 
Georgi Pepelyankov
Posts: 9
  • Likes 1
  • Mark post as helpful
  • send pies
    Number of slices to send:
    Optional 'thank-you' note:
  • Quote
  • Report post to moderator
Thank you for the detailed response, John!

Have you considered using composting toilets instead of a septic? Urine can still go through the Sun Still filtration before being introduced to the greenhouse (or external gardening) but the fecal waste related effort could be minimized with a composting toilet system in place of the septic hole, which in best case scenario, still requires maintenance.

I'm no expert in constructions so I won't comment anything about the roofs, slopes, crickets, etc.. I am more focused, however, into the greenhouse optimization of space and methods of growing. I guess by "techniques to grow extremely close" you mean certain hydroponic systems? If so, have you considered aquaponics and aeroponics (high-pressure hydroponics)? I have been working on the designs of the growing beds, the positioning, and spacing in the greenhouse, optimal watering system, and environment according to the different plants, then grouping them to optimize space, etc. I am both trying to create a full-cycle ecosystem that can be as self-sustainable as possible as well as trying to minimize the need of using any chemicals (either for pest control or diseases). Thus, one of my main priorities is finding a way to grow soil-less. Also, if I truly want to achieve some "balanced" ecosystem, I would need to find a way to separate the different parts so I can find a way to control pests.

If you are planning on growing produce for a family of 4, that would probably require quite a lot of different plants and as a result, a lot of space. Have you thought about the plants' irrigation system? At one time I was even thinking of designing a whole internal stream and watermill system for the growing bed watering, which in turn will rotate the growing beds, allowing maximum sunlight intake. That would require a lot of supporting electrical support, however, and soon after I shot it down in my scrapbook of ideas.

Do you mind sharing more of your farming plans? What techniques do you plan on using? Also, how would you control temperature, humidity and CO2 levels in the greenhouse for year-round produce?
 
Posts: 263
Location: Western Massachusetts (USDA zone 5a, heating zone 5, 40"+)
19
urban
  • Likes 1
  • Mark post as helpful
  • send pies
    Number of slices to send:
    Optional 'thank-you' note:
  • Quote
  • Report post to moderator
Interesting plan.

Personally I would not be interested in any design that has significant valleys - much less horizontal ones - over the house.  To my mind that's asking for trouble in the form of a leak eventually.
 
John Eklund
Posts: 20
  • Mark post as helpful
  • send pies
    Number of slices to send:
    Optional 'thank-you' note:
  • Quote
  • Report post to moderator

Glenn Herbert wrote:Instead of a shed roof sloping north over the corridor, how about a long skinny gable roof? That shed roof, with skylights, will get zero direct sun all winter. If it was gabled, the south side of the gable surface could have skylights that would let sun shine on the back wall of the corridor. Then the only cricket you would need would be the long middle gutter. You could just add a slightly sloped shed-type roof between the main gables to direct water to the north end. It could be full width from ridge to ridge and up to the back edge of the corridor roof, tapering like a triangle as it heads to the north end. This would just require purlins spanning between the main trusses, very simple framing.


Steven Kovacs wrote:Interesting plan.

Personally I would not be interested in any design that has significant valleys - much less horizontal ones - over the house.  To my mind that's asking for trouble in the form of a leak eventually.


I think I was able to solve the roof issue by going back to Glenn's original idea. The image below will illustrate the fix. Let me know if this will work, I am mainly concerned about the structural integrity of the roof section that will be extending over the corridor. I also plan to remove the top row of windows where the greenhouse starts and, having already removed the skylights, this will save 34 windows (68 sheets of polycarbonate).


I may need to also add 2 posts on the greenhouse side, by the greenhouse entryway, for more support (couldn't hurt to be stronger). I simply copied the door frame and added 2 of them to support the opposite ends of the trusses.

I'm really happy with how the roof will tie together now and the only worrisome location is now the middle gutter. When constructed, I will make sure to take the time to waterproof it very well. This middle gutter is located directly over a Rammed Earth Wall (with the bond beam and wooden plate between) and water should never settle on or in these walls.

Hoping this is the best solution.
John
 
John Eklund
Posts: 20
  • Mark post as helpful
  • send pies
    Number of slices to send:
    Optional 'thank-you' note:
  • Quote
  • Report post to moderator

Georgi Pepelyankov wrote:Thank you for the detailed response, John!

Have you considered using composting toilets instead of a septic? Urine can still go through the Sun Still filtration before being introduced to the greenhouse (or external gardening) but the fecal waste related effort could be minimized with a composting toilet system in place of the septic hole, which in best case scenario, still requires maintenance.

I'm no expert in constructions so I won't comment anything about the roofs, slopes, crickets, etc.. I am more focused, however, into the greenhouse optimization of space and methods of growing. I guess by "techniques to grow extremely close" you mean certain hydroponic systems? If so, have you considered aquaponics and aeroponics (high-pressure hydroponics)? I have been working on the designs of the growing beds, the positioning, and spacing in the greenhouse, optimal watering system, and environment according to the different plants, then grouping them to optimize space, etc. I am both trying to create a full-cycle ecosystem that can be as self-sustainable as possible as well as trying to minimize the need of using any chemicals (either for pest control or diseases). Thus, one of my main priorities is finding a way to grow soil-less. Also, if I truly want to achieve some "balanced" ecosystem, I would need to find a way to separate the different parts so I can find a way to control pests.

If you are planning on growing produce for a family of 4, that would probably require quite a lot of different plants and as a result, a lot of space. Have you thought about the plants' irrigation system? At one time I was even thinking of designing a whole internal stream and watermill system for the growing bed watering, which in turn will rotate the growing beds, allowing maximum sunlight intake. That would require a lot of supporting electrical support, however, and soon after I shot it down in my scrapbook of ideas.

Do you mind sharing more of your farming plans? What techniques do you plan on using? Also, how would you control temperature, humidity and CO2 levels in the greenhouse for year-round produce?


I have definitely considered using composting toilets. The only reason I strayed from that idea is to try and widen the audience for this build. I figured that it would appeal to more people if it acted more like a modern home, not just to those who are already interested in the off-grid lifestyle. The toilets can definitely still be replaced by composting toilets (I actually plan to skip the septic tank for my own build, but included it just in case). Most composting toilets would need slight modification to automate the urine collection for the plants (hook up to existing plumbing). Also, the urine won't be going to the Solar Still, this isn't Waterworld (great movie), but all joking aside, the urine will flow with the greywater to feed the plants. Only rainwater will enter the Solar Still, otherwise it would need to be cleaned too often.

I'm still trying to remember the exact terms for the techniques I mentioned. The growing extremely close technique was actually originally accomplished with soil. It has to do with depth of roots, height of plants, necessary nutrients (some plants like high nitrogen and others low, etc. A good balance will mean each plant will still get all the nutrients they want/need), growth time to harvest, planting certain crops near other crops at a certain stage of development, etc. I found some study a long time ago by Arizona State University about creating potential farming systems for a colony in space or on an uninhabitable planet/moon. They experimented with both soil and hydroponics under 24/hour lighting. Obviously 24/hour lighting is not required, but it was still used since the goal of the study was to maximize farming productivity. I will have to find the study again, but this was years ago when I first came across it.

I have definitely been looking into aquaponics and would love to find a simple way to incorporate it into my design. I personally plan to raise fish for meat and aquaponics will give my plants more nutrients as well as keep maintenance to a minimum for the fish farm.

The greenhouse is currently setup to "kind of" regulate its own temperature. The small section should have a more consistent temperature than the large section since the small section will receive more sunlight during winter and less during summer. The large section will receive a lot of sunlight during summer and less during winter. So, in the winter, the hot air from the small section will want to move into the large section and then be pumped into the house for some free heating. During the summer, the hot air from the large section will want to escape through ventilation that I have yet to add (identical to an Earthship). I plan to use the large section to grow fruit trees and crops that don't allow multiple harvests. The small section will grow basically any crop that can be harvested on a cycle such as tomato, greens (if you harvest individual leaves at a time), vine crops, etc.

I currently have no systems in place to control humidity and CO2. I am open to any and all suggestions as I know this will need to be looked into to maximize the effectiveness of the greenhouse. I have yet to iron out all the details involved, but will hopefully have a fool-proof system created soon.

John
 
Posts: 30
Location: Western Mass
  • Likes 1
  • Mark post as helpful
  • send pies
    Number of slices to send:
    Optional 'thank-you' note:
  • Quote
  • Report post to moderator
I see from your gofundme post that you intend your design to be broadly used, in which case your choice of conventional roof framing is wise. Building codes vary from place to place, and each jurisdiction strongly prefers its own way of doing things. In my experience, building inspectors, however sympathetic, find it difficult to smile upon innovation. (Or on 'outmoded' construction methods.)

Since you've gone with conventional roof framing, I presume a conventional attic insulation package will be specified to go with it. I note that you've got a budget of $2000 dollars for attic insulation.

The Department of Energy recommends, and Massachusetts (my locale) demands, a minimum value of r-49 (15.5 inch thickness of fiberglass!) insulation for attic spaces in the colder parts of the U.S. You may find it difficult to put that much insulation under the center valley of your roof.*
Further, that much insulation cuts way down on the none-too-generous 4'3" peak height of your attics which you're counting on for usable space. (Given the 4-12 pitch and 34' span of the specified trusses.)

Also, please consider frost walls for your slab foundation, to help prevent cracks and heaving.

*Seeing the phrase 'center valley of your roof' makes me flinch. I have visions of cubic yards of ice sitting up there until Memorial Day.
 
John Eklund
Posts: 20
  • Mark post as helpful
  • send pies
    Number of slices to send:
    Optional 'thank-you' note:
  • Quote
  • Report post to moderator

Brian Cooper wrote:I see from your gofundme post that you intend your design to be broadly used, in which case your choice of conventional roof framing is wise. Building codes vary from place to place, and each jurisdiction strongly prefers its own way of doing things. In my experience, building inspectors, however sympathetic, find it difficult to smile upon innovation. (Or on 'outmoded' construction methods.)

Since you've gone with conventional roof framing, I presume a conventional attic insulation package will be specified to go with it. I note that you've got a budget of $2000 dollars for attic insulation.

The Department of Energy recommends, and Massachusetts (my locale) demands, a minimum value of r-49 (15.5 inch thickness of fiberglass!) insulation for attic spaces in the colder parts of the U.S. You may find it difficult to put that much insulation under the center valley of your roof.*
Further, that much insulation cuts way down on the none-too-generous 4'3" peak height of your attics which you're counting on for usable space. (Given the 4-12 pitch and 34' span of the specified trusses.)

Also, please consider frost walls for your slab foundation, to help prevent cracks and heaving.

*Seeing the phrase 'center valley of your roof' makes me flinch. I have visions of cubic yards of ice sitting up there until Memorial Day.


That center valley does bug me as well. I have plans to use concrete to create a slope so it acts as a gutter to move the water to the cisterns. I can still see snow being a problem. I might consider adding in a strip of electrical radiant heating since I already plan to use that for additional heating options. I could easily cut loose the single wire and run that the entire length of that center valley.

Thanks for the info on attic insulation. I have been looking into possibly using vacuum insulation. This is expensive if bought brand new, but I saw it for cheap if buying used insulation from old refrigerators. These can have up to R-50 per inch.

For under the center valley, is insulation of that degree still required even if it is sitting on top of a 4-ft wide Earth wall? I have no clue about most codes and appreciate all the information provided.

Thanks,
John
 
Brian L. Cooper
Posts: 30
Location: Western Mass
  • Likes 1
  • Mark post as helpful
  • send pies
    Number of slices to send:
    Optional 'thank-you' note:
  • Quote
  • Report post to moderator
Your central wall is inside the building envelope, so an inspector would probably call it an interior wall - and would likely want a beefed-up footing under it for the load.
 
Brian L. Cooper
Posts: 30
Location: Western Mass
  • Likes 1
  • Mark post as helpful
  • send pies
    Number of slices to send:
    Optional 'thank-you' note:
  • Quote
  • Report post to moderator
On third thought, consider stopping the earthen wall short of full height and frame knee walls to support the trusses and make insulation room. Also see: raised-heel trusses.
 
  • Mark post as helpful
  • send pies
    Number of slices to send:
    Optional 'thank-you' note:
  • Quote
  • Report post to moderator
Hi John!
I am also interested in building an earthship but will be using gabions to create the mas. My location is near a river bed which is being mined for building sand and ther is a huge stockpile of reject material available [stone and pebble] I agree that the use of tyres is not "the" issue. However, your layout removes on of the rooms completely for the energy source - ie the solar facing greenhouse. And even more strangely, you have put a garage between the living area and the energy source. While tires are a matter of choice, the "row of rooms" is somewhat more fundamental to the whole concept and its likely success..
 
John Eklund
Posts: 20
  • Mark post as helpful
  • send pies
    Number of slices to send:
    Optional 'thank-you' note:
  • Quote
  • Report post to moderator

Brian Cooper wrote:Your central wall is inside the building envelope, so an inspector would probably call it an interior wall - and would likely want a beefed-up footing under it for the load.


Yep, the central wall definitely has a good footing. It utilizes the same grade beam as the outer walls (figured I would treat it the same since it is load-bearing).

Brian Cooper wrote:On third thought, consider stopping the earthen wall short of full height and frame knee walls to support the trusses and make insulation room. Also see: raised-heel trusses.


Will have to look into this further and find a way to incorporate it.

Bernhard Haussler wrote:Hi John!
I am also interested in building an earthship but will be using gabions to create the mas. My location is near a river bed which is being mined for building sand and ther is a huge stockpile of reject material available [stone and pebble] I agree that the use of tyres is not "the" issue. However, your layout removes on of the rooms completely for the energy source - ie the solar facing greenhouse. And even more strangely, you have put a garage between the living area and the energy source. While tires are a matter of choice, the "row of rooms" is somewhat more fundamental to the whole concept and its likely success..


When it comes to thermal mass, the sun does not have to be shining on it for heat to be stored. Thermal mass is simply used to "stabilize" temperatures throughout the entire year. If I were to dig a tunnel going a mile deep (nowhere near sunlight), thermal mass will still apply and keep the temperatures steadily between 50 and 60 degrees Fahrenheit all year.

The concept of thermal mass was to limit the use of HVAC. In my design, that 70 degrees you keep constant inside the house, even through use of HVAC, will be stored inside the 4-ft thick walls to be used throughout the winter. In a standard modern house, with practically zero thermal mass, will waste every bit of HVAC used throughout the year.

In my opinion, and many opinions I read online from people who have tried living in Earthships, not having a thermal mass barrier between the house and the greenhouse only invites many problems. Humidity being the largest factor. This is why I include the separation and the use of attics. During the winter, let that heat be pumped into the duct-work that will already exist for central air so it can be properly filtered (dirt, pollen, etc. and humidity). All it takes is a duct fan to draw that air in from the greenhouse and the airflow will reverse when compared to the airflow during the summer.

Also, the airflow of a standard Earthship is not created due to the sun being able to "enter the house" or "heat the rooms". It is created due to temperature differences between your house, the greenhouse and the outside world. If the air is only given a few places and enter and a few places to exit, it will flow in the direction you want it to (even if it doesn't, it can be forced to with the help of a duct fan, still making it way more efficient than standard HVAC). My design still utilizes this airflow concept, it only differs in that I will have the air flow through the attic instead of directly through each room. From the attic I can better maintain the utilities involved and I can more efficiently heat and cool the entire house, making sure each room is given ample airflow.

As for the garage, due to the explanations provided above, it really doesn't matter that it sits between the greenhouse and the living area. In fact, the bedrooms being in the back of the house, where it is buried, was chosen on purpose due to the concept of thermal mass. These rooms will have the most stable temperatures when compared to the garage or kitchen and living room. By forcing the airflow through the attic and not through a series of rooms, I am now able to design this Earthship-type house with any floor-plan (you dream it and it can be done). I honestly think the original Earthship only utilizes the airflow in its current manner simply because they chose not to use roof trusses and do not have the option of utilizing an attic for ventilation purposes. Their roof was chosen for efficient rainwater collection which left many other aspects of the house inefficient.

-John
 
John Eklund
Posts: 20
  • Mark post as helpful
  • send pies
    Number of slices to send:
    Optional 'thank-you' note:
  • Quote
  • Report post to moderator
Just thought of a quick concept for controlling airflow and humidity within the greenhouse itself. Since my design utilizes 2 separate greenhouses, I was thinking of adding a small amount of duct-work to create a constant circulating airflow between the greenhouse. I would pump air out from one top corner and pump it back in through the opposite bottom corner and have identical duct-work in the other 2 corners. This way I can have one set of the ducts simply create a constant airflow, and the other set can have filters specifically for eliminating humidity and these will only be turned on if humidity is too high (plan to automate it with sensors). By doing this, I imagine the 2 greenhouses would regulate each other, not to mention all the added benefits of having the air circulated. Will have to experiment with this on a small scale.

Edit: Thought I would toss in the latest 3D model with the new roof design.


The center valley and the slope created with stucco. An idea also just popped into my head that I could possibly use upside-down roof trusses of decreasing length to create this slope. Will have to try designing this and will post a picture later to see if it is even possible or reasonable.


The roof comes directly up to the greenhouse now. This will not only help with drainage, but also makes it very easy to ventilate the greenhouses into the attic to use that heat inside the house during the winter.
 
Brian L. Cooper
Posts: 30
Location: Western Mass
  • Likes 1
  • Mark post as helpful
  • send pies
    Number of slices to send:
    Optional 'thank-you' note:
  • Quote
  • Report post to moderator
Are you planning a passage through the center wall to get to the third bedroom and the interior door of the garage? Also, am I correct in thinking that the center wall is also a plumbing wall, with water supplies and drainage from the kitchen and baths? What are your plans for positioning the water heater(s)? Point-of-use or central?

If your room layout is finalized, do you have a ductwork plan? I've witnessed horrible blowouts between tradesmen where lumber, duct, wire, and pipe conflict. It ain't pretty.

I just saw your recent drawing. That helps a lot. Good call on eliminating that awkward northern slope over the entryway.

There's no benefit to an upside-down truss. If you want a flat-bottomed slope there just (!?) nail lumber between the main trusses. (sorry, still flinching.)
 
John Eklund
Posts: 20
  • Mark post as helpful
  • send pies
    Number of slices to send:
    Optional 'thank-you' note:
  • Quote
  • Report post to moderator

Brian Cooper wrote:Are you planning a passage through the center wall to get to the third bedroom and the interior door of the garage? Also, am I correct in thinking that the center wall is also a plumbing wall, with water supplies and drainage from the kitchen and baths? What are your plans for positioning the water heater(s)? Point-of-use or central?

If your room layout is finalized, do you have a ductwork plan? I've witnessed horrible blowouts between tradesmen where lumber, duct, wire, and pipe conflict. It ain't pretty.


Yeah, a passage to get through to the bedroom and garage is planned. Not sure if I posted the floor-plan here, so I will also include that at the bottom of this post.

I plan for the plumbing to run from the pressurized tanks in the garage up into the attic and then run down that center wall to the points where it will be needed. Conduit and plumbing will be built into the walls and run up into the attic. Duct-work is also being planned for and I will make sure there will be no conflicts. I also plan to use on-demand water heaters at point-of-use supplemented with solar heated water (been looking into how this is accomplished). All drainage will run under the floor next to the center wall (didn't want to deal with a horizontal pipe running through the wall sections).

Here is the floor-plan and side view.

The additional floor-plan is simply the same design, but flipped to have the garage on the opposite side. The red sections of the wall indicate where to start the Rammed Earth Walls and then the arrows indicate which direction to continue the wall. Light-red sections don't fit the template for the form I designed and may be replaced with standard framing. It is hard to see, but conduit locations are marked, both for electrical and ethernet. The 2 rectangles in the garage represent very large vehicles (6'9" x 18'8" each) and the 2 squares in the rooms represent access points to the attics. Purple indicates a place to sit (beds, sofas, chairs, etc.), orange is for counter/table surface area and the blue-green color represents utilities/appliances. Green for plants, pink for insulation, blue for rainwater and white for distilled water (also for plumbing/hvac, but the white in the tanks is distilled water).

Edit: Forgot to mention the yellow area with the sofa on it. This is raised up about 2 feet and includes a ramp to access it. I did this to create theater-style seating and allow for additional storage underneath. I chose to go with a ramp to keep the entire house wheelchair friendly, with all doors being 3-ft wide and 8-ft tall as well (I work part-time as a mover and I dread all small entryways).

Wanted to also quickly mention that this floor-plan is not current. It still uses 3-ft thick outer walls with the insulation outside them and I have progressed to 4-ft thick outer walls with 6" of insulation built-in.
 
Posts: 315
58
3
  • Mark post as helpful
  • send pies
    Number of slices to send:
    Optional 'thank-you' note:
  • Quote
  • Report post to moderator
" Walls are now perfectly straight and square like a modern house."

Might want to check that. If you look at a typical earthship design the bearing walls facing the earth berm are mostly curved. % of flat is very low. You need to account for bearing load + hydrostatic pressure against the wall surface. Curved surfaces have better resistance to shearing loads. Its why most dams are curved.

Shed roofs are easier to construct and maintain. Every hip and valley you create costs more and adds to the maintenance complexity.

The idea of the tanks around the structure is reasonably novel.

Good luck!
 
John Eklund
Posts: 20
  • Mark post as helpful
  • send pies
    Number of slices to send:
    Optional 'thank-you' note:
  • Quote
  • Report post to moderator

john mcginnis wrote:" Walls are now perfectly straight and square like a modern house."

Might want to check that. If you look at a typical earthship design the bearing walls facing the earth berm are mostly curved. % of flat is very low. You need to account for bearing load + hydrostatic pressure against the wall surface. Curved surfaces have better resistance to shearing loads. Its why most dams are curved.

Shed roofs are easier to construct and maintain. Every hip and valley you create costs more and adds to the maintenance complexity.

The idea of the tanks around the structure is reasonably novel.

Good luck!


This design uses Rammed Earth Walls, which require 5% to 10% cement mixed in with the dirt in which solves any problem with load-bearing or pressure. This technique has been used for thousands of years and many thousand-year-old structures still stand today. The main reason for the curved-nature of the walls in an Earthship is due to using tires (creating a perfect square with circles will result in a loss in structural integrity, but creating a perfect square with rectangular segments results in added structural integrity, e.g. modern house framing) as well as those tires being packed with only dirt, no cement.

As for the roof, there are many reasons for its current design. Clear span, attic space, common building materials, etc. Find me some 50' beams for cheap and I would gladly make it a single slope. Check any lumber yard for roof trusses and they are cheap due to being mass-produced with consistent specifications.

Edit: Some examples of Ancient Rammed Earth Structures.
 
John Eklund
Posts: 20
  • Mark post as helpful
  • send pies
    Number of slices to send:
    Optional 'thank-you' note:
  • Quote
  • Report post to moderator

Brian Cooper wrote:There's no benefit to an upside-down truss. If you want a flat-bottomed slope there just (!?) nail lumber between the main trusses. (sorry, still flinching.)


Darn, was a quick thought, but figured it wouldn't be really reasonable. I guess nailing the lumber between the trusses would accomplish the same thing for much cheaper anyways.

That center valley still makes me flinch too. I hope all will be fine if I take extra care waterproofing it and add in the strip of radiant heating to melt the snow in the winter. Depending on how cheap I can get the electric radiant heating in bulk, I may even setup the entire roof and driveway to be heated (I used to do sales/marketing for ThermoSoft years ago).
 
Brian L. Cooper
Posts: 30
Location: Western Mass
  • Mark post as helpful
  • send pies
    Number of slices to send:
    Optional 'thank-you' note:
  • Quote
  • Report post to moderator
Until we've perfected the household-sized 1.21 gigawatt Mr. Fusion generator I'd prefer to stay away from engineering exterior electric radiant heat $$ into a roof design. Ask my wife how much I hate to heat the outdoors.
Over the long haul it might be less expensive to source full 68-foot trusses (or 58 footers running the other way, tying into the greenhouse roof.)

This is an interesting exercise - I don't often run into spans this large in single-unit residential construction. Maybe we could crib from a commercial application. There's no doubt that this is a big ol' roof.
 
John Eklund
Posts: 20
  • Mark post as helpful
  • send pies
    Number of slices to send:
    Optional 'thank-you' note:
  • Quote
  • Report post to moderator

Brian Cooper wrote:Until we've perfected the household-sized 1.21 gigawatt Mr. Fusion generator I'd prefer to stay away from engineering exterior electric radiant heat $$ into a roof design. Ask my wife how much I hate to heat the outdoors.
Over the long haul it might be less expensive to source full 68-foot trusses (or 58 footers running the other way, tying into the greenhouse roof.)

This is an interesting exercise - I don't often run into spans this large in single-unit residential construction. Maybe we could crib from a commercial application. There's no doubt that this is a big ol' roof.


I do plan for 2x Tesla PowerWalls for 28-kWh @48V energy storage, but no time travelling with that, haha. I could most likely get away with heating only that center valley only on snowy days, but am still looking for a more permanent, easier to maintain, less risky solution.

Any idea how much roof trusses that large would cost? Main reason I went with 2 sets of trusses was because I wasn't able to find any pricing on anything larger than 40-foot trusses so decided to go with what I could easily find.
 
Brian L. Cooper
Posts: 30
Location: Western Mass
  • Likes 1
  • Mark post as helpful
  • send pies
    Number of slices to send:
    Optional 'thank-you' note:
  • Quote
  • Report post to moderator
That's a question of material science, you might need steel for that kind of span. Not to fret, though, bigger roofs than this are built every day, even if not by your local nailbanger.

Maybe it's time to check in with a Amish barn-builder if you want to stay with wooden framing.
 
John Eklund
Posts: 20
  • Mark post as helpful
  • send pies
    Number of slices to send:
    Optional 'thank-you' note:
  • Quote
  • Report post to moderator

Brian Cooper wrote:That's a question of material science, you might need steel for that kind of span. Not to fret, though, bigger roofs than this are built every day, even if not by your local nailbanger.

Maybe it's time to check in with a Amish barn-builder if you want to stay with wooden framing.


Found a few businesses that make up to 80-foot trusses, so I got 3 quotes for a 70-foot truss and they are about $500 each (rounding up from highest quote). I did not get any quote on shipping and I'd imagine that would be pretty expensive. To build them myself would cost $400 each in lumber and hardware. Then I will need many 2x6s (over 500 of them) to run between the trusses for both the roof and the ceiling inside the house. If all trusses are built myself, this will run over $7,000 for just the framing of the roof (not including other hardware, like nails for the 2x6s). Cost to buy the trusses and get them shipped out will add between $1,000 and $2,000 more. Going to update my price sheet with these figures as this is the route my design is taking. I am happy with this roof now and can now move onto the plumbing of the design.


Very large roof, but should solve all the problems that were previously mentioned. Thank you everyone who has helped make this evolve into a better design.


Inside view. You can see all the 2x6s that need to be used.

Thanks,
John
 
John Eklund
Posts: 20
  • Mark post as helpful
  • send pies
    Number of slices to send:
    Optional 'thank-you' note:
  • Quote
  • Report post to moderator
I thought I was done with the roof, but I decided to try out a design that may or may not work. Please let me know if this design is feasible.


Went back to the original Earthship-style roof concept. I used flat roof trusses of varying height to create the slope then connected them with 2"x6"x10' lumber similar to the large 70' roof. I lose most of the attic, but will still be able to run utilities through it. The area above the entry corridor will have heights between 4'6" and 5'6", with each adjacent area losing 1 additional foot as you move north.


I also added the greenhouse planters. You can see that each planter gains depth the further they are from the center. This is to guarantee drainage, which will end at the "treated greywater tank" which is not shown. From there, it will be pressurized for use by the toilets.
 
gardener
Posts: 1236
360
7
trees wofati rocket stoves
  • Likes 1
  • Mark post as helpful
  • send pies
    Number of slices to send:
    Optional 'thank-you' note:
  • Quote
  • Report post to moderator
It probably varies from place to place, but some areas require at least 2 forms of egress from every bedroom or perhaps every room of livable space. So if you have rooms in the back with no windows the design would fail inspection. I think that's one of the common reasons earthships are laid out the way they are, with no doorway between bedrooms and the main living space so they aren't counted as separate rooms requiring windows you can crawl out of in case of a fire. Perhaps 2 bedrooms with a shared bathroom between them would provide that "second door" to escape a particular bedroom, running to the other and then out? I'm not at all sure how that works, but I think it should be considered since that impacts other parts of the design.
 
John Eklund
Posts: 20
  • Mark post as helpful
  • send pies
    Number of slices to send:
    Optional 'thank-you' note:
  • Quote
  • Report post to moderator

John Namazi wrote:It probably varies from place to place, but some areas require at least 2 forms of egress from every bedroom or perhaps every room of livable space. So if you have rooms in the back with no windows the design would fail inspection. I think that's one of the common reasons earthships are laid out the way they are, with no doorway between bedrooms and the main living space so they aren't counted as separate rooms requiring windows you can crawl out of in case of a fire. Perhaps 2 bedrooms with a shared bathroom between them would provide that "second door" to escape a particular bedroom, running to the other and then out? I'm not at all sure how that works, but I think it should be considered since that impacts other parts of the design.


Thanks for bringing up this point. I did some quick research into this and found a few loopholes that many areas are adding to their building code, specifically due to the increase in popularity of the "buried home". Many places will now make an exception to the rule as long as you use specific materials to guarantee "fireproofing" of the room in question. Since I use a wooden roof, my rooms would still fail this, however, since I opted for 10-ft walls, I could always include a drop ceiling with fireproof ceiling tiles, which should satisfy the code requirements for areas that do include the exception.

Another route I may look into would be some form of "roof exit". As long as the exit includes a permanent ladder and does not require a key or tools to open, it will fit the criteria (even though the only things capable of burning in the room would be roof and furniture, this will still satisfy the code requirements). Normally, "roof exits" would not fit the criteria as a means of egress, but that is based on the fact that most roof exits exist on tall buildings in which the roof is not at ground level so the occupants would still need to re-enter the building to make it safely to ground level. With the roof of my design being at ground level on the north end, a vertical exit to the roof is also an exit to the outside in which does not require re-entry to get to the ground level. One of my original concepts (the double roof design) was actually going to include exits, to the north end of the building, in the attics. Not sure if those exits would have been counted as exits for the bedroom below though, but with the roof design above, I could simply add in skylights, that open from the inside, with the addition of some sort of pull-down ladder. This will then provide additional light as well as the exit required for code.

I'm liking the skylight exit and plan to add it to the design now.

Thanks,
John

Edit: Just did a quick search on "skylight exits" and many websites are calling them "Egress Skylights" which are designed specifically to meet the "2 means of egress" code. Can get these windows for anywhere between $400 and $1,000 each, while the average cost of adding a drop-ceiling would be $1,250 per room (I love it when savings is also combined with functionality and even aesthetics).
 
Posts: 1
  • Mark post as helpful
  • send pies
    Number of slices to send:
    Optional 'thank-you' note:
  • Quote
  • Report post to moderator
I have been very interested in a global earthship model, mainly for the aquaponics, but instead of using tires, I was looking at using hyper-adobe. Have you thought of this, and what's your conclusion? I was also thinking about using treated bamboo poles for the roof. Again does anyone have experience with this?
 
I think he's gonna try to grab my monkey. Do we have a monkey outfit for this tiny ad?
Heat your home with the twigs that naturally fall of the trees in your yard
http://woodheat.net
reply
    Bookmark Topic Watch Topic
  • New Topic