• Post Reply Bookmark Topic Watch Topic
  • New Topic
permaculture forums growies critters building homesteading energy monies kitchen purity ungarbage community wilderness fiber arts art permaculture artisans regional education skip experiences global resources cider press projects digital market permies.com pie forums private forums all forums
this forum made possible by our volunteer staff, including ...
master stewards:
  • Nancy Reading
  • Carla Burke
  • r ranson
  • John F Dean
  • paul wheaton
  • Pearl Sutton
stewards:
  • Jay Angler
  • Liv Smith
  • Leigh Tate
master gardeners:
  • Christopher Weeks
  • Timothy Norton
gardeners:
  • thomas rubino
  • Jeremy VanGelder
  • Maieshe Ljin

Above ground wet/charged system

 
Posts: 1
  • Mark post as helpful
  • send pies
    Number of slices to send:
    Optional 'thank-you' note:
  • Quote
  • Report post to moderator
Hi there, I've just discovered this forum and I can see I have a lot to learn - we purchased a 1/2 acre block 2 years ago and, having spent the last 2 years removing the last owners rubbish and blunders, we're finally getting our planting underway.  We have a large vegetable garden planned for the spring so I'm trying to get my water tank installed before then (its early winter here).  
I'm after some advice on my plans to connect my water tank.  I'm based in New Zealand so please forgive me if I use funny terms for some of the parts.

We have a 2nd hand steel tank with a capacity of 1800 litres.  I'm planning to connect it at one end of our rectangular house.  It will be used for the garden and, hopefully washing machine - so no need to be potable standard.

For neatness and to bring in the second downpipe from the other side of our deck I have planned to put in a wet system which will rise at the centre of the house wall and into the tank.  To one side of this junction will be a 100mm access point - a t-junction with a screw cap opening facing down - so that I can periodically drain the wet system and flush the pipes though, if necessary, to clear blockages.

The pipes that run from each down pipe to the tank inlet will be attached to the baseboards of the house - above ground.  This if for 2 reasons - 1 so that I can access the system for maintenance and 2 so I dont have to dig!

All pipes will be 80mm diameter except the access point which will be 100mm.

No first flush as I've read mixed reviews and will have the ability to manually flush the system and it is not for potable use.

I've attached a plan - not to scale!
Our rainfall intensity is 100mm/hr
The roof pitch is 11 degrees.

I'd be interested in what people (with more experience than me!) think of my plan and also if the 80mm pipes will be sufficient especially when the flow combines into one pipe to enter the tank.

I have used 80mm as they are coloured and dont come in larger sizes - so, if possible, I'd like it to match and look pretty!
downpipes.jpg
[Thumbnail for downpipes.jpg]
Downpipe plan
 
Posts: 138
Location: FEMA District III - Appalachia
82
9
duck forest garden foraging chicken bee homestead
  • Likes 1
  • Mark post as helpful
  • send pies
    Number of slices to send:
    Optional 'thank-you' note:
  • Quote
  • Report post to moderator
I have a few question for you.

1.) What are you using to catch the water from the roof?

2.) Are you adding filter system before it enters the tank?

3.) What is your plan for overfilling?

4.) Water volume by month/year?


I'm going to add a few tips.

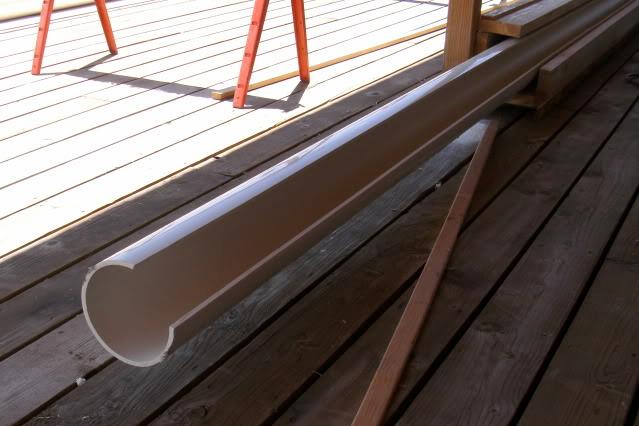
1.) 3 inches pvc ( 80 mm)slip is over the edge of your roof line. then you can add fitting to it to direct it to the water capture areas.


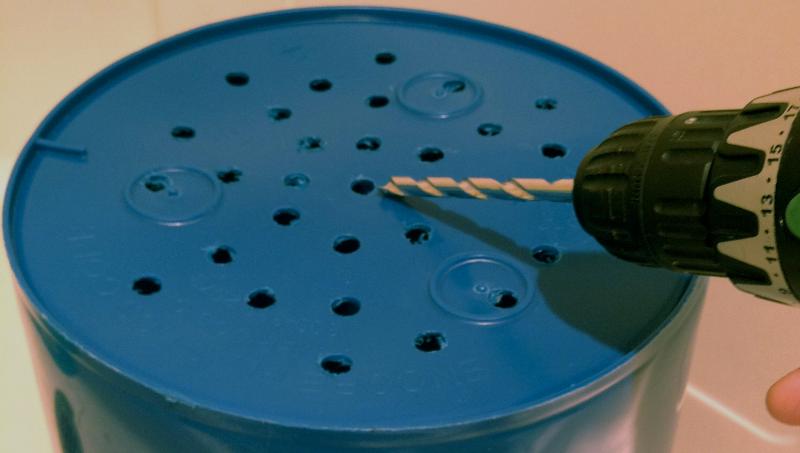
2.) a 5 gal bucket (19L) drill holes in bottom, then add rocks, and screen door screen (mosquito netting) hold on with rubber band or rope. This goes onto your water capture area, the pipes leading from the roof go into this ( bucket rock filter) first then the water capture area.  This makes a very easy clean out. keeps bugs out of your capture area, and at a level of filtration. (Personally I drink the water straight from my water capture system)


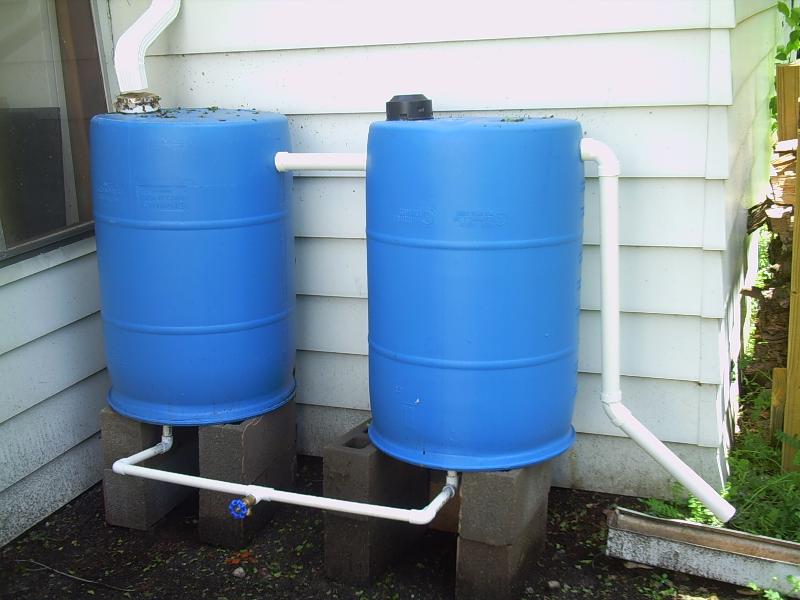
3.) near bottom have a cleanout value, and near top have a place to install an overflow pipe so you can add another water capture unit.


4.) volume

Here is my example. I have a 30'x60' metal roof building I have around 50 inches of annual rainfall. I can capture 56,103 gal a year
162 m2 metal building x 1270 mm annual rain = 205,740 litres

http://www.calctool.org/CALC/other/default/rainfall


I've build 5 unit. Most of this is 3rd world tech I've learnt in my travels.

Cheers

-Justyn
 
Posts: 38
1
  • Mark post as helpful
  • send pies
    Number of slices to send:
    Optional 'thank-you' note:
  • Quote
  • Report post to moderator
You might YouTube search for homesteadonomics. He is in the desert and gets his water from rain catchment. I think he is doing what you have described. He has pipes that go up to his gutters and are sealed so the water fills up the pipes and when the level gets high enough it dumps into his storage system. He is great about answering questions and just put out a new video on his raincatchment.
 
Posts: 3
  • Mark post as helpful
  • send pies
    Number of slices to send:
    Optional 'thank-you' note:
  • Quote
  • Report post to moderator
Hi,
I have a business setting up rain harvesting systems. I use mostly off the shelf rainheads and first flush kits. One thing that I've noticed over the years is that the first flush is an essential part of the system. The fine dust, pollen, and roofing materials(even metal roof) wind up getting diverted out in the first flush otherwise that's going to all wind up as food for algae and bacteria in the bottom of your tank. If you want to look at a detailed study of the effects of a first flush on different roof surfaces this is a good one: https://www.twdb.texas.gov/innovativewater/rainwater/projects/rainquality/2011_02_rainquality_final_rpt.pdf         Rainharvesting sells an inexpensive first flush kit that I use and they work well or you could get the pieces yourself and put one together.

Good luck,
Andy
 
steward
Posts: 1387
Location: Northwest Montana from Zone 3a to 4b (multiple properties)
216
11
hugelkultur forest garden hunting books chicken wofati
  • Mark post as helpful
  • send pies
    Number of slices to send:
    Optional 'thank-you' note:
  • Quote
  • Report post to moderator
Lots of good points made by all posters. Justyn, thanks for that great project view.
Andrew's point about a first flush diverter is a really good one, with that bucket filter of Justyn's doing a pretty good job too.
My main thought is that 80mm is a good sized pipe, with the amount of rainfall you can get in an event, I think a 100mm would be a better run to your tank. Your tank is about 4 times as big as the barrels pictured in Justyn's post. I highly recommend the point that is made regarding what is your plan for overflow. A one hour rainfall event of 100mm/hr can put 12,500 liters of water in your system - that is a wee bit more than your tank.
I'd also do as suggested and verify what actual annual rainfall is for your area along with the amount of time between events. I'd want a system sized large enough to capture as much as possible to get me through the dry time.
You may need more tanks, which can be connected per Justyn's example.
One last point, that water is going to weigh a lot. That 1800 liter tank is going to weigh nearly 1800 kg when full, I'd plan accordingly for a foundation for that.

Good luck!
 
Posts: 63
Location: La Bretagne
13
homeschooling solar rocket stoves
  • Mark post as helpful
  • send pies
    Number of slices to send:
    Optional 'thank-you' note:
  • Quote
  • Report post to moderator
If I were you, and if there are any possible ways to do it, I would have a larger storage system, if you really want to use the water for household usage, plus the garden. A washing machine typically requires 50 litres of water and that adds up fast during dry periods, when the garden requires a lot, also. We have 7300 litres of capture, and I often think I would like to add another 1000.
 
Posts: 6
  • Mark post as helpful
  • send pies
    Number of slices to send:
    Optional 'thank-you' note:
  • Quote
  • Report post to moderator
Hi Team,

With nothing of value to add to your project I have two quick things to say:
1. Its great to hear from another kiwi on here. I don't think larger countries know how hard it is to find relevant geo-specific content.
2. For dummies (like me) who scour posts to learn all they can it would help to put a quick sub heading blurb about your goal with this set up. A lot of the more technical stuff is lost on those who have yet to tackle water tanks projects.
 
Without deviation from the norm, progress is not possible - Zappa. Tiny ad:
A rocket mass heater is the most sustainable way to heat a conventional home
http://woodheat.net
reply
    Bookmark Topic Watch Topic
  • New Topic