Hi,
Thanks for your responses. Here is some answers to questions and photos:
THE WATER JACKET
I got this from Spiroloc in 2020, but only just trialed it for the first time last week. It was a one-off he had hanging round and sold me. Attached is a photo of the top of the water jacket. It appears to just be two cylinders welded together, and the water fills the middle and no coil inside.
They now make these water heaters:
https://spiroloc.co.nz/product-category/wood-fired-water-heaters/ Occasionly photos pop up that shows the inside, and it is a large coil.
I actually bought it to use with this bucket stove/oven ?2019 and only fired it up for the first time last week as well.
https://www.woodburnerstoves.co.nz/product/bucket-stove/
A wood stove shop owner saw it and said it was a great stove to cook on and my water jacket was also great, but I would burn out the stove heating the water jacket, and sold me the big metal stove it is with now for $100. I think the bucket stoveoven is working too well and lacking for secondary air, but that is another post.
I paid a few thousand dollars for the pipes and pumps and controllers to pump heat under the house, and into a greenhouse, and put 400m of piping under the house floor before polyester batts underfloor insulation were added under a gov stimulus grant. Then various crises struck, and the parts all sat unused for the next several years.
I am quite happy with the idea of starting again rather than putting more money in stove as it is among the cheapest conponents.
THE STOVE
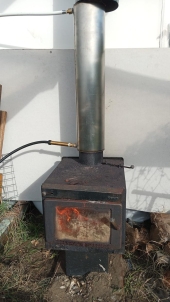
I include a few photos of the stove. It is an old Kent stove, but I can't see a model or year of manufacture. I It is just a very heavy old rusty cast iron box, now but I am guessing it had a baffle and firebricks at some stage as there is the frame to hold the baffle inside. It only has air holes above the door at the front that can be dampened down. There is no air inlet or grate at the base. I think it is a model that works like this:
https://hearth.com/images/uploads/kentbrochsmall.pdf diagram on page two
https://www.woodmanspartsplus.com/xref/WoodCoal/KentStove/TileFire (also described here
The firebricks and baffles can still be bought online, but they are in the hundreds of dollars, and there are different models/sizes.
Later models have secondary burn air pipes, but I can see no evidence that mine did. There is a video here of what they look like:
https://www.youtube.com/watch?v=PWceJwJxm3A
I can't find online anywhere where that shows where the air comes from for these tubes.
It also seems that the chimney used to have a dampener, but there is now just a metal hook left. That hole for the hook lets in a little air, so it may act as a sort of secondary air inlet, but maybe too high to be any use?
MATERIALS
We are not adverse to buying materials, but we are on a limited budget right now. Our main immediate goal is to stop payng $400++ a month for electricity and still freeze our feet in most of the house, and to start growing seedlings and greenhouse vegies without them freezing and get off disability/unemployent payments. We don't care if parts of it burn out in a year or so.
The beach is 7km away and river sand and rocks are available free for the taking nearby.
We are in a sandy area, so no easy clay/cob options. We may be able to source natural clay somewhere, but it is not easy to transport in a car. Pumice stone is relatively cheap to buy bulk locally as a gardening product - $42 for a tractor scoop (?200L) and $210 for a cubic metre, and free trailer use to take it home.
Fibreglass / rockwool insulation batts is readilly available, and we have a couple of bags of fibreglass batts insulation. Metal sheeting and copper is much more expensive in NZ than the USA.
The factory that makes this fire morter is actually in our tiny town and sells cash to the public:
https://mastermix.co.nz/product/fire-mortar-mix-concrete/ We can get 30kg for NZ$69
PUMICE FIRE BRICKS/CORE OPTIONS
About 9 years ago we tried to make a rocket stove core with this fire cement and perlite. I forgot to take into account that 1 cup of perlite and 1 cup of cement will not equal 2 cups of mixture (due to all the air gaps in the perlite), and we did not make enough to fill the mould. What we did make was so heavy we knew we could never easily move it, and we went no further.
A while later I was speaking to someone that makes and sells light fire bricks, and sold the Master-mix fire cement, and I am pretty sure he said the recipe for their fire bricks was 9 parts pumice stone to one part fire cement. I found a few other websites that speak of pumice, and it is meant to be less durable but more insulative.
https://www.hearth.com/talk/threads/firebrick-pumice-lightweight-vs-standard-heavier.128343/
We do have longer-term plans of making a rocket stove core with the pumace that we can carry to the greenhouse and heat up rock/sand beds if we had a week of rain. It might be better to focus limited time and money just on making that rather than improving the firebox. I am a maths secondary teacher with 4 years of technical drawing in High School, so I think I could create the mould to make a rocket core if I can find the dimensions. I like the idea of the core going though a box of sand, it was sit up at a show in a day, but I can't find the link right now.
It is years since I researched it, and I never did feel confident making a rocket stove, and wonder if the DVD's on permies.com would be a good investment.
Most stovepipe in NZ is 150cm / 6 inch, and I hae salvaged a bit of it, so I would like a plan to fit that. (I guess a 6inch box).
Looking online it seems the baffle in the KEnt stove is a metal plate with a firebrick bolted underneath. I also wonder if it would be possible to make a firebrick baffle with chickenwire inside it that would last a while at least. I am wondering if making firebricks for our kent stove would be a good way to trial the process and give us an instant start to warm the house and start growing seedlings (late winter here), and then make a core.
The baffle firebrick would have to be 40cm x 30cm to fit the metal bracket. The gap from the bottom of the bracket to the top of the fire is 5-6cm, so if the baffle brick as 3cm high that would still leave2-3cm for the smoke to move over.
I think years ago someone else looked at the water jacket and suggested that I put a small length of chimney pipe between the stove and the water jacket to give the fire more time to burn fore the water jacket takes out heat. It would not be as stable though.
INTENSIFIRE
I have not ever seen one nor know anyone with one, but knew of their existence. I had already written to see if it would handle the weight of the water jacket on top, and am waiting a reply. But NZ$500 is a lot of money for us right now. I keep hoping a cheap second-hand one will turn up on trademe (NZ ebay equivalent) or Facebook marketplace, but no luck so far. I must confess I don't understand Kevin's suggestions how to make my own equivalent.
FREEZING PIPES
I am 7km from the sea. The lowest we ever get is -4C, so freezing pipes are not a major problem. If it is cold enough to go below zero, it is a clear night, and pretty much always a sunny morning and it is all melted by 10am. We run rainwater from a tank through a pump and to the house without a problem. Occasionally 1/2" black Polyethelene pipe running on the ground to a water trough and the top of water troughs themselves freeze overnight.