John Venn

+ Follow
since Apr 10, 2021
Merit badge: bb list bbv list
For More
Apples and Likes
Apples
Total received
In last 30 days
0
Forums and Threads

Recent posts by John Venn

Thank you all for sharing your experiences with frankentrees. Something to experiment with in the future.

I do know someone who has fruit trees in espalier form where every arm is a different variety of apples or pears, which takes a lot of manipulation and cutting I imagine. I have not had the chance yet to ask him how he did this.
10 months ago
Hey everyone

Just wanted to add the following: I have done a couple of grafts and had a discussion with a friend of mine who is a tree surgeon about the use of wax to avoid the graft drying out. (I used pure beeswax in which I dipped the graft a couple of times, like making drip candles.) In his opinion this is uneccesary: not for avoiding infection nor for preventing the drying out off the graft or scion. The plant is perfectly able to fight against this itself in his opinion, which I believe. We did some tests, there is no difference in succes rate with or without wax.

However, I have always used a long piece of cut bicycle inner tubbing of about 3/4 inch or 2cm which I tightly and overlappingly roll from about an inch or 2,5cm under the graft to about to 2inches or 5cm above the graft, like you would bandage a wound. This (air)seals, supports and protects the graft.
Only recently I learned that in the olden days they used taffia in which case you do need extra protection for the graft against water and air to prevent it drying out, which was wax.
In my experience, the rubber of the inner tube cracks after a while because of uv/sunlight and will drop off. Shoots will even grow through it.
I find this 'waxless' method the easiest and simplest and the inner tubing is readily, freely available locally here.

Now that I am writing about this, if you want a frankentree, I thing you need to do a chipbudding or oculate the tree. If you craft a branch I think the tree will invest in its own branches rather than the graft but I have no experience in this. (I want to do this myself, so please, let me know) I only know that the rootstock will develop shoots that need to be trimmed back during the summer or otherwise the scion will die off, even if it took in the beginning.
I am not a native speaker so if I'm confusing what the original question was about, please excuse me.
10 months ago
Hello everyone

For those in Europe, almost all the hardwoods are safe to use: oak, beech, birch, ash, lime, hawthorn and any wood from fruit trees.
Stay away from conifers; taxus is toxic and the rest is too soft and contains too much resin.

For spoon carving, you do use green wood! Much softer to carve! For spoon carving I even kept pieces I could not carve immediatley in the freezer to avoid it drying out.

As long as you split it with an axe or froe and discard the middle of the log (the hearthwood) warping and cracking on such a small object should be minimal.
Even on the ends, if you use sharp carving knifes, you will rather cut then break the end fibers and thus avoid inducing drying cuts.

If you worry about drying it too quickly, dry your spoons  in a box with the curls you made while making the spoon and keep it in a dry spot. Do not dry it above a heatsource.  

If you are looking for more info: barn the spoon has some good books about everything to do with making spoons. In dutch you have Lepelhout.

As for finishing, do not use sandpaper but burnish your spoon with a piece of smooth antler or ivory or such. This will soften and hide the lines of your cuts and give luster to the wood. Finishing you can do with  pure tung oil, (boiled) lineseed oil and food grade beeswax. These are all edible and shoud not pose a problem for eating or cooking with the spoon but are not necessary.
As mentioned above, wood is naturaly antibacterial.


1 year ago
Hello everyone

Please find attached the pictures for my submission.
If I missed something please let me know.
Some explanation: wanted to reschape the blade as to have more of a smoother plane.

Kind regards!
2 years ago
Oh no...had a flat tire
oh yes... a chance at another badge!

pleasefind attached pictures of the flat tire, the hole, contact cement and fix and reinflating.
2 years ago
Hey, replying to the post above:

I am not from your area but it sounds like you are trying to keep deer out of your orchard.

You might want to look into 'hedge laying', this is a technique where you partly cut the base of a hawthorn (in Europe) and bend it to 'lay' it.
e.g. https://www.youtube.com/watch?v=WoprVhpOKIk
This is also the movie that was shown in the workshop I followed. As you can see, the guy is also a bit more experienced in life, so I am sure this is something you would be able to do.
There are many more ways to do it and it seems every place had its own style. It is a lot of fun and is a bit like coppicing but you do not cut the branches completely so the brances continue to live and make new vertical shoots that fill in the hedge. We used hatchets and pruning shears to cut away the dead branches and brambles etc so no need for the fancy billhook and stuff.
If done right and with the right plant (you might find a local variety that stands this sort of abuse and has thorns? Edit:  just looked up osage orange, seems like a really interesting plant and a good candidate for the above technique, anybody has some experience 'laying' osage orange? ), this gives a very sturdy hedge that will stop cows and even cars after a few years.
This was the preferred method in the UK before the invention of barbed wire. It seems from paintings and old pictures that in Belgium and the Netherlands the preferred way of making a fence was using willow brances, which is another use I forgot to mention in my previous post.
Hope this gives you some inspiration!


2 years ago
Hello everyone

Just wanted to share with you some experiences from Belgium, and especially from Flanders.
Here we call pollarding 'knotten' and a pollarded willow a 'knotwilg'.

It's a very old tradition only known in the north of Belgium, the Netherlands and the south of Germany which leads to a very distinct culture landscape.
The willows are excellent for drying and holding ground in wetlands and are very drought and wet resistant.

The branches were used to strenghten dams, indicate channels in marches, heating, making clogs, making baskets (for which specific breeds of willows were selected) and the smaller sticks are excellent for heating a traditional wood fired bread oven.

Nowadays, there is less use for them but farmers get a reward for each tree they 'knot'. Volunteers ( which I am) can do it for them and keep the wood which is excellent fuel for rocket stoves.

Pollarding was something we did as a teenager during winter camps and with the proper technique to prevent splitting while sawing and hand tools this is a relatively save job, and loads of fun. Especially as a kid, if you can make a fire with the smaller sticks.

In regards of leaving a few branches instead of cutting the whole tree at once, some people swear that especially with trees that have grown too big because of neglect this is neccesary to keep the tree healthy.
The rule here is also to saw off the branches about one and a half times the diameter of the branch itself above the trunk so as to make the crown bigger and have a bigger harvest of wood in the coming years.
Another tip, desinfect your saw and tools before starting on a new tree, you might carry diseases from one tree to another and kill a whole row.
As to when is the best time to do this, the Dutchies used to do it when their streams were frozen over so they only had to pick up the branches from the ice. They would then transport them over the ice on sleighs. We normally to it during winter and stop once the bird nesting period begins.
If I find some pictures, I will try to post them.


2 years ago
Hello all

Thank you very much for all the apples!

I am working, when time allows, on collecting some badge bits. If I find something else interesting to post, I will do so!

The problem with the pictures was that they were too big. I think I have a solution for next time.
2 years ago
Yes, I am having some problems uploading! Stand by! Sorry, I am new to this!
2 years ago
Hello all

Wanted to submit this for a badge, but discovered that you need to make a wedge style handle. I am posting it here because it might be interesting to some people here. If anybody knows a better place for this, please let me know, if I can score some point for badge, please let me know also.

Went tool hunting in my favourite thrift store and found a very big 'pig sticker' (love the name) mortising chisel for €1,5 euro with a broken handle.

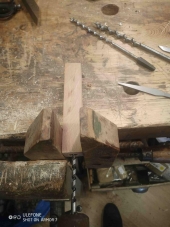
These chisel come with a very simple handle design which you can see in the pictures but I wanted to show you how to fit the chisel to handle!
Normally, they tell you to drill a pilot hole in the handle (store bought ones will already have this), heat the tang and burn in into the handle.
However, in my attempts at collecting a set of chisels in thrift shops (and removing handles to replace with a new one) I have only once found one where the chisel seems to have been 'burned' into the wood. All the other ones seem to have a nice tapered hole for the tang.
I discovered how the old timers did this through a comment on a tutorial on how to fit a handle to a chisel as described above.
What you do is use the tang itself as a 'reamer' (had to look up what they meant by this, if you do not know either it will all become clear in the pictures).
First, I start with a big drill bit, then a smaller one, and so one until I have a pilot hole in 'steps'. I then take a file and straighten all side of the tang slightly to make it fit easily and this creates a bur which will help in the next step.
I then put the handle on top of the chisel and start turning the wood around. This will create a tapered hole and you will see wood dust falling out. When the handle sticks about 3mm or 1/8th of an inch above the chisel, hammer it home all the way so you have a pressure fit.

You might notice there is no ring on these handles preventing them from splitting but with normal and correct use, these chisels do not need them (just like carving gouges). And anyway, a new handle can be quickly made from a scrap piece of wood. If you make a handle with a ring, you can still use the above technique to fit the handle.
2 years ago