Alicia Bayer

pollinator
+ Follow
since Oct 13, 2017
Merit badge: bb list bbv list
Biography
I'm a writer and a homeschooling mother of 5 kids (now ages 15 to 28). Our family does a lot of foraging of wild foods, organic gardening, homesteading and preserving. We are also very active in music and the arts.

I am the author of nine books and I run a number of websites about foraging, homeschooling, natural living and living well on less. I have also put out a free nature and foraging magazine for kids called Wild Kids Magazine for over 7 years.

Our family runs a free community arts center out of a 126 year old church that we purchased in our tiny town in 2020.
Apples and Likes
Apples
Total received
In last 30 days
11
Forums and Threads

Recent posts by Alicia Bayer

What are your favorite wild edible and medicinal plants to forage in fall?

Our family's (in SW Minnesota) are generally....

~ Acorns, mostly for flour (though sometimes for fun things like coffee creamer, ice cream, etc.)

~ Hawthorn berries (haws) for tinctures for heart health

~ Wild mushrooms like lion's mane (medicinally), chicken of the woods (eating) and inky caps (art).

~ The last of the berries and fruits like elderberries and wild grapes for food, drinks and medicine.

~ Dock seeds for flour for things like brownies and crackers.

~ Fruits like pears, apples and crab apples for baking, cider, etc.

~ Herbs like dandelion root for tinctures.

~ Sumac for spice and sumac lemonade.

~ Walnuts for baking, though they are so fiddly that we don't do them most years, TBH.

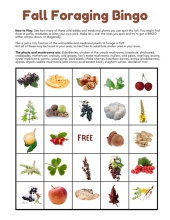
If you and your kids would like to have fun with it, here's a fall foraging BINGO I made up for the September Wild Kids Magazine (a free nonprofit nature and foraging magazine for kids and their grown ups that I've put out for over 7 years).  If you want a printable version, you can find it in the September 2026 issue here.  (The current October 2026 issue up now too here.)

Would you get a bingo?  What would you add?  :)

PS These are obviously for our part of the world but I'd be happy to make one up for other areas if you want to list favorite plants to look for!


3 days ago
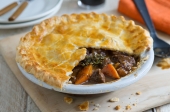
I love to make pot pies with pourable crusts to make them even easier.  I cook for gluten free family members and this is similar to the crust I use (scroll down past the pot pie recipe to the topping recipe).  For the insides, I do something similar to hers but just wing it -- lots of veggies, chopped cooked potatoes, a protein of some sort, mushrooms and herbs, leftovers, whatever in a creamy homemade sauce.  I got these little tart dishes for 90% off after Thanksgiving at Michael's one year and my kids especially love having their own little pot pie.  :)
1 week ago
Oops!  I just posted this and then I got a note under it that it was similar to another thread about GF pizza crust that I apparently posted 8 years ago!  LOL  Well, that was a waste of a lot of typing! 😜 Oh well!  I'm leaving it since I might have said something different.  I think I need more coffee. 😜
2 weeks ago
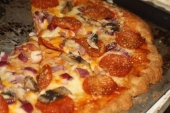
I thought I'd share our family's tried-and-true pizza crust recipe for gluten free folks.  I used to make this every Friday night when we still had 6 kids at home (5 of our own, plus a bonus teen we took in).  Even my gluten-eating kids still request that I make this because they like it even better than regular crust.  It's actually easier to make than traditional wheat crust, because there's no kneading. You don't even roll it -- you just smooth it onto the pan with really wet hands.  It's soft, chewy, with a good rise and a nice flavor. I grind the grains myself in my Vitamix grain mill but you can also buy them pre-ground for a little more.  This makes two crusts and I usually double it because I cook for so many.  It also makes a heavenly dessert pizza (I can post the recipe for that if anyone would like it).

It looks long and complicated, but only because I've written out the directions kind of precisely so be helpful. With mixing, rising and baking, I can make homemade pizza from scratch in a little over an hour, of most of that time is me watching TV with a glass of wine while I wait for rising or baking.  :)

Note:  You can easily substitute your favorite GF flour mix for all the flours and starches.  This mix of them works really well for texture and taste, though.  It's great either way, but the whole grain brown rice flour and millet flour make a nice texture and make it healthier than most commercial mixes that are mostly starch and white rice.

Alicia's Gluten-Free Pizza Crust

(makes two 14-16 inch crusts)

   2 cups brown rice flour
   1 cup potato starch
   1/2 cup tapioca starch
   1/2 cup millet flour
   4 1/2 teaspoons active dry yeast
   2 teaspoon baking powder
   4 teaspoons xanthan gum or guar gum
   1 teaspoon garlic powder (optional)
   2 teaspoon fine sea salt
   4 tablespoons honey or sugar
   2 large eggs (flax eggs work great if you’re vegan)
   4 tablespoons extra-virgin olive oil + more for oiling the pans
   2 teaspoons apple cider vinegar
   1 1/2 cup warm water (plus more if needed)

   Add all ingredients to a mixing bowl of a heavy duty mixer fitted with paddle attachment.

   Start mixer on slowest speed to incorporate ingredients, then increase to medium and mix for 2 minutes. Increase mixer speed to medium-high and mix for another minute. The dough should look like a thick cake batter and should stick to the sides of the mixing bowl (not form a ball like traditional wheat dough).

   Oil two pizza pans with 1-2 tablespoons olive oil. Divide the dough in half and scrape into two balls onto the pans.

   Fill a bowl with warm water and put it next to your work area. Wet your hands and gently press and spread the dough outward in circular motions towards the outer edges of the pan to form 14 to 16 inch circles (or squares if you like a square pizza), leaving a slightly raised crust along the edge. Wet your hands as needed so that you can keep spreading and smoothing the dough without it sticking to your hands. Don’t worry about getting the dough too wet. Patch and press any spots that break through. Go ahead and smooth it fairly thin, as it will rise and get thicker.

   When the dough is smoothed onto the pizza pan, drizzle with a bit of olive oil and and gently smooth over the dough. Set uncovered in a warm place.

   Let the dough rise for 35-45 minutes. It will puff up somewhat.

   Bake in preheated 400 degree oven for 10 minutes.

   Remove from oven and add sauce and desired toppings.

   Return the topped pizza to oven and bake for approximately 12-16 more minutes until cheese is melted and crust is light golden brown.

   Slide onto a wire rack to cool (optional, this helps keep the crust crisp up), slice and serve.

***

Substitutions: This dough is very forgiving! If you have allergies or just run out of one type of gluten free flour, feel free to substitute a similar flour. For instance, you can substitute arrowroot starch for one of the starches and sorghum flour for some or all of the brown rice flour. We have made this recipe with many combinations of flours and it’s always a success. Just make sure to substitute flours of the same type (starches for starches, and whole grains for whole grains) and many different combinations will work.  As mentioned, we have friends who make it by just using a gluten free flour mix for the whole 4 cups of flours and starches, too, but individual mixes may vary in results.

A note about pans:  Pizza crusts will cook up differently on different types of pans.  They may cook very quickly on dark metal pans.  At home, I use cookie sheets that are double layered and light colored and I have good results.  When I cook pizza at my friend Tiffany’s house, I have to cook one pizza in a dark pan and another in a light one, and have to keep a closer eye on the one on the dark pan.  Know your pans and adjust times as needed.  You can also use a preheated pizza stone if you prepare the crust on parchment paper and then slide the paper right onto the stone.

Enjoy!
2 weeks ago
We have a big family (5 kids, and we've taken in extra teens for months and even years before) and a small budget, so this is something I've really worked on over the years.  We also have special dietary needs like gluten free kids, which made it even more important to find frugal hacks. Here are my best strategies, that I made into a graphic on our family foraging/homesteading blog years ago.  Using any of these will help, the more the better.  We live pretty far from most stores but we make trips to "civilization" regularly and bundle that with fun and educational things with the kids.  Every one of these has been a huge part of being able to eat really well, really healthy, on a fraction of what most modern families spend on food.

I would also add that discount grocery stores often have great prices on gluten free, organic and other specialty foods. We call them scratch and dent stores and our nearest one is called Mike's Discount Foods. The stuff tends to be close to expiration but you can quickly freeze, prep, can, etc. produce or just use it quickly.  I regularly get things like organic cherry tomatoes for $1 a pint with another free (so .50 each box), or a bag of gluten free bagels for $2.50 that we toss in the freezer for treats.

2 weeks ago
My favorite fall food has been anything made with acorns for years now.  About 20 years ago, we decided to try foraging acorns and making acorn muffins with our oldest kids as a fun homeschooling project.  We thought they would taste like "survival food" like hard tack (blech, LOL), which we also made to realize what Civil War soldiers had to eat.  We were so shocked at how delicious the acorn muffins were, and the smell as they were baking was so unique and heavenly.  

It became our favorite Thanksgiving recipe to make every year, and then when our son Alex was diagnosed Celiac and we had more kids and a tighter budget, we started seriously harvesting them for the wonderful flour. I kept finding more and more delicious ways to use them, and ultimately ended up writing an acorn foraging book with over 80 recipes (afflink: Acorn Foraging: Everything You Need to Know to Harvest One of Autumn’s Best Wild Edible Foods, with Recipes, Photographs and Step-By-Step Instructions ).

We had so much fun developing them, and I even went down a rabbit hole and found out that the first version of hot cocoa was actually a roasted acorn drink called racahout, but in Europe they had to find a cheap and easy substitute for the acorn flour to make it commercially and they were trying to promote this newly introduced commercial food product -- cocoa powder -- so they substituted that and it became a hit.  As far as I know, there's no surviving recipe for it but I managed to recreate it and then taught folks how to make it and handed out samples at free community workshops, along with things like acorn spice cupcakes.  If you want to learn the long history of racahout, I wrote it up on our family foraging/homesteading blog here.

The smell of roasting acorns is still my favorite fall smell.  You can leach the bitter tannins out either the cold water method (long soaking, frequent rinsing, in a fridge over a couple of weeks or in a running stream -- yes, I know some people do the toilet tank method but I could never go there) or hot water leaching (bring them to a boil in water, keep changing the water as it gets brown) and both methods have different benefits (cold water leaching retains the starches, for instance, and is better for baking or when you want things to stick together, hot water leaching is faster....).

Anyway, here's a picture of our youngest daughter drinking racahout (I can dig out the recipe if anyone would like it, I don't have it online) and a picture of me teaching a child how to make it at a library talk, and here's my recipe for acorn spice cupcakes, which are my husband's favorite cake for his fall birthday.  :)  If you want to make them as sweet muffins, just leave off the frosting.  I also have a more traditional muffin recipe with less sugar that's less of a breakfast/dessert.  These are definitely a cake kind of muffin.  My frosting is incredibly decadent, but for special occasions it's what my family loves.

This recipe uses less acorn flour to make it stretch longer but enough that it has that wonderful acorn flavor.

Ingredients:

   Â½ cup acorn flour
   1 ¾ cup gluten free flour mix with xanthan gum (or add 1 tsp xanthan gum) or all-purpose flour (I use an easy homemade GF cake flour, recipe below)
   1 TBS baking powder
   1 tsp salt
   1/4 tsp baking soda
   4 eggs
   1/2 cup vegetable oil
   1 cup sugar
   1 TBS pumpkin pie spice (optional)
   2/3 cup sour cream

Directions:

   Preheat the oven to 325 and grease pans (one 9×13 pan, two cake pans or about 24 cupcakes).
   Blend all dry ingredients in a mixing bowl on low until well mixed.  Add the rest of the ingredients, blend well on low, then turn to medium and then high and beat 3 minutes.
   Pour the batter into your prepared pan(s) and bake about 20 minutes for cupcakes, 30-40 minutes for larger pans (check every few minutes after 30 minutes) or until springy on top and a toothpick inserted in the center comes out clean.
   Cool completely before frosting or slicing.

Cream Cheese Frosting

Blend 1 stick of softened butter, one brick of softened cream cheese, 3-4 cups of powdered sugar (depending on how sweet you like it) and one teaspoon of vanilla or acorn extract.  Beat until smooth and spread on cooled cake.

Homemade GF cake blend:
   400 grams millet flour
   300 grams sweet rice flour --- not regular rice flour, this is also called glutinous rice flour but it contains no gluten
   300 grams potato starch


2 weeks ago
Just as a note, I am the author of an acorn foraging and recipe book (Acorn Foraging (aff link), and I've posted a lot of recipes and info about harvesting, leaching and preparing acorns here in the forums.  If it's helpful, this is one thread where I've shared info and a lot of recipes:

Acorn mush preparation
Here's a discussion of the book, as well.

If there's any recipe in particular you'd like, I'd be happy to post it.  I've got them for so many wonderful ways to use acorns -- biscuits, coffee creamer, veggie meat patties, spice cake, beverages, ice cream, waffles, porridge, meatballs, crackers, you name it.  :)

This collage is some of the treats we've made with acorns over the years.  We absolutely love them and they're such a great gluten-free ingredient for our big family with allergies too.

(PS  I've also written a children's foraging alphabet called A is for Acorns (aff link), illustrated by my oldest daughter. I'll include the A page from that for fun, too. Each letter has a wild food you can forage and then in the margins there are other wild edible and medicinal plants that start with that letter to try to name too.)  :)


2 weeks ago
I included easy directions for how kids (and their grown ups) can make charcoal in my children's nature art book, Wild Art: Awesome Art Projects Using Wild & Invasive Plants & Other Nature Items (aff link).

Here's the page from the book if it's helpful (and the front and back cover, if you're curious).  My teenage son Alex did the charcoal for me so I could take pictures. It's so simple with an Altoids tin and you can also crush the charcoal to make paint too (adding different things for different results).  I've posted other projects from the book in other threads like this one showing other fun art materials you can make with nature, if you want to do more wild art fun.  :)


2 weeks ago
art
They're fantastic!  

I make inks and paints from natural materials too, but I keep it completely foraged other than sometimes adding a pinch of baking soda or vinegar to change colors. I got a grant from the Minnesota State Arts Board to write a book about it and to do free community workshops for kids and adults.  The resulting art projects can change colors over time, sometimes to really astounding degrees (magenta art pieces look black the next day and then green the next...) and sometimes they don't change at all.  The paints and colors we have are different every time we do it according to what is growing wild or what is in my garden or even fridge.

We generally use a mortar and pestle to grind the materials with a tiny bit of water, with the exception of berries.  Berries are fabulous because if you freeze them it will break the cell wall and when they thaw they release all this wonderful deep rich juice (think of thawed blueberries).  And with most blue or purple berries, you can completely change the colors with an acid or base because they are pH reactive (the anthocyanins do it).  We can also make wild mushroom ink in a couple of hours by literally just letting mushrooms like inky caps sit in a jar on the counter for a couple of hours and they melt into ink.

We use foraged clam shells for the palettes and they dry into little portable dry paints that you can use like traditional watercolor pans.  We make easy paintbrushes from the top and bottom of a found feather inserted in a foraged hollow stem.

The book I wrote with the projects (and a lot more, like how to find and forage wild clay, make paper from invasive plants, make color changing paper, make invisible ink paintings, etc.) is Wild Art: Awesome Art Projects Using Wild & Invasive Plants & Other Nature Items (aff link: https://amzn.to/4gDylT0).  

My goal with it was to have all the projects be things that children could do without having to buy additional materials or to do things they'd need an adult to help with (like boiling down natural watercolors on the stove or using toxic chemicals).  I wanted them to be able to make truly cool art projects for free or virtually free, entirely from natural materials.  It's a kids' book, but I do workshops all the time for adults who also really have fun with it.  I even did an Inktober challenge where I did a little 5 minute art piece every day of October with a different wild ink/paint I made that day.  :)

Here are a few pics of some workshops we've done.  I love that we do it in all seasons and there's always something different with different colors. I even keep my dried flower petals and such in a basket for people to play with.  Dried red poinsettia leaves make the coolest paint/ink -- it starts out blood red and then dries to nearly black, and then a couple of days later it's a gentle gold that persists (the cat in the upper left corner of the Inktober collage was painted in poinsettia leaf ink), but it will also dry to different colors depending on if you grind it with vinegar or water.  I'll include a few pages from the book too, and a collage of some of my Inktober little daily doodles.  I've had so much fun with this project!


1 month ago
art
I'm sad that only one person replied all those years ago!  I'll answer for anyone else who might also be looking for some permaculture-related art ideas with kids.

I wrote a children's book last year on this theme, partially funded by a grant from the Minnesota State Arts Board.  It's called Wild Art: Awesome Art Projects Using Wild & Invasive Plants & Other Nature Items (aff link) and these are a few projects from it if it helps.

I have also put out a free, nonprofit nature and foraging magazine for kids for over six years called Wild Kids Magazine and I often put nature art projects in there.  All of the archives are online so you can search for keywords like paint, charcoal, or certain plants.  Each issue is about 20 pages in PDF format to read online or print.

6 months ago