I made this last year and am finally getting around to posting this how to. I know there are a ton of videos but I have very limited broadband and figured some are in the same boat as I. All the pictures will be at the bottom. (I am clueless how to post between paragraphs.)
1. Find a good sturdy 5 gallon bucket. The one I picked has 3 ribs at the top. It was a paint bucket. I ordered all my materials from a well known internet marketplace. The bucket should have enough room on the bottom to fit a 1” uniseal in the center. Uniseal has an outside dimension of 2”. The bucket size I used is 11-7/8” wide at top and 10-3/8” on the bottom and 14-1/2” tall. I mention this because it will affect some of the pipe lengths if your bucket is different.
2. Parts list.- I used schedule 40, 1/2” pvc.
6- 1/2” 90 degree elbows
4- 1/2” 45 degree elbows
1- 1/2” t fitting
1- 1/2”, 5 way fitting
5- 3/4” uniseals
1- 1/2 ball valve
About 8’ of 1\2” schedule 40 pipe
About 10’ of 1/4” irrigation tube
1- air pump, I used a vivosun 6 outlet 950 gallon per hour 32 watt.
The pump I got is probably overkill.
Tools needed, something to cut the pipe. A must -1/4” brad point drill bit (keeps it from moving around) a must 1-1/4” hole saw or spade bit
Fabricating: look at pictures first to famiarize yourself.
Drill 4, 1-1/4” holes along the top of the bucket, each hole should be equidistant from each other
Drill 1, 1-1/4” centered in the bottom of the bucket
Install the uniseals in each hole, the bottom uniseal should have the wide side facing out, the top uniseals I had to do opposite to fit between the bucket ribs.
Drill a 1/4” hole in the top of 4, 90 degree fittings
Install the 45 degree fittings in the top bucket holes and 5 way fitting in bottom hole
Cut 5 pieces of pipe (1-1/2”) that will connect the 45 and 90 degree fittings so they almost touch.
Cut 4 pieces of pipe about 13” (depends on your bucket) and insert them into the 90’s
Cut another 4 pieces of pipe about 6” (depends on bucket size) for the 5 way fitting.
I inserted the 1-1/2” into a 90 then then inserted the 13” into that, then another 90 then the 6” piece.
Once 3 Of these are assembled you can install them. See pics of assembled unit
The final one will have the “T” fitting on the bottom for the drain assembly
With your last 1-1/2” piece of pipe glue that into the bottom of the “T” the glue the ball valve to that. This is the only place I used glue.
I didn’t use glue anywhere else in case I wanted to clean thoroughly or the bucket developed a crack, etc. When it’s pumping the unglued fittings may leak a bit but will usually stop within 5 minutes or so on your first batch. After that it shouldn’t be an issue.
The pump should always be higher than the tea that is in the bucket. The reason for this is so that the tea cannot backflow into the pump if it’s lower than fluid level.
When installing the 1/4” irrigation tube it should be inserted almost all the way down the vertical pipe till it reaches the lower fitting.
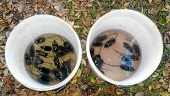
You can adjust the vortex action by the valve controls on the air manifold.
0B222AB0-C3CD-45EF-937D-30AE86AEEEDE.jpeg
Parts and pieces
FC7D6621-D281-4E87-8CBC-0922D6DE9EB1.jpeg
Tools
18765C2F-EFF2-4EED-8E42-F0ED13179F85.jpeg
Holes
2BC6D7D3-174C-4706-83BB-A8607BF9C89B.jpeg
Holes
A71FC310-D778-4AEE-A7DD-6D7AF10BBE1A.jpeg
Uniseals
AF99816E-E234-4C53-AC46-35889FB4659A.jpeg
Uniseals
B9FD017C-6016-4D7B-8DC2-208B2926A2A5.jpeg
1/4” hole in a 90
BAE3147B-DA74-4F92-A080-9DDDAE4A0CA5.jpeg
Top view
BA5E8A79-3A00-4FB8-8031-EA7E6EAF8C1D.jpeg
1/4” tube depth
2355C4E3-ABED-4359-8DA8-D891ADEB697A.jpeg
Stand with pump
768439B0-400F-4632-9502-DAC36C3D890F.jpeg
Vortex
No occupation is more delightful than the culture of earth and no culture as comparable as that of the garden.
Thomas Jefferson
Don't MAKE me come back there with this tiny ad:
building a permaculture community with hands on gardening and natural building


.png)


![[Thumbnail for 0B222AB0-C3CD-45EF-937D-30AE86AEEEDE.jpeg]](/t/109694/a/75512/0B222AB0-C3CD-45EF-937D-30AE86AEEEDE.jpeg "Filename: 0B222AB0-C3CD-45EF-937D-30AE86AEEEDE.jpeg
Description: Parts and pieces")
![[Thumbnail for FC7D6621-D281-4E87-8CBC-0922D6DE9EB1.jpeg]](/t/109694/a/75513/FC7D6621-D281-4E87-8CBC-0922D6DE9EB1.jpeg "Filename: FC7D6621-D281-4E87-8CBC-0922D6DE9EB1.jpeg
Description: Tools")
![[Thumbnail for 18765C2F-EFF2-4EED-8E42-F0ED13179F85.jpeg]](/t/109694/a/75514/18765C2F-EFF2-4EED-8E42-F0ED13179F85.jpeg "Filename: 18765C2F-EFF2-4EED-8E42-F0ED13179F85.jpeg
Description: Holes")
![[Thumbnail for 2BC6D7D3-174C-4706-83BB-A8607BF9C89B.jpeg]](/t/109694/a/75515/2BC6D7D3-174C-4706-83BB-A8607BF9C89B.jpeg "Filename: 2BC6D7D3-174C-4706-83BB-A8607BF9C89B.jpeg
Description: Holes")
![[Thumbnail for A71FC310-D778-4AEE-A7DD-6D7AF10BBE1A.jpeg]](/t/109694/a/75516/A71FC310-D778-4AEE-A7DD-6D7AF10BBE1A.jpeg "Filename: A71FC310-D778-4AEE-A7DD-6D7AF10BBE1A.jpeg
Description: Uniseals")
![[Thumbnail for AF99816E-E234-4C53-AC46-35889FB4659A.jpeg]](/t/109694/a/75517/AF99816E-E234-4C53-AC46-35889FB4659A.jpeg "Filename: AF99816E-E234-4C53-AC46-35889FB4659A.jpeg
Description: Uniseals")
![[Thumbnail for B9FD017C-6016-4D7B-8DC2-208B2926A2A5.jpeg]](/t/109694/a/75518/B9FD017C-6016-4D7B-8DC2-208B2926A2A5.jpeg "Filename: B9FD017C-6016-4D7B-8DC2-208B2926A2A5.jpeg
Description: 1/4” hole in a 90")
![[Thumbnail for BAE3147B-DA74-4F92-A080-9DDDAE4A0CA5.jpeg]](/t/109694/a/75519/BAE3147B-DA74-4F92-A080-9DDDAE4A0CA5.jpeg "Filename: BAE3147B-DA74-4F92-A080-9DDDAE4A0CA5.jpeg
Description: Top view")
![[Thumbnail for BA5E8A79-3A00-4FB8-8031-EA7E6EAF8C1D.jpeg]](/t/109694/a/75520/BA5E8A79-3A00-4FB8-8031-EA7E6EAF8C1D.jpeg "Filename: BA5E8A79-3A00-4FB8-8031-EA7E6EAF8C1D.jpeg
Description: 1/4” tube depth")
![[Thumbnail for 2355C4E3-ABED-4359-8DA8-D891ADEB697A.jpeg]](/t/109694/a/75521/2355C4E3-ABED-4359-8DA8-D891ADEB697A.jpeg "Filename: 2355C4E3-ABED-4359-8DA8-D891ADEB697A.jpeg
Description: Stand with pump")
![[Thumbnail for 768439B0-400F-4632-9502-DAC36C3D890F.jpeg]](/t/109694/a/75522/768439B0-400F-4632-9502-DAC36C3D890F.jpeg "Filename: 768439B0-400F-4632-9502-DAC36C3D890F.jpeg
Description: Vortex")