I am sharing the process for building these self wicking barrels which I used successfully last year to grow 2 to 3 large tomato plants each, 3 or more pepper plants, beans, peas, etc. The reservoir is about 5 gallons of water so it does not need water more than every other day.
Bill of Materials
=============
1) 22gal. Feed Bucket
6') black plastic drain pipe
12") 1"PVC pipe
1) 1" PVC female NPT to glue connector
1) 1" PVC male NPT to glue connector
1) 1" PVC glue "L"
Rebar wire
Landscape Fabric
Optional - duct tape
Small tube of silicon caulk or PL400/ liguid nails glue
Tools needed
===========
Drill
1-1/4" spade bit
3/16" or 1/4" bit
Utility knife
Linemans pliers or pliers and a side cutter
Small hand saw
Optional - pvc pipe cutter
Utility knife
Tape measure
Scissors
Large adjustable wrenches or channel lock pliers to fit PVC fittings
Planting Material
=============
2-3 gal. of sand
Potting material of your choice, needs to be friable so it will wick
Procedure
========
1) The first photo shows the bucket with a drain installed. It is 1" PVC, and I drill a 1-1/4" hole near the bottom of the bucket. In this size hole, the male threaded adapter will thread into the plastic bucket from the outside of the bucket. On the female adapter use the hand saw to cut off the back 5/16" to 3/8" of the glue side. This well become a washer to slip onto the male threads. Put glue or caulk on the threads (be generous) and around the interface to the bucket. Then thread the female adapter onto the male and tighten.
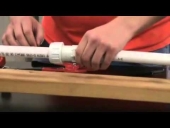
2) Cut the 1" PVC pipe into a 6", 2", and 4" pieces. Cut one end of the 6" piece at roughly a 45° angle. Also drill the 1" pipe with several 1/4" or 3/16" holes (as shown in the second photo). Insert the 2" and 4" pieces into the "L", and insert the assembly into the adapter in the outside of the bucket a dowrn in the photo. This is the drain. The water level in the bucket can be adjusted by rotating the external pipe assembly.
Take the long angled pipe with the holes settled and cut a small piece of cloth and either duct tape it onto the pipe or use a piece of rebar wire to hold the cloth in place. Insert the pipe with cloth into tube adapter on three inside of the bucket (as shown in the third photo).
3) Preparation of water reservoir pipes. Cut the drain pipe into 2) roughly 22" pieces and 2) 14" pieces and make sure they cut into the bottom of the bucket. Cut down the pipes to adjust as necessary. Cut 8 pieces of landscape fabric, approx. 10" x 10". Cut 8 pieces of rebar wire 16" long. Form them around the pipe so they are roughly circular in shape (as shown in the fourth photo). With the lineman pliers or abother pair of pliers twist the wire together to hold the square of landscape fabric on the end of each pipe. To the end of one of the longer pipes cut an X slit in the end so that the drain can go through the X (as per the fifth and sixth photos). This keeps the sand from filling up the pipes.
4) The seventh photo shows the completed plumbing system of the planter. The pipes will be surrounded with sand. Between the sand and the pipes, the reservoir will hold approximately 5 gallons of water, but can be adjusted by the angle of the external drain. The reason for filling the bae with sand is that it can quick but well not turn rancid because it does not contain organic material.
5) This was a planter that I put together as a quick nursery for a recent comfrey purchase. In a future posting, I will show photos of a watering tube and worm feeding tube in they middle of the planter, for localized feed production.
1-Bucket-showing-drain-assembly-.png
Bucket showing drain assembly
2-Bucket-showing-complete-drain.png
Bucket showing complete drain assembly
3-Interior-drain-with-cloth-filter.png
Interior drain with cloth filter attached
4-Wire-Rings.jpg
Rebar wire rings to hold cloth on ends of black pipe
5-Pipe-end-cap.png
Pipe end with filter cloth cap in place and secured with wire
6-End-cut-for-drain.png
Filter cloth cut to slip onto drain assembly
7-Connection-to-drain-fitted.jpg
1st pipe in place connected to drain assembly
8-Reservoir-assembled.jpg
complete reservoir in place, ready for filling
9-Sand-filled-around-reservoir.png
Sand filled in around reservoir pipes
10-Planted-with-comfrey.png
Filled with dirt and comfrey plants in their nursery
One difference between this design and many other wicking bed designs is a slight risk, but with a huge benefit.
The difference is that I put the drain hole as close to the bottom as is reasonably possible. The risk this creates is that if you have a leak, the water might drain out. I have never had this be an issue with the numerous barrels that I have built.
The advantage of this design is that you can look down into the short length of vertical pipe connected to the elbow and see what the water level is in the barrel. If it is low you can add water, and if not you don't need to worry about it until later. With the usual design, you have no way of knowing the level. You have to fill the barrel and only know the level once the water begins to drain out.
You can also connect these tubes from one barrel to another and then you can fill the highest barrel and let the water trickle down to the lowest. This can greatly simplify watering. If you use a clear plastic pipe to connect the barrels you can monitor the filling process between the barrels.
I hope this is of interest.
I will also be doing another post soon on a self wicking barrel with built in vermi-composting to provide a healthier growth environment for the plant. I have a couple off them in proves at the moment and the worms seem to like the barrels and they are eating and fertilizing the plants in real time.


 4
4


![[Thumbnail for 1-Bucket-showing-drain-assembly-.png]](/t/106864/a/73833/1-Bucket-showing-drain-assembly-.png "Filename: 1-Bucket-showing-drain-assembly-.png
Description: Bucket showing drain assembly")
![[Thumbnail for 2-Bucket-showing-complete-drain.png]](/t/106864/a/73834/2-Bucket-showing-complete-drain.png "Filename: 2-Bucket-showing-complete-drain.png
Description: Bucket showing complete drain assembly")
![[Thumbnail for 3-Interior-drain-with-cloth-filter.png]](/t/106864/a/73835/3-Interior-drain-with-cloth-filter.png "Filename: 3-Interior-drain-with-cloth-filter.png
Description: Interior drain with cloth filter attached")
![[Thumbnail for 4-Wire-Rings.jpg]](/t/106864/a/73836/4-Wire-Rings.jpg "Filename: 4-Wire-Rings.jpg
Description: Rebar wire rings to hold cloth on ends of black pipe")
![[Thumbnail for 5-Pipe-end-cap.png]](/t/106864/a/73837/5-Pipe-end-cap.png "Filename: 5-Pipe-end-cap.png
Description: Pipe end with filter cloth cap in place and secured with wire")
![[Thumbnail for 6-End-cut-for-drain.png]](/t/106864/a/73838/6-End-cut-for-drain.png "Filename: 6-End-cut-for-drain.png
Description: Filter cloth cut to slip onto drain assembly")
![[Thumbnail for 7-Connection-to-drain-fitted.jpg]](/t/106864/a/73839/7-Connection-to-drain-fitted.jpg "Filename: 7-Connection-to-drain-fitted.jpg
Description: 1st pipe in place connected to drain assembly")
![[Thumbnail for 8-Reservoir-assembled.jpg]](/t/106864/a/73840/8-Reservoir-assembled.jpg "Filename: 8-Reservoir-assembled.jpg
Description: complete reservoir in place, ready for filling")
![[Thumbnail for 9-Sand-filled-around-reservoir.png]](/t/106864/a/73841/9-Sand-filled-around-reservoir.png "Filename: 9-Sand-filled-around-reservoir.png
Description: Sand filled in around reservoir pipes")
![[Thumbnail for 10-Planted-with-comfrey.png]](/t/106864/a/73842/10-Planted-with-comfrey.png "Filename: 10-Planted-with-comfrey.png
Description: Filled with dirt and comfrey plants in their nursery")