steve folkers

+ Follow
since Dec 14, 2014
Merit badge: bb list bbv list
For More
Apples and Likes
Apples
Total received
In last 30 days
0
Forums and Threads

Recent posts by steve folkers

Aj Hendershott wrote:Thanks for sharing what you do.  I am aspiring to make some buckets and piggins and have make a croze and hoop driver. Mainly just for fun gifts.  I have successfully made a coopered dipper, and enjoyed that build.

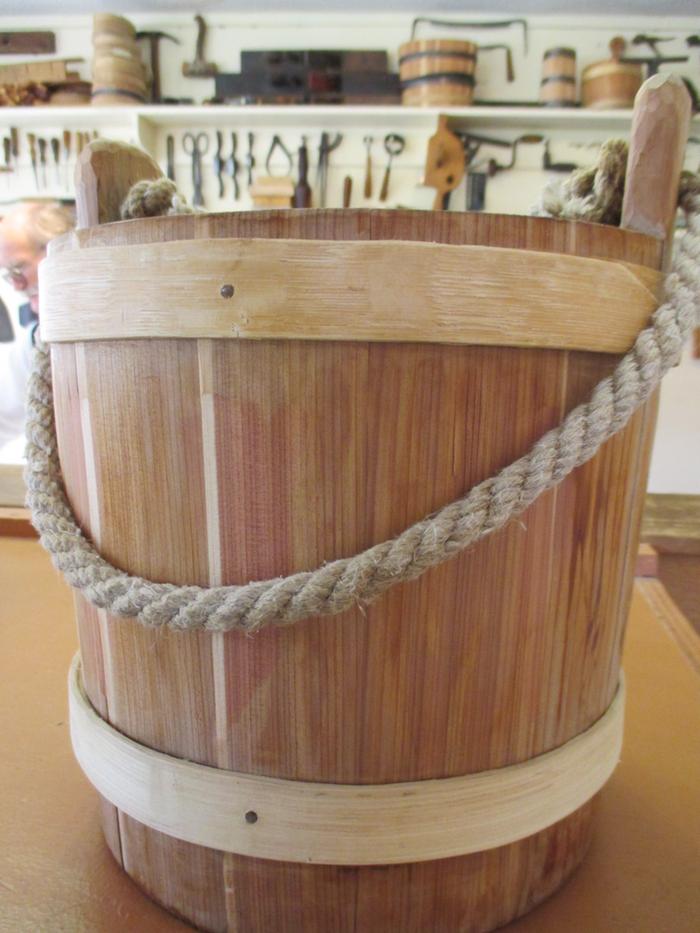
I read a book on Alex Stewart (I suspect you might recognize him from the butter churn chapter n Firefox 3) and he mentioned honey buckets and that there were certain woods appropriate for making them.  No more detail was included.  I am curious, do you know much about these and could you share what kind of woods would be appropriate?  Also what dimensions were these buckets?  Do they look like the lidded bucket shared on your website.  

Thanks for the education work you do.  Oh and your shop is well organized!!

Arron Hendershott

    Arron-- I learned bucket coopering from Keith Bowman, who was Alex Stewart's last apprentice.  Alex died halfway through, and Keith finished under his son Milton.  By this time the Stewarts had been to Japan demonstrating, and been converted to using dozuki saws, which Keith used.  (I used my father's, grandfather's, and one I suspect was my great-grandfather's Western-style handsaws, out of both respect for the tradition I was demonstrating, and general do-what-you-can-with-what-you-got.)  Keith brought the craft back to north Arkansas, where it had died out, when he took the job at the Ozark Folk Center.  But it was the same Southern Highlands craft, which we knew not only from books, but also from several local pieces from the late 1800s.  We had a churn the same as those Alex made, except for the simpler (but finely done) half lap joints on the hoops, and the wear on the bottom from scooting around on floors for decades.  I met the 96 year old man who had donated it, and he told me where he had accepted it in payment for milk and eggs in the 30s, not far out of town, when the bottom was already worn out.  

I have heard of sap buckets for sugar making, but that was not practiced much here, and I haven't seen any.  Pictures I have seen seem to show all sorts of forms, but not too large (1 gallon), and made to either hang from the spile the sap drips from, or from a nail just underneath.  I presume one would use a soft, neutral-tasting wood like yellow poplar or white pine.  Actual honey is usually put up in canning jars (or temporarily in gallon plastic milk jugs).  You should be aware that "honey bucket" is a euphemism for nightsoil collection.  As in, to paraphrase George Carlin, "I don't want to offend you, Marge, but your breath could knock a buzzard off a honey-bucket wagon."  If that IS what you mean, wood is not appropriate.  May I recommend plastic 5 gallon buckets (the right height to put a toilet seat on, and they come with lids), and a covering of sawdust after each use (which works fine if TP is collected separately).  And a separate pee bucket, primed with a few inches of water to dilute it.

The shop in the pictures was the demonstration shop at the Center, so I was able to arrange it optimally, saws here, axes there, everything within easy reach.  My shop at home is a mess.
4 years ago

Brian Sayers wrote:Where can a person buy holding hoops for making wooden buckets that you use while making the bucket before replacing them with
The permanent hoops that you make

 Brian-- The heraldic "arms" of the European cooper's guilds usually included the three main tools of the trade: the short-handled broadax to hew staves, the croze to cut the groove for the head, and the set-up hoops.  That is, a graduated set of hoops in all sizes, stout enough to pound on for years, is a main tool.  When I worked in the cooper shop at the Ozark Folk Center, there was already a partial set there, made by the blacksmiths of mild steel bar stock, about 1/2 inch wide by 1/8 or 3/16 thick, arc welded solid and ground smooth.  These were then rounded and splayed (tapered) by hammering down on a mandrel (a heavy steel cone) to stretch the lower edge.  The thickness gave good purchase for the wooden hoop drivers we used.  (My teacher was from Appalachia, and his were of laurel-- I made mine of persimmon, with a few of dogwood.)  But the splay was never sufficient on many of them, and I had to hammer them out and re-round them.
    The set was pretty much every half inch diameter between 6 and 16, with some gaps and a few quarter inches.  (I found it useful to stamp the number on them.)  But for smaller and larger stuff (from tankards to washtubs) I ended up making my own out of old barrel hoops.  This cut well with large tin snips, splayed well if not already splayed appropriately, and punched well with my dad's (a sheet metal worker) punch.  I ballpeen rivetted (cold) with copper often, iron not infrequently, and cut-off nails in emergencies (but nail heads are too thick).  A wire brush wheel does wonders for old steel.  These thinner steel set-up hoops needed a steel hoop driver, though.  A cold chisel ground to a square flat end works well, or any scrap piece of steel that has or can be given an appropriate grip and square end.
    And a set of giant rubber bands, cut from old inner tubes and simply square knotted, completes the set.  Kilby shows brewery coopers pounding wooden "truss hoops" (of ash) to draw the the hot staves together, but they must be steam bent laminations mysteriously fastened.  I've had little luck with wooden set-up hoops, not for lack of trying.
    The picture shows three of my old (now rusty) set-up hoops cut from barrel hoops.  The two smaller ones are rivetted with copper, and the larger one with iron.  The largest, rusty hoop I actually found in our back yard.  This is an old cooperage town, and I suspect kids used to roll hoops around, even though the splay makes them roll in a circle.  It closely approximates the bar stock hoops we had at the Center, except it's 7/8 wide.  The oval white oak hoop with a plain single-lap join, is still on the block I made to shape it.  It's a remnant from an oval cedar wastebasket I did.  But they weren't stout enough to pound on repeatedly for set-up.
    This doesn't really answer your question, except to say, make them yourself, or commission a local blacksmith.
4 years ago

N.Y. Anzai wrote:I'm a complete novice. Never done any kind if woodcarving at all but I'd love to be able to. Where do you recommend I start learning? (Online only as i'm in Japan) and what tools will I need to carve a spoon? Thank you! :)

 
I myself always advised against rushing out and buying a lot of expensive tools.  Traditional is carve with what you've got.  Also. traditional is mostly carve with one sharp knife, though unless its a bent knife (the Canadian preference), you'll also need some sort of gouge to dig out the bowls.  And stones to keep them sharp.  But mostly, start carving some, which will let you know what you need.  I carved green wood whenever I could, which is also traditional, and way easier for hard woods, but takes experience working green wood, learning how to work it so it will dry without cracking.  I say traditional, but I only know of Western--  the peaks of traditional woodworking on this planet were Scandinavia and Japan, so you're better set than me for the latter.  I ended up using broad hatchet, drawknife, spokeshave, gouge, a 1" chisel (as a push knife), a carving knife, occasionally scrapers (but usually used the knife as a scraper), and sandpaper-- but these were all things I had.  

There are some great websites on spoons, but I mostly found them highly inspirational, more than how-to, and I don't have any list of them.  Just search for wooden spoons, etc.  But the two books I started with long ago would certainly be Swedish Carving Techniques by Wille Sundquist (1990) and Country Woodcraft by Drew Langsner (1978), which has a chapter on spoon carving that was the result of a visit from... Wille Sundquist.
4 years ago

Whitney Dee wrote:

kevin stewart wrote:Hi
Where is your welsh love spoon?


My husband is Welsh and was taught spoon carving by his uncle.

Is there any way to keep the wood from drying so quickly? On my first ladle, I ended up having to scrap it because I didn’t finish it before it dried too much to carve.


My humble but experienced opinion:  1. Spoons traditionally carved in green wood; carve the cheese, then turn it into concrete.  2. Traditionally, including Wales, is store the unfinished spoon under the bushel-size pile of shavings on the floor-- the wood you took off keeps the wood you want moist.  3.  Substitutes include multiple cloth bags, cardboard boxes, etc. to slow drying, with plastic bags being last choice as too unbreathable (I've used plastic for very short periods, preferably with lots of small holes.)  4. Alternatively or additionally, oiling the unfinished spoon (or usually a larger object like a dough bowl), especially any areas suspected of a tendency to crack, then carving that off the next day. But any areas left oiled may make the final oil finish look uneven.  5. Traditionally, carve the whole spoon in one sitting (from the hewn blank), down to virtually tool-finished, then leave it to dry slowly (away from breezes) while you carve a dozen more.  Traditionally, they were sold at this stage, "in the white", that is, dried but unfinished.  Nowadays, do the boring but esthetically and commercially necessary sanding once they are fully air dried.  (I've known spoon carvers to dry them, then wet-sand in front of a tub of water.  This keeps the dust down nicely but takes expensive wet & dry sandpaper.)  Traditional is in fact to scrape, with curved-edge metal scrapers, or for poor farmers. bits of broken glass.  5.  avoid as much of the cracking as possible by attention to the grain.  6. Some species (notably hackberry and persimmon) are especially prone to staining if not carved completely in one sitting.
4 years ago
PS--

And since we had no power nor even money for batteries (most of the time) for radio or tape decks, we read The Complete Sherlock Holmes out loud, by kerosene lamp.  
5 years ago

Dave Burton wrote:I recently finished reading The One-Straw Revolution by Msanobu Fukuoka, and I also started and finished Holy Cows and Hog Heaven by Joel Salatin.

I am now reading The Road Back to Nature by Masanobu Fukuoka. Right now, I think it is just quite interesting from the prefaces how much Masanobu Fukuoka has grown and developed since he wrote The One-Straw Revolution.


When we first moved to the Ozarks in 1973, and soon thereafter, several books helped shape our thinking about self-reliance and sustainable agriculture.  One was One Straw Revolution, going out as a hardbound Christmas present this year, along with Larry Korn's biography, One Straw Revolutionary.  We actually grew tiny amounts of wheat, all the way to bread, once or twice.  (Lodging was a major problem.)  So Gene Logsdon's Small-Scale Grain Raising was also inspirational.  And Ruth Stout, the Nearings, and Jethro Kloss.  And the few glances I managed through someone else's Farmers of Forty Centuries, which I reread a few years ago.  (Now I try to pick up every blade of grass we track in and dutifully get it into the compost bucket and back into the garden soil.)  I don't remember what started us on "French Intensive Gardening", or on companion planting, but both were a huge part of life.  Most often, though, the struggle was to create any topsoil at all, much less double dig it.

And parallel to these were the broader cultural inspirations:  Seven Arrows, Black Elk Speaks, Ishi, Last of His Tribe,  and other First Nations books, including two from my father's boyhood, Manabozho and Stories the Iroquois Tell Their Children.  Also inspiration from Japan: a book of Hiroshige prints, and Harold Henderson's Introduction to Haiku.  And soaking up local Ozark history, from the library, from neighbors, and from the river.  And National Geographic.
5 years ago
Just finishing Blue Remembered Earth, hard sci-fi by a 16-year astrophysicist for the European Space Agency, and great Welsh writer, Alastair Reynolds.  First book in a trilogy about the first interstellar voyages (of course I read book 2 first, and don't have book 3), the science point of which is that the stars are vastly far away, we will probably never get much faster than 50% of lightspeed, it will take many years to accelerate to that, and therefore "ships" will have to be essentially planets  (hollowed asteroids, spun for gravity) where generations of people live out their whole lives without getting there yet.  There is not much about growing food aboard these (that was in the 2nd one), but a lot about actually taking care of practical business while living in space.  And the whole series is set in a completely inhabited, space-faring solar system, a century after the "Resource and Relocation Crisis", which Reynolds is confident we will get a grip on ourselves and honorably deal with.

Up next:  Death of a Swagman, Arthur Upfield's 1945 "Inspector Napoleon Bonaparte  mystery".  I ran across one of these a decade or two ago and loved it.  "Bony" is a half-Aboriginal detective in (1930s?) Australia.  I met an Aussie who said it was a TV show in B&W days.


5 years ago
    I'm a retired homesteader/naturalist/craftsperson in north-central Arkansas, out of woodwork to sell, but I have a self-published chapbook, American Haiku, Too, with 246 of my haiku, an introduction covering the technicalities of the form, and illustrated with my own drawings.
   
     I also have another 48 page chapbook, Iron Roads West, "a haiku-prose journal of an Amtrak & hostels circumnavigation of the western 2/3 of the US"; haibun from a wonderful trip we took some years ago.
   
     These are $12 each, shipping in US included.  If interested, send me a PM.  
5 years ago

denise ra wrote:Are you coopers making a living at this craft?


I'm not.  (Back gave out.)  But I did for ten years or so, under special circumstances.  There ARE a very few doing so, mostly either as historical re-enactors (subsidized to do so; the product is not what pays) or special use (movie props, etc., at enormous prices).  My buckets ran a good $200, at $7/hour.  (That is, including retail markup, from wholesale production from the trees.)  I therefore finally accumulated an inventory of them, because they mostly did NOT sell.  I made a living demonstrating how to do it, and mostly whittled spoons and bowls for actual sales.


But the history of the economics is fascinating.  This kind of bucket (and churn and tub) coopering came over from the British Isles, where like in most of western Europe, it had developed from an ancient farm craft into a village and town shop profession, called small coopering or white (dairy) coopering, providing household woodenware.  But it came over here at the very time the industrial revolution was putting the bucket coopers over there out of work, mostly stamped metal buckets from the 1820s on.  Yet, reverted to a farm craft, it lingered on here through the 1800s, and in some places like the Ozarks, up past WWII.  Part of this was tradition-- I want a cedar water bucket on my porch like Mom and Dad had, and Grandpa had...  But some was the paradox of poverty, left over from before there were stores full of stuff to buy or jobs paying money to buy them with.  This is one of those things you can't afford to pay someone else to do for you in today's economy).  You do it yourself because you can't afford to buy it, or because you want it and that's the only way to get it, or because you like doing things from absolute scratch.  But it all amounts to being outside the cash economy, out in the Great Economy (Wes Jackson's phrase, popularized by Wendell Berry) of people and trees and reality.  Back in the 1800s, Ozarkers were making cedar buckets because they were mostly subsistence farmers outside the cash economy until the railroads came in, which was later than the rest of the US.


Barrel coopering, on the other hand, has always been economically viable, with the three qualifications that doing it by hand crashed after enough machinery was perfected (about 1875), that the wooden barrel market shrank dramatically after glass, then stainless steel replaced uses not reliant on breathability and oak aging (about 1950), and that it then expanded again with the gourmet micro-winery and micro-distillery boom (around 200).  Here in Arkansas a distillery in Little Rock was the salvation of a cooperage in Hot Springs that uses machinery installed in 1909.  But that's factory economics.

                                                                                          --Steve Folkers
5 years ago
Joylynn--
    P.S.  Try Drew Langsner, Country Woodcraft, Rodale Press, 1978.  Chapter 6 is Shaving Horses.  And my roundwood confusion was the distinction my circles made between roundwood (using still-round pieces of tree trunks and branches) and green wood (cutting, splitting, shaving, hewing, carving etc. fresh cut pieces of trees while the material is still much softer), which is what I was doing as much as possible.  Carve the cheese, then season it into concrete.  This was traditional all over the world, especially for poor country folks.  But it requires knowing how the different tree species, and different dimensions and orientations of them, shrink and crack.  E.g., mulberry is exactly what you want to carve green, because it hardens to a rock, and is pretty tough (and pretty).  But like most woods it will crack badly if you include those little rings of center grain, and your horse will eventually split down the middle, so you'd need a big log and split a slab off the side.  And then those bigger quarter rings of grain will make the board cup as it shrinks.  Assuming we're talking about Red Mulberry.  Paper Mulberry is much faster growing, softer, weaker, easier to peel (and make paper out of the bast), lighter in weight, and smaller growing.  But once one enters this addictive world of working local trees in the green state, one discovers an infinite and literally growing bunch of materials, and uses for them, and methods of working them that are in the most direct contact possible with nature, and have the lowest possible footprint.

                                                                   Steve Folkers

(Judith Browning's husband)
6 years ago