I started with a small used Cub Cadet tractor with bucket.
There were a few repairs necessary over the first couple years and it did a good job.
And we realized it wasn't big enough for many of our needs.
BUT, a couple summers with it gave me time to do several things:
1) learn how to use a tractor and front end loader;
2) understand how such a machine feels underneath you;
3) what it can do, what it can't do, what it SHOULDN'T do;
4) WHERE i could use it.
I upgraded to a New Holland 35HP diesel compact tractor and here's why:
1) it was available in town and could be serviced locally;
2) it had enough power to do at least 80% of what I needed to do;
3) it fit between all the trees on the property, so I didn't have to remove any more trees for property access;
4) it had a standard front quick attach mounting system for a variety of tools (several added over its lifetime, so far);
5) it had PTO;
6) it was just off a 1 yr lease at a nursery. They moved mulch and pallets of plants. The wear and tear amounted to some paint chips missing;
7) purchase price was less than 1/2 of the estimate for the gravel driveway I wanted to add;

My wife said I could get it!!
Attachments:
- Front End Loader
- Front Pallet Forks
- Front Brush Grapple
- Rear Brush Chipper - sold 'cuz without hydraulic feed it wouldn't chip evergreens
- need to add Rear Grader Blade or York Rake
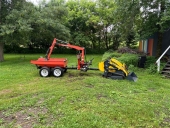
I do wish I could justify an excavator.
But I can rent one locally for under $1k per weekend - and that's delivered within 50 miles.
I don't think that all my neighbors combined could come up with enough projects to warrant the price of a good used mini-ex.
And don't bother with a backhoe attachment for the compact tractor. The excavator rental will be cheaper, do more work in less time and
won't hang off the back end of your tractor making it 15 feet longer (remember that part about
where you can use it?).
And don't forget to factor in the weight of the machine if you think you might want to move it.
In a short time, you'll also realize you won't get as much seat time as you expect - after your Dad finds out how much fun it is to operate!
My two cents worth.
Good luck.