|

|
|
|
|

|

|

|

|

|
 7
7


 7
7
For all your Montana Masonry Heater parts (also known as) Rocket Mass heater parts.
Visit me at
dragontechrmh.com Once you go brick you will never go back!
7
![[Thumbnail for 20210107_141247-1.jpg]](/t/265307/a/249370/20210107_141247-1.jpg "Filename: 20210107_141247-1.jpg
Description:")
For all your Montana Masonry Heater parts (also known as) Rocket Mass heater parts.
Visit me at
dragontechrmh.com Once you go brick you will never go back!
7
7
 8
8
regards, Peter
8
Randy Butler wrote:
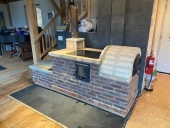
System riser is IFB, octagonal (close to 6" diameter) and 54" high. I did not add the wedge at the base, yet.
regards, Peter


 3
3
thomas rubino wrote:
Consider buying remote temp-sending units and placing one midway up the riser and another at the top of the bell.
They are not very expensive and it is nice to see how much your stove creates during full burn, how hot the top of your bell gets, and how long it stays warm inside.
Proudly presenting RocketMassHeaters.com
A good starting point to all RMH research
How Permies.com works
5
For all your Montana Masonry Heater parts (also known as) Rocket Mass heater parts.
Visit me at
dragontechrmh.com Once you go brick you will never go back!
6

 5
5
For all your Montana Masonry Heater parts (also known as) Rocket Mass heater parts.
Visit me at
dragontechrmh.com Once you go brick you will never go back!
5
Proudly presenting RocketMassHeaters.com
A good starting point to all RMH research
How Permies.com works
5
For all your Montana Masonry Heater parts (also known as) Rocket Mass heater parts.
Visit me at
dragontechrmh.com Once you go brick you will never go back!
5
7
4
9
For all your Montana Masonry Heater parts (also known as) Rocket Mass heater parts.
Visit me at
dragontechrmh.com Once you go brick you will never go back!
3
9
For all your Montana Masonry Heater parts (also known as) Rocket Mass heater parts.
Visit me at
dragontechrmh.com Once you go brick you will never go back!


 4
4
thomas rubino wrote:Tension frames are only hand snugged not tightened with a wrench.
I only stack bricks flat on surrounds or bells
Tradition is not the worship of ashes, but the preservation of fire.
8
![[Thumbnail for 20240509_172155.jpg]](/t/265307/a/249897/20240509_172155.jpg "Filename: 20240509_172155.jpg
Description: Partial tension frame")
For all your Montana Masonry Heater parts (also known as) Rocket Mass heater parts.
Visit me at
dragontechrmh.com Once you go brick you will never go back!
9
6
For all your Montana Masonry Heater parts (also known as) Rocket Mass heater parts.
Visit me at
dragontechrmh.com Once you go brick you will never go back!
6
4
Randy Butler wrote:What I find online for the prices seems a tad steep.
I paid 6 bucks for a piece 1/4x12x24. Much of what I saw in eBay was closer to $20/SF.
Now I'm no rocket scientist (oh, does rocket mass heatering count?), but my math isn't terrible.
Maybe I should post my local shop contact info?

|
Do NOT activate your jet pack until AFTER you get out of the car! Even this tiny ad knows that:
permaculture bootcamp - gardening gardeners; grow the food you eat and build your own home
https://permies.com/wiki/bootcamp
|