|

|
|
|
|

|

|

|
.png)
|

|
 2
2


![[Thumbnail for 1-MW-build-1.jpg]](/t/96634/a/68075/1-MW-build-1.jpg "Filename: 1-MW-build-1.jpg
Description:")
![[Thumbnail for 2-MW-build-2.jpg]](/t/96634/a/68076/2-MW-build-2.jpg "Filename: 2-MW-build-2.jpg
Description:")
![[Thumbnail for 3-MW-build-3.jpg]](/t/96634/a/68077/3-MW-build-3.jpg "Filename: 3-MW-build-3.jpg
Description:")
![[Thumbnail for 4-core-foundation.jpg]](/t/96634/a/68078/4-core-foundation.jpg "Filename: 4-core-foundation.jpg
Description:")
![[Thumbnail for 5-core-build.jpg]](/t/96634/a/68079/5-core-build.jpg "Filename: 5-core-build.jpg
Description:")
![[Thumbnail for 6-riser-build-v1.jpg]](/t/96634/a/68080/6-riser-build-v1.jpg "Filename: 6-riser-build-v1.jpg
Description:")
![[Thumbnail for 7-riser-v1-final.jpg]](/t/96634/a/68081/7-riser-v1-final.jpg "Filename: 7-riser-v1-final.jpg
Description:")
![[Thumbnail for 8-high-temp-silicon.jpg]](/t/96634/a/68082/8-high-temp-silicon.jpg "Filename: 8-high-temp-silicon.jpg
Description:")
![[Thumbnail for 9-mass-ducting-v1.jpg]](/t/96634/a/68083/9-mass-ducting-v1.jpg "Filename: 9-mass-ducting-v1.jpg
Description:")
![[Thumbnail for 10-core-v2.jpg]](/t/96634/a/68084/10-core-v2.jpg "Filename: 10-core-v2.jpg
Description:")
![[Thumbnail for 11-core-v2-pt2.jpg]](/t/96634/a/68085/11-core-v2-pt2.jpg "Filename: 11-core-v2-pt2.jpg
Description:")
![[Thumbnail for 12-riser-v2.jpg]](/t/96634/a/68086/12-riser-v2.jpg "Filename: 12-riser-v2.jpg
Description:")
![[Thumbnail for 13-riser-v2-insulated.jpg]](/t/96634/a/68087/13-riser-v2-insulated.jpg "Filename: 13-riser-v2-insulated.jpg
Description:")
![[Thumbnail for 15-sealed-by-cob.jpg]](/t/96634/a/68088/15-sealed-by-cob.jpg "Filename: 15-sealed-by-cob.jpg
Description:")
![[Thumbnail for 16-exit-duct-csa.jpg]](/t/96634/a/68089/16-exit-duct-csa.jpg "Filename: 16-exit-duct-csa.jpg
Description:")


 3
3
For all your Montana Masonry Heater parts (also known as) Rocket Mass heater parts.
Visit me at
dragontechrmh.com Once you go brick you will never go back!
2
1
God of procrastination https://www.youtube.com/watch?v=q1EoT9sedqY
1
3
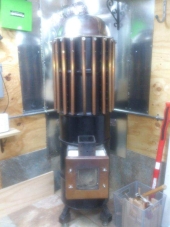
Additionally before placing the drum back on, I put 2x4s over the riser and measured the gap between the two drum sections. I got 1.25 inches. Since the 2x4s are 1.5x3.5 that would give me 2.25 inches of space between the riser and the top of the drum.
This time during the burn I had to close off 50% of the feed tube to get any draft and when the drum hit 400 degrees it flamed out and I got smoke blow back and fire out the feed tube.
I sealed off the feed tube with bricks and let it die out.
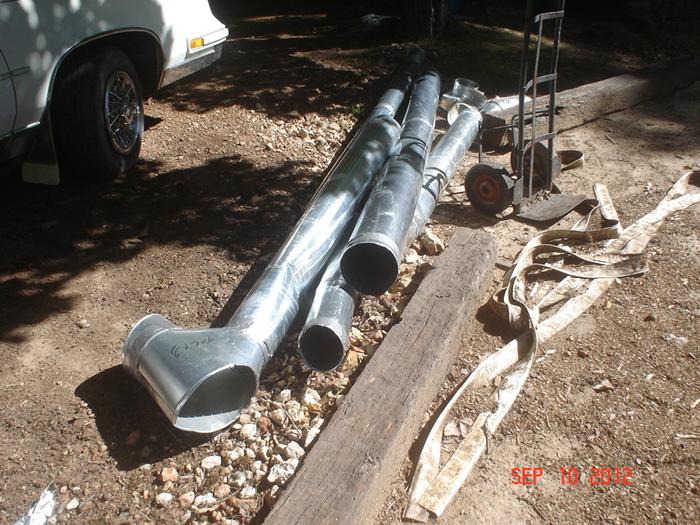
About this time, it occurred to me that maybe my mass duct really didn't have enough rise, so I tore that apart and reinstalled it with a 3 inch rise in each 10 foot section with a 1 inch rise between the end elbows for a total of 7 inches of rise before it hits the chimney. And I had the same issue as before: at 350-400 smoke blow back made its appearance.
In the meantime I met a young gentleman at one of the local fireplace shops who had attended one of Paul's RMH Seminars, and explained to him the problems I was having and showed him my photos. He offered his opinion that the CSA of the exit duct going to the Mass was probably not enough. So, back to the books and sure enough there is a 3 inch CSA requirement there I had totally overlooked (much to my chagrin).
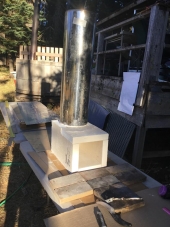
I tore out the back of the support bricks and again cut them to the size I needed and also considered since the surfaces of the ceramic board, the tiles and the firebricks that support the riser were not perfectly smooth, I would put a thin (1/2 inch) layer of cob between the riser and the core to make sure everything was sealed up tight.
This having been about the fourth time I had torn things apart, another thing became apparent. While the silicone is wonderfully easy to apply and does seal things up, its a real pain in the rear to get off and clean up. So, this time since I was cobbing things up, I decided to use cob for the resealing of the drum.
see 15-sealed by cob
16-exit duct csa
With the new duct gap in place and everything rebuilt, the final burn was more dismal than any of the others such that even a small fire to start came back through the feed tube.
So this is where I currently sit. There has to be a choke point somewhere, and having just read the post on how to make your RMH rockier, the only other think I can think of is to lower the riser, or move the whole thing back the the three inches I moved it forward.
While I'm not freezing, as the propane back up is in place, my pocket book is hemorrhaging to keep the propane flowing. So the sooner I can fix this the sooner my pocketbook will love me again lol.
Thanks in advance for your posts and constructive comments.
the chimney which consists of 3, 4 foot runs , 1, 90 degree elbow and 2, 45 degree elbows to get outside.

God of procrastination https://www.youtube.com/watch?v=q1EoT9sedqY
2
best regards, Byron

![[Thumbnail for IMG_0446.JPG]](/t/96634/a/68127/IMG_0446.JPG "Filename: IMG_0446.JPG
Description:")
![[Thumbnail for IMG_0461.JPG]](/t/96634/a/68128/IMG_0461.JPG "Filename: IMG_0461.JPG
Description:")
![[Thumbnail for IMG_0479.JPG]](/t/96634/a/68129/IMG_0479.JPG "Filename: IMG_0479.JPG
Description:")
![[Thumbnail for IMG_0505.JPG]](/t/96634/a/68130/IMG_0505.JPG "Filename: IMG_0505.JPG
Description:")
![[Thumbnail for IMG_0506.JPG]](/t/96634/a/68131/IMG_0506.JPG "Filename: IMG_0506.JPG
Description:")
God of procrastination https://www.youtube.com/watch?v=q1EoT9sedqY
1
Satamax Antone wrote:We have heard here, of several semi failures, where people burned, with bare pipes. And the heat extraction was too much, so the stove stalled. I think you are in the same kind of case.

Silence is Golden
For all your RMH needs:
dragontechrmh.com
1
best regards, Byron
![[Thumbnail for IMG_0511.JPG]](/t/96634/a/68422/IMG_0511.JPG "Filename: IMG_0511.JPG
Description:") 1
1
God of procrastination https://www.youtube.com/watch?v=q1EoT9sedqY
best regards, Byron

| I agree. Here's the link: http://stoves2.com |