• Post Reply Bookmark Topic Watch Topic
  • New Topic
permaculture forums growies critters building homesteading energy monies kitchen purity ungarbage community wilderness fiber arts art permaculture artisans regional education skip experiences global resources cider press projects digital market permies.com pie forums private forums all forums
this forum made possible by our volunteer staff, including ...
master stewards:
  • Carla Burke
  • Nancy Reading
  • John F Dean
  • r ranson
  • Jay Angler
  • paul wheaton
stewards:
  • Pearl Sutton
  • Leigh Tate
  • Devaka Cooray
master gardeners:
  • Christopher Weeks
  • Timothy Norton
gardeners:
  • thomas rubino
  • Matt McSpadden
  • Jeremy VanGelder

Raised Barrel RMH baking oven design

 
Posts: 43
12
  • Likes 7
  • Mark post as helpful
  • send pies
    Number of slices to send:
    Optional 'thank-you' note:
  • Quote
  • Report post to moderator
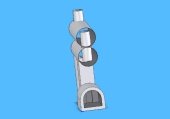
Hi all, for anyone interested, I'm currently testing my new RMH design that raises the 55 gal steel barrel and incorporates a smoke free baking oven between the burn chamber below and the barrel above that is heated from the burn chamber below as well as the barrel above. The floor of the oven is 1/4" plate steel which acts as a skillet with the oven door removed.

This design is actually a dual oven design,  as I use the burn chamber itself as an oven to bake in when I want smoke flavor or cooking directly over coals. But I wanted a second oven above the burn chamber that doesn't have exhaust and smoke contact for baking.

The build is coming along and burns really well considering it's not a proper Batch Box burn chamber.  Having a glass door and large burn chamber is a non negotiable feature I require so have to make it work however I can, even if it it costs a little efficiency. I can always improve the burn chamber design if needed in the future, but as of now it burns smokless and acceptable.

I'm still in the process of building the second oven between the burn chamber and barrel above and will update this thread as it progresses. I'll  be using Rammed Earth to fill in around the glass door. IMO, Rammed Earth is  better than Cob as it's more dense and less prone to cracking. After I finish this test oven build, I plan on building a refined version without any cinder blocks and using Rammed Earth as much as possible. I'll try and get some YouTube vids up soon.
20240128_164845.jpg
[Thumbnail for 20240128_164845.jpg]
20240128_164926.jpg
[Thumbnail for 20240128_164926.jpg]
20240125_105559.jpg
[Thumbnail for 20240125_105559.jpg]
 
Nate Nute
Posts: 43
12
  • Likes 2
  • Mark post as helpful
  • send pies
    Number of slices to send:
    Optional 'thank-you' note:
  • Quote
  • Report post to moderator
Here's another pic
Screenshot_20240129-104413_Gallery.jpg
[Thumbnail for Screenshot_20240129-104413_Gallery.jpg]
 
Nate Nute
Posts: 43
12
  • Likes 5
  • Mark post as helpful
  • send pies
    Number of slices to send:
    Optional 'thank-you' note:
  • Quote
  • Report post to moderator
I forgot to mention, in my design I like to use glass doors that slide up. This eliminates any back drafting suction force that happens that can happen when swing doors are opened rapidly, and also feels very elegant in use, not having a door that turns into a large intrusive obstacle when opened.

I also incorporated an oven rack inside the burn chamber at the top that is accessed by a slidable small stainless steel door above the bottom glass door. I have a metal baking rack that is not shown in the pics above, I'll upload another pic showing it installed.  I should also mention that the bottom Glass door is high temperature Ceramic glass and for the second oven above, I used tempered glass which is actually made from a $13 tempered glass cutting board I got on Amazon.  
 
Nate Nute
Posts: 43
12
  • Likes 5
  • Mark post as helpful
  • send pies
    Number of slices to send:
    Optional 'thank-you' note:
  • Quote
  • Report post to moderator
Here's a pic with the burn chamber baking rack, and a pic showing the sliding stainless door removed so you can see it from the side. I made it from a scrap piece of SS and curved the top so it seals nicely and hangs from the top lip of the burn chamber. It works awesome and so convenient to have a little low profile oven you can slip pizzas and other stuff in and get amazing smoke flavor. This oven burns smokless when fired properly, but I can get smoke by adding a few small pieces of white oak or other wood of choice to the coals. So the oven burns both smokless or with smoke depending on how you choose to run it.
Screenshot_20240129-110858_Gallery.jpg
[Thumbnail for Screenshot_20240129-110858_Gallery.jpg]
Screenshot_20240129-110905_Gallery.jpg
[Thumbnail for Screenshot_20240129-110905_Gallery.jpg]
 
Nate Nute
Posts: 43
12
  • Likes 5
  • Mark post as helpful
  • send pies
    Number of slices to send:
    Optional 'thank-you' note:
  • Quote
  • Report post to moderator
With the Ceramic glass door in the open position slid up. I love sliding doors and you can make them slide up or down,  whichever you prefer. As of now I prefer it sliding up. Still need to make handles that stay cool, as well as a simple mechanism that keeps the door open in the up position.
Screenshot_20240129-113750_Gallery.jpg
[Thumbnail for Screenshot_20240129-113750_Gallery.jpg]
 
Nate Nute
Posts: 43
12
  • Likes 5
  • Mark post as helpful
  • send pies
    Number of slices to send:
    Optional 'thank-you' note:
  • Quote
  • Report post to moderator
A huge benefit and feature of sliding glass doors is that no gasket seal is needed when you incorporate an air wash into the design.  I can go into detail how I designed the air wash on this build of anyone is interested.  There is complete inlet air flow 360 deg around the glass even though it somewhat seals against the metal on the front, which creates a nice air wash to keep smoke off the glass.
 
Nate Nute
Posts: 43
12
  • Likes 4
  • Mark post as helpful
  • send pies
    Number of slices to send:
    Optional 'thank-you' note:
  • Quote
  • Report post to moderator
Here's an illustration of the exhaust air flow though the barrel. Quite similar to other common RMH barrel designs. It drafts extremely well. The tubes inside the barrel aren't insulated and are just regular 6" stove pipe, we'll see how long they last. If the main riser tube was insulated like commonly done in RMH designs, it would increase efficiency, but even like this isn't too bad because the hot air inside the barrel acts as a great insulator around the riser. The question is how long will a thin wall riser last and how hot is it getting?? This can be worried about and improved later, as this is a concept test build.  Also, the second pipe inside the barrel where the exhaust exits is perhaps not the best design, as this pipe will re-absorb some heat and heat the air back up somewhat as it exits the barrel. Perhaps it's better to have the second pipe outside of the barrel and attach ed at the bottom so that there is no parasitic heat loss. BUT, having the tube inside would result in a stronger draft than if the pipe were outside the barrel, due to the increased air temp inside the barrel! All fun stuff to think about and experiment with. This can be worked out later....... Lots of fun stuff I'll be experimenting with including multiple barrel stratification chambers, Total downward stratification exhaust exiting, etc.
20240129_115419.jpg
[Thumbnail for 20240129_115419.jpg]
 
Nate Nute
Posts: 43
12
  • Likes 2
  • Mark post as helpful
  • send pies
    Number of slices to send:
    Optional 'thank-you' note:
  • Quote
  • Report post to moderator
Some pics of the air wash design. There is a permanent 1/4" air gap along the top and bottom of the Ceramic glass door. There are also air gaps behind the side metal pieces that allow air to freely flow inside, all down both sides of the glass. This all results in 360 deg inlet airflow around the entire piece of glass. 1/4" gap Seems to be working fantastic thus far but the gap size could be played with and fine tuned to find the optimum gap size. I can also slide up the door slightly or as much as needed to let a little more air in if needed, but it burns wonderfully closed.

The thing I love about RMH's is you don't need a sealed door or adjustable air inlet system. Just design the air wash inlet for optimum max burn and your done. Let the fire do its thing. There's never a need to dampen air flow. You control the burn by how much wood you put inside and also how you stack and adjust the wood as it burns.  Most of the time you want a super hot smokless burn,  but when you want to cook and want some smoke flavor....no problem,  just spread out the wood away from each other, and add a few fresh small pieces of wood if needed and voila, you suddenly will have some amazing smoke to flavor your Pizza or whatever inside the bake rack. After its done, move all the coals and/or wood back together and the smoke disappears.
20240129_131339.jpg
[Thumbnail for 20240129_131339.jpg]
20240129_131356.jpg
[Thumbnail for 20240129_131356.jpg]
 
Nate Nute
Posts: 43
12
  • Likes 2
  • Mark post as helpful
  • send pies
    Number of slices to send:
    Optional 'thank-you' note:
  • Quote
  • Report post to moderator
Some pics of how the top oven door will slide up to open. Need to figure out a handle solution that stays cool to the touch. I'll probably make some side hanger handles, one on each side that clamps to the bottom of the glass, goes up the height of the glass and has a hook on the top that hooks onto the metal frame above the glass or something like that. As of now I'm just using a single 16x12 Tempered glass cutting board for the oven door. After its built and I test oven baking temps, if I find I want a little more heat inside the oven, I can add a second cutting board to this one and make a dual layer glass door with an air gap for insulation.  I may also insulate the inside of the oven if needed, but we'll see. If temps can get hot enough without insulating it, and all the thermal mass around the oven gets hot enough, it will have extended thermal mass baking time that having insulation would hinder. Just have to experiment with it and see where we end up.
20240129_132710.jpg
[Thumbnail for 20240129_132710.jpg]
20240129_132750.jpg
[Thumbnail for 20240129_132750.jpg]
 
Nate Nute
Posts: 43
12
  • Likes 5
  • Mark post as helpful
  • send pies
    Number of slices to send:
    Optional 'thank-you' note:
  • Quote
  • Report post to moderator
One word of caution and disclaimer: I have over a decade or experience building various types of wood burning stoves, contraptions, and whatnot. Safety first and always be mindful of potential unseen dangers. I have multiple fire and CO safety detectors to monitor air status, and my #1 rule is never ever have a fire burning when you are sleeping. If you're a newbie, or even experienced, know what you're doing and take the time to learn how fire drafting works, basic foundational principles of how fires burn, etc. Safety, safety, safety!
 
Nate Nute
Posts: 43
12
  • Likes 4
  • Mark post as helpful
  • send pies
    Number of slices to send:
    Optional 'thank-you' note:
  • Quote
  • Report post to moderator
One thing I forgot to mention,  this build does not have a TRUE RMH insulated riser, nor properly designed burn chamber. This won't see the super high temps of a properly designed RMH. I just built this for lower temp burning using materials I have on hand, and the main purpose is to test the burn chamber, secondary oven, and raised barrel design, how it drafts and cooks. After this one is finished, I'll be tearing it down end of Winter and rebuilding another proper one before next Winter, same design (or maybe with improvements), but with proper insulated RMH riser compnents and also a more efficient burn chamber design. I will still make the burn chamber very large like this one because I can always reconfigure the inside with Batchbox geometry using fire brick and ceramic or other high heat insulation or whatever. I'd actually like to have a real world experience comparison of how my final version performs with this exact same burn chamber design, but with all other components up to RMH specs, and then reconfigure the  burn chamber to smaller Batchbox specifications and compare the difference.
 
Nate Nute
Posts: 43
12
  • Likes 4
  • Mark post as helpful
  • send pies
    Number of slices to send:
    Optional 'thank-you' note:
  • Quote
  • Report post to moderator
Just got the Rammed Earth top oven section built. I didn't spend much time making it too nice as this is just a quick hodge podge test build. Letting the Earth dry and will do some test baking in the next few days.
20240210_162739.jpg
[Thumbnail for 20240210_162739.jpg]
20240210_162659.jpg
[Thumbnail for 20240210_162659.jpg]
20240210_162754.jpg
[Thumbnail for 20240210_162754.jpg]
 
Nate Nute
Posts: 43
12
  • Mark post as helpful
  • send pies
    Number of slices to send:
    Optional 'thank-you' note:
  • Quote
  • Report post to moderator
On my first test run that is helping the Rammed Earth dry, the top oven is getting up to about 300 deg F within about 30-40 min, and that is  with a large 3/4" air gap behind the top of the glass. I left this air gap to let steam or water vapor out while its drying, and also with no insulation inside the oven. Any sort of insulation inside would be a last resort, as the intent is to get as hot as possible using the Rammed Earth as thermal mass for extended baking times.

 I will insulate the rear of the oven, though, as there is no thermal mass there, and I * may*  insulate  the outside sides of the Rammed Earth with a blanket of some sort to see if that makes much of a difference, but probably not needed, as the goal is a nice happy medium between heat retention in the oven for baking but releasing just enough heat for heating the house.

 After I seal the door air gap and insulate only the inside back wall, I'm expecting temps closer to 400-450 deg. Id like to get up to the 500-550 deg F range so I may add a second layer of glass to the door, and I also have the option of lining the inside of the oven with 1" thick Rammed Earth or Clay bricks with a 3/4" air gap behind them to decrease the amount of immediate thermal mass and add a layer of air insulation to slow heat going into the large thermal mass. So it shouldn't be difficult to get temps to a stable 500-550 deg or more on the high end, and when the 350 deg range is desired with build a smaller fire, or wait until the thermal mass temp drops. This oven should have a very stable and usable temp range that slowly drops.
 
Nate Nute
Posts: 43
12
  • Likes 1
  • Mark post as helpful
  • send pies
    Number of slices to send:
    Optional 'thank-you' note:
  • Quote
  • Report post to moderator
Doing some first test bakes tonight....the top oven section easily gets up to 400 deg now that I have the door sealed and back wall insulated. Very happy with the performance thus far and it will only get better with improvements and more testing.
20240215_175824.jpg
[Thumbnail for 20240215_175824.jpg]
 
pie. tiny ad:
Learn Permaculture through a little hard work
https://wheaton-labs.com/bootcamp
reply
    Bookmark Topic Watch Topic
  • New Topic