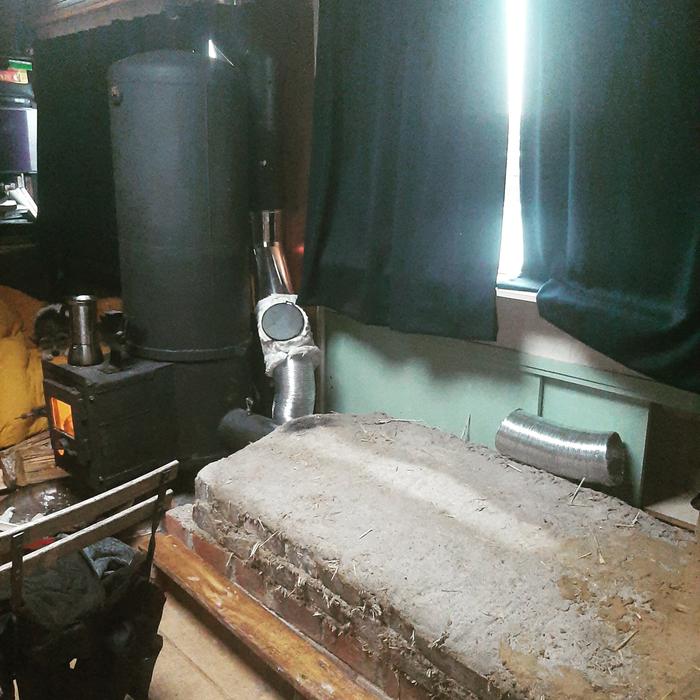
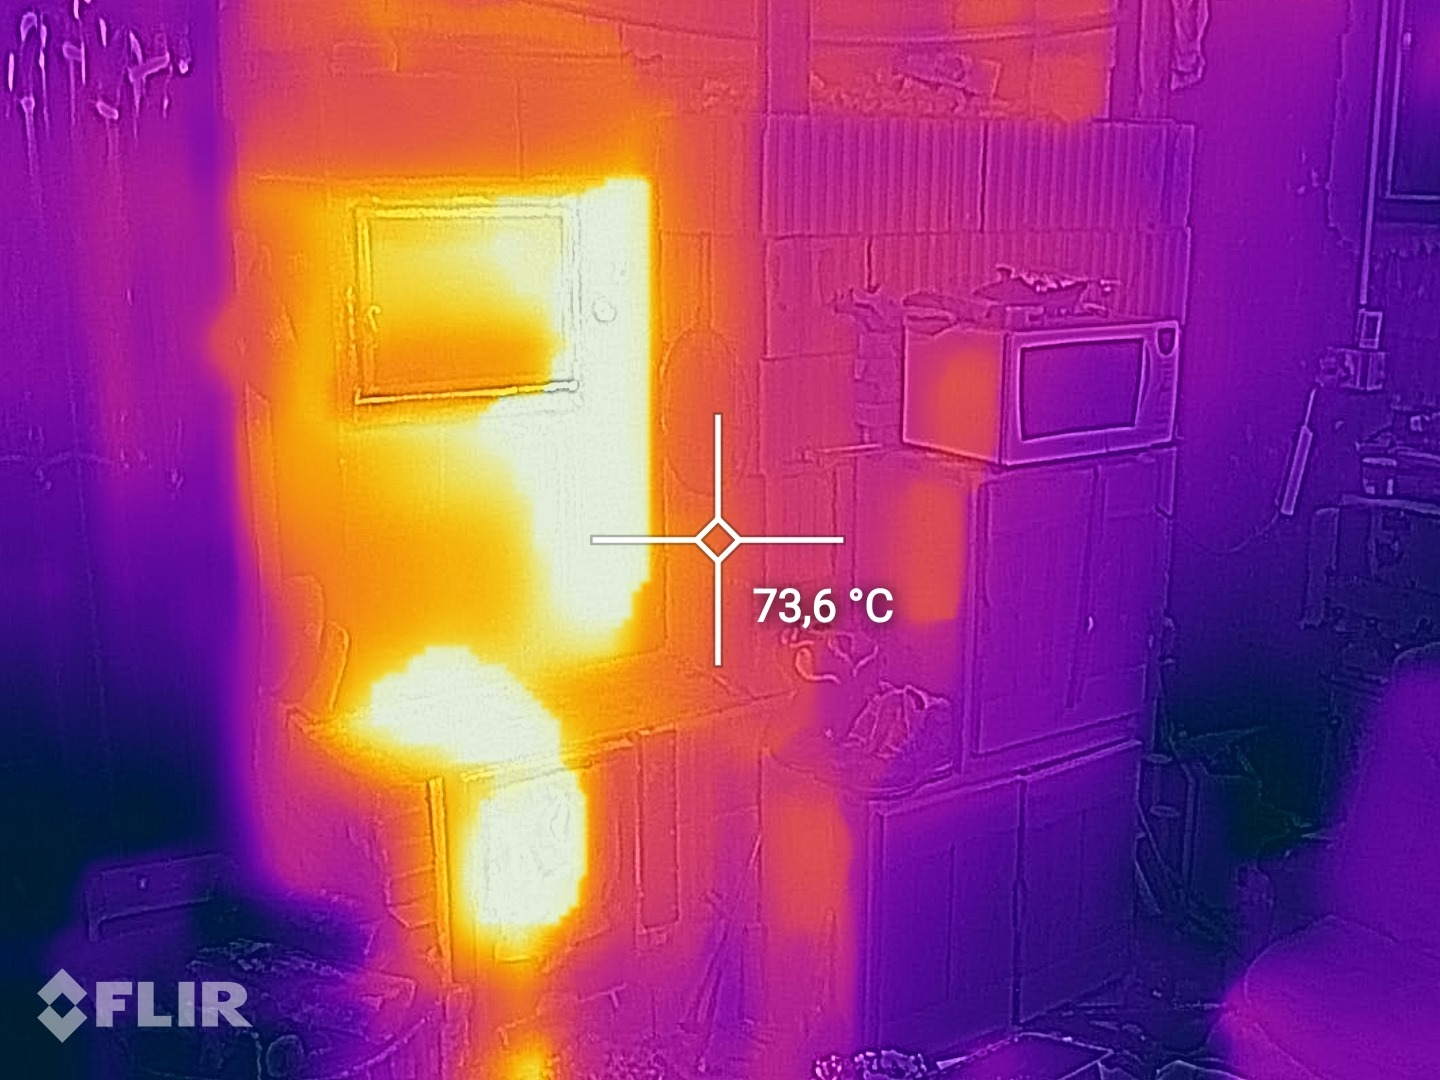
• Post Reply Bookmark Topic Watch Topic
  • New Topic
permaculture forums growies critters building homesteading energy monies kitchen purity ungarbage community wilderness fiber arts art permaculture artisans regional education skip experiences global resources cider press projects digital market permies.com pie forums private forums all forums
this forum made possible by our volunteer staff, including ...
master stewards:
  • Nancy Reading
  • Carla Burke
  • r ranson
  • John F Dean
  • paul wheaton
  • Pearl Sutton
stewards:
  • Jay Angler
  • Liv Smith
  • Leigh Tate
master gardeners:
  • Christopher Weeks
  • Timothy Norton
gardeners:
  • thomas rubino
  • Jeremy VanGelder
  • Maieshe Ljin

Tips for Cob on vertical bell/barrel

 
gardener
Posts: 3471
Location: Southern alps, on the French side of the french /italian border 5000ft elevation
194
  • Mark post as helpful
  • send pies
    Number of slices to send:
    Optional 'thank-you' note:
  • Quote
  • Report post to moderator
How do i explain?

You know what is your CSA?

Cross sectional area of your tubes.

15cm x 15cm x PI /4 = 176.71 cm²

The gap between your protruding tube, in the base of the barrel, and the heat riser, or nearest "wall" inside the "barrel"

Should be at the very least  176.71cm² x1.5

Imagine the circumference of that tube, projected to the nearest "wall" in the bell or barrel.

That makes circumference x distance. And in this case, this should be about 265cm² at the very minimum. If you can go for 3x CSA, even better.

Circumference of your tube is 15xPI= 47.12cm.  

265/47.12= 5.62 cm between your protruding tube and the nearest "wall" At the very least. If it is touching the floor, you need more space. And in this case, where it is protruding, i would say you need more space too.

11cm would be best.  the gases can do a sharp turn with that amount of space.

And about your video. I cannot heat any rocketing sound.

I guess it's a lazy fire.

Here, you can hear what a healthy rocket sounds like.


Posts: 126
26
  • Mark post as helpful
  • send pies
    Number of slices to send:
    Optional 'thank-you' note:
  • Quote
  • Report post to moderator
I uploaded another video for you to see.
With the chimney bypass open and the bench i do here a rocket like roar.

I cannot measure the cross sectional area without taking the bell off. Something i will need to do once my wife and 2 month old baby are out off of the ship.


I was wondering whether this might be a solution to incease flow to the bench:

Perform a surgery on the side of the bench, removing the pertruding pipe and flexy pipe, and creating a larger and sloped entrance. In the link you sent someone posted photos in which they used a wire mesh and then cob to join the barrel to the bench. This would increase the csa i hope and make the bench void and the barrel perform as one and not as two seperate entitys.
I wondered what you think of this idea/plan

Video with door open for diagnostic

 
Satamax Antone
gardener
Posts: 3471
Location: Southern alps, on the French side of the french /italian border 5000ft elevation
194
  • Mark post as helpful
  • send pies
    Number of slices to send:
    Optional 'thank-you' note:
  • Quote
  • Report post to moderator
Flames are definitely pulling. So that must rocket.
 
fraser stewart
Posts: 126
26
  • Mark post as helpful
  • send pies
    Number of slices to send:
    Optional 'thank-you' note:
  • Quote
  • Report post to moderator

Satamax Antone wrote:Flames are definitely pulling. So that must rocket.

I have been running it with everything open. Burns everything super fast and you hear that distinctive rocket sound.

I think there is, like you surmised not enough space for exit to the bench. Plus drag from that flexi pipe. To open this up and create new connection would surly help to ensure the bench gets heat and warms.

?

 
Satamax Antone
gardener
Posts: 3471
Location: Southern alps, on the French side of the french /italian border 5000ft elevation
194
  • Mark post as helpful
  • send pies
    Number of slices to send:
    Optional 'thank-you' note:
  • Quote
  • Report post to moderator
I guess, from those pics, that your bench is bypassing, looking at how close the pipes are together.

What i would do, if it was mine, get rid of that flexi pipe in the elbow here


May be make a plenum, a bigger chamber,  instead of that. Like that, i would be sure there is no restriction there.  Get rid of the flexi pipe inside the bell.

But i would fit an elbow before; in the bell. To lower the height of the cold gases pick up. I call that a plunger tube.

The best explanation if from Gerry.


Here https://permies.com/t/69146/Bell-questions

Even if it is an elbow, what is interesting is to get the cooled gases, and not the hot ones in the case of a low bench.  What i was explaining  to Gerry there, is that a flare or funnel enlarges the pickup area, so you can lower it even more.

Do do the maths.

A 15cm pipe would have to be at least 5.62cm from the bell's floor. Same calculation as a barrel gap. Or heat riser gap.

If you enlarge the end of that plunger tube, to say 30cm.  You have 94.24 cm of circumference.


Then you divide your absolute minimum surface area, which is 265cm² or 1.5x the  CSA, by those 94.24cm, and you get

2.81cm from the floor.

I would leave at the very least 3, to avoid problems with the boundary layer.


fraser stewart
Posts: 126
26
  • Mark post as helpful
  • send pies
    Number of slices to send:
    Optional 'thank-you' note:
  • Quote
  • Report post to moderator

thomas rubino wrote:Hey Fraser;
Your 150 mm pipe going to the mass would be fine with a J tube.
With a batchbox, I suggest installing  a 200 mm tube  instead.
Free flowing that way and I would also use 200  hard pipe in the bell.
The corrugated pipes are known for slowing flow.

My 6" (150mm) batch in the studio flows into an 8" (200mm) piped mass.
I do need and use a bypass to start a cold stove.

Old Weathered builder...


Im now considering a major overhaul of the transition from the  barrel to the bench.

That would mean breaking that part of my stove open.
I will Grind off the 15cm pipe that purtrudes into my barrel bench. Removing this and the flexible pipe i added long ago.
Then rebuilding the entrance.
I could then reuse the cut of pipe and attach this as the exit pipe.
A 20cm or larger hole cold be grinded where the pipe is now positioned and a new entrance could be connected to the barrel bench.

Is it needed to have a pipe pertruding into the end of the bench. I know now not to use flexible. But i mean a normal pipe?

Should there be a pipe to the end of the bench connected to the exaust?

Will the gasses just flow out due to the draw of the chimney.

I made abit of a mess of this part of the build hope i can get it working before winter hits.
 
fraser stewart
Posts: 126
26
  • Mark post as helpful
  • send pies
    Number of slices to send:
    Optional 'thank-you' note:
  • Quote
  • Report post to moderator

Satamax Antone wrote:I guess, from those pics, that your bench is bypassing, looking at how close the pipes are together.

What i would do, if it was mine, get rid of that flexi pipe in the elbow here
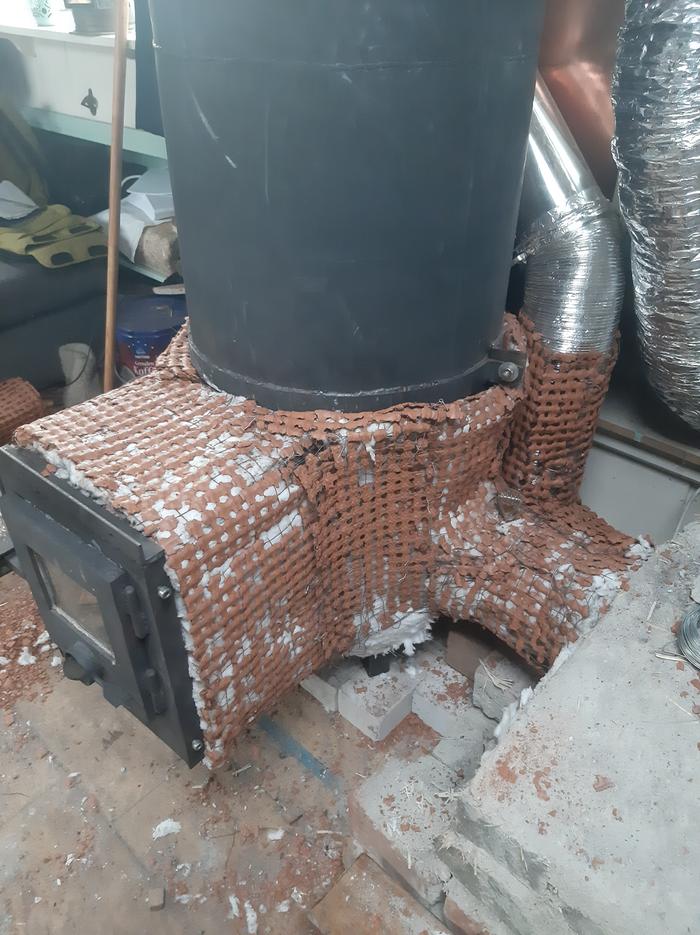


May be make a plenum, a bigger chamber,  instead of that. Like that, i would be sure there is no restriction there.  Get rid of the flexi pipe inside the bell.

But i would fit an elbow before; in the bell. To lower the height of the cold gases pick up. I call that a plunger tube.

The best explanation if from Gerry.


Here https://permies.com/t/69146/Bell-questions

Even if it is an elbow, what is interesting is to get the cooled gases, and not the hot ones in the case of a low bench.  What i was explaining  to Gerry there, is that a flare or funnel enlarges the pickup area, so you can lower it even more.

Do do the maths.

A 15cm pipe would have to be at least 5.62cm from the bell's floor. Same calculation as a barrel gap. Or heat riser gap.

If you enlarge the end of that plunger tube, to say 30cm.  You have 94.24 cm of circumference.


Then you divide your absolute minimum surface area, which is 265cm² or 1.5x the  CSA, by those 94.24cm, and you get

2.81cm from the floor.

I would leave at the very least 3, to avoid problems with the boundary layer.


I just saw your post after i last posted.

Interesting idea.
I understand that this plunger tube is referring to extracting the cooler gasses from the bench.

In this way i could connect the entire side of the stove to the the bell/bench.

Then using your description of a plunger tube as a way to extracht the cooled of gasses.

On another note to all those who have engineering blood, hats off to you for putting up with those that dont. I am really trying to wrap my head around the maths required but it pretty new stuff for me. Respect for your patience
 
Satamax Antone
gardener
Posts: 3471
Location: Southern alps, on the French side of the french /italian border 5000ft elevation
194
  • Mark post as helpful
  • send pies
    Number of slices to send:
    Optional 'thank-you' note:
  • Quote
  • Report post to moderator

fraser stewart wrote:

Is it needed to have a pipe pertruding into the end of the bench. I know now not to use flexible. But i mean a normal pipe?


No it is not needed. Rather the contrary, it adds drag.

In my opinion, you either use a plunger tube in there,  or a low slit. Imagine a window 53x5 cm at the very bottom of the barrel.  Transitioning to the  chimney .

Basically, what you want is the hot gases to rise in the bell, and get at the cooled ones at the bottom.  There is tons of solutions.  


Another one is a tube where you have your flexi pipe  linking to the chimney , i mean, where you get out of the bell.  You insert a tube there, that you plug at the end,  something like 50 70 or 1 meter long into the bell. And you cut a window at the bottom.  A long and narrow window. Like  1 meter long, 4cm wide, about 3 or 4 cm from the bottom of your bell would do the trick.

Don't rush to modify where you have your flexi pipe elbow at the bottom of the chimney.  That might be OK.

The first thing, get rid of that flex pipe in the bench, and have a low gas entrance.
 
fraser stewart
Posts: 126
26
  • Mark post as helpful
  • send pies
    Number of slices to send:
    Optional 'thank-you' note:
  • Quote
  • Report post to moderator
Ok guys.

So here i go.

This morning i got my trusty hammer out and started to do some surgery on my stove.

From the previous tips and advice i have two elements that i would love to hear your thoughts on.

1)Should i remove the black pipe altogether and create a larger hole. Then make it connect to the bench for a better transition.

2) the two designs suggested are either a plunger design or a 1m long tube with a slot cut 3cm and blocked at the end. This would be placed at three cm from the bottom of the bell (inside bench) and I would replace the flexible pipe with solid pipe.


Im have been back and forth in my mind whether to keep the pipe or to remove and increase the size of the hole.

I hope you find to time to share your opinions. I know you cant answer for me but would lime to do this correct this time.
16378332172753716369655415547035.jpg
[Thumbnail for 16378332172753716369655415547035.jpg]
16378332441901799672474598373305.jpg
[Thumbnail for 16378332441901799672474598373305.jpg]
16378332635003739635478169874698.jpg
[Thumbnail for 16378332635003739635478169874698.jpg]
 
Satamax Antone
gardener
Posts: 3471
Location: Southern alps, on the French side of the french /italian border 5000ft elevation
194
  • Mark post as helpful
  • send pies
    Number of slices to send:
    Optional 'thank-you' note:
  • Quote
  • Report post to moderator
Fraser, your pics don't show for me. May be way big ones? Can't seem to fix it either.

Also, i wanted to ask, you're in Scotland?
 
fraser stewart
Posts: 126
26
  • Likes 1
  • Mark post as helpful
  • send pies
    Number of slices to send:
    Optional 'thank-you' note:
  • Quote
  • Report post to moderator

Satamax Antone wrote:Fraser, your pics don't show for me. May be way big ones? Can't seem to fix it either.

Also, i wanted to ask, you're in Scotland?


No im not in scotland. Im in the netherlands. The rmh is on a ship, a dutch barge.

I removed the bell and checked the sizes. There is more than 11cm for the gasses to enter the bench.

The secondary exist at the back, i.e the one that is for preheating the chimney has 5.5. So I think clearance should not be an issue. Its tight but not too tight.

I think the main issue is the flexi pipe at this stage.
Before i added that i was getting temps, i looked back at pictures of early build.

I have no way to remove that flexi pipe so i need to dig down into the bench. Thats what im doing now.


1637838430880174894607199737184.jpg
[Thumbnail for 1637838430880174894607199737184.jpg]
163783848460582064730200964390.jpg
[Thumbnail for 163783848460582064730200964390.jpg]
20211125_113328.jpg
[Thumbnail for 20211125_113328.jpg]
IMG-20211125-WA0010.jpeg
[Thumbnail for IMG-20211125-WA0010.jpeg]
 
fraser stewart
Posts: 126
26
  • Mark post as helpful
  • send pies
    Number of slices to send:
    Optional 'thank-you' note:
  • Quote
  • Report post to moderator

Satamax Antone wrote:Fraser, your pics don't show for me. May be way big ones? Can't seem to fix it either.

Also, i wanted to ask, you're in Scotland?


My mum and dad are both scottish so you can blamr them for my ultra scottish name
 
Rocket Scientist
Posts: 1809
Location: Kaslo, BC
525
building solar woodworking rocket stoves wood heat greening the desert
  • Mark post as helpful
  • send pies
    Number of slices to send:
    Optional 'thank-you' note:
  • Quote
  • Report post to moderator
Hi Fraser, IMHO,  you can never go wrong with a larger manifold transition area.  It’s one of the biggest bottlenecks on a RMH.  Be sure to also make a clean out for this area as it tends to get a fair amount of ash build up.

Also, any flex pipe really does not have much use in any RMH as well.

To me, I would say that the plunger tube or horizontal pipe with slit will work equally as well. The trick of extending a pipe down the bench does however give you the advantage of allowing the hot gases  to better evenly hit the bench.
 
Satamax Antone
gardener
Posts: 3471
Location: Southern alps, on the French side of the french /italian border 5000ft elevation
194
  • Mark post as helpful
  • send pies
    Number of slices to send:
    Optional 'thank-you' note:
  • Quote
  • Report post to moderator
Fraser, why is it so rough on the right of the tape measure? That's superwool over the firebox?

May be it would be a good thing to smooth that out.  But may be not absolutely necessary.

 
fraser stewart
Posts: 126
26
  • Likes 4
  • Mark post as helpful
  • send pies
    Number of slices to send:
    Optional 'thank-you' note:
  • Quote
  • Report post to moderator
Update on the alterations

I just want to share for the sake of others learning from mistake.

I probably went overkill, but I had to open the stove anyway so thought I make some upgrades

Let me know what you think and of you see any problems before i start making things like cob
20211125_125227.jpg
No other way was possible to get this out. At that time anyway
20211126_101725.jpg
Cut the hole. Its now 20cm diametre instead of 15
20211126_111533.jpg
Removed this to recycle as exaust extractor
IMG-20211126-WA0013.jpeg
Making a slot 3 cm from the foor. 3cm wide 60 cm long
IMG-20211126-WA0015.jpeg
The slot
The slot
IMG-20211126-WA0017.jpeg
Low level slot for cool gasses. Welding angel iron to stop pipe rolling over
20211126_123735.jpg
Extractor going in
Extractor going in
20211126_133937.jpg
This is the current state. I will be refining the floor of this. Plan is to add superwool, wirestone mesh and cob. And making a cleanout
 
rocket scientist
Posts: 6320
Location: latitude 47 N.W. montana zone 6A
3191
cat pig rocket stoves
  • Likes 1
  • Mark post as helpful
  • send pies
    Number of slices to send:
    Optional 'thank-you' note:
  • Quote
  • Report post to moderator
Looking good Fraser!
I think you will be very happy with your Dragons performance when you get done!
 
fraser stewart
Posts: 126
26
  • Likes 3
  • Mark post as helpful
  • send pies
    Number of slices to send:
    Optional 'thank-you' note:
  • Quote
  • Report post to moderator
More draw than ever before
IMG-20211127-WA0003.jpeg
[Thumbnail for IMG-20211127-WA0003.jpeg]
IMG-20211127-WA0005.jpeg
[Thumbnail for IMG-20211127-WA0005.jpeg]
IMG-20211127-WA0011.jpeg
[Thumbnail for IMG-20211127-WA0011.jpeg]
IMG-20211127-WA0013.jpeg
[Thumbnail for IMG-20211127-WA0013.jpeg]
IMG-20211127-WA0015.jpeg
[Thumbnail for IMG-20211127-WA0015.jpeg]
IMG-20211127-WA0023.jpeg
[Thumbnail for IMG-20211127-WA0023.jpeg]
20211127_172843.jpg
[Thumbnail for 20211127_172843.jpg]
 
fraser stewart
Posts: 126
26
  • Likes 2
  • Mark post as helpful
  • send pies
    Number of slices to send:
    Optional 'thank-you' note:
  • Quote
  • Report post to moderator
Zero smoke from chimney

Cob is steaming.

Two extra clean outs.

Really and warm.

Wife and baby can return to the boat.


Thankyou to you heros out there who gave advice and help to steer me on the correct path
 
Gerry Parent
Rocket Scientist
Posts: 1809
Location: Kaslo, BC
525
building solar woodworking rocket stoves wood heat greening the desert
  • Likes 1
  • Mark post as helpful
  • send pies
    Number of slices to send:
    Optional 'thank-you' note:
  • Quote
  • Report post to moderator
Great job Stewart!
The size and configuration of your manifold transition is ideal. One that I would refer others to without hesitation as a model to follow.  
 
Satamax Antone
gardener
Posts: 3471
Location: Southern alps, on the French side of the french /italian border 5000ft elevation
194
  • Likes 1
  • Mark post as helpful
  • send pies
    Number of slices to send:
    Optional 'thank-you' note:
  • Quote
  • Report post to moderator
I like the slitted tube.

Never used it myself, nor heard of anybody using it before. I had spoken about it before in other posts. But nobody ever replied, or stated that they used it. If it works for you, i'm happy. And you can brag that you"re the first one to officially use it!

How far from the bottom of the bench did you set it at?

What's that mesh with the clayish blobs?

 
fraser stewart
Posts: 126
26
  • Likes 1
  • Mark post as helpful
  • send pies
    Number of slices to send:
    Optional 'thank-you' note:
  • Quote
  • Report post to moderator

Satamax Antone wrote:I like the slitted tube.

Never used it myself, nor heard of anybody using it before. I had spoken about it before in other posts. But nobody ever replied, or stated that they used it. If it works for you, i'm happy. And you can brag that you"re the first one to officially use it!

How far from the bottom of the bench did you set it at?

What's that mesh with the clayish blobs?


In dutch its called steengaas. Stone mesh, is probably a bad transnationale. Peter Van der Berg told me about it and its where this story started. If you go to the top of this thread you will see that i asked what it was called and the peter gave the answer so I could find it in the netherlands.

As for the exaust. I reused tge pipe that I had from connecting to stove to the bench. And inserted that. So it stick roughly 80cm into the bench. The slot is 3cm from the bottom of the bell in the bench and its 60cm long. Do 3 x 60cm. 180cm squared i made sure that it was low. I had the bypass plate so i used that to plug the end of the tube. It is a nice peice but saved me time making somthing to plug.


The stove is pumping out heat. Wow. Improvement is a understatement.

Cooking my dinner on it as i type

IMG-20211127-WA0030.jpeg
[Thumbnail for IMG-20211127-WA0030.jpeg]
 
fraser stewart
Posts: 126
26
  • Mark post as helpful
  • send pies
    Number of slices to send:
    Optional 'thank-you' note:
  • Quote
  • Report post to moderator
Forgot to say. The steengaas

I find it a really nice material to use over morgen superwool. And then cob over that.

Its how my dragon has her lovely curves

Hehe

Screenshot_20211127-201322_Google.jpg
[Thumbnail for Screenshot_20211127-201322_Google.jpg]
 
Satamax Antone
gardener
Posts: 3471
Location: Southern alps, on the French side of the french /italian border 5000ft elevation
194
  • Mark post as helpful
  • send pies
    Number of slices to send:
    Optional 'thank-you' note:
  • Quote
  • Report post to moderator
Does the bench starts to warm up?
 
fraser stewart
Posts: 126
26
  • Mark post as helpful
  • send pies
    Number of slices to send:
    Optional 'thank-you' note:
  • Quote
  • Report post to moderator

Satamax Antone wrote:Does the bench starts to warm up?


I left patch open and i can see it drying. Itnis noticeable warmer to touch and sove is easier to start. Thermostat is startimg to climb.


The bench is clay and 5cm of cob so it might take a while but all good signs
16380640978294228765044381164223.jpg
[Thumbnail for 16380640978294228765044381164223.jpg]
 
fraser stewart
Posts: 126
26
  • Mark post as helpful
  • send pies
    Number of slices to send:
    Optional 'thank-you' note:
  • Quote
  • Report post to moderator
Update. Bench is warming up.

Here is some pics from flir camera


20211128_093028.jpg
[Thumbnail for 20211128_093028.jpg]
20211128_092859.jpg
[Thumbnail for 20211128_092859.jpg]
20211128_093035.jpg
[Thumbnail for 20211128_093035.jpg]
 
Satamax Antone
gardener
Posts: 3471
Location: Southern alps, on the French side of the french /italian border 5000ft elevation
194
  • Mark post as helpful
  • send pies
    Number of slices to send:
    Optional 'thank-you' note:
  • Quote
  • Report post to moderator
Cool, even the end of the L warms up ?

I guess you know, the arrow and round pointer thing on the flir of the S60 (or is it a s61?) serves as a spot temperature "sensor" That would be nice if you could take pics of the hot spots with the temperature showing.

Something like this.


By the way, if you want to see my build. It's here!

https://permies.com/t/44806/Cobbling-workshop-heater-cooktop-oven

 
fraser stewart
Posts: 126
26
  • Mark post as helpful
  • send pies
    Number of slices to send:
    Optional 'thank-you' note:
  • Quote
  • Report post to moderator

Satamax Antone wrote:Cool, even the end of the L warms up ?

I guess you know, the arrow and round pointer thing on the flir of the S60 (or is it a s61?) serves as a spot temperature "sensor" That would be nice if you could take pics of the hot spots with the temperature showing.

Something like this.


By the way, if you want to see my build. It's here!

https://permies.com/t/44806/Cobbling-workshop-heater-cooktop-oven


Thanks i did not realise. I used the phone shortly before it broke. Then i had it repaired and it was never good after that.

I made some shots of the bench 24 hours after firing it up. And it definitely warming.

The flir camera max out at 150c but the steel bell is much hotter than that.


Waking up before work and the stove was still warm.
20211129_080103.jpg
The bell
The bell
20211129_080215.jpg
From above the transition
20211129_080320.jpg
[Thumbnail for 20211129_080320.jpg]
20211129_080425.jpg
[Thumbnail for 20211129_080425.jpg]
20211129_080510.jpg
[Thumbnail for 20211129_080510.jpg]
20211129_080336.jpg
You can see the heat between the two cushions
20211129_080624.jpg
One warm house.
One warm house.
20211128_115138.jpg
Baby Billie really likes it now
 
Satamax Antone
gardener
Posts: 3471
Location: Southern alps, on the French side of the french /italian border 5000ft elevation
194
  • Mark post as helpful
  • send pies
    Number of slices to send:
    Optional 'thank-you' note:
  • Quote
  • Report post to moderator
That's good then. Not too cold in that room in the morning, then?

The blackview BV9800 pro has a max limit at 400C°

 
Chris has 3 apples and Monika has 4 apples. With this tiny ad they can finally make a pie!
turnkey permaculture paradise for zero monies
https://permies.com/t/267198/turnkey-permaculture-paradise-monies
reply
    Bookmark Topic Watch Topic
  • New Topic