jordan barton

rocket scientist
+ Follow
since Feb 18, 2015
Merit badge: bb list bbv list
Forum Moderator
jordan barton currently moderates these forums:
For More
Apples and Likes
Apples
Total received
In last 30 days
18
Forums and Threads

Recent posts by jordan barton

SO I finally got the stove up and running. Its been working flawlessly. First start it drafted with no issues. I quite simply haven't had any issues so far. Its just been pleasant to use. Bricks were 49*F first day of lighting.

I capped it with superwool. There is about 5+ inches from the top of the riser ----> to the underside of the super wool. Than I placed cement board on top with bricks around the edges

Ya I don't have much more to say. Its been easy to use and its nice hearing the fire roar. Its almost like having a fireplace in your house. Zero smoke back!

The most time consuming part was the brick laying..

I still need to make a p channel for the stove.
2 weeks ago

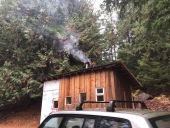
Rico Loma wrote:Superb work. Any visitor to your home can't miss your ethical priorities,  steady heat without a heavy smoke output, I like that.

Can you explain a little about your wool insulated feed tube....did you wire the pieces to the brick before cobbing?  Or use hardware cloth over wool before cob? I


True that rico.

I didn't do anything. I considered options and than in haste I just cobbed it in place. Was somewhat floppy, until I got to the top.
2 weeks ago

William Bronson wrote:Hey Jordan, great build!
Can you elaborate on what made you switch from a  riserless core to a j tube?


Mostly I switched because my use case is so little. Ie I only burn for an hour or so per day. In the riserless core it was 1 firewood load per day most of the time. And the stove top would get to 1000*F which was only good for boiling water. Than it would cool off, and I guess I could cook something in that time but its not really practical.

So ya I didn't find the cooktop part useful in my case. And I don't need to run the stove long enough to warrant having a cooktop. Being that it was in a 200SQFT house. So  ya it was mostly a space heater for me...

The riserless core was easy to use/build.
3 weeks ago
What I meant by cutting the wool. ... Was how do I cut it up. Do I make it one large piece, or do  I make it into smaller pieces. I usually just cut the ceramic wool with scissors. Its great stuff to work.

There are other things I look for as well,  but yes the bug holes are an indicator I've found. Colour, cracks in the ground, standing water. Luckily people here get excavator work done every now and than so there is easy to access subsoil. I had almost pure sand right outside my doorstep!
3 weeks ago

thomas rubino wrote:Looking good Jordan!
I have never seen a feed tube insulated  before,  most are just cobbed.
It should help keep the heat heading into your bell.


Thanks Thomas, your threads inspire me.
Think I was looking thru Ernie and Erica's Annex 6. And they had what was stabilized perlite surrounding the whole j tube portion. Figured it can't hurt. Plus the feed tube is hard firebrick which will want to steal heat. So what the heck, plus I keep seeing on the outside of the box of this ceramic wool, that it needs to stay in very favorable conditions.... ie not outside, out of rain, and not in moisture rich environments. So its just been inside my tiny house for christs sake!
Its getting much smaller..
3 weeks ago
So spent the day making up cob to seal up the feedtube/burn tunnel. Spent quite some time coming up with the best method for cutting the ceramic wool. I wish it came in different sizes, as I end up with a bunch of offcuts. 8" x 15", 8" x 12". Hope they are useful in the future.

Luckily I was able to find the perfect soil for making the cob. I didn't need to screen it or add anything, besides the wheat straw. I usually look for soil that has bug holes in it on the surface. I imagine its mason bee holes, but its probably not. Eitherway I enjoy looking for good soil.

3 weeks ago

Gerry Parent wrote:Hey Jordan,
Nice rebuild with all the same materials....even the mud! (reminds me too of the good ole days where local clay or even purchased was hard to find for a Canuck).
Happy to see that your still enjoying your J tube where the urge to switch (maybe later for lack of time right now?) to a different style didn't sway you.
 
Question: In one of your teardown photos, it appeared that the plunge tube in the bell was not insulated. Did you find having the exhaust absorbing the heat necessary for better draft or just didn't have enough room in your tiny home to keep it entirely out of the bell?


Well the previous one was a riserless core, and yes it could have used a bypass. ( Chimney is only 12' tall) I figured the warm air from starting the stove was necessary. In the end I am not sure if it helped. But yes its a small house. The stove is in the middle and basically I need to walk past the stove to get from one side to the other. A pipe hanging out 8 inches or so would make the passage close to 1 foot or less. I would like to do something similar to what thomas just did in his new build.

Ya I can get fireclay here. I might even get to make the more typical 1:3 ratio for the mortar mix. As I might run out of the old mortar. But really its nice to just use local soil with good properties to make the mortar. It does take time to sift it and what not. I do enjoy it however. I also live on a small island, so getting sand and really anything heavy costs $$$. One day I dream of getting a pallet of bricks like thomas. one day..

Yes lack of time.  Id need to find someone who could build the door locally. In order to make a batchbox rocket. But I have a j tube for the rocket oven and find it enjoyable enough. I like that it doesn't really require any special parts to make it work.
3 weeks ago
SO this stove is no longer. I had to move my tiny house to a new location. And basically the road out of the place was quite steep. plus Skidding a tiny house was bound to topple this stove. It was very enjoyable to take the stove apart and reminded me of how much I enjoy building/working with brick/masonry stoves. Kinda had forgotten that.

Here are some photos of me taking it apart. One thing I found interesting was the cardboard I left in the stove was still there. Only in one place had it burned out. FUn times!

You can check out the new build here!
3 weeks ago
Hey folks

Due to moving my tiny house this year. I had to take my Old masonry stove down to make transportation smoother. I will admit I enjoyed taking the stove apart and it reminded me of how much  I enjoyed building the stove. Being that it's October and we were seeing 3-4*C last week. I am quickly trying to finish off my new build
Its quite simple.

6" J tube going into a single skin bell/stratification chamber. I had a plan for a bench portion as well, but time constraints led to that being nixed this year.
I am just trying to get iPhone photos to show up on my Ubuntu laptop..... much more difficult than when I was using Apple IOS


So yes the bell is going to be close to 54" tall. Still figuring the bell chamber cap. Need to still put ceramic wool around the feed tube/burn chamber. I used hard firebrick for the feed tube. and burn tunnel, because I figured the weight of the bell on top needed to be well supported over the burn chamber. Otherwise the rest is Insulated fire bricks.

Its been real nice to just use the old mortar from the previous build. Just break it up and add water. Ill admit... I added some more sand to it which made it even nicer.

Ive got 3 more layers of red clay bricks to go( than I run out) Than I am going to switch to hard firebrick for 3 courses( laided as Shiners)

Think for simplicity's sake I'll do the hardware cloth and the 1" ceramic wool for the top cap. The span is only 12". I can always change it later on when I can gather the materials. Just need something functional now!


Just for reference it took a piece of 22 1/4 inch ceramic wool piece to make a 6 inch 5 minute riser. A figure I had to figure out. Was pretty nice making the 5 min riser


3 weeks ago
Great build tom and gerry. Its great to see what you are doing and how you are doing it! thanks for the documentation! Now drop Gerry off at my place please. I could use the help :D
3 weeks ago