|

|

|

|

|

|
|
|
|
|
|
|
|

|
|

|

|

|


 15
15


![[Thumbnail for IMG_2363.jpg]](/t/361660/a/276537/IMG_2363.jpg "Filename: IMG_2363.jpg
Description:")
![[Thumbnail for IMG_2364.jpg]](/t/361660/a/276538/IMG_2364.jpg "Filename: IMG_2364.jpg
Description:")
![[Thumbnail for IMG_2365.jpg]](/t/361660/a/276539/IMG_2365.jpg "Filename: IMG_2365.jpg
Description:")
![[Thumbnail for IMG_2366.jpg]](/t/361660/a/276540/IMG_2366.jpg "Filename: IMG_2366.jpg
Description:")
![[Thumbnail for IMG_2367.jpg]](/t/361660/a/276541/IMG_2367.jpg "Filename: IMG_2367.jpg
Description:")
![[Thumbnail for IMG_2368.jpg]](/t/361660/a/276542/IMG_2368.jpg "Filename: IMG_2368.jpg
Description:")
![[Thumbnail for IMG_2369.jpg]](/t/361660/a/276543/IMG_2369.jpg "Filename: IMG_2369.jpg
Description:")
![[Thumbnail for IMG_2370.jpg]](/t/361660/a/276544/IMG_2370.jpg "Filename: IMG_2370.jpg
Description:")
![[Thumbnail for IMG_2375.jpg]](/t/361660/a/276545/IMG_2375.jpg "Filename: IMG_2375.jpg
Description:")
![[Thumbnail for IMG_2376.jpg]](/t/361660/a/276546/IMG_2376.jpg "Filename: IMG_2376.jpg
Description:")
![[Thumbnail for IMG_2377.jpg]](/t/361660/a/276547/IMG_2377.jpg "Filename: IMG_2377.jpg
Description:")
![[Thumbnail for IMG_2378.jpg]](/t/361660/a/276548/IMG_2378.jpg "Filename: IMG_2378.jpg
Description:")
It is a privilege to live, work and play in the traditional territory of the Salish People.
Now drop and give me 52... ~ Come Join the permies Shoecamp! ~ All about Permies, including Tutorials ---
Twenty bucks off the homesteading bundle for the next 72 hours!

Skill verified by Mike Haasl")

Skill verified by Leigh Tate")

Skill verified by jordan barton") 9
9
Silence is Golden
For all your RMH needs:
dragontechrmh.com
11
Gerry Parent wrote:Hey Jordan,
Nice rebuild with all the same materials....even the mud! (reminds me too of the good ole days where local clay or even purchased was hard to find for a Canuck).
Happy to see that your still enjoying your J tube where the urge to switch (maybe later for lack of time right now?) to a different style didn't sway you.
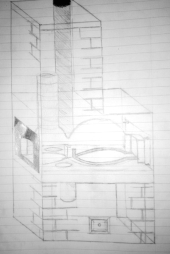
Question: In one of your teardown photos, it appeared that the plunge tube in the bell was not insulated. Did you find having the exhaust absorbing the heat necessary for better draft or just didn't have enough room in your tiny home to keep it entirely out of the bell?
It is a privilege to live, work and play in the traditional territory of the Salish People.
Now drop and give me 52... ~ Come Join the permies Shoecamp! ~ All about Permies, including Tutorials ---
Twenty bucks off the homesteading bundle for the next 72 hours!
9
Silence is Golden
For all your RMH needs:
dragontechrmh.com
10
![[Thumbnail for IMG_2380.jpg]](/t/361660/a/276598/IMG_2380.jpg "Filename: IMG_2380.jpg
Description:")
![[Thumbnail for IMG_2381.jpg]](/t/361660/a/276599/IMG_2381.jpg "Filename: IMG_2381.jpg
Description:")
![[Thumbnail for IMG_2382.jpg]](/t/361660/a/276600/IMG_2382.jpg "Filename: IMG_2382.jpg
Description:")
![[Thumbnail for IMG_2383.jpg]](/t/361660/a/276601/IMG_2383.jpg "Filename: IMG_2383.jpg
Description:")
![[Thumbnail for IMG_2384.jpg]](/t/361660/a/276602/IMG_2384.jpg "Filename: IMG_2384.jpg
Description:")
![[Thumbnail for IMG_2385.jpg]](/t/361660/a/276603/IMG_2385.jpg "Filename: IMG_2385.jpg
Description:")
![[Thumbnail for IMG_2386.jpg]](/t/361660/a/276604/IMG_2386.jpg "Filename: IMG_2386.jpg
Description:")
![[Thumbnail for IMG_2387.jpg]](/t/361660/a/276605/IMG_2387.jpg "Filename: IMG_2387.jpg
Description:")
It is a privilege to live, work and play in the traditional territory of the Salish People.
Now drop and give me 52... ~ Come Join the permies Shoecamp! ~ All about Permies, including Tutorials ---
Twenty bucks off the homesteading bundle for the next 72 hours!
 8
8
For all your Montana Masonry Heater parts (also known as) Rocket Mass heater parts.
Visit me at
dragontechrmh.com Once you go brick you will never go back!
9
thomas rubino wrote:Looking good Jordan!
I have never seen a feed tube insulated before, most are just cobbed.
It should help keep the heat heading into your bell.
It is a privilege to live, work and play in the traditional territory of the Salish People.
Now drop and give me 52... ~ Come Join the permies Shoecamp! ~ All about Permies, including Tutorials ---
Twenty bucks off the homesteading bundle for the next 72 hours!
8
jordan barton wrote:So spent the day making up cob to seal up the feedtube/burn tunnel. Spent quite some time coming up with the best method for cutting the ceramic wool. I wish it came in different sizes, as I end up with a bunch of offcuts. 8" x 15", 8" x 12". Hope they are useful in the future.
jordan barton wrote: Luckily I was able to find the perfect soil for making the cob. I didn't need to screen it or add anything, besides the wheat straw. I usually look for soil that has bug holes in it on the surface. I imagine its mason bee holes, but its probably not. Eitherway I enjoy looking for good soil.
Silence is Golden
For all your RMH needs:
dragontechrmh.com
8
It is a privilege to live, work and play in the traditional territory of the Salish People.
Now drop and give me 52... ~ Come Join the permies Shoecamp! ~ All about Permies, including Tutorials ---
Twenty bucks off the homesteading bundle for the next 72 hours!
8
8
William Bronson wrote:Hey Jordan, great build!
Can you elaborate on what made you switch from a riserless core to a j tube?
It is a privilege to live, work and play in the traditional territory of the Salish People.
Now drop and give me 52... ~ Come Join the permies Shoecamp! ~ All about Permies, including Tutorials ---
Twenty bucks off the homesteading bundle for the next 72 hours!
8

|
If you settle for what they are giving you, you deserve what you get. Fight for this tiny ad!
Workee-job sucks? Quit and live the permaculture way in Montana
https://wheaton-labs.com/bootcamp
|