• Post Reply Bookmark Topic Watch Topic
  • New Topic
permaculture forums growies critters building homesteading energy monies kitchen purity ungarbage community wilderness fiber arts art permaculture artisans regional education skip experiences global resources cider press projects digital market permies.com pie forums private forums all forums
this forum made possible by our volunteer staff, including ...
master stewards:
  • Carla Burke
  • Nancy Reading
  • John F Dean
  • r ranson
  • Jay Angler
  • paul wheaton
stewards:
  • Pearl Sutton
  • Leigh Tate
  • Devaka Cooray
master gardeners:
  • Christopher Weeks
  • Timothy Norton
gardeners:
  • thomas rubino
  • Matt McSpadden
  • Jeremy VanGelder

Were Starting our Build!! Got some thoughts/questions

 
Posts: 9
Location: WAY WAY WAY up in the Mountains of NC
  • Mark post as helpful
  • send pies
    Number of slices to send:
    Optional 'thank-you' note:
  • Quote
  • Report post to moderator
Ok couple of thoughts/question for Y'all,

If I’m correct, the burn tube going from the feed chamber to the riser needs to be the same diameter as the riser. I’m using a 6” system and planing on using the 6” tube inside a 10” tube packed with fireclay/perlite mix as the riser.

My first thought is:
Under the riser can I encase a 6” 90’ elbow inside a few inches of fireclay/perlite inside of fire brick. Then continue that heading into a short section of 6” pipe encased in the same two layers of fireclay/perlite and firebrick heading to the feed chamber. The feed chamber will be made using just fire brick. This will be all encased in masonry mass/cobish something or other.

My current questions are:
1st. How long should the burn tunnel be from the feed chamber to the heat riser.
2nd. What is the distance from the top of the riser to the surface of the 55gal drum- this will let me know how tall to build the insulated riser.

Another thought: in the manifold system, I’m using standard 6” hvac pipe. From the bottom of the barrel I’m feeding/flowing into a rectangular air duct next, I was considering putting a T inline with a cap on the the T. This would be angled slightly down to serve as an ash trap. There is also a T clean out in the middle of the system. The photo shows the inline T.

Just for some FYI. this build is in a “Sun Room” that we are wanting to be able to use. We are WAY WAY up in the mountains of Western North Carolina and our un-sunroom rarely gets much sun as the former owners built it on the north side of the house that is located on the northeast side of a ridge. We purchased this small mountain farm last spring and are slowly getting things ready to be of the grid. The un-sunroom is built over an old elevated concrete patio and the floor is plywood on treated timber sitting on the concrete so weight is not an issue. Winter time temps in the un-sunroom are quite often barely above outside temps. (It is currently 14 degrees in there as I‘m typing this). So hopefully y’all can see our desires to have a RMH. About 50% of our in house heat is currently from a wood-fired cook stove that we run of cut up pallets. The other 50% is from a propane furnace fed by a 1000gal in ground tank.

Thanks for your time a dedication to this craft. I have enjoyed reading and learning about RMH here for the past few months. Just wish I had the time to sit down and read all the previous posts, I'm sure these have been answered somewhere before.
DSCN8075.JPG
mockup of RMH 6 Pipe
 
pollinator
Posts: 4154
Location: Northern New York Zone4-5 the OUTER 'RONDACs percip 36''
67
hugelkultur fungi books wofati solar woodworking
  • Mark post as helpful
  • send pies
    Number of slices to send:
    Optional 'thank-you' note:
  • Quote
  • Report post to moderator
bryan davis : Well I have no problems with your 1st paragraph ! Then it gets a little tricky ! I am going to skip ahead to a description of the layout of parts of the
Heat Riser, while it is possible to make a Heat Riser without any Fire brick at all, just Perlite andClay slip, you shouldn't put firebrick on the outside of insulation,
there is no job for fire brick other than that of surrounding the fire, for any other job something else will do a better job !

The next thing is the brick that you have your galvanized stovepipe sitting on, looks like Concrete Pavers and not any kind of standard size Fire brick, and is not
safe by itself under your Rockets Burner base ! Without insulation 1) around your Burn tunnel combustion zone, and 2) between the bottom of your Rocket burner
base you WILL catch your wooden floor on fire! Your Rocket achieves its great efficiencies in burning wood at between 1000dF and 2000dF, with temperature
swings to 2400df ! A little backer board will not provide enough protection !

Goto=> ''villagevideo.org'', and find and click on the You-Tube icon! On the next page you will see a rank and file of groups of short videos, the top set is
called > Rocket Mass heater Scenes, next to it is a flashing "PLAY" button, when you click on play it will automatically load a set of 19 short videos covering
~3/8ths~ of a complete build, watch the set carefully ,if you have any problems watching, start over at villagevideo.org, This video is for sale, and is better than any
thing else out there! you decide if this is what you want! Lets get these things cleaned up before we fix more problems ! Big AL !


bryan davis
Posts: 9
Location: WAY WAY WAY up in the Mountains of NC
  • Mark post as helpful
  • send pies
    Number of slices to send:
    Optional 'thank-you' note:
  • Quote
  • Report post to moderator
Thanks for the reply Al,

In my post under the heading "my first thought" I explain the insulating of the burn chamber. So you stated you have no problem with Under the riser "encasing a 6” 90’ elbow inside a few inches of fireclay/perlite inside of fire brick. Then continue that heading into a short section of 6” pipe encased in the same two layers of fireclay/perlite and firebrick heading to the feed chamber. The feed chamber will be made using just fire brick. This will be all encased in masonry mass/cobish something or other. "

The wood floor is covered in durrock backer board, then 4" concrete cap block, then there will be a double layer of fire brick under the burn chamber and the the double insulated tube. The heat exchange pipes will be elevated to as close to the center of the core of the mass as I can get it, so at least 12"-14"" off the floor. The photo was a mockup just to show the T clean out which you did not comment on.


Al, you stated: "Heat Riser, while it is possible to make a Heat Riser without any fire brick at all, just Perlite andClay slip, you shouldn't put firebrick on the outside of insulation, there is no job for fire brick other than that of surrounding the fire, for any other job something else will do a better job !
It kind of sounds like your not a fan of the double pipe packed with fire clay perlite method that seams to be one way that has been suggested by Ernie and Erica to use on the Heat riser. (IE heat risers made without using fire brick.) Also, I did not say that the riser was going to be inside firebrick.
To explain the proposed burn tunnel again: there is a square tunnel of fire brick.....inside of it is a 6" tube.....between the tube and the brick, there is a layer of Fire clay and perlite to keep the tube centered, and to maintain the 6" tube shape after the metal has burned out.

As four the questions I was asking

1st. How long should the burn tunnel be from the feed chamber to the heat riser.
2nd. What is the distance from the top of the riser to the surface of the 55gal drum- this will let me know how tall to build the insulated riser.


allen lumley
pollinator
Posts: 4154
Location: Northern New York Zone4-5 the OUTER 'RONDACs percip 36''
67
hugelkultur fungi books wofati solar woodworking
  • Mark post as helpful
  • send pies
    Number of slices to send:
    Optional 'thank-you' note:
  • Quote
  • Report post to moderator
bryan davis : We are definitely talking past easy other ! Starting on your plans for the floor of the Un-Sun Room, I have given you my opinion of the safety of
your build, get a second opinion before going Farther ! You need a physical air space between the plywood floor and the backer board, and a reflective barrier
on top of the Backer board, with insulation on top of that, Again you are trying to use Firebrick for a job it can not do ! (insulate )

In agreeing with your first paragraph, I am agreeing to a heat riser made out of Perlite and Clay slip, E & E are personal friends! Because there have been
reports of the metal inner liner expanding and cracking the Heat Riser, mostly now a cardboard sonotube is used as a sacrificial inner liner, to burn out with the
first couple of firings, and many people are using 4'' of perlite and clay slip with an outside form at 14'' !

Second paragraph, You did put the Perlite and 'Fire clay' ahead of the Firebrick and wrote of double layers ! Potentially you will have problems dealing with
different expansion rates and stress cracking! Unless you want to make a box and then within that box, create a Cast-able core of Perlite, Clay slip and a
non-portland Refractory Cement, to then use in place of firebrick, don't mix the two up! This paragraph I Did Not agree with then or Now !

They once asked Abe Lincoln ' how long a mans legs should be', 'he replied, long enough to touch the ground!' Your Heat Riser should be at least 3 Xs the depth
of your Feed Tube and twice the length of the Burn Tunnel !

Minimum Distance between the top of the tapered Heat Riser, and the bottom of the Barrel should be 1.5 inches with a 6'' system, and 2'' minimum with an 8''
system ! Subtract that from the height of your drum, and pay close attention to keeping everything level and plumb !

In order to find the minimum Constant Cross Sectional Area for your rocket we take the diameter 6'', 1/2 of that is the radius, 3'' squared is 9'', Xs 'pi' = 28''~ish
The Ducting you have to make up the Transitional Area should be a minimum 3'' by 10'' slightly better would be 4'' by 8'' ! 2 to 3 Xs that Cross Sectional Area / size
would be better yet!

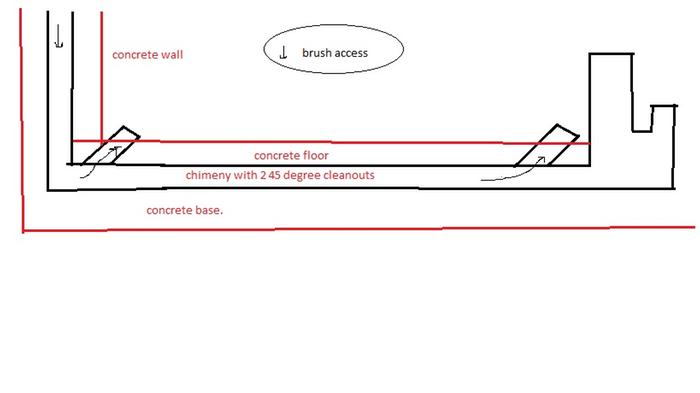
Anything you can easily do to place the ash pit directly under the Transitional area, and squeeze the 'T' closer to the Transitional area will pay you big dividends
for the work you put into the system ! For the Good of the Craft ! BIG AL
 
bryan davis
Posts: 9
Location: WAY WAY WAY up in the Mountains of NC
  • Mark post as helpful
  • send pies
    Number of slices to send:
    Optional 'thank-you' note:
  • Quote
  • Report post to moderator
Thanks again Allen for the response, If the floor catches on fire threw 12.5 inches of insulated mass and 2 layers of Aluminum foil then so be it let it burn. As for what I was trying to figure out about the burn chamber, I will now refer to it as a "cast core" using the 6" inch tube going into the 90 then into the riser. with a perlite fireclay mix.

(By the way my current plan is using the standard fire brick construction exactly as it is outlined in the Erica and Ernies plans I'm holding in my hand right now for the feed tube and the burn chamber.)


OK NEW QUESTION!!! is a cast core using a 6" round tube burn chamber and a 6" round 90' flowing into a 6" round riser an efficient way to get a clean burn

By me knowing the optimum distance between the top of the riser and the barrel will let me know how tall to build the riser for my specific build. I understand the proportions of feed tube verses riser verses burn chamber. I was mainly interested in knowing the best length for a 6" system. I can be flexible in the build. So from your response about old Abe, size don't matter an long as the proportions are correct.
 
You ought to ventilate your mind and let the cobwebs out of it. Use this cup to catch the tiny ads:
A rocket mass heater heats your home with one tenth the wood of a conventional wood stove
http://woodheat.net
reply
    Bookmark Topic Watch Topic
  • New Topic