• Post Reply Bookmark Topic Watch Topic
  • New Topic
permaculture forums growies critters building homesteading energy monies kitchen purity ungarbage community wilderness fiber arts art permaculture artisans regional education skip experiences global resources cider press projects digital market permies.com pie forums private forums all forums
this forum made possible by our volunteer staff, including ...
master stewards:
  • Carla Burke
  • Nancy Reading
  • r ranson
  • Jay Angler
  • John F Dean
  • Pearl Sutton
stewards:
  • Nicole Alderman
  • paul wheaton
  • Anne Miller
master gardeners:
  • Christopher Weeks
  • Timothy Norton
gardeners:
  • thomas rubino
  • Jeremy VanGelder
  • Matt McSpadden

RMH Under Construction-Three Very Specific Questions

 
  • Mark post as helpful
  • send pies
    Number of slices to send:
    Optional 'thank-you' note:
  • Quote
  • Report post to moderator
Background- I am in the process of creating a pretty standard rocket mass heater in my 16x18 vinyl window greenhouse. I have been you tubing and gathering ideas for the last few months, just bought Wood Stoves 2.0 yesterday and have not watched them yet.

I have assembled the stove in my mock up-
-3 inch cement pad on asphalt floor
-thin cement cinder blocks as base for the firebrick
-firebrick  for feed and the heater riser.

Question #1
Has anybody ever used a metal cage built on top of the feed tube to hold long pieces of wood in place, in order prolong the time between feeding the stove.
This would prevent air flow issues. So basically a cage to hold the wood upright as it burns down.


Question #2
If I use the regular size firebrick for the chimney in the metal drum riser do I need to insulate the chimney with the refractory wool?

Question #3
I will preface this question I will take all the necessary precautions when dealing with heating water.
Has anyone successfully coiled copper pipe around the drum in order to create hot water?  It would look pleasing to the eye and it would produce warm/hot water.

Question #4
Any issues with the exhaust pipe directly leaving the metal drum at the bottom?

Thank you in advance for the wonderful information that will be given.

 
Posts: 27
2
4
purity forest garden greening the desert
  • Likes 1
  • Mark post as helpful
  • send pies
    Number of slices to send:
    Optional 'thank-you' note:
  • Quote
  • Report post to moderator

Aaron McKinley wrote:Question #4
Any issues with the exhaust pipe directly leaving the metal drum at the bottom?


I have heard that the manifold is commonly regarded as the most tricky part of an RMH build. WS2.0 may cover that part in detail but I can't recall. If you don't feel like it did once watching, there are plans on scrubbly that can help.
 
Posts: 617
Location: ontario, canada
15
transportation fungi tiny house
  • Likes 3
  • Mark post as helpful
  • send pies
    Number of slices to send:
    Optional 'thank-you' note:
  • Quote
  • Report post to moderator
#2 You can get insulative fire bricks, which I used on my latest build.   Two of my builds use firebrick risers, nothing other than bricks.   And #4 ... two of my RMH hybrids have exhaust coming directly out of the lower side of the barrel/bell.  

So I'd say yes you can exhaust out the side of the bell, and yes you can have a riser made exclusively from firebricks.   I've done both.   I'm no pro but I've got plenty of hands on experience with your questions, and I've also had help and advice from permies.  You're welcome to check my YouTube videos, and my 60+ episode rocket stoves playlist.


https://www.youtube.com/playlist?list=PLElYsR7ucePSLnp1X1ZhE_cVjTyKHpo5O
 
John McDoodle
Posts: 617
Location: ontario, canada
15
transportation fungi tiny house
  • Likes 2
  • Mark post as helpful
  • send pies
    Number of slices to send:
    Optional 'thank-you' note:
  • Quote
  • Report post to moderator
In episode 48 I am using a firebrick riser and exhaust comes out of the side of the lower bell.   This was one of the best configurations I've ever experimented with actually.   Lots of heat, good fire, and clean exhaust

 
Rocket Scientist
Posts: 4566
Location: Upstate NY, zone 5
590
5
  • Likes 1
  • Mark post as helpful
  • send pies
    Number of slices to send:
    Optional 'thank-you' note:
  • Quote
  • Report post to moderator
Be aware of the difference between insulating firebrick and regular dense firebrick. Insulating firebricks are very lightweight and relatively soft - you can cut or carve them with a hacksaw or utility knife - and would make a good riser by themselves. Standard hard firebricks transmit heat fairly rapidly, and if used for a heat riser need to be insulated on the outside. Also, for a riser, splits which are only 1 1/4" thick are much better, as they have much less mass and come up to operating temperature faster.

You need insulation on the riser because you want it to stay as hot as possible inside, and also you want it to be as cool as possible outside. A hard firebrick riser will eventually get hot all through, heat up the gases descending around it, and weaken the "pumping" action of the descending gases cooling. Such systems have been known to work fine initially, and then stall as they heat up. If you have naturally strong draft, this might not be such a problem.

Again, a naturally strong draft may overcome an abrupt exit from barrel to duct, but this point is one of the most frequent causes of draft failure when the transition is too sharp. The gases need to change from moving down around the barrel to horizontally through the duct, and if the space between the outside of the barrel and the heat riser is too small, the flow is choked. A larger duct at this point transitioning to duct size is much safer.
 
Glenn Herbert
Rocket Scientist
Posts: 4566
Location: Upstate NY, zone 5
590
5
  • Likes 2
  • Mark post as helpful
  • send pies
    Number of slices to send:
    Optional 'thank-you' note:
  • Quote
  • Report post to moderator
Lots of people have proposed a wire cage to hold long sticks upright. The hazards of this are that any irregularity can catch on the horizontal wires and hang up the wood. If you make any cage, it needs to have the inner wires smooth and vertical, with any horizontal wires set well back so they cannot snag the wood.

A cage holding tall sticks does risk fire creeping up out of the firebox; once out of the draft, there is no impediment to the whole length of the sticks burning up like a torch. I would strongly advise against it unless you are in a fireproof building where possible smoke would not be a problem.

Lots of people have used copper tubing coils to heat water. A coil around the barrel is probably the safest version of this, and several people have posted here about their builds.
 
Aaron McKinley
Posts: 45
1
trees chicken bee
  • Mark post as helpful
  • send pies
    Number of slices to send:
    Optional 'thank-you' note:
  • Quote
  • Report post to moderator
Patrick thank you for the advice.  I watched some more of the 2.0 video and it made more sense. I also read in Rocket Mass Heatersby Evans and Jackson that Ernie and Erica Wisner which used a half barrel that is cut just so, in order to fit around the burn chamber and sit flush. The question is how do they seal the two portions of the barrels? Most efficient simple way would be preferred.

John the videos are very good, and I will be watching many more of your videos in the near future. Thank you about the confirmation about going out the side of the bell. So just the firebricks without any insulation?

Glenn I believe I have the full size soft insulating brick.  Can I use it for the building of the heat riser portion? Wouldn't it make sense that when the bricks are thicker, then you need less or no insulation around the stack? Or should I still wrap it in perlite or refractory wool? If I could use the bricks I have, I could afford some piping for the mass heater part.

It's a green house so I can have it a bit smoky if needed at times but not always.

So Glenn what is the maximum time between stoking?  I am a working man and need to go away for the day.  Just run it when I get home and into the night?

Copper coil seems like a no brainer (with the proper safety precautions) also I am planning to stack 6-10 metal barrels (with the proper venting) behind and around the stove. Any suggestions?

I have been out in the greenhouse, after dark, with my trusty Coleman lantern, building and rebuilding this contraption, and every night it gets better and more realized. Life is good. First fire is within the week.

And to permies, thank you for putting me in an email, that was cool. First time.
 
Posts: 70
4
  • Mark post as helpful
  • send pies
    Number of slices to send:
    Optional 'thank-you' note:
  • Quote
  • Report post to moderator
Regular firebrick will weigh about the same as a red clay wall/fire brick...  Or concrete block of the same size.

 Insulated firebrick will be MUCH lighter.

 If it is actually the insulated firebrick you have,  it can be used to make the insulated riser quite effectively...  but It will probably perform even better with a wrap of kaowool ceramic fiber blanket, but that stuff is fairly pricey.

 Your burn tunnel between the feed and the riser will also benefit from the IFB being the "hot face" layer of brick...
 
gardener
Posts: 1922
Location: Longbranch, WA Mild wet winter dry climate change now hot summer
469
3
goat tiny house rabbit wofati chicken solar
  • Mark post as helpful
  • send pies
    Number of slices to send:
    Optional 'thank-you' note:
  • Quote
  • Report post to moderator

The question is how do they seal the two portions of the barrels? Most efficient simple way would be preferred.  


I have not done any building yet but I am impressed with the versions where they used a barrel with a removable top and used the top for the bottom, cutting an opening for the heat riser and exit in the lid. The lid then can be fastened into the cob that surrounds the fire brick of the horizontal run and the beginning of the bench.  The barrel then can easily be clamped on and unclamped for inspection and or repair. The descending gasses in the barrel then fall into the bench and residual heat at the end of the run pulls it up the chimney. The exit in the lid can be oval or bean shaped to avoid a sudden volume restriction the the cob tapered down to the flue size. I think that is the shape they made the castable core used in the tepe.
 
Glenn Herbert
Rocket Scientist
Posts: 4566
Location: Upstate NY, zone 5
590
5
  • Mark post as helpful
  • send pies
    Number of slices to send:
    Optional 'thank-you' note:
  • Quote
  • Report post to moderator
For the Wisners' 1 1/2 barrel setup, I believe they used or adapted the clamping band that holds the lid onto a barrel with removable lid. Some fiberglass rope stove gasketing material can be used to seal the joint.
 
pollinator
Posts: 158
Location: Czech Republic; East Bohemia; Latitude 50Ëš 12' 34"
41
10
  • Mark post as helpful
  • send pies
    Number of slices to send:
    Optional 'thank-you' note:
  • Quote
  • Report post to moderator

Aaron McKinley wrote:
-thin cement cinder blocks as base for the firebrick
 
Hi Aaron,

I'd personally shy away from having any cinderblock from having contact with the flames directly. Portland cement will pop and crack and deteriorate really quick at around 600F. The ash buildup may help slow it down.

Have you looked at using a batch burner? That way you would not need a cage. I'm on my fourth now and I've been making changes. First I make the burn chamber longer and taller now so I can put in longer wood and so I can raise the port where the smoke mixes with secondary air and enters the riser. This gives me room for the bed of coals and ash without blocking the port. And it gives me room for the door to be lower than the port to make sure when I open to load it that the smoke keeps going to the port which is higher than the door.

Good luck with whatever you come up with!

Jason

IMG_4991.JPG
The next time I'll make the port higher still.
 
Posts: 21
2
  • Mark post as helpful
  • send pies
    Number of slices to send:
    Optional 'thank-you' note:
  • Quote
  • Report post to moderator

Question #1:
Here is an example of “an extended feeding system” for a rocket stove. It allows you to use longer sticks, and feed less-often. Start looking at the 5-min 30-sec mark. A mesh would catch more than a slick-walled tube. I was thinking that a simple metal ring (like a small basketball hoop) would look more aesthetically pleasing, and still work fine.

I also thought “how long a stick would I really want to load?” For myself, all I’d want to do is split standard-length fire wood into rocket-stove-sized kindling, and that’s all I’d want. Consider what’s practical for you.


Question #3:
Yes, some people have put copper pipe (inside) the rocket stove, to heat water.

His first idea was an orderly & spread-out coil of tube:
https://www.youtube.com/watch?v=-6xc2CWN9tA&list=PLIx_jyzR8dJ7e_rJ2Rwv_tnDpYG7bUYDr&index=7

On a later re-build, he chose to bunch-up all the tube in a chaotic mess near the top of the heat-riser. This resulted in better heat-transfer into the water (and presumably less into room, which was fine for his green-house):
https://www.youtube.com/watch?v=1kfLLmxfyBw&index=9&list=PLIx_jyzR8dJ7e_rJ2Rwv_tnDpYG7bUYDr

I’ve thought about doing the same. As an engineer, I always look for failure modes – “what if the pump stops, the water boils, and ...”. If your coil is below the water-line of your water tank, then after the water has boiled-off, the tank will try to back-fill the hot copper pipe, probably leading to constant heat-cycling and metal fatigue. Placing he coil above the water-line of your tank means that in a failed-pump scenario, the water will run back into the tank, and the copper will run dry … and very hot. Check that your pipe (copper?) is ok at 2,000 oF.


-Scott
 
gardener
Posts: 1292
Location: Okanogan Highlands, Washington
397
4
hugelkultur cat dog books food preservation
  • Mark post as helpful
  • send pies
    Number of slices to send:
    Optional 'thank-you' note:
  • Quote
  • Report post to moderator
Some good answers already, I'm going to go ahead and repeat the original points first.

Aaron McKinley wrote:Background- I am in the process of creating a pretty standard rocket mass heater in my 16x18 vinyl window greenhouse. I have been you tubing and gathering ideas for the last few months, just bought Wood Stoves 2.0 yesterday and have not watched them yet.

I have assembled the stove in my mock up-
-3 inch cement pad on asphalt floor
-thin cement cinder blocks as base for the firebrick
-firebrick  for feed and the heater riser.

Question #1
Has anybody ever used a metal cage built on top of the feed tube to hold long pieces of wood in place, in order prolong the time between feeding the stove.
This would prevent air flow issues. So basically a cage to hold the wood upright as it burns down.


I have seen these mesh cages.  Hangups are one issue, as previously noted.  
A bigger one is that if you have more than 1 stick of wood, high chance of flames creeping back up between the sticks ('candling' or chimney effect), or smoke escaping as that bundle of wood gets hot inside the cage.  
At the mouth of the feed opening you have good downward air flow, a thermal siphon, and if the wood all fits below that level it is air-cooled from the top, preheated air flowing down through it feeds the fire.  
Above that opening, or if you punch holes in it, you have a leaky siphon or just a lot of normal air flow, where fire naturally tends to creep up.  The cage would prevent burning wood toppling out of the feed if it hangs up, but it still doesn't stop smoke getting into your plants, and some plants are smoke-sensitive.
The worst fire hazards I've seen have come from setups like this - one actual building fire at Cob Cottage when someone loaded 4' tall wood in the feed plus piled kindling on the stove to dry out; one (or possibly two) chimney fires on a badly mis-proportioned system, where the feed was too short and a wire cage was their wood support.  It could be done well, of course, but I've seen it done badly, and two of the top three most dangerous close calls that I am aware of included this feature.
So it kinda gives me the willies.


Question #2
If I use the regular size firebrick for the chimney in the metal drum riser do I need to insulate the chimney with the refractory wool?


Previous responses regarding insulated brick are probably accurate.  I have only done about 3 projects with the soft insulated brick for the heat riser, in one case it was a re-build that seemed kinda crumbly, but it was all reclaimed so might have been crumbly going in.  We have some in the lower corner of the firebox on our 8" J-style system, bottom of the heat riser, to reduce clearance space in the manifold, and it seems to be holding up fine after 5 years.
I would recommend mortaring with a soft mortar, like a light application of thin fire clay slip, or a very fine clay-perlite mix if you need to chink it.  Hard mortars will bust it up over time.


Question #3
I will preface this question I will take all the necessary precautions when dealing with heating water.
Has anyone successfully coiled copper pipe around the drum in order to create hot water?  It would look pleasing to the eye and it would produce warm/hot water.


Yes it has been done.  As you mention, it requires precautions, and I am not qualified to give you a complete list - but you probably heard the term "boom-squish," and beware of scale (both the hard-water kind and the right-size-and-speed kind).
The suggestion to coil it inside the barrel has also been done but is more dangerous; Ernie and his buddies blew up a couple of these systems before they got the right size of copper pipe dialed in.  (They built a bunker first, for observing their tests, so everyone survived).


Question #4
Any issues with the exhaust pipe directly leaving the metal drum at the bottom?


As opposed to what?  Coming out below it?  
Bring it out at whatever height is convenient for where you want to take the heat. If you need it to come out a little higher for a higher raised-bed or something, or you sunk your firebox down to floor level for more convenient use of the barrel-top, that's fine.
If you are worried about being able to fire it, but are not putting thermal mass around the pipe just taking it straight up and out like a chimney, you might want to find a way to do the thermal mass.  If the system can store heat to match the overnight heat loss of your greenhouse, you don't have to burn it all day, just short bursts.  If you're heating a greenhouse it's worth looking at some of the climate-banking greenhouses, and particularly their use of insulation on the shaded side, and seasonal or night-time insulation blankets, to cut the heat loss down to workable levels.  If you can't pop the lid every morning, you could still do some passive-solar calcs and line the non-solar-gain panels with reflective insulation.  Good light, less heat loss, less time operating a fire.  For myself, I've gone to more climate-tolerant plants instead of greenhouses, it is surprising how fast a greenhouse can kill things if it doesn't have a full-time operator or good automation.  But I still dream of miniature orangeries, one day when I can carry my house on my back like a snail.

You asked something about how we indexed the barrel around the bricks, and sealed it.  
We mostly prop it directly over the finished firebox to mark the exact cut dimensions, after we have the height estimated to hold the second barrel 2" above the heat riser.  To seal it around the brick, I like little bits of rock wool or fire blanket, backed up by cob.  Ernie likes a cob mortar, a tight fit, and plunking the sharp metal down so it's embedded in the cob as a knife-edge join with cob on both sides.  
To seal barrel-to-barrel, you can use a few different options.  Sticky-backed gasket, band clamp, high-temp foil tape (milspec if you can get it), or all three.  I also like doing a little trick where the lower barrel is bottom-up, and instead of removing the whole bottom can-opener style, you leave a rim about 2" in and tab or hammer it up.  Very noisy, but it creates a sort of flange that helps hold the upper barrel in place, makes it easier to seat a fiberglass rope gasket, and generally makes the whole thing take a lot less hands to put together.  I love having an Ernie to hold the barrel while me and two other people hand-adjust the gasket from 3 different angles, but really, there has to be an easier way.  A flange and a thicker rope gasket, or a sticky-backed gasket on the upper barrel, seem very helpful to avoid so much fiddling.


Thank you in advance for the wonderful information that will be given.


Glad to hear you're moving forward with the project.  Pictures are always welcome on these threads.
 
Posts: 153
10
  • Mark post as helpful
  • send pies
    Number of slices to send:
    Optional 'thank-you' note:
  • Quote
  • Report post to moderator

Glenn Herbert wrote:Lots of people have proposed a wire cage to hold long sticks upright. The hazards of this are that any irregularity can catch on the horizontal wires and hang up the wood. If you make any cage, it needs to have the inner wires smooth and vertical, with any horizontal wires set well back so they cannot snag the wood.

A cage holding tall sticks does risk fire creeping up out of the firebox; once out of the draft, there is no impediment to the whole length of the sticks burning up like a torch. I would strongly advise against it unless you are in a fireproof building where possible smoke would not be a problem.

Lots of people have used copper tubing coils to heat water. A coil around the barrel is probably the safest version of this, and several people have posted here about their builds.


I agree. . . . I set up a bit of a wire cage too hold my wood up, and when the wood failed too drop into the fire box, it just burned right up out of the stove . . . failed experiment . . .

When I have longer pieces of wood, I usually brick it in, to help boost the draft . . .

Pic : notice the bricks and spacers keeping the wood vertical . . . BUT  . . . you still have too keep an eye on it . . .
20161215_144844.jpg
[Thumbnail for 20161215_144844.jpg]
20161215_144741.jpg
[Thumbnail for 20161215_144741.jpg]
 
Aaron McKinley
Posts: 45
1
trees chicken bee
  • Mark post as helpful
  • send pies
    Number of slices to send:
    Optional 'thank-you' note:
  • Quote
  • Report post to moderator
Thank you Scott for the copper piping videos.  That will be a project after I get this sucker running.

Thank you Erica as well to add to the thread.  So if want to feed larger lengths of wood then I would make the feed tube and the heat riser proportionately higher? Something I can do at a later date if I feel compelled to do so.  Will stick to the basic model for the first run through.


Question #2
If I use the regular size firebrick for the chimney in the metal drum riser do I need to insulate the chimney with the refractory wool?

Previous responses regarding insulated brick are probably accurate.  I have only done about 3 projects with the soft insulated brick for the heat riser, in one case it was a re-build that seemed kinda crumbly, but it was all reclaimed so might have been crumbly going in.  We have some in the lower corner of the firebox on our 8" J-style system, bottom of the heat riser, to reduce clearance space in the manifold, and it seems to be holding up fine after 5 years.
I would recommend mortaring with a soft mortar, like a light application of thin fire clay slip, or a very fine clay-perlite mix if you need to chink it.  Hard mortars will bust it up over time.


I am using fire brick mortar to put the fire bricks together.   Since my original post I have decided to go the wire mesh and perlite insulation route, with a 45degree clay lip on the riser.  

Thank you for the advice on joining the two drums together.  Right now the bottom drum is quite short and thin around the fire chamber.  (Picture below) Is this too thin?  I can recut another drum higher if needed.

Here is the most current picture of the systems so far.

New question.  Looking at the piping going out of the green house, can I use a 90degree elbow for the rain.  I have a few extra and don't want to spend more money on a proper cap.  I will put some wire mesh on the end to prevent critters from going in.

Last question- is it ok for a galvanized T to be plugged directly into the drum manifold?

Thank you,

Getting excited to see this first of many rocket stoves coming closer to the first burn!

Aaron
IMG_0063.jpg
[Thumbnail for IMG_0063.jpg]
IMG_0066.jpg
[Thumbnail for IMG_0066.jpg]
IMG_0065.jpg
[Thumbnail for IMG_0065.jpg]
 
Dave Lot
Posts: 153
10
  • Mark post as helpful
  • send pies
    Number of slices to send:
    Optional 'thank-you' note:
  • Quote
  • Report post to moderator
Have a look at my build, I added flexible copper tubing to the barrel to heat water . . .

https://permies.com/t/40107/hot-barrel

Helps too heat the house...
 
Aaron McKinley
Posts: 45
1
trees chicken bee
  • Mark post as helpful
  • send pies
    Number of slices to send:
    Optional 'thank-you' note:
  • Quote
  • Report post to moderator
Thank you Dave for your wonderful threads.  Very clear and with the pictures  it all make sense.

I also figured out what I am going to do to insulate the stove, with the perlite and masonry on the outside, like you.

The copper coil on the outside is what I am going to do.  Do you need a pump? Couldn't you get a thermal siphon going?  I don't know yet. I will do some more digging.

Thank you very much.
 
gardener
Posts: 1063
Location: +52° 1' 47.40", +4° 22' 57.80"
452
woodworking rocket stoves wood heat
  • Likes 1
  • Mark post as helpful
  • send pies
    Number of slices to send:
    Optional 'thank-you' note:
  • Quote
  • Report post to moderator
I'd suggest it would be sensible to add a vertical piece of pipe in order to reach above the highest point of the greenhouse's roof. It's all about pressure differences, when the rooftop is leaking just a bit it's fighting the pull of the chimney pipe.
 
pollinator
Posts: 293
Location: US, East Tennessee
34
  • Mark post as helpful
  • send pies
    Number of slices to send:
    Optional 'thank-you' note:
  • Quote
  • Report post to moderator

Aaron McKinley wrote:
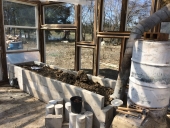
Right now the bottom drum is quite short and thin around the fire chamber.  (Picture..) Is this too thin?  I can recut another drum higher if needed.
Aaron


Yeah, that is way to thin, it needs to be broad enough for proper sealing, and I'd make that a minimum of 4" wide (where the lower barrel cutout crosses over the burn tunnel). Wider is even better, to better accommodate a flexible seal that will need to be built-in for the full circumference of the lower barrel portion, to combat the effect of cracking masonry from thermal cycling / expansion of the steel exhaust transition.

Secondly, for the "half barrel manifold", turn the "lip" end up. You can check your barrels first to see how they'll go together. For mine I found that the barrel "bottoms" would easily "band clamp" together, or that one barrel bottom end could be "band clamped" to one barrel top end.
 
Dave Lot
Posts: 153
10
  • Mark post as helpful
  • send pies
    Number of slices to send:
    Optional 'thank-you' note:
  • Quote
  • Report post to moderator

Aaron McKinley wrote:Thank you Dave for your wonderful threads.  Very clear and with the pictures  it all make sense.
 Do you need a pump? Couldn't you get a thermal siphon going?  I don't know yet. I will do some more digging.


I was debating on putting a 40 or 60 gallon tank in the loft above the stove, and letting it thermo siphon, but for all I run the stove, a large storage tank would heat up too slowly.  With this system, I can heat up the 5 gallon pail quickly, and turn on the radiator in the house faster.

Also, I like the idea of pumping the water up.  If the power goes out, or if I forget too turn the pump on (it has happened once or twice) the tubing gets hot, no harm done.  (BOOM - SQUISH)

If you do go the thermosiphon route, larger is better ! A 1/2 inch pipe has not enough flow - 3/4 inch might work . . .  go with 1 inch or larger - since you are relying on heat convection to move the water, there is no power there, just flow . . .

Just my thoughts . .
gift
 
permaculture thorns eBook - DRAFT
will be released to subscribers in: 19 : 37 : 10
reply
    Bookmark Topic Watch Topic
  • New Topic