• Post Reply Bookmark Topic Watch Topic
  • New Topic
permaculture forums growies critters building homesteading energy monies kitchen purity ungarbage community wilderness fiber arts art permaculture artisans regional education skip experiences global resources cider press projects digital market permies.com pie forums private forums all forums
this forum made possible by our volunteer staff, including ...
master stewards:
  • r ranson
  • Nancy Reading
  • Carla Burke
  • John F Dean
  • Jay Angler
  • paul wheaton
stewards:
  • Nicole Alderman
  • Pearl Sutton
  • Anne Miller
master gardeners:
  • Christopher Weeks
  • Timothy Norton
gardeners:
  • Nina Surya
  • Matt McSpadden
  • thomas rubino

Tile on cob covered barrel?

 
Posts: 4
Location: Murfreesboro, Tennessee
1
  • Likes 1
  • Mark post as helpful
  • send pies
    Number of slices to send:
    Optional 'thank-you' note:
  • Quote
  • Report post to moderator
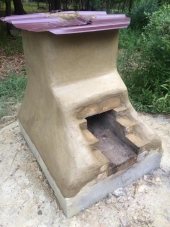
I’ve had my rocket mass heater up and running for 3 years and I finally applied the last bit of cob around the barrel as well as applying the first coat of plaster. I’m experiencing cracking in the cob at the ridges in the sidewall of barrel, which I’m not terribly surprised about, but I’ve been thinking of ways to finish the cob on the barrel so, when it’s completly finished, the cracks will not re-emerge. I instal tile for a living and considered using mosaic tile to finish the barrel. First of all, has anyone seen this done successfully before? Secondly, what can I do to prevent the cracks from re-emerging once it’s finished. I’m not hell-bent on having tile but I’ve considered it may be wise, if I do tile, to apply a layer of plaster of Paris to the barrel prior to tiling or prior to applying the final coat or two of cob plaster. I often times over think things and the solution may simply be to apply the final 1-2 coats of cob plaster and I’m good but I wanted to seek some guidance to make sure I’m headed in the right direction rather than just spinning my wheels. Glad to finally be part of this group as I’ve been living the RMH life for a while now and I’ve gotten a lot of guidince from previous posts on here and now I’m at a place where i finally needed to ask a question of the group. Attached is a pic of the stove.
31AE51BA-A750-4C9B-BF2C-5361EB963B5D.jpeg
[Thumbnail for 31AE51BA-A750-4C9B-BF2C-5361EB963B5D.jpeg]
 
rocket scientist
Posts: 6528
Location: latitude 47 N.W. montana zone 6A
3398
cat pig rocket stoves
  • Likes 1
  • Mark post as helpful
  • send pies
    Number of slices to send:
    Optional 'thank-you' note:
  • Quote
  • Report post to moderator
Hi Ben;
Your Rmh looks really good !

I attempted to put  2x2 tile on my cob covered barrel.  They lasted a few months and started dropping off. I reapplied them a few times and finally gave up.  I was using just sticky cob no mortar mix.
They were up near the top of the cob and temps there were to hot for anything but cob.  

RMH-rebuild_108.JPG
[Thumbnail for RMH-rebuild_108.JPG]
 
master pollinator
Posts: 1848
Location: Ashhurst New Zealand (Cfb - oceanic temperate)
565
duck trees chicken cooking wood heat woodworking homestead
  • Likes 2
  • Mark post as helpful
  • send pies
    Number of slices to send:
    Optional 'thank-you' note:
  • Quote
  • Report post to moderator
The cob cracks because the barrel expands and contracts a lot more than it's able to accommodate. That's the first problem. If you cover the cob with a dissimilar material you will introduce another thermal expansion gradient and have the same problem. Plaster of paris is probably the least suitable due to its breakdown at relatively low temperatures (130C is all that's needed to partially calcine gypsum, and it's easy to surpass that even with a layer of cob).

Tile needs a solid substrate, so you'd be forever remortaring loose tiles, I'm afraid. If you forced some cob into those cracks, you'll just end up with a bigger gap between the barrel and the cob. That might not be so bad, and it might improve the aesthetics for you. That's a really nice looking RMH, by the way.
 
thomas rubino
rocket scientist
Posts: 6528
Location: latitude 47 N.W. montana zone 6A
3398
cat pig rocket stoves
  • Likes 1
  • Mark post as helpful
  • send pies
    Number of slices to send:
    Optional 'thank-you' note:
  • Quote
  • Report post to moderator
Ben;   One thing I did with mine was to apply a thick layer of cob then I tightly wrapped the barrel with a fiberglass mesh , same stuff you use when sheet rocking. I was concerned about the temps ,wondering if the mesh would off gas or melt or some other equally nasty thing...   It worked wonders. BUT... I still, after 5 years get some cracking at the barrel.  

I keep a bucket of sandy fireclay handy.  When the cracks show up I just rub in a bit of cob.  

At one time I was planning on painting/dying  my barrel, but other than purchasing the pigments I haven't done it yet.... why paint a Picasso only to have it crack... right?
 
gardener
Posts: 5262
Location: Cincinnati, Ohio,Price Hill 45205
1052
forest garden trees urban
  • Likes 1
  • Mark post as helpful
  • send pies
    Number of slices to send:
    Optional 'thank-you' note:
  • Quote
  • Report post to moderator
Nice RMH!
I have no advice on the tile that hasn't been offered.
If I were to do a cop covered barrel, I think I would want a layer of something flexible between the barreland the cob.
This layer would leave room for the metal to expand and contract at a different rate than the cob, thus discouraging cracking.
Ceramic insulation or cardboard are used when building a masonry double bell, ceramic is expensive and cardboard burns off, so I'm not sure if either would be good between the cob and the bell.

Aluminum foil melts at 1,220 degrees Fahrenheit,  higher than your average RMH barrel, so that might work nicely.
Another approach would be to use a layer of something that would melt readily, and plan accordingly, leaving weep holes to let the material escape.

Ultimately I would be concerned most with it falling apart, not how it looks, and to that end I would probably add rockwool or fiberglass fiber to the cob mix itself.
Like the fibers usually used in cob, they should stop and redirect cracks as they developed.
Unlike those fibers, they wouldn't burn out, thus remaining to hold things together.
I have only used this mixed refractory cement, but it works well there.
 
pollinator
Posts: 290
Location: The Arkansas Ozarks
54
8
cat dog forest garden rabbit building solar rocket stoves woodworking wood heat homestead
  • Mark post as helpful
  • send pies
    Number of slices to send:
    Optional 'thank-you' note:
  • Quote
  • Report post to moderator

William Bronson wrote:Nice RMH!
I have no advice on the tile that hasn't been offered.
If I were to do a cob covered barrel, I think I would want a layer of something flexible between the barrel and the cob.


My thoughts exactly.  This is what Erica and Ernie suggest in their RMH book to use kaowool or equivalent as a flexible barrier in areas that are prone to cracking from thermal stress.  I think you could use rock wool at barrel temps without a problem. Wrap it fairly tight and then cob over that.  It should expand and contract way less.  I would also use a tight weave hardware cloth mounted over a layer of cob on the rock wool and final cob on top of that.  This will reinforce the cob and should keep it from cracking.

BTW beautiful cob job on that stove.

Sincerely,

Ralph
 
Ben Valentine
Posts: 4
Location: Murfreesboro, Tennessee
1
  • Likes 3
  • Mark post as helpful
  • send pies
    Number of slices to send:
    Optional 'thank-you' note:
  • Quote
  • Report post to moderator

Phil Stevens wrote:The cob cracks because the barrel expands and contracts a lot more than it's able to accommodate.


It’s funny how hind sight is 20/20, Phil. I came to this forum before installing the iron stove door and it was recommended to use rockwool, which I did, to allow for the difference in how the materials expand and contract. What’s funny, I guess, is that I did not extend that logic to the part of the stove that clearly has a lot of movement because of its location. Amazingly I’ve noticed the top of the barrel (technically the barrels bottom but in this case the end that is facing the ceiling) protruding past the the rim where the wall and barrel head are joined together. This was thrilling to me because I know the barrel wasn’t like that before and it only happened after applying the cob around it. This makes me think that, even though the cob is cracking, it may be creating enough resistance so that, as the barrel wants to expand, it is limit and finds the path of least resistance: where it’s uncovered. It could be other reasons but none the less something very interesting.

I appreciate all the replies and what you have all recommended make sense. I’ve thought of all the things you’ve recommended so it’s confirmation that, truly, the simplest explaination is probably the correct one rather than me looking for some “magic-bullet” alternative. The rockwool, like i used for the stove door, is the solution I’ll most likely go with. Seeing as how, after approximately 3 years of using this stove, I’ve finally given it some of the finishing touches, I think that I will make the cracks into a design feature when I do the final layers of plaster, and when I eventually rebuild the guts of the stove I will redo the barrel with the rockwool. Interestingly, even though the cracks at the thinnest sections of cob on the barrel are fairly deep, everything is intact because of the straw in the cob mix is acting like structural fibers holding everything together.

Certainly, if anyone else has any cool ideas or experience similar to mine I’m all ears. And thank you all very much for the comments on the appearance of the stove. There’s something about natural building that speaks to me like no other kind of construction. It connects to a mysterious part of myself with knowledge and experience that I don’t think I can fully claim is from my own experience. Even though I had an idea of what I wanted it to look like, when you get down to it it kind of becomes what it’s going to be in the process. Cool stuff.

I’ll attach a couple other pics below
8148E4D6-D817-40A2-8F88-D9D53A4D319E.jpeg
[Thumbnail for 8148E4D6-D817-40A2-8F88-D9D53A4D319E.jpeg]
Here the plaster was still wet but this was once it was fully coated
E65C2006-DFDF-4252-9E7E-FF6828F85150.jpeg
[Thumbnail for E65C2006-DFDF-4252-9E7E-FF6828F85150.jpeg]
This shows the wall detail. I will be building bench backs that will go in a “L” shape around the bench and this cob wall.
3C9A6303-B519-42F3-9A78-B10B33E38F7F.jpeg
[Thumbnail for 3C9A6303-B519-42F3-9A78-B10B33E38F7F.jpeg]
An in-progress photo of the wall with built in bookshelf separating the stair landing from the bench
 
Ben Valentine
Posts: 4
Location: Murfreesboro, Tennessee
1
  • Mark post as helpful
  • send pies
    Number of slices to send:
    Optional 'thank-you' note:
  • Quote
  • Report post to moderator
I thought I’d tie someone else’s post to mine. In it you see where they use a ceramic coated wire mesh around the barrels before applying cob:

Johan Thorbecke wrote:

Alan Mikoleit wrote:Johan, I like how you covered the barrels, what material did you use and how did you get it to stick to the metal? thanks alan


We had a wire mesh that was covered in some sort of terra cotta that we tied around the build before we put on the loam.(loam is the right English word for the clay-like stuff right?)


allen lumley wrote: - Does any one else remember seeing this as an under 10 minute video here or at Donkey **? Big AL !


I haven't seen it here before but I know that the build was documented and put on Youtube:
http://www.youtube.com/watch?feature=player_embedded&v=pfyOSengWTk

http://www.youtube.com/watch?feature=player_embedded&v=JQe1hSwQ6Ac

 
Ben Valentine
Posts: 4
Location: Murfreesboro, Tennessee
1
  • Mark post as helpful
  • send pies
    Number of slices to send:
    Optional 'thank-you' note:
  • Quote
  • Report post to moderator
Here’s the link to the quoted thread:
https://permies.com/t/29052/builds-experimental
 
rubbery bacon. rubbery tiny ad:
Binge on 17 Seasons of Permaculture Design Monkeys!
http://permaculture-design-course.com
reply
    Bookmark Topic Watch Topic
  • New Topic