gift
Collection of 14 Permaculture/Homesteading Cheat-Sheets, Worksheets, and Guides
will be released to subscribers in: soon!
  • Post Reply Bookmark Topic Watch Topic
  • New Topic
permaculture forums growies critters building homesteading energy monies kitchen purity ungarbage community wilderness fiber arts art permaculture artisans regional education skip experiences global resources cider press projects digital market permies.com pie forums private forums all forums
this forum made possible by our volunteer staff, including ...
master stewards:
  • John F Dean
  • Carla Burke
  • Nancy Reading
  • r ranson
  • Pearl Sutton
  • Jay Angler
stewards:
  • Liv Smith
  • paul wheaton
  • Nicole Alderman
master gardeners:
  • Christopher Weeks
  • Timothy Norton
gardeners:
  • thomas rubino
  • Matt McSpadden
  • Eric Hanson

What is the best way to harvest vermicompost from indoor bins?

 
Posts: 8
  • Mark post as helpful
  • send pies
    Number of slices to send:
    Optional 'thank-you' note:
  • Quote
  • Report post to moderator
Hi all.

I want to set up some indoor worm composting bins for my food scraps and other food waste that I get from restaurants. My problem is that I can't really come up with a good, efficient way to harvest a lot of castings. I'm looking for something that minimizes sorting by hand and sifting, since I have an almost unlimited resource for food scraps and thus potentially a lot of worm bins. What methods have you guys used and what do you think works the best?
 
Posts: 5
Location: North
  • Mark post as helpful
  • send pies
    Number of slices to send:
    Optional 'thank-you' note:
  • Quote
  • Report post to moderator
The most efficient way i know is a diy trommel set-up.

the kindler gentler way is to allow the worms to move on their own from a finished area into fresh bedding/food. I'm assuming you have a two bin rm system. The drainage holes in the bottom of the first bin should be large enough to allow worm to move through - 1/4 or so. I haven't tried it but i imagine if you set the bin with drainage holes inside a bin with fresh bedding you would be able to repeatedly skim off finished vc while forcing the worms eventually into the new bin.

you could also just drop 1/2 the finished vc directly onto the bedding of your new bin. It will help if your new bedding is seeded with some old/finished bin material and left to 'cure' for a week or more. After a few days of skimming you should be able to dump the second half of the finished bin and repeat the process. A bright light will speed the process.

another way i know would be to dump out the finished vc onto a small tarp and divide it up into piles and strip away the vc from the piles until you're left with more worms than vc.

There are horizontal set-ups that encourage a steady migration through material and vertical flow-through designs but as far as rm's go that's what i know or can remember atm.
 
Sam Becze
Posts: 8
  • Mark post as helpful
  • send pies
    Number of slices to send:
    Optional 'thank-you' note:
  • Quote
  • Report post to moderator

Allan Ewan wrote:I'm assuming you have a two bin rm system.


Sorry, I am quite new to this process. So i'm not sure what you mean by "rm"? I do like the idea of stacking bins though. I was previously thinking of some sort of flow through bin, but I was having trouble figuring out how to get the finished compost out without emptying the whole thing. But the stacking idea would eliminate that problem. All you would have to do is add a new bin with fresh bedding when the one on the bottom got full. I wonder about the timing though. Do you know approximately how long it would take the worms to migrate from one bin to the next?
 
Allan Ewan
Posts: 5
Location: North
  • Mark post as helpful
  • send pies
    Number of slices to send:
    Optional 'thank-you' note:
  • Quote
  • Report post to moderator

Sam Becze wrote:

Allan Ewan wrote:I'm assuming you have a two bin rm system.


Sorry, I am quite new to this process. So i'm not sure what you mean by "rm"? I do like the idea of stacking bins though. I was previously thinking of some sort of flow through bin, but I was having trouble figuring out how to get the finished compost out without emptying the whole thing. But the stacking idea would eliminate that problem. All you would have to do is add a new bin with fresh bedding when the one on the bottom got full. I wonder about the timing though. Do you know approximately how long it would take the worms to migrate from one bin to the next?


whoops - rm=rubbermaid

a stacking bin system is absolutely possible though i'd be careful not to compact the lower bin with the weight of the upper - some short sticks or what-not in the corners would help keep the weight off i imagine.

*on separating worms from vermicompost* just to clarify - the finished vc(bin with drainage holes) is placed on top of a new two bin or 'nested' rubbermaid system. it helps to have some extra bins/systems around for this shuffling or storing/curing bedding material/vc.

with a bright light and continual skimming i imagine you could get a bin separated over the course of a day or sooner but ultimately everything in this endeavour happens at worm speed anyway so it's kinda' up to them.

you will inevitably scoop up a few worms in the process but most will get caught up in the 1/4 inch screening needed to get 'processed' vc. the cocoons will fall through but if you leave your vc to 'cure/finish' for 6 weeks or so you will be able to save some worms with a second screening.

cheers


Posts: 45
Location: Zone 6 Ohio
2
  • Mark post as helpful
  • send pies
    Number of slices to send:
    Optional 'thank-you' note:
  • Quote
  • Report post to moderator
I have the worm condo system and the worm population is pretty good at moving up with the food. There are always straglers but you can dump those bins on a tarp and pick out the worms you can (good job for kds?) If you aren't too concerned about a few, you could just move the few with the soil to its new resting spot. I'm in a part of the country that gets cold enough that it would be hard for a redwiggler population to take over for the local worms. A few may survive the winter in the bottom of the leaf mulch or a hugelkultur but they won't spread far for sure.

 
Posts: 65
1
6
  • Likes 1
  • Mark post as helpful
  • send pies
    Number of slices to send:
    Optional 'thank-you' note:
  • Quote
  • Report post to moderator
I also struggled with the effort and mess involved with collecting the worm compost.

My aim is to reduce the amount of waste I send to landfill, I don't go out looking for compost so I guess I would not have such a need for speed.

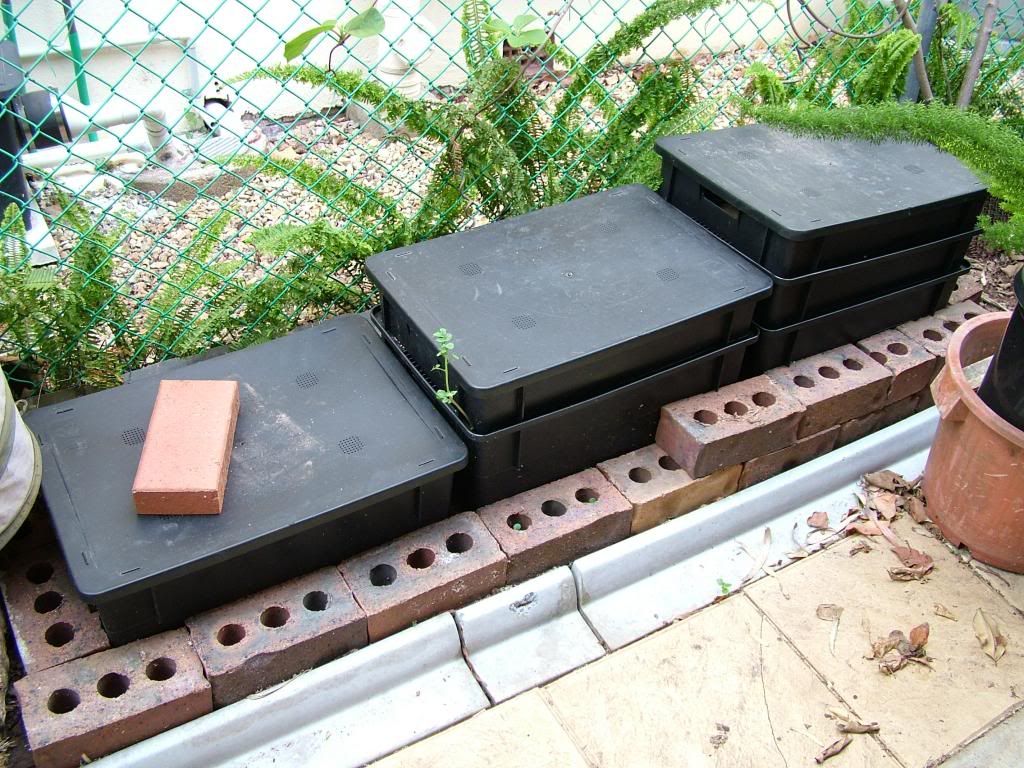
I decided to place my worm farms directly on the ground and forgo collecting the leachate. I place new food items at one end of the worm farm and build upwards as the food is consumed and turned into compost. When I get to about 3 stacks high I let the worms finish the food in the stack and I start placing the food items in the bin next door. The worms are free to travel under the bins as they please.


Once most of the food in the stack has been consumed the worms will move on looking for new food sources. I imagine they leave a lot of eggs in the compost as well. With three stacks on the go I am hoping that the eggs have plenty of time to hatch and the baby worms will leave looking for food before I get around to harvesting the compost.

My original plan was to build the bins at waist height so I wouldn't have to bend over, that way I could also collect the leachate. But it meant I would have to find a way for the worms to communicate between stacks, which meant building a common lower floor. It seemed a lot easier to place them directly on the floor. The bricks around the base are to stop cane toads and rodents from getting into the bin. I have no issues with ants in the compost bin yet but that may change. I intend to empty the full bins on the right and place them on the left. That way the garden doesn't get a build up or concentration in any particular area. I guess it is a worm tractor

I have Kiwi vines above the worm farm which gives them some shade in the summer and allows them to heat up in the 'winter' when the leaves drop.

In your case with your indoor bins I would be tempted to do something similar, have two towers side by side with a communal lower level to allow the worms to move from one side to another as you change the feeding side. If the bins have a lot of wet veg in them they tend to get very heavy so I wouldn't stack them too high. You would probably need to have them raised so that you would be able to drain the leachate easily. I don't think you will every get the area completely worm free but I guess you could aim a lamp at the top layer so it warms and dries up making the worms retreat to the lower level.

 
Posts: 244
6
  • Mark post as helpful
  • send pies
    Number of slices to send:
    Optional 'thank-you' note:
  • Quote
  • Report post to moderator
I agree with everyone, i have nothing new to add to this but i would like to emphasize that the worms will flee light so putting the compost under a bright lamp will allow you go scoop off the top a bit more every hour or so. Patience is easier.
 
Posts: 105
Location: Foot of the Mountain, Front Royal VA
3
hugelkultur fungi chicken
  • Mark post as helpful
  • send pies
    Number of slices to send:
    Optional 'thank-you' note:
  • Quote
  • Report post to moderator
I have been using the worm farm 360. I enjoy it very much. I would recommend using it on a small to medium size scale. If I could scrounge up more scraps I would have a second and third one of these.. Harvesting is very easy, I put the bottom tray on top and left the lid off for 2 days, next I piled everything into a pyramid. Every day I took a bit off the top as it became dry. Compared to many other gardening tasks, this was very easy and productive. I now almost wish I worked in the food industry for the daily left overs..
 
pollinator
Posts: 3827
Location: Massachusetts, Zone:6/7 AHS:4 GDD:3000 Rainfall:48in even Soil:SandyLoam pH6 Flat
555
2
forest garden solar
  • Mark post as helpful
  • send pies
    Number of slices to send:
    Optional 'thank-you' note:
  • Quote
  • Report post to moderator
Each worm lays 10 babies/egg per week. So in a month the population would increase by 42000% as long as there is enough food.
So I would get a bin fill it up with fresh food(green and brown) let it compost for 30 days, and now it will be finish.
I would then use 75% of the compost and leave the top(most populated)25% as a starter for the new fresh food.
To do this you would obviously need 30 separated bins/factory.

An even simplier way to seperate the top 25% (most populated) is to just put a empty bin on the finish worm bin
with a little food let them climb up for 3days or so and presto.

Things are a little bit more complicated due to the fact that each egg takes 75 to hatch.
So unless your keeping some of the compost with a few egg, your starting population would go down
So I would still keep some of the "finish" compost containing a few worm egg.
 
Posts: 308
Location: long island, ny Z-7a
4
  • Mark post as helpful
  • send pies
    Number of slices to send:
    Optional 'thank-you' note:
  • Quote
  • Report post to moderator
the way i do it is with nesting 5-gallon buckets in the basement, and outside i have a large 6'x2'x3'(4'tall,3' actual compost area height)
it can take quite a while for all the worms to hatch and migrate to the upper buckets. i go 3 buckets tall,plus the bottom basin for catching leachate. by the time i add the highest level they've had enough time to mostly all move up at least out of the lowest bucket. the very few stragglers left below i don't fret over, that bucket either sits a while to dry out and use indoor for soil-blocks, or it gets mixed into compost for the garden(or compost tea)

the outoor bin is far less hassle..i strung the false-bottom with the thickest weed trimmer line i could find. spaced 2" apart. the floor is the dirt ground so i just use my metal rake to scrape it down..the sag in the middle makes it easy,

you could make a smaller version inside. i initially had a BIG one own there, 2x4' . it was unmanageable with the fruit flies at that size... many peope have made smaller ones by using a 55gallon plastic drum, or even garbage cans etc...that would be easier to handle.

i also designed a fancy-ish thing and made a 3d model of it. never did build it but think it could work well and be equally aesthetic in a kitchen or back porch/mud room etc.

album of my worm bins
179568_463702280321845_1952903083_n.jpg
[Thumbnail for 179568_463702280321845_1952903083_n.jpg]
175111_550588568299882_187233704_o.jpg
[Thumbnail for 175111_550588568299882_187233704_o.jpg]
562713_439305919428148_245668597_n.jpg
[Thumbnail for 562713_439305919428148_245668597_n.jpg]
 
Posts: 7
Location: Frankton, Indiana
  • Mark post as helpful
  • send pies
    Number of slices to send:
    Optional 'thank-you' note:
  • Quote
  • Report post to moderator
I use a flow through bin, specifically the "Worm Inn". http://www.theworminn.com/products-page/ Food goes in the top, and finished compost comes out the bottom. Virtually impossible to over water, because it breathes. You know when to stop harvesting when there is a lot of worms and undigested stuff. Any accidentally harvested worms and unfinished material simply goes back in the top. Much easier than tubs. Larger scale flow-through bins are available commercially, and there are many examples of DIY flow through bins. The original "Worm Inn" prototype was simply a pair of blue jeans, suspended in the air, and filled up with bedding and worms. The leg openings were tied closed. It was affectionately called "creepy pants". It worked well enough to be developed into the current product.
Steve Gibson
 
this tiny ad cannot hear you because of the banana
Back the BEL - Invest in the Permaculture Bootcamp
https://permies.com/w/bel-fundraiser
reply
    Bookmark Topic Watch Topic
  • New Topic