• Post Reply Bookmark Topic Watch Topic
  • New Topic
permaculture forums growies critters building homesteading energy monies kitchen purity ungarbage community wilderness fiber arts art permaculture artisans regional education skip experiences global resources cider press projects digital market permies.com pie forums private forums all forums
this forum made possible by our volunteer staff, including ...
master stewards:
  • Nancy Reading
  • Carla Burke
  • r ranson
  • John F Dean
  • paul wheaton
  • Pearl Sutton
stewards:
  • Jay Angler
  • Liv Smith
  • Leigh Tate
master gardeners:
  • Christopher Weeks
  • Timothy Norton
gardeners:
  • thomas rubino
  • Jeremy VanGelder
  • Maieshe Ljin

RMH design for safety and code compliance

 
Posts: 18
Location: Beulah, CO
1
  • Mark post as helpful
  • send pies
    Number of slices to send:
    Optional 'thank-you' note:
  • Quote
  • Report post to moderator
Hi Permies!

I need some help and guidance on customizing a standard design RMH (rocket mass heater). Just as a primer, I'm absolutely NOT trying to reinvent the wheel here. I'm attempting to squish an existing, proven design into the space I have available and complete a safe and hopefully compliant build! I have bought and watched/read: the 4 video set from Ernie and Erica, the rocket mass heater III book by Ianto Evans, as well as the build plan from Ernie and Erica.

So as an an introduction, we have a house built in 2002 (stick built). The house is approximately 1600 sq ft, single story ranch with a crawlspace, 2x4 interior walls with drywall. The proposed location of the RMH is relatively near the center of the house. We are initially planning on using a 6" standard system (the plans from Ernie and Erica Wisner). Basically, I'm going to straighten out the thermal mass bench to be linear, instead of an "L" shape and pass the thermal mass through a wall (which is one of the questions).

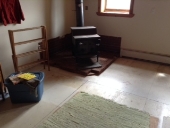
Here's where we plan on placing the J-tube and barrel. The left side of the cubby where the propane decorative fireplace sits is where I want to run the thermal mass, into the space pictured in the second photo.

Interior dimensions of the cubby are 2' x 5'


The left side of this picture is the same wall as the left side of the previous picture. It's just on the other side of the wall that the hutch backs up to. You can see the side of the hutch for reference. The interior dimensions of this cubby are 2' x 4'.


Requirements:

My wife demands this installation look tidy - not the cob look, and no "trash can fire" aesthetic.

I want to ensure the installation is safe and meets code.

Assumptions:

I am assuming I'm going to need to put up some sort of heat shield against the wall for the barrel to conserve floor space. 36" is just too much.
I assume I'm going to need to put in some serious insulation where the thermal mass passes through a wall (duraboard?).
I assume that I'm going to need to rip out the existing chimney system and replace with triple-wall 6" ID piping. (I have a concrete "clay" tile roof which will be an absolute joy to cut a bigger hole through /sarcasm).
I'm assuming my J-tube and feed will need to extend outward into the floor space from the barrel.
I'm assuming that I will use a stainless 55 gallon barrel.
I assume that I will create some sort of box for the thermal mass using brick masonry, and hope to cover the sides of the barrel as well, but preserve a cooking surface on the top. (kind of like the build in Brussels Belgium that looks so tidy)

So my questions:

Will duraboard be sufficient to create a rectangular hole/thermal pipe through the wall for thermal protection (thermal mass pass-through)? How many layers would be required? Is an air-gap required?

How should I heat shield the walls in the cubby where the barrel and J-tube will sit? Reading Ernie and Erica's site, they claim 18" space required from the barrel to the wall (with heat shield). Did I read that correctly? If I box the barrel in with brick, does the 18" requirement still stand?

There's all these pictures of RMH units in cob houses with the barrel right up against the wall. That obviously can't be done in a conventionally built house. Though it's kind of frustrating. That's a lot of wasted space.

Any ideas or confirmed answers to these questions would be greatly appreciated. Thanks all!!
 
Rocket Scientist
Posts: 4526
Location: Upstate NY, zone 5
574
5
  • Mark post as helpful
  • send pies
    Number of slices to send:
    Optional 'thank-you' note:
  • Quote
  • Report post to moderator
In a stick-built house, it would be appropriate to treat the barrel like a standard woodstove (it will reach similar temperatures on the surfaces), and follow the building code for clearances and shielding. The International Building Code which may be used as the base for your local code has sections for woodstoves and masonry heaters - you can look it up online.
http://publicecodes.cyberregs.com/icod/ibc/2009/icod_ibc_2009_21_sec012.htm

You probably do not need to do anything to your existing woodstove chimney, as the exhaust from a properly built RMH will be much lower temperature and have less toxic/corrosive gases in it than a standard woodstove. Do inspect it to make sure it is in good condition.
 
Glenn Herbert
Rocket Scientist
Posts: 4526
Location: Upstate NY, zone 5
574
5
  • Mark post as helpful
  • send pies
    Number of slices to send:
    Optional 'thank-you' note:
  • Quote
  • Report post to moderator
Per the "masonry heater" clearance options in the IBC, it looks like enclosing the sides and back of the barrel with an 8" brick wall spaced 4" from the existing wall would satisfy it. Likewise, 8" of masonry cover for the ducts in the bench, with studs or other combustible elements cut back to 4" from the masonry, should be acceptable to code. It's probably more than needed for safety, but if practical I would follow that code.

Your existing chimney is presumably functional to carry the propane exhaust gases, though I have no idea how hot they can be in your situation.
 
Bob Becker
Posts: 18
Location: Beulah, CO
1
  • Mark post as helpful
  • send pies
    Number of slices to send:
    Optional 'thank-you' note:
  • Quote
  • Report post to moderator
Glenn,

Thanks so much for the response!

So the existing chimney is 4" inner diameter. Is that going to be sufficient to exhaust a 6" system? Or do they make bigger triple wall pipe that will fit in a 7" OD hole. The pipe that's there is 4" ID, and 7" OD.

For the pass-through: a pair of 6" pipes stacked (horizontally or vertically) plus 8" masonry plus 4" air gap will require an approx 30" x a 36" hole on the stacked pipe dimension. Could I use triple wall pipe on the pass-through and make a smaller hole? Or does that not gain me anything as far as a smaller hole in the wall?

Thanks!

 
Posts: 39
Location: Western Montana
1
  • Mark post as helpful
  • send pies
    Number of slices to send:
    Optional 'thank-you' note:
  • Quote
  • Report post to moderator
That looks like a direct vent gas flue, correct? If that's the case, then yes...you'll need to replace it with a Class A chimney. You can run single wall up to the ceiling box though if you want. Double wall is recommended but I don't believe required. You might want to be careful about how much of the barrel you enclose... If you follow NFPA clearances for an unrated wood stove you'll be fine. With a properly built heat shield IIRC that gets you around 12" for the barrel going on memory here)
 
Bob Becker
Posts: 18
Location: Beulah, CO
1
  • Mark post as helpful
  • send pies
    Number of slices to send:
    Optional 'thank-you' note:
  • Quote
  • Report post to moderator
Thanks Scott! I truly appreciate everyone's input. It's very helpful to get other points of view!!

Thanks everyone very much!
 
pollinator
Posts: 684
Location: Richmond, Utah
33
  • Likes 1
  • Mark post as helpful
  • send pies
    Number of slices to send:
    Optional 'thank-you' note:
  • Quote
  • Report post to moderator
Hi Bob,
If it were me, I would replace the propane stove with a pellet stove, since it can be vented in the original flue, though not optimal as "B" vent is lined with aluminum which will corrode eventually, it will get the job done for years to come.
I get my pellets from the local lumber mill for $150 per ton/pallet. This lasts us more than a winter as our primary heat source. My wife loves it! Press a button and away it goes, press it again and it shuts down.
I love RMH's as well, but they are not code acceptable to the local officials here in Utah, so I will be installing my first in the greenhouse I plan to build in the spring.
I don't want to distract you from your original plan, but this is a cheap and eco-friendly way to heat that satisfies all code requirements.
 
The time is always right to do what is right. -Martin Luther King Jr. / tiny ad
2024 Permaculture Adventure Bundle
https://permies.com/w/bundle
reply
    Bookmark Topic Watch Topic
  • New Topic