• Post Reply Bookmark Topic Watch Topic
  • New Topic
permaculture forums growies critters building homesteading energy monies kitchen purity ungarbage community wilderness fiber arts art permaculture artisans regional education skip experiences global resources cider press projects digital market permies.com pie forums private forums all forums
this forum made possible by our volunteer staff, including ...
master stewards:
  • John F Dean
  • Carla Burke
  • Nancy Reading
  • r ranson
  • Pearl Sutton
  • Jay Angler
stewards:
  • Liv Smith
  • paul wheaton
  • Nicole Alderman
master gardeners:
  • Christopher Weeks
  • Timothy Norton
gardeners:
  • thomas rubino
  • Matt McSpadden
  • Eric Hanson

Rocket Mag heater, Rocket Mag Stove

 
Posts: 455
Location: climate zone 6b
3
  • Likes 1
  • Mark post as helpful
  • send pies
    Number of slices to send:
    Optional 'thank-you' note:
  • Quote
  • Report post to moderator
Since my stove has Unique Characteristics and has grown to a level on its own merits it deserves a name and I call it the "Rocket Mag Heater"
"Rocket Mag or Rocket Mag Stove" is acceptable. This was once called a vertical batch but it does not have enough similarities of a batch system to be called a batch so since it has the unique air tight wood magazine, hence the name it has earned.

The Characteristics of my type of stove are as follows but not all inclusive:

* Extra Large vertical Feed Magazine

* Air tight lid on Extra large feed Magazine

* Burn Tunnel at the bottom of the extra large feed Magazine

* Necessary front bottom Access port for unique burning of this type of stove

* Not only extra large but very deep feed chamber.


These characteristics allow this stove to burn the way it does and address many of the concerns of "standard rocket stove" users have.

Over the years of research I have noticed that same complaints repeated from the owners of standard rocket Stoves as follows:

1 less than easy [cold] start ups.

2 inconvenient maintenance and clean out.

3 baby sitting start ups and tedious short feeding intervals.

4 limited wood chunk sizes.

5 copious amounts smoke back.

6 once installed its difficult to move especially if you change your mind.

7 no restarts and short burn times.

8 unattended burn are out of the question.

9 limited work load [mostly just heat home].

this list is not all inclusive and may not be what every single rocket stove owners has or feels is an issue that needs to be addressed.

over the years i wrote down every one of these complaints i saw that people were saying and i sought out to address every single one of them to meet my needs and i am happy i feel i have met each of those goals as best i could.


Posts: 617
Location: ontario, canada
15
transportation fungi tiny house
  • Likes 1
  • Mark post as helpful
  • send pies
    Number of slices to send:
    Optional 'thank-you' note:
  • Quote
  • Report post to moderator
Everyone should have big mags if you ask me lol. . I'm working on a slightly larger feed tube on my next unit, but I'm afraid to go too big. I decided on an extra inch going from 5x5 to 6"x6". See how that works, the 5x5 works well and works amazing with pellets, but sometimes with the wood you just need that extra inch lol
 
F Styles
Posts: 455
Location: climate zone 6b
3
  • Mark post as helpful
  • send pies
    Number of slices to send:
    Optional 'thank-you' note:
  • Quote
  • Report post to moderator

John McDoodle wrote:Everyone should have big mags if you ask me lol. . I'm working on a slightly larger feed tube on my next unit, but I'm afraid to go too big. I decided on an extra inch going from 5x5 to 6"x6". See how that works, the 5x5 works well and works amazing with pellets, but sometimes with the wood you just need that extra inch lol


If i may make some suggestions from experience. Make it as large as you can and as long as you can create an air tight enough lid and you must have a front bottom access air flow port in order for it to work. front bottom air flow port is key to making this Rocket mag stove work. Also keep in mind that the front air flow access port cannot be larger than your system core size in order to have proper air burn flow.
 
F Styles
Posts: 455
Location: climate zone 6b
3
  • Mark post as helpful
  • send pies
    Number of slices to send:
    Optional 'thank-you' note:
  • Quote
  • Report post to moderator
I have to agree with the out of the box no pun intended ideas Satmax has talked about. This concept of mine was already in full motion build stage when Satmax was talking about it in the link below. I had no idea this was a subject others were talking about and my idea of the Rocket Mag formerly others called vertical batch grew from my original concept to what it is today.

here is Satmax talking about the idea if I may quote him.

Oct 4, 2015 at 4:49pm

Post by satamax on Oct 4, 2015 at 4:49pm
Hi everybody.

Well, Peter, if you happen to be around. Have you ever thought about a vertical batch? I mean, something of the right CSA for a horizontal batchbox. But squarer, and vertical. Door on top. A port on the side, of the right size, with the P channel. A V at the bottom. May be some bottom air instead of top air.

I'm thinking about this for the retrofit of ranges. It would be easier to load than my tiny horizontal batch.


source: http://donkey32.proboards.com/thread/1803/peter-vertical-batch

according to the link the idea did not sit well with others at first. But that did not hinder smart people from creative thinking. There are people with ideas and I believe you should see your ideas through and those out of the box ideas are what pioneer new paths. Satmax is a sharp man and was on the right track to something while i was in process of building without knowing he was talking about that very idea. I just wish i could have been part of that discussion while i was building the stove. I may have been able to tweak the design something even greater. we can use this section to ask questions and dig into upgrades. Ill do my best to help anyone with questions.
 
John McDoodle
Posts: 617
Location: ontario, canada
15
transportation fungi tiny house
  • Mark post as helpful
  • send pies
    Number of slices to send:
    Optional 'thank-you' note:
  • Quote
  • Report post to moderator

F Styles wrote:
according to the link the idea did not sit well with others at first. But that did not hinder smart people from creative thinking. There are people with ideas and I believe you should see your ideas through and those out of the box ideas are what pioneer new paths.


Absolutely brother.
I checked that link also I didn't realize it was from October. I thought it was recent. I see max mentioned you in there also .
 
gardener
Posts: 3471
Location: Southern alps, on the French side of the french /italian border 5000ft elevation
194
  • Mark post as helpful
  • send pies
    Number of slices to send:
    Optional 'thank-you' note:
  • Quote
  • Report post to moderator
Well, if life and death didn't get too much in the way, i could have tried it by now. I realy want a "batch" reaction, something which you make two or three fires at once, and your mass is charged for the next 24 hours. Myself, i don't long for something mobile. I don't want the hassle of feeding the fire, like you have to with J tubes. Also, splitting kindlings etc.

But the batch sometimes overloads, and i don't like that.

I might try a magrocket just to see how it behaves. One of thoses days.
 
F Styles
Posts: 455
Location: climate zone 6b
3
  • Mark post as helpful
  • send pies
    Number of slices to send:
    Optional 'thank-you' note:
  • Quote
  • Report post to moderator
With my extension lid i can stuff the extended wood load inside, use one match, with one hand full of wood shavings, 5 slim pieces of wood to catch the load on fire and i walk away and it super heats the mass for 24 hours. The Rocket Mag stove gets the job done with no baby sitting, no "batch overloads", no splitting tons of kindling, no clogging and no fuss. easy, easy easy! I love this system

my system does not have to be mobile to be a Rocket Mag. It is only mobile so i can cook outside, easy pull out and clean and is not necessary for a Rocket Mag build. Its a personal preference that my Rocket Mag be mobile.
 
F Styles
Posts: 455
Location: climate zone 6b
3
  • Mark post as helpful
  • send pies
    Number of slices to send:
    Optional 'thank-you' note:
  • Quote
  • Report post to moderator

Absolutely brother.
I checked that link also I didn't realize it was from October. I thought it was recent. I see max mentioned you in there also .


I was smack dab in the middle of my Rocket Mag build when they were having that conversation and i had no idea. I saw Satmax mentioned me and it was a fair comment. im not mad we had our differences and it may have been partly a language barrier.
 
F Styles
Posts: 455
Location: climate zone 6b
3
  • Likes 1
  • Mark post as helpful
  • send pies
    Number of slices to send:
    Optional 'thank-you' note:
  • Quote
  • Report post to moderator
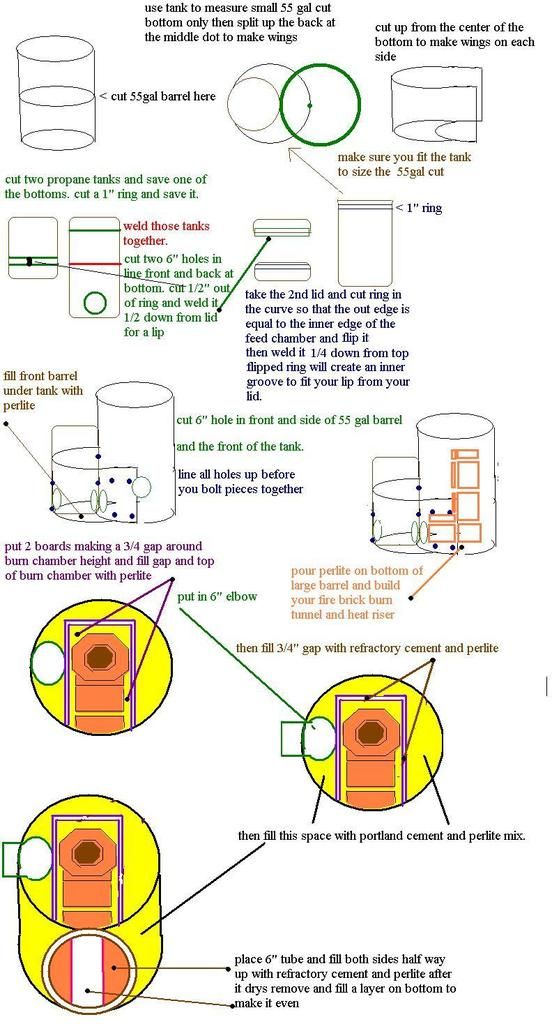
Basic step by step I used to build my Rocket mag Stove:


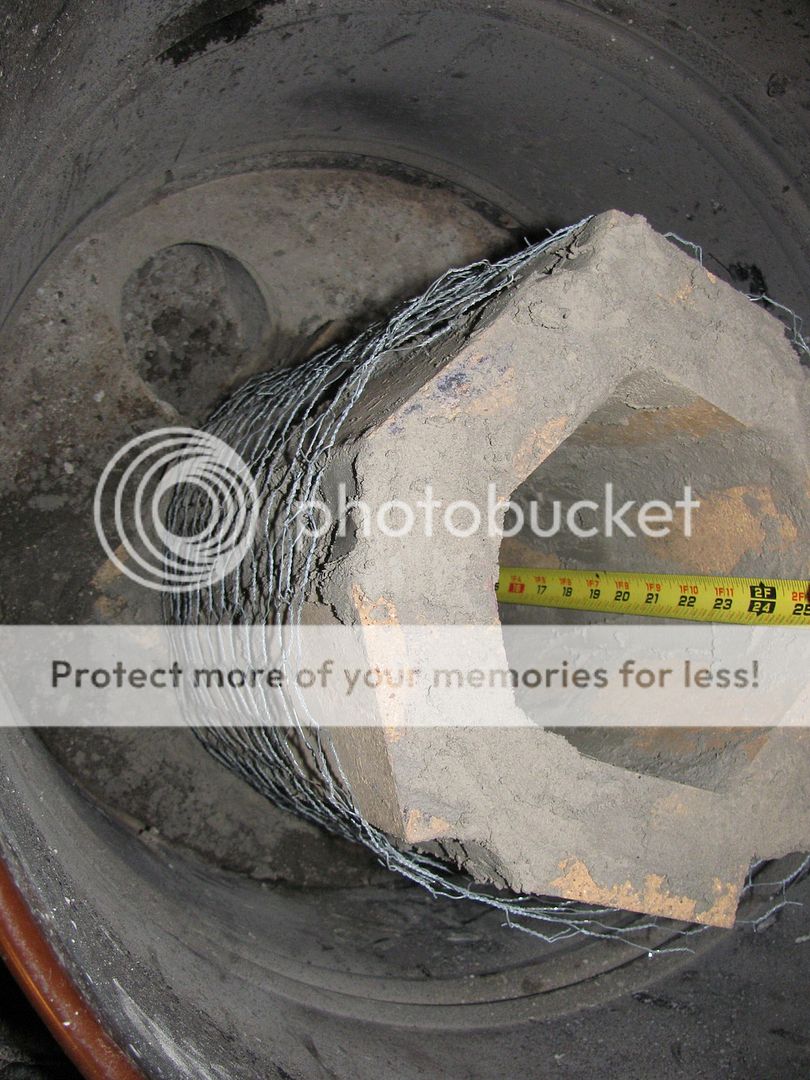
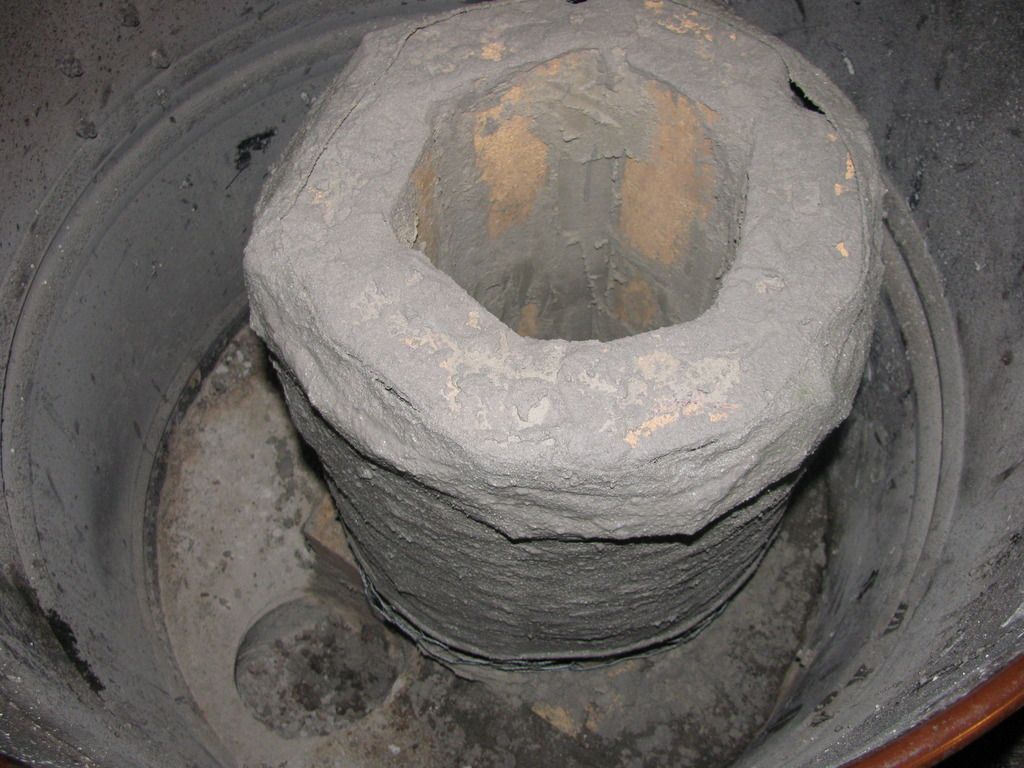
heat riser pics:


Refractory cement slurry soaked material wrapping heat riser for extra strength:


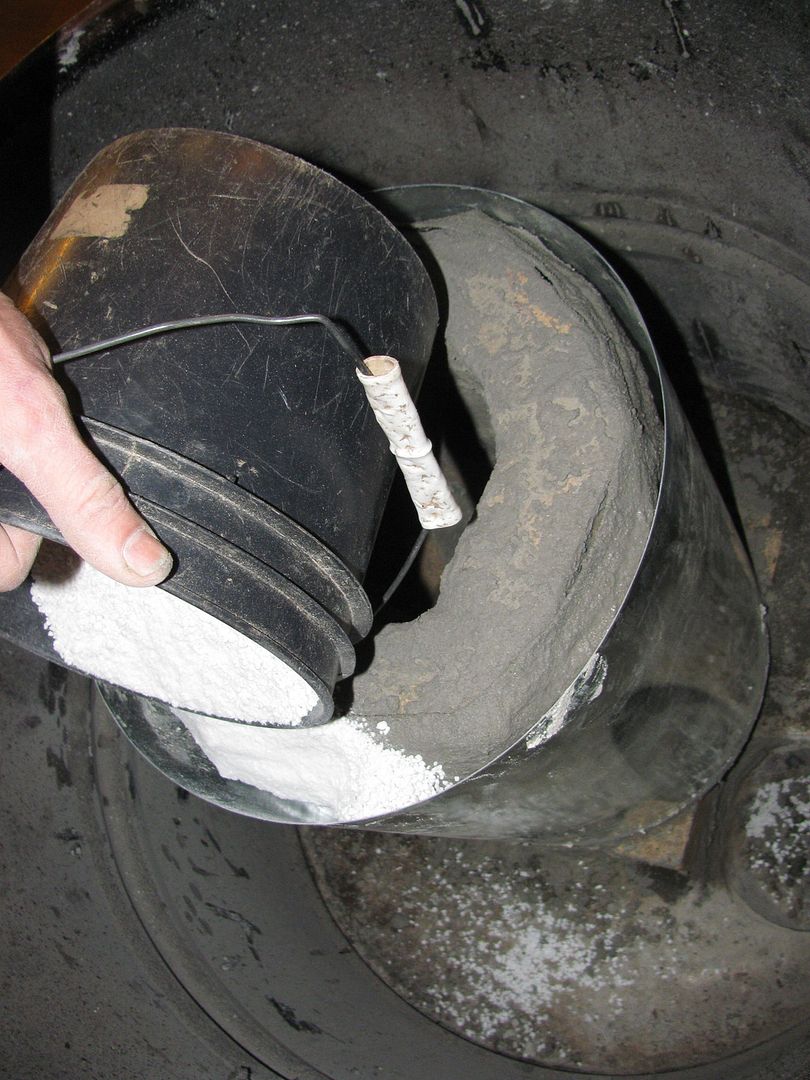
combining two duct sections you can make your outer sleeve to hold your perlite or favorite insulation as big as you want. I use loose perlite since it seems to work so much better than clay or cement perlite mix. Loose perlite may actually work twice a well since i have experience with both i can tell a huge difference between the two.


I do not use a larger manifold as suggest but i incorporate a concrete slope so that the lowest point in the bell is the same as core size manifold exit and it seems to compress and force the colder air into the manifold for increased pressure and added suction for the burn magazine air flow. this sloped incorporation in my estimation doubles my suction capabilities from other observed systems just by observation only.

Rocket Mag stoves can be made with larger burn magazines but the two key things that make this work is 1. air tight lid and 2. same as core size bottom front air flow access port . These key points will allow the Magazine to burn the way it does at the bottom and if you make it all correctly I have had no clogs from embers and ash. I have noticed the fuller the embers the more furious it burns.

 
Posts: 1
  • Likes 1
  • Mark post as helpful
  • send pies
    Number of slices to send:
    Optional 'thank-you' note:
  • Quote
  • Report post to moderator
I live in Mass close to new Hampshire border .. anyone have a mass heater that would not mind if I came to see it ?
 
F Styles
Posts: 455
Location: climate zone 6b
3
  • Mark post as helpful
  • send pies
    Number of slices to send:
    Optional 'thank-you' note:
  • Quote
  • Report post to moderator
Just to keep things organized i will post this here to consolidate the important information under the Rocket Mag thread.

Post season video inspection.
 
F Styles
Posts: 455
Location: climate zone 6b
3
  • Mark post as helpful
  • send pies
    Number of slices to send:
    Optional 'thank-you' note:
  • Quote
  • Report post to moderator
Satmax did ask me if I was going to purdy the upgrade lid and here it is.
 
Posts: 140
1
  • Likes 1
  • Mark post as helpful
  • send pies
    Number of slices to send:
    Optional 'thank-you' note:
  • Quote
  • Report post to moderator
i have read about over fueling. why doesnt this over sized load of wood over fuel? i like the concept F Styles.
 
F Styles
Posts: 455
Location: climate zone 6b
3
  • Mark post as helpful
  • send pies
    Number of slices to send:
    Optional 'thank-you' note:
  • Quote
  • Report post to moderator
good question.

i have read about over fueling. why doesnt this over sized load of wood over fuel? i like the concept F Styles.


It does not "over fuel" because of multiple reasons.

1. The air flow is designed in such a way you may have been able to see in a few videos that the bottom is concaved to the size of the system and keeping a small air gap for air flow.

2. the front air port allows direct air flow access to the burning fuel and burn tunnel it doesnt have to fight going down through the wood.

To be serious the front air flow access port is a superior design and i highly suggest it. The system never leaves unburnt wood in it and seems to adjust its self when burning allowing it to burn perfectly.

Ive burnt 10"x18" large wood chunks in it for testing only and have videos of it those are the only times you may have to adjust the wood if it gets stuck. the most practical size is about 8".

 
F Styles
Posts: 455
Location: climate zone 6b
3
  • Mark post as helpful
  • send pies
    Number of slices to send:
    Optional 'thank-you' note:
  • Quote
  • Report post to moderator
I also have posted multiple videos showing no smoke or flash fire when opening the lid at different times of the burn cycle. The intense draw my system has sucks down the smoke and gases to be burned in the burn tunnel.

 
F Styles
Posts: 455
Location: climate zone 6b
3
  • Mark post as helpful
  • send pies
    Number of slices to send:
    Optional 'thank-you' note:
  • Quote
  • Report post to moderator
Now thats how you load a Rocket Mag Stove with an extension lid

 
ronald bush
Posts: 140
1
  • Mark post as helpful
  • send pies
    Number of slices to send:
    Optional 'thank-you' note:
  • Quote
  • Report post to moderator
looking good man! so you havent run into any issues with the "mag" catching on fire?
 
F Styles
Posts: 455
Location: climate zone 6b
3
  • Mark post as helpful
  • send pies
    Number of slices to send:
    Optional 'thank-you' note:
  • Quote
  • Report post to moderator
I have had no issues with the stove and it has exceeded my expectations many fold. the air tight lid is designed to handle a a full chamber fire. the concerns of a flash are minimum for many reasons, the design of the stove doesnt allow for a flash because it has constant air and it circulates in the magazine in a way not to allow enough gas fuel to be stored as it goes up and pulled into the burn tunnel and to get my system to flash would take the same efforts to create same flash in a conventional stove.

I have a custom forced air flow fan to bust through any cold chimney and system exhaust weight that would cause smoke back in any normal system, but i have not needed to use it much at all. I have built in many secondary, easy maintenance,and easy start options. Inside the internals the combined attributes bring this into a super package. The unique build of the mag, the custom heat riser concept, the slanted bell floor to exhaust, the 50 gal water tank inside the last mass absorbing all the last available heat from the exhaust and as the water slowly releases the stored heat energy it keeps the chimney exhaust from having cold air plugs.

 
F Styles
Posts: 455
Location: climate zone 6b
3
  • Mark post as helpful
  • send pies
    Number of slices to send:
    Optional 'thank-you' note:
  • Quote
  • Report post to moderator
I literally suck just about every ounce of BTU in my system to the point that the exhaust is about body temperature at the top of the chimney. Even though i suck that much heat out of the system it is extremely powerful. I bet it has the draw of a 8" system at least.
 
Posts: 1
  • Mark post as helpful
  • send pies
    Number of slices to send:
    Optional 'thank-you' note:
  • Quote
  • Report post to moderator
Hi! Your ideas look very good and you are clearly learning and experimenting with Rocket Stove technology. This is very inspiring. Is there a commercially available Rocket Stove I can install in my basement for home heating and/or water heating? One that has an automatic feed so I can leave it burning when I go to work? Or is the technology too new to meet those requirements? Please let me know, Thank you!
 
F Styles
Posts: 455
Location: climate zone 6b
3
  • Mark post as helpful
  • send pies
    Number of slices to send:
    Optional 'thank-you' note:
  • Quote
  • Report post to moderator
C Williamson

this stove is commercially made and UL tested so it can be insured.
https://permies.com/t/54791/rocket-stoves/Rocket-Heater-UL-Tested-UPDATE

This batch stove looks real good.


i dont think there is a commercial RMH with a water heating option to my knowledge.

a batch stove can burn for many hours as you can see so can my Rocket Mag Stove. I pack mine full and go out and work all day. the idea of any rocket stove is that it does not have to or should not have to burn all day long. one load packed should make and store enough heat to radiate your home all day and keep it toasty.
 
Posts: 146
3
  • Mark post as helpful
  • send pies
    Number of slices to send:
    Optional 'thank-you' note:
  • Quote
  • Report post to moderator
Hello

I am thinking of doing this Mag when my dad can no longer help me burning the RMH. I have some questions please advise:

1) Your giant feedtube is some barrels welded together, but that's too complicated for me to even think about. Can I use firebricks? As long as I make the feedtub big like your with the groove at the bottom for air and a side airway like yours, do you think that would work? Is any one already try this please let me know

2) Your airway has a fan, I don't think I can do that. Does it work if my is just an opening with no fan

3) so the bottom of your feedtube is not flat, it has a groove for air, how deep is this groove below the burn tunnel? the deepest middle point

4) Your heat riser is of full size firebricks or half-firebrick? How tall is your heat riser? it looks pretty short?
 
Satamax Antone
gardener
Posts: 3471
Location: Southern alps, on the French side of the french /italian border 5000ft elevation
194
  • Mark post as helpful
  • send pies
    Number of slices to send:
    Optional 'thank-you' note:
  • Quote
  • Report post to moderator

F Styles wrote:C Williamson

this stove is commercially made and UL tested so it can be insured.
https://permies.com/t/54791/rocket-stoves/Rocket-Heater-UL-Tested-UPDATE

This batch stove looks real good.


i dont think there is a commercial RMH with a water heating option to my knowledge.

a batch stove can burn for many hours as you can see so can my Rocket Mag Stove. I pack mine full and go out and work all day. the idea of any rocket stove is that it does not have to or should not have to burn all day long. one load packed should make and store enough heat to radiate your home all day and keep it toasty.


It can be insured, but it is not a rocket.

As explained many times before, if the internals, " feed tube, burn tunnel and heat riser" are not insulated, it's not a rocket.


And the video of T2H instructionals is nice. Lots of good tricks, but as i have said before, it doesn't respect the proportiion of Peter's "batch rocket" the original It is also all metal. No insulation, bottom air. No P cahnnel etc. This is another guys trying to reinvent the wheel. If you realy want an all metal (or nearly,) baych rocket with water heating. Go there at the bottom of the page.

http://batchrocket.eu/en/applications

I think it might go commercial one of those days.
 
F Styles
Posts: 455
Location: climate zone 6b
3
  • Mark post as helpful
  • send pies
    Number of slices to send:
    Optional 'thank-you' note:
  • Quote
  • Report post to moderator
Satmax I respect your opinion and I agree with you , please take note I only called them "stoves"
 
F Styles
Posts: 455
Location: climate zone 6b
3
  • Mark post as helpful
  • send pies
    Number of slices to send:
    Optional 'thank-you' note:
  • Quote
  • Report post to moderator

Bacon Lee wrote:Hello

I am thinking of doing this Mag when my dad can no longer help me burning the RMH. I have some questions please advise:

1) Your giant feedtube is some barrels welded together, but that's too complicated for me to even think about. Can I use firebricks? As long as I make the feedtub big like your with the groove at the bottom for air and a side airway like yours, do you think that would work? Is any one already try this please let me know

2) Your airway has a fan, I don't think I can do that. Does it work if my is just an opening with no fan

3) so the bottom of your feedtube is not flat, it has a groove for air, how deep is this groove below the burn tunnel? the deepest middle point

4) Your heat riser is of full size firebricks or half-firebrick? How tall is your heat riser? it looks pretty short?


Mr Bacon, Thank you for your interest. I will do my best to help you in anyway I can.

1 you may bolt two tank together or you can create your "mag" in other ways as long as your lid is air tight. an air tight lid keeps the draw of the air in the correct way it should at the bottom of the wood where i believe it should be, so gravity can feed it and mix the air, heat and flames together using the wood itself to do the mixing.

2 my airway does not have a permanent fan. i only designed the fan option to push cold air out of the vertical smoke stack which i used only a few times. you may not even need it.

3 the bottom of my feed Mag is concaved and tapers up against the sides so the wood always slides toward the center. the bottom has the same shape and curve as a 6" pipe from front to the burn tunnel. imagine the front pipe running to the burn tunnel. if you still cant visualize it I will try and upload a pic just for you so you can see. try watching all the videos especially the end of year inspection to see the concaved bottom.

4 heat riser is full size and can be seen with a measuring tape and i use full size bricks. if i did the heat riser again i think i would use half bricks so i can add more insulation but i am happy with the full size bricks because it makes it more rugged. i prefer rugged over most options.

please ask more questions if you have them. i am here to help.
 
Diana Lee
Posts: 146
3
  • Mark post as helpful
  • send pies
    Number of slices to send:
    Optional 'thank-you' note:
  • Quote
  • Report post to moderator

If you could post clear pics that would be great, thanks
 
F Styles
Posts: 455
Location: climate zone 6b
3
  • Mark post as helpful
  • send pies
    Number of slices to send:
    Optional 'thank-you' note:
  • Quote
  • Report post to moderator

Bacon Lee wrote:
If you could post clear pics that would be great, thanks


I will do my best my friend, but i do have a crappy camera.

which angle and area did you want to see a pic i do not have posted?
 
Diana Lee
Posts: 146
3
  • Mark post as helpful
  • send pies
    Number of slices to send:
    Optional 'thank-you' note:
  • Quote
  • Report post to moderator

For what I see from your video and pictures, I can't tell the high of the groove. Yours is a 6" right, so your burn tunnel is should be 5.25 inches if it is square. Now you have a groove. So, if I use two firebricks make into a triangle at the bottom (the groove), I will put cob to support those two bricks so they can stay diagnose like yours, would that work?
groove.png
[Thumbnail for groove.png]
 
Diana Lee
Posts: 146
3
  • Mark post as helpful
  • send pies
    Number of slices to send:
    Optional 'thank-you' note:
  • Quote
  • Report post to moderator

Here is my plan: I can easily find a pot diameter 12 inches with a glass lid tightly fit the pot. I will have someone help cut out the bottom of that pot. The feed tube, I will have round shape around the pot, with the pot a little out so I can have the lid cover it. This satisfy the requirement you said, "only one air source".

The glass lid help me to see everything going on inside.

The thing which mainly determine if it work or not is the bottom of the feed tube. I still not sure how to make the groove to allow air in. Someday when you burn your mag, would you record from the air way so we can have a better view of how the firewood not blocking the airway.
 
F Styles
Posts: 455
Location: climate zone 6b
3
  • Mark post as helpful
  • send pies
    Number of slices to send:
    Optional 'thank-you' note:
  • Quote
  • Report post to moderator
i dont think your above cob idea will work...unless i am imagining what you are doing wrong.

i can not vouch for the heat tolerance of the glass lid. if you do use a lid it MUST be air tight.

the wood will stack pretty tight and the air mixes around it as it burn and collapses onto itself.

if you are trying to make a Rocket mag stove i would try and stick to the instruction i drew out.

Cob is not going to work in the wood mag and i enlarged my burn tunnel so it is larger than 5.25 inches. i eyeballed everything as i built it and did not measure anything.

here is my youtube channel. i would watch all the videos. i have some close ups of the front bottom air access port in the channel.
 
Posts: 52
2
  • Mark post as helpful
  • send pies
    Number of slices to send:
    Optional 'thank-you' note:
  • Quote
  • Report post to moderator
Hi, I know this is an old thread, but this seems like such a great idea and design?
I am very impressed with your results.
You can burn big logs that last for many hours and the design is quite basic and relatively easy to make.
I guess it will not be as hot or efficient as some other designs but from what I can read it seems to work really well and might suit some people’s needs.
The main negative seems to be safety but if it was in an outbuilding or workshop rather than inside a house I think I would be ok with that.
On the off change Mr F Styles is still around can you give an update?
 
I am going to test your electrical conductivity with this tiny ad:
Back the BEL - Invest in the Permaculture Bootcamp
https://permies.com/w/bel-fundraiser
reply
    Bookmark Topic Watch Topic
  • New Topic