• Post Reply Bookmark Topic Watch Topic
  • New Topic
permaculture forums growies critters building homesteading energy monies kitchen purity ungarbage community wilderness fiber arts art permaculture artisans regional education skip experiences global resources cider press projects digital market permies.com pie forums private forums all forums
this forum made possible by our volunteer staff, including ...
master stewards:
  • r ranson
  • Carla Burke
  • Nancy Reading
  • John F Dean
  • Jay Angler
  • paul wheaton
stewards:
  • Pearl Sutton
  • Burra Maluca
  • Joseph Lofthouse
master gardeners:
  • Timothy Norton
  • Christopher Weeks
gardeners:
  • Jeremy VanGelder
  • Maieshe Ljin
  • Nina Surya

Pallet-Wood Raised Bed Concept

 
Posts: 6
  • Mark post as helpful
  • send pies
    Number of slices to send:
    Optional 'thank-you' note:
  • Quote
  • Report post to moderator
Hi folks.

Disclaimer : I have no idea what I'm doing.  I've never planted anything.

I'd like to request some constructive comments and criticisms towards my first raised bed design.  


Raised Bed Concept


Raised Bed Concept (X Ray)

Concept : A raised bed; constructed from pallet wood; and integrating elements of hugelkultur, vermiculture, and natural pest control.

It would stand 14" tall, and roughly 4' long by 2' wide.  It's my uneducated opinion that the small size of the grow bed has a few benefits for someone of my experience level.  I can control soil ph conditions, prevent erosion, and encourage healthy soil biology with relative ease; all while I acquaint myself with various plants for the first time.  By building several of these beds next to each other, I can easily experiment with different seed/soil/fertilizer combinations in real time.  Construction costs would be close to zero.

The design elements are based on a very tenuous grasp of several concepts.  

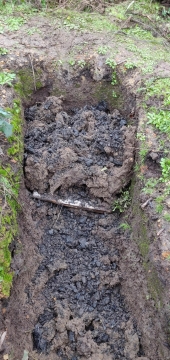
I really don't know how deep the log should rest beneath the structure in order to best provide moisture to the root systems above, nor do I know whether the 4' long log in the concept image would be sufficient to produce the desired effect.  i want to create a moisture sponge that won't make the small bed so densely populated by fungi that it would discourage plant growth.  The attached images depict a hugel log resting about 16-18" beneath the soil's surface within the grow bed for reference.    

I've never done serious research into the effective use of worm towers.  I'm mulling around  the  concept of hollowing out an 8" diameter log by burning a coal straight down the middle, then drilling portals in the side of the log to allow worm-traffic between the tower's interior and the surrounding soil.  Food waste and manure rich compost would be fed into the top cavity, capped with a disc cut from the same log, then held shut by a 10-15 lb. rock that easily absorbs heat.  The concept appeals to me because it hypothetically would sequester more carbon into the soil (avoiding the releasing of carbon into the air by traditional composting), and would keep my grow bed rich with worm castings with no effort on my part.  The rock would hopefully prevent clever mammals from attacking the food waste, while also encouraging the presence of pest-killing lizards in the grow bed.

At this point, I'm stacking hypotheticals on hypotheticals.  Does anyone with real-world experience see potential in this design?    

Thank you for your consideration.  

 
gardener
Posts: 787
Location: NE Oklahoma zone 7a
52
dog forest garden books urban chicken bike
  • Likes 1
  • Mark post as helpful
  • send pies
    Number of slices to send:
    Optional 'thank-you' note:
  • Quote
  • Report post to moderator
My advice is to build it and observe how it does. You have obviously done a lot of design work and some consideration so just see how it goes. By observing the result you will gain the most from this idea.  Raised beds work in some climates, hugels work differently in different climates, etc. getting out and gaining experience is #1 in my book, because you might succeed using a method i would fail at using.
just give it a go! I like the idea.
One thing to look out for is pallet wood thats been treated with anti fungal or some chemicals. In my experience with pallets this level of care is rare(usually about as cheap as they can make them, no need for treatments just throw it away mentality), but ive heard it can happen.
Goodluck
 
gardener
Posts: 5294
Location: Cincinnati, Ohio,Price Hill 45205
1069
forest garden trees urban
  • Likes 1
  • Mark post as helpful
  • send pies
    Number of slices to send:
    Optional 'thank-you' note:
  • Quote
  • Report post to moderator
Beautiful design! I like the idea of the hollow log worm tower.
Failing that,pallet wood could be screwed into a rectangular tube.
I would avoid any design that required much dismantling of the pallets.
You should only use the ones marked "HT" (heat treated) ,and realize they simply won't last very long.


The most I would do is cut them parallel to the slats,to make them the right heigh, then slide the open ends over posts driven into the ground and tie the corners with bailing wire.
I almost always bury wood below grade in my raised beds,and a worm tower will deliver nitrogen and moisture directly to the buried wood.

:
One more thing. I have found worm towers to be more like mold towers when I have used them. To avoid this in I will spike my towers with compost worms,just in case.
 
pollinator
Posts: 155
Location: Mid-Atlantic zone 5ish
34
forest garden trees woodworking wood heat
  • Likes 1
  • Mark post as helpful
  • send pies
    Number of slices to send:
    Optional 'thank-you' note:
  • Quote
  • Report post to moderator

William Bronson wrote:One more thing. I have found worm towers to be more like mold towers when I have used them. To avoid this in I will spike my towers with compost worms,just in case.


On that note, how does the worm tower contents become cycled out and into the garden?

In a worm bin, the bottom bin of finished product gets dumped out into a garden or wherever. With the tower, holes in the side of it allow worms to come in and out, but how does the compost inside it go in and out (to prevent overflow)?
 
Posts: 263
Location: Western Massachusetts (USDA zone 5a, heating zone 5, 40"+)
19
urban
  • Likes 1
  • Mark post as helpful
  • send pies
    Number of slices to send:
    Optional 'thank-you' note:
  • Quote
  • Report post to moderator
That's a fascinating idea.

If you build it, and you are able to build several, you could try some variants to figure out the effects of each component - say, one with a log but no tube, one with a tube but no log, one with both, and one with neither.

The rock may or may not enough to deter larger animals like racoons.
 
Christian Hull
Posts: 6
  • Mark post as helpful
  • send pies
    Number of slices to send:
    Optional 'thank-you' note:
  • Quote
  • Report post to moderator

Zach Muller wrote:My advice is to build it and observe how it does. You have obviously done a lot of design work and some consideration so just see how it goes. By observing the result you will gain the most from this idea.  Raised beds work in some climates, hugels work differently in different climates, etc. getting out and gaining experience is #1 in my book, because you might succeed using a method i would fail at using.
just give it a go! I like the idea.
One thing to look out for is pallet wood thats been treated with anti fungal or some chemicals. In my experience with pallets this level of care is rare(usually about as cheap as they can make them, no need for treatments just throw it away mentality), but ive heard it can happen.
Goodluck


Thanks Zach.

I'm looking forward to finding out 40 different ways the concept doesn't work =)  

I'll be moving closer to my future homestead property soon, and I'll be able to make monthly trips out there to (very) slowly develop it, but the pallet experiment has to wait at least a little bit.  I wouldn't be able to properly care for plants there while only visiting sporadically, and for now I'm stuck living in an apartment without the freedom of land use to dip my feet in hugelkutur.  

Thanks for the heads-up on the treated pallets, I hadn't even thought that a shipping company would bother considering their disposable nature.  

 
Christian Hull
Posts: 6
  • Mark post as helpful
  • send pies
    Number of slices to send:
    Optional 'thank-you' note:
  • Quote
  • Report post to moderator

William Bronson wrote: Beautiful design! I like the idea of the hollow log worm tower.
Failing that,pallet wood could be screwed into a rectangular tube.
I would avoid any design that required much dismantling of the pallets.
You should only use the ones marked "HT" (heat treated) ,and realize they simply won't last very long.


The most I would do is cut them parallel to the slats,to make them the right heigh, then slide the open ends over posts driven into the ground and tie the corners with bailing wire.
I almost always bury wood below grade in my raised beds,and a worm tower will deliver nitrogen and moisture directly to the buried wood.

:
One more thing. I have found worm towers to be more like mold towers when I have used them. To avoid this in I will spike my towers with compost worms,just in case.


Stellar response.  

With respect to dismantling pallets : should I avoid it due to the "pain in the ass" factor, or because they lose their integrity in the process of pulling them apart?

I will tinker on sketch-up later this week and try to recreate your description of an alternate construction.  I just got off work so I'm still to fuzzy to fully visualize what you're saying, but the bailing wire/post concept sounds a lot more durable than holding it together with 8 narrowly cut slats.  

Check mark on spiking with compost worms.  Do you have a favored instructional youtube/article regarding the use of worm towers?

Thanks much.


Christian Hull
Posts: 6
  • Mark post as helpful
  • send pies
    Number of slices to send:
    Optional 'thank-you' note:
  • Quote
  • Report post to moderator

Steven Kovacs wrote:That's a fascinating idea.

If you build it, and you are able to build several, you could try some variants to figure out the effects of each component - say, one with a log but no tube, one with a tube but no log, one with both, and one with neither.

The rock may or may not enough to deter larger animals like racoons.


I have lofty goals of running at least a dozen or two of these beds to experiment with in terms of seed/sunlight/soil composition/compost recipes, but you're right.  Perhaps I should consider first building alternative designs in parallel with each other, and setting these alternative designs compete with each other.  Otherwise I might build 12 copies of a half baked prototype and waste my time and productivity.  

And yes, I should probably consider some sort of cheap but durable latch system to keep the trash-pandas out of the worm tower.  

Thanks much.
 
Christian Hull
Posts: 6
  • Mark post as helpful
  • send pies
    Number of slices to send:
    Optional 'thank-you' note:
  • Quote
  • Report post to moderator

Forus Tserof wrote:

William Bronson wrote:One more thing. I have found worm towers to be more like mold towers when I have used them. To avoid this in I will spike my towers with compost worms,just in case.


On that note, how does the worm tower contents become cycled out and into the garden?

In a worm bin, the bottom bin of finished product gets dumped out into a garden or wherever. With the tower, holes in the side of it allow worms to come in and out, but how does the compost inside it go in and out (to prevent overflow)?


I intended to address my personal concerns with overflow by monitoring the intake of each tower, and building as many of these beds as possible to spread the waste around before it could become a problem.  But I'm talking strictly out of my ass.    

But I would love to find out if an avid vermiculturist could estimate a realistic worm population for a  bed like this, and how much compost would realistically be consumed in a given time.  
 
William Bronson
gardener
Posts: 5294
Location: Cincinnati, Ohio,Price Hill 45205
1069
forest garden trees urban
  • Likes 1
  • Mark post as helpful
  • send pies
    Number of slices to send:
    Optional 'thank-you' note:
  • Quote
  • Report post to moderator
Definitely a pain in the ass to dismantle them without ruining them.
I have built my worm tunnels out of bottomless 5 gallon buckets and PVC pipe.
I like what this guy did here:

http://www.instructables.com/id/Worm-Cafe-Compost-with-earthworms-right-in-your/


There are many different kinds of compost worms.
Red wigglers probably won't survive the winter, which might be a good thing.

Alabama Jumpers might survive the winter and are noted for digging deep into the soil as well as consuming compost. There are some areas of the country that are concerned with the effects of worms on the native ecosystem. You will have to look into it for yourself,but you might start here:
http://www.wormfarmfacts.com/Alabama-Jumper.html


My suggested form for the pallet raised beds looks something like this:

https://www.flickr.com/photos/raches/6740103639/in/photostream

Notice how the front pallet has been cut down to size. I prefer very tall raised beds,but as toucan see they are easily altered.

A square bed will easily hold itself up.
If the bin is rectangular,it will benefit from having a few posts driven vertically through each pallet.

Here is an example:
http://4.bp.blogspot.com/-4eSwRtOPBSU/UFYS-nie2fI/AAAAAAAAG74/F2iLi-fT88I/s320/533164_10151109633282436_1915926012_n.jpg
 
Christian Hull
Posts: 6
  • Mark post as helpful
  • send pies
    Number of slices to send:
    Optional 'thank-you' note:
  • Quote
  • Report post to moderator

William Bronson wrote: Definitely a pain in the ass to dismantle them without ruining them.
I have built my worm tunnels out of bottomless 5 gallon buckets and PVC pipe.
I like what this guy did here:

http://www.instructables.com/id/Worm-Cafe-Compost-with-earthworms-right-in-your/


There are many different kinds of compost worms.
Red wigglers probably won't survive the winter, which might be a good thing.

Alabama Jumpers might survive the winter and are noted for digging deep into the soil as well as consuming compost. There are some areas of the country that are concerned with the effects of worms on the native ecosystem. You will have to look into it for yourself,but you might start here:
http://www.wormfarmfacts.com/Alabama-Jumper.html


My suggested form for the pallet raised beds looks something like this:

https://www.flickr.com/photos/raches/6740103639/in/photostream

Notice how the front pallet has been cut down to size. I prefer very tall raised beds,but as toucan see they are easily altered.

A square bed will easily hold itself up.
If the bin is rectangular,it will benefit from having a few posts driven vertically through each pallet.

Here is an example:
http://4.bp.blogspot.com/-4eSwRtOPBSU/UFYS-nie2fI/AAAAAAAAG74/F2iLi-fT88I/s320/533164_10151109633282436_1915926012_n.jpg


Couldn't ask for better resources.  I thank you greatly.  
 
Posts: 144
Location: Sacramento, CA
8
  • Likes 1
  • Mark post as helpful
  • send pies
    Number of slices to send:
    Optional 'thank-you' note:
  • Quote
  • Report post to moderator
Pallets are FREE...oh boy!  They are useful intact, making a three bay compost bin with full pallets is the best use of them well, that and big bonfires.   Taking pallets apart takes a fair amount of work and yields relatively little useful wood.   It looks good on Pinterest but you don't see the labor involved or how much cheating was done.

Best way to get free wood is look for large construction sites, the sheer volume of great material they throw away will shock you.   I once got 400 board feet of clear vertical grain old growth redwood interior trim that would have cost easily $1,000.  

The other source for good cheap wood is fence boards, both new and used.   Fencing companies remove old wood fencing in blocks of 4 feet usually, throw legs on one and you have a rustic table.  They will actually come apart using a lot of usable wood for relatively little effort.   Play your cards right and the fencers will sometimes drop them off for you to save the cost of going to the dump.

Buying new fence boards is pretty cheap, its what I build my raised beds out of.   They are less than $3 at most box stores.

Another tip is ask if they have any rejected wood.  I just got 200 redwood fence boards from Lows for $200, rejected because they had gotten wet and mildewed a bit...LOL!
 
this is supposed to be a surprise, but it smells like a tiny ad:
5 Ways to Transform Your Garden into a Low Water Garden
https://permies.com/t/97045/Reduce-garden-watering
reply
    Bookmark Topic Watch Topic
  • New Topic