• Post Reply Bookmark Topic Watch Topic
  • New Topic
permaculture forums growies critters building homesteading energy monies kitchen purity ungarbage community wilderness fiber arts art permaculture artisans regional education skip experiences global resources cider press projects digital market permies.com pie forums private forums all forums
this forum made possible by our volunteer staff, including ...
master stewards:
  • Carla Burke
  • Nancy Reading
  • r ranson
  • Jay Angler
  • John F Dean
  • Pearl Sutton
stewards:
  • Nicole Alderman
  • paul wheaton
  • Anne Miller
master gardeners:
  • Christopher Weeks
  • Timothy Norton
gardeners:
  • thomas rubino
  • Jeremy VanGelder
  • Matt McSpadden

Attaching Grain Bin Roof

 
Posts: 2
  • Mark post as helpful
  • send pies
    Number of slices to send:
    Optional 'thank-you' note:
  • Quote
  • Report post to moderator
Hello all. I am new here, but am desperate to find an answer to this question. I have built a 30 foot earthbag roundhouse out of scoria. The time has come for the roof and I have acquired a 36 foot grain bin roof to cap it. While there is infinite suggestion out there to utilize a grain bin roof, there is zero practical advice on how to actually adapt such a roof. I would be convinced no one has ever done it before, save for one re in Kaki Hunters earthbag book.

We are laminating two lapping 2x12s together for a bond beam and banding them into the final rows of bags. Concrete is a non option due not only to cold weather but also the fact the property is only accessible by light bridge.

I have talked to some bin engineers and they seem to suggest making a number of corrugated metal "L"s. The vertical arm of the L would have the stock roofing brackets bolted to them, which would in turn attatch to the roof. The horizontal arm of the L's would lag bolt into the wood bond beam. Currently I am planning on constructing the L's out of old culvert steel, assembling the roof on the ground, lifting into place, and attaching the L's once its there.

This is as good a plan as I can come up with no other experience to draw from. Perhaps someone has done it and I must have not found the information. Or maybe there is a simpler approach I am overlooking short of pole barning it.

Any input is much appreciated!
 
Posts: 120
8
  • Mark post as helpful
  • send pies
    Number of slices to send:
    Optional 'thank-you' note:
  • Quote
  • Report post to moderator
30' ID? So 33' OD? I assume no posts. How far in from the end are the factory mounting tabs located? How many rows are you strapping? What are your wind loads? What is your climate? How high is your top plate? Any major openings? Barb wire?  1 or 2 floors? Maybe a turnbuckled cable as 36' has got to exert some force outwards.

I would think assembling on the ground and hosting (what are you rigging--cabling a high wire off trees or backhoe boom??) Would be more difficult than assembling in place. I've only assembled in place, goes easy with 3 guys. I rigged an entire bin roof off once with a backhoe, pretty floppy Fyi. Don't wanna tweak your new roof. It's only strong when it's connected to something at the bottom. Unless you are talking about assembling it on the ground bolted to your top plate, then lifting roof and top plate together. Still, positioning, fingers, machinery or hoist tending... I'd recommend assemble in the air.

The one thing that I'd like to know is, if this is a house (I assume), what is your ceiling and roof insulation plan. Something like a Flat ceiling, cellulose and vented roof or more vaulted ceiling with radial rafters and spray foam? Or different? If so, are you installing rafters first and are you planning a "raised heel" type L bracket to accommodate your rafters? Or just mitre their ends and rotate them into place? Or are you considering something different? Your roof connection should really depends on your insulation and ceiling type. I would want L brackets to be more substantial than some 14 GA corrugated sheet since this is not continuous contact, and especially if you raise heel it for rafters. I'd chop something like 1/4x2x2 (or similar) into 3" chunks, so that there is still meat after drilling. Also depends on your rafter situation,  your brand's tab spacing and local winds.
Appropriate L brackets make sense to me if the tabs are located to the exterior or above of your top plate. Bolt directly if to the interior of your plate. or if you rafter, and want to bolt to the rafter then spin those L brackets to bolt through the side of your rafter, then hurricane strap down to plate. One last thought, if you rafter, you could fab gusseted L brackets, like 3 sides of a box (x,y,z directions), and use the one hardware piece to fasten roof, rafter and top plate together all at once, effectively killing any wind up lift..
You have a few options, but coalesce your roof mount with your insulation and ceiling. Also consider if your ceiling and insulation and bracket approach may warrant you installing inner or outer blocking before the roof panel installation.
Hope that made sense.
 
Herb Jason
Posts: 2
  • Mark post as helpful
  • send pies
    Number of slices to send:
    Optional 'thank-you' note:
  • Quote
  • Report post to moderator
Thank you for the reply! I will try to answer as many questions as possible, but as I dont have your quoted text, I might forget couple. Let me start by saying that the primary driving factor behind my decision making is getting dried in asap. I live in Montana, in high altitude mountains and we are pushing December. We did not appreciate the monumental scale of our project and started too late in the season, but we are here now and cannot afford to wait out the winter for a myriad of reasons.

The diameter of the house is 30 foot to bag center. They are  little over 12" wide, so true OD/ID is 30.5/29.5 approx.

We are drilling our own holes, on site, in the roof itself for the factory tabs (once it has been lifted in place). The drilling in place was the brainchild of the bin companies engineers.

We are heavy duty poly strapping 3 bag layers down.

Not sure of exact wind loads, but they are signifigant in the valley below us. Much less in the mountains here, but some heavy gusts find there way through here.

Our climate is dry, mild high alpine. Cold in winter, hot in summer. Middle of the road snow loads.

Two courses of barb wire per row and 440 twine.

One substantial opening. 6 foot straight away for french doors. Planning on flanking it with pine posts after the roof is in place to offset loads to this weak point. I intend for these to be the only posts.

I worry a turnbuckle cable would ruin aestics, and is furthermore not possible due to the the loft. However, there are external steel bracing rings on the roof, serving a similiar purpose I believe.

Speaking of which, the bond beam will be at a finished height of 11' 6". The loft floor is at 8' 6" and poses a great challenge, as we are relying on the steep pitch of the roof to make up most the space of the loft.

I have a contractor friend who will be bringing in a grade all to hoist the roof into place, where it will be gently lowered one click at a time with a chain hoist. We crunched the numbers and it is viable. We wish to assemble on ground for two reasons. First we may complete the bond beam and roof simultaneously rather than consecutively (the time thing). Secondly, to head off the bracketing position nightmare. As we must place each bracket as we go and drill custom holes in the roof. The logistics seemed daunting as opposed to supporting the completed roof in place, and placing the brackets wherever they should land.

I am currently trying to come up with a sub roof plan that can be accomodated post grain bin roof, as it we will be wintered out here too soon to get a lead out on it. But the ongoing thought is to do a matching lightweight compression roof. Basically a yurt roof with plywood backing to hold blow in or foam. I know it will be tricky, but I was planning on simply mitering the ends of small dimension lumber or thin pine and finding a way to bolt them directly to the bond beam on one end and a fabricated compression ring on the other. The plan is still evolving. Unfortunately both foam and blow in seem prohibitively expensive. May try to work in bats by some miracle. Open to suggestions here as well. All I know for sure is I want to give the roof a coat of closed cell foam to seal and strengthen it. Is it possible to spray foam the roof with little additional structure? Would it be insanely spendy?

Due to time and financial constraints, I am afraid I will not have the resources to fabricate any more complicated brackets than the culvert ones described. I believe it to be a step up from metal roofing which every engineer I touched base with believed to be strong enough to make the brackets out of. I suppose strength in numbers as far as they are concerned. If its any consolation, the culvert is old style industrial grade salvage. It feels like it could stop a bullet.

Not sure if I covered everything. This is our first building adventure, and we are touch and go every day on the learning curve. I know thats not the ideal way to build a structure, but I dont execute anything without a prefessionals blessing. Earthbags is a strange area for many though, as most guys have only ever worked with lumber and make educated guesses based on loads.

I certainly appreciate you taking the time to reply, and I will take your advice under great consideration. Have you attached grain roofs you have assembled to earthbags before? If so, how did you do it in those situations?

Thanks again!


Joe Vaughn
Posts: 120
8
  • Mark post as helpful
  • send pies
    Number of slices to send:
    Optional 'thank-you' note:
  • Quote
  • Report post to moderator
I have not attached a bin roof to bags. I have worked with a few bin roofs on bins, bin roof panels as end walls on a bin set up as poor man's Quonset, conical framing with dimensional on bale, reciprocal timber on bag, hip on bags. Domes of all flavors. Plenty of traditional roofs. It's all kinda the same though.

You'll be fine, as you got a contractor buddy, machine and an outer ring. No breeze that day! Some strapping deeper down couldn't hurt on the prevailing wind side, and maybe the other too if you have nightly katabatic winds off the mountain.

I was picking up on your urgency. But It sounds like you know what you need to know. Show you contractor buddy my ripped  blocking suggestion at the end of this post.

Also, seems like to have plenty of loft space, depending how deep you'll have it. Low ceilings along walls is for built ins. It'll be nice to work off that for your ceiling/roof.

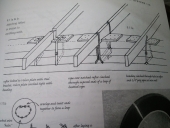
I didn't realize that you were drilling through the panels. That is good. You could even rip lumber on a table saw at the angle matching your bin pitch. Glue and screw them to the top plate, later add hurricane clips. Spray foam would glue it all together even more . Then you could screw panels to those angle ripped pieces directly. You could even plan ahead, making say one angled piece per bin roof section, or whatever number you desired, and if and when you install these run them 1.5" short of the next angled ripper block, including a rafter tail between these angled ripper blocks that could stick inside say a foot, and outside run shy of the end of the panel. That would give you continuous roof pitch angled attachment points on your top plate, and 2x4 stubs inside to sister up rafters next to, and rafter tails outside for fascia, soffit, etc.

Closed cell SPF is going for $.75-1.20 a board foot here in Colorado. A board foot is a square foot 1" thick. your ceiling is about 700 square feet. $1 BF is about standard. If you are super rural and the only rig that will travel to you has no competition, he will probably be at the higher end of that, while the lower end is usually for bigger jobs. My friends bin  here in Colorado has 2" I think, and it's rediculous how toasty it is all winter. She never framed/furred out, as in no additional structure, so she'll have to do like the sprayfoam air form domes do, and spray a drywall texture or such and spray a paint.. which isn't a bad route... Or plaster. Another friend covered her spray foam yurt ceiling with an old parachute. Since you are vaulting your ceiling due to the loft, I second you on the closed cell. I'm sure money is tight, but you'll be glad that he sprayed the second or third pass, if he is already coming out, firing up machines, setting up, etc. It's worth it.. He may make it worth your while on a lower board foot cost if you spray a little more. Sell some thing you don't need, sign a payment plan with him, pawn, borrow, cheat, steal, gamble. Get that foam on your roof.

And wrap tarps, billboards, free lumber tarps, etc on your exterior of your bags if you haven't plastered yet. Don't let them sit exposed all winter. And take pictures, I regret only having a couple.
 
Good night. Drive safely. Here's a tiny ad for the road:
Permaculture Pond Masterclass with Ben Falk
https://permies.com/t/276849/Permaculture-Pond-Masterclass-Ben-Falk
reply
    Bookmark Topic Watch Topic
  • New Topic