Annie Hope

+ Follow
since Mar 05, 2012
Merit badge: bb list bbv list
For More
Apples and Likes
Apples
Total received
In last 30 days
3
Forums and Threads

Recent posts by Annie Hope

Hi,  

Thanks for your responses.  Here is some answers to questions and photos:

THE WATER JACKET
I got this from Spiroloc in 2020, but only just trialed it for the first time last week.  It was a one-off he had hanging round and sold me.  Attached is a photo of the top of the water jacket.  It appears to just be two cylinders welded together, and the water fills the middle and no coil inside.
They now make these water heaters: https://spiroloc.co.nz/product-category/wood-fired-water-heaters/   Occasionly photos pop up that shows the inside, and it is a large coil.

I actually bought it to use with this bucket stove/oven ?2019 and only fired it up for the first time last week as well.  https://www.woodburnerstoves.co.nz/product/bucket-stove/
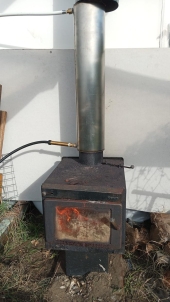
A wood stove shop owner saw it and said it was a great stove to cook on and my water jacket was also great, but I would burn out the stove heating the water jacket, and sold me the big metal stove it is with now for $100. I think the bucket stoveoven is working too well and lacking for secondary air, but that is another post.

I paid a few thousand dollars for the pipes and pumps and controllers to  pump heat under the house, and into a greenhouse, and put 400m of piping under the house  floor before polyester batts underfloor insulation were added under a gov stimulus grant. Then various crises struck, and the parts all sat unused for the next several years.
I am quite happy with the idea of starting again rather than putting more money in stove as it is among the cheapest conponents.  


THE STOVE
I include a few photos of the stove.    It is an old Kent stove, but I can't see a model or year of manufacture.  I It is just a very heavy old rusty cast iron box, now but I am guessing it had a baffle and firebricks at some stage as there is the frame to hold the baffle inside.    It only has air holes above the door at the front that can be dampened down. There is no air inlet or grate at the base.  I think it is a model that works like this:
https://hearth.com/images/uploads/kentbrochsmall.pdf    diagram on page two
https://www.woodmanspartsplus.com/xref/WoodCoal/KentStove/TileFire   (also described here
The firebricks and baffles can still be bought online, but they are in the hundreds of dollars, and there are different models/sizes.

Later models have secondary burn air pipes, but I can see no evidence that mine did.  There is a video here of what they look like:  https://www.youtube.com/watch?v=PWceJwJxm3A
I can't find online anywhere where that shows where  the air comes from for these tubes.

It also seems that the chimney used to have a dampener, but there is now just a metal  hook left.  That hole for the hook lets in a little air, so it may act as a sort of secondary air inlet, but maybe too high to be any use?

MATERIALS
We are not adverse to buying materials, but we are on a limited budget right now.  Our main immediate goal is to stop payng $400++ a month for electricity and still freeze our feet in most of the house, and to start growing seedlings and greenhouse vegies without them freezing and get off disability/unemployent payments.  We don't care if parts of it burn out in a year or so.

The beach is 7km away and river sand and rocks are available free for the taking nearby.
We are in a sandy area, so no easy clay/cob options.    We may be able to source natural clay somewhere, but it is not easy to transport in a car. Pumice stone is relatively cheap to buy bulk locally as a gardening product - $42 for a tractor scoop (?200L) and $210 for a cubic metre, and free trailer use to take it home.  
Fibreglass / rockwool insulation batts is readilly available, and we have a couple of bags of fibreglass batts insulation. Metal sheeting and copper is much more expensive in NZ than the USA.  

The factory that makes this fire morter is actually in our tiny town and sells cash to the public:
https://mastermix.co.nz/product/fire-mortar-mix-concrete/   We can get 30kg for NZ$69

PUMICE FIRE BRICKS/CORE OPTIONS
About 9 years ago we tried to make a rocket stove core with this fire cement and perlite.  I forgot to take into account that 1 cup of perlite and 1 cup of cement will not equal 2 cups of mixture (due to all the air gaps in the perlite), and we did not make enough to fill the mould.  What we did make was so heavy we knew we could never easily move it,  and we went no further.

A while later I was speaking to someone that makes and sells light fire bricks, and sold the Master-mix fire cement, and I am pretty sure he said the recipe for their fire bricks was 9 parts pumice stone to one part fire cement.  I found a few other websites that speak of pumice, and it is meant to be less durable but more insulative.
https://www.hearth.com/talk/threads/firebrick-pumice-lightweight-vs-standard-heavier.128343/

We do have longer-term plans of making a rocket stove core with the pumace that we can carry to the greenhouse and heat up rock/sand beds if we had a week of rain.  It might be better to focus limited time and money just on making that rather than improving the firebox.  I am a maths secondary teacher with 4 years of technical drawing in High School, so I think I could create the mould to make a rocket core if I can find the dimensions. I like the idea of the core going though a box of sand, it was sit up at a show in a day, but I can't find the link right now.

It is years since I researched it, and I never did feel confident making a rocket stove, and wonder if the DVD's on permies.com would be a good investment.  
Most stovepipe in NZ is 150cm / 6 inch, and I hae salvaged a bit of it, so I would like a plan to fit that.  (I guess a 6inch box).


Looking online it seems the baffle in the KEnt stove is a metal plate with a firebrick bolted underneath.  I also wonder if it would be possible to make a firebrick baffle with chickenwire inside it that would last a while at least.  I am wondering if making firebricks for our kent stove would be a good way to trial the process and give us an instant start to warm the house and start growing seedlings (late winter here), and then make a core.  
The baffle firebrick would have to be 40cm x 30cm to fit the metal bracket.  The gap from the bottom of the bracket to the top of the fire is 5-6cm, so if the baffle brick  as 3cm high that would still leave2-3cm for the smoke to move over.  

I think years ago someone else looked at the water jacket and suggested that I put a small length of chimney pipe between the stove and the water jacket to give the fire more time to burn fore the water jacket takes out heat.  It would not be as stable though.  


INTENSIFIRE
I have not ever seen one nor know anyone with one, but knew of their existence.  I had already written to see if it would handle the weight of the water jacket on top, and am waiting a reply.   But NZ$500 is a lot of money for us right now.   I keep hoping a cheap second-hand one will turn up on trademe (NZ ebay equivalent) or Facebook marketplace, but no luck so far. I must confess I don't understand Kevin's suggestions how to make my own equivalent.  

FREEZING PIPES
I am 7km from the sea.  The lowest we ever get is -4C, so freezing pipes are not a major problem.  If it is cold enough to go below zero, it is a clear night, and pretty much always a sunny morning and it is all melted by 10am.  We run rainwater from a tank through a pump and to the house without a problem.    Occasionally 1/2" black Polyethelene pipe running on the ground to a water trough and the top of water troughs themselves freeze overnight.

1 day ago
I am trying to make this set-up (in picture) that has the primary purpose of heating water.  We are wondering if the best thing to do is to wrap the fire box in rockwool batts and then a metal shell like the rocketovens on this website, (make the shell purely insulative) or to build up bricks around and top of it (so there is also some thermal mass - but would this reduce the burning efficiency).  We are 7km from the beach with very sandy soil. so cob is not an easy option.

It is a purpose built water jacket we bought, and it has the chimney heat going through the middle of it, and water pumped in the bottom and back off the top.  We did a trial in an open 140L metal tub of water, with no attempt at insulation.   In the first 15min of burn it took the water from 9C to 19C, by the end of a 1 hour burn it was at 38C.   So I reckon it will give 5-10KWH of heated water with proper insulation of the water pipes and storage container.
This stove is not meant to be our main heating source.  It is meant to be the back-up after passive solar heating and thermal mass and solar water panels storing heat in water and pumping it under the floorboards are not adequate.

We live in Temperate NZ where our mid-summer highs are an average of 23C.  Warm enough so that we don't want it indoors, but cold enough that we don't go swimming in nature and would like to make a heated spa and/or pallet pool.  We are thinking of making a small outdoor bath-house and boiler house shed and putting it in that.  We run the house on rainwater, but have unlimited high-iron bore water (that stains the bathroom fittings) so we could use this in the out-door bath house.
1 week ago
I am trying to work out the practicaliites of running water through pex coils.  I have done this with them horizontal on a board, and had our boar water pump push water in one end and out the other and then run to an outdoor shower with a mixer with cold water.  It worked great for when the sun shone, but lost temperature as soon as the the sun stopped shinning on them, and we could get 15 min of guilt-free showers in summer for a number of years until the untreated ply rotted on the ground beneath them and the plastic film on top came off.     Now I am wanting to  stand them up vertically at the back of a greenhouse / side of our house and store heat in a water container below them.   I have two queries.

- If I have a small pump that will pump water from the container straight up to above the coil, will gravity and the leveling effect of water pressure allow the water to slowly run through the coil and down into the water box?

- Can Air locks form and what should I do to stop this?
1 week ago
Hi,

I am experimmenting with growing in biodegradible wood-pulp pots (similar to peat pots).  

Mid-winter here in New Zealand and I have them in my hot water cupboard for warmth with grow lights.
White mold is growing on the side.  I have read this can also be an issue with newspaper pots.

A fan is recommended to stop mold, but I don't see how air circulation alone will help unless you also have a filter to filter out spores or are exchanging the air with the outside to decrease mold fruiting more spores inside.
It could dry off the surface of the pots, but you wouldn't want this to happen.  I am having problems with this with the frost-hardy pots outside and the plants are wilting.

I use an organic compost that claims to be bacteria and fungi rich.
4 weeks ago
I have just found out about non-woven cloth seedling bags.  They all claim to be bio-degradible, but reading up more they can be made from polypropalene,  PLA or natural fibres like Jute.  Which suggests they just break down into micro/nano plastics.
https://www.biononwoven.com/info/what-are-biodegradable-non-woven-grow-nursery-102879641.html

Does anyone know of bags that are made from all natural fibres and do actually fully biodegrade?
1 month ago
I live 7km from the sea where frosts are frequent (down to -4C /25F) but snow is pretty much unknown.  

I am looking at building a Chinese style Greenhouse with a wooden frame.  I am not going to try and do a roll-up curtain on the outside, but will build inter-Greenhouses for the tropical plants if I need it.

Is there any reason why a basic lean-to with a straight sloping roof and straight walls is not as good a shape as any other?

Does steep roof pitch or slanting side walls really maximise sun exposure to plants  if the floor area is the same?  I can't logically see why they would.  They may maximise the ratio of sunlight to air inside the greenhouse by a little bit.    (I know that plastic sheedt left directly on plants can burn them within a hour, so there is some importance in this).  Because these will be used also as valuable living space, having adequate roof height is important. (our three bedroom house is 100m2 / 1000ft2 and we also use it as home office/factory for multiple buinrsses.)

EDIT
This is the suncharts for 100km away/  https://www.wgtn.ac.nz/architecture/centres/cbpr/resources/pdfs/wlg_sunpath.pdf
We also have an average max in our hotest month of 23C / 73F and the highest on record is 31C/81F, so sweet potato, eggplant, melons etc really need extra heat as well even in mid-summer.  One market garden even grows their sweetcorn in a tunnel house in summer!  The house already has a 1m overhang on the sunfacing side, that shades summer sun.   I am happy for the greenhouse to get full sun in summer and just vent out the excess.  
3 months ago

I was wondering if anyone has had success with a DIY insulation blanket.

I am interested in making a cheapo Chinese greenhouse, but the insulated blanket is the most difficult part.  Both making it and how to roll it - either with motor or by hand.

Has anyone had success without the blanet but with the "Greenhouse within a greenhouse" and some good thermal mass?

We have frequent frost but with a min of record of -4C (we are 7km from the sea).  
I also have a water table only 5 feet down, and it sits at 13C year round.   I have thought I could make a second well in the greenhouse, and pull water from that and use it to heat somehow.  

3 months ago

Douglas Alpenstock wrote:First, protect the hay. Good hay is precious, expensive, and hard to get. Other insulation is cheap and easy to get. My 2c.

  What insulation would you use?  I prefer not to use styrofoam.
4 months ago
I am wanting to use hay bales as greenhouse insulation, and also have them maintain quality to be used as stock feed if needed.  (I would have two greenhouses, one with hay I intend to use that year with my winter greens, and one with my 3 month emergency reserve that I hope to keep with insulation all winter with my heat-loving plants, but will sacrifice if needed.  I will alternate them each year.  Avery lows in winter at 2C and max low on record is -4C so plants pasture/lawn stays green even in winter here).

 I am looking at a  Chinese style greenhouse, with single row of straw at the front, and sides, but three or four rows high at the back.  
I see two concerns, humidity on the side of the walls, and moisture from below.  We are looking at building the frame anyway from pallets, and so I am thinking that having the hay a bit from the side and/or doubling lining the pallet frains with plastic inside and outside would help a lot with condensation.

I could put the hay on a raised bed of stones, but then this would allow the cold air through at ground level with the coldest frost, so again maybe covering the base of pallets on the ground with plastic and then filling them with wood shavings, (which we have a pile of).

I would like to avoid as much plastic as possible, but there seems little other good choice at this stage for greenhouses.  


4 months ago
Hi,  This is many years later, but did you try this?  Did it work?
4 months ago