

|

|
|
|
|
 Five acres, two little ones, one awesome husband, 12 ducks (give or take), and a bunch of fruit trees and garden beds. In her spare time, Nicole likes to knit, paint, draw, teach kids, make fairies & dragons, philosophize, and read fantasy. She doesn't HAVE spare time, but does like to fantasize about it!


A class room of kids and real gold leaf don't go together. Gold leaf is expensive, finicky (you lift it with a gilder's brush that has been made just slightly tacky by the oil in the gilder's hair) and super duper light. The slightest air current will send the gold leaf flying across the class room - I'm visualizing kids trying to catch gold leaf, sending it and many more flying further through the air just by their own movements.
Instead of using real gold leaf, I'd go for possible different shades of acrylic gold paint (dark, bright, warm, almost silver), and offering the choice between making a slightly domed gesso underground for the 'gilding', doing an under painting in red/ochre/green... and then adding the gold colour. The under painting may/may not add tint to the gilding, depending on the thickness of the gold paint layer.
Dian Green wrote:There are few things you can do. One of the bigger issues is if you want the manuscripts to be able to be rolled. If you are willing to keep them flat, you can fairly easily gild.
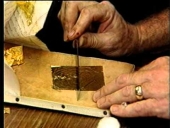
You can cut or break off small pieces that are just a bit bigger that the area you want, use a static charged clean and dry paint brush to move the scrap over and another soft clean brush to smooth it down. It will crumble and brush away where there isn't any glue.
r ransom wrote:There is an episode of Time Team where the put gold in a manuscript the authentic way. I cannot remember the episode but most of them are free on yt.
Something in my head says gold looks better when glued onto red. So paint all the gold places red so you know where to put it.
For gold powder binding, it is better to use fish glue or glue made from gelatin. Gum Arabic dulls the gold powder.
The origin of gum Arabic in the Middle Ages was not always clear. Much of what passed under the name gum arabic came from apricot – cherry – or plum trees and was certainly not from ‘Arabia’. Understandably, however, people also used the lesser quality cherry gum because, after all, it was available nearby. Apricot, plum and cherry trees grew in many places.
Gum solution: Recipe for laying gold leaf :
“Take white clean gum Arabic and break it into small pieces or grind it and put it in a glazed dish. And pour enough water over it so that it comes to two fingers deep and let it stand a day and a night and then put it in the hot ash for a while to dissolve and test it just as you tested the “planeerwater’ (2*). And when it is well tempered, such that it is not too strong or too weak, strain it through a cloth and keep it in a bottle and use it.”
From: “De Coloribus Faciendis ” by Jean le Bègue. ( 3*)
Gum solution for the preparation of paint:
“When mixing colors for painting in books, make a binder of the brightest gum arabic and water, as before, and mix it with all colors except green and ceruse (lead white), minium (red lead), and carmine. Salt green is unusable in a book. Spanish green should be made with wine, and if you want to make it darker, add a little of the juice of sword grass, or cabbage, or leeks. You should mix minium and ceruse, and carmine, with egg white”.
The products recommended for use on SCA scrolls, on the grounds of authenticity and durability, are gold gouache, powdered or shell gold, and gold leaf.
There are several varieties of metallic gouache available. For my money, Pelikan Rich Gold is best. Windsor & Newton is rather lifeless and difficult to apply evenly. Pelikan Pale Gold is a bit anaemic, and Pelikan Dark Gold is too coppery in tone. This is only a personal recommendation, please use whatever you like best. The paint should be diluted to a creamy consistency, and stirred constantly to keep the gold from settling out. For the best results, paint the area to be covered with a thin wash, and while this is still wet, flood on a sizeable amount of gouache. The surface tension of the water will distribute the gold evenly, but you might have to tease it carefully into tight corners. When completely dry, polish it with a dog-tooth burnisher, using a circular motion and very gentle pressure. This will smooth down the gouache and give it a nice sheen.
Powdered gold is sold in small quantities, and must be combined with gum arabic and diluted with distilled water before use. It can also be bought ready combined in small dried tablets, which is called shell gold. Powdered / shell gold is applied with a brush like ordinary paint, and when dry has a finely grained, quite dull finish. It can be brightened up quite a lot with burnishing, but is can never quite equal the brilliance of leaf.
Since well applied gold gouache looks very like shell gold (at a fraction of the cost and bother), I tend to stick to that for scrolls, especially for illuminating AA blanks.
"The adhesive and sealer in the Mona Lisa Composition Gold Leaf Kit are water-based synthetic products. When applied, they introduce an acrylic/polymer layer onto the surface of your work, which is not usually compatible with egg tempera paintings. Because of this, the manufacturer recommends testing this on a sample of a fully cured egg tempera painting before applying it to a finished artwork."