Karen Pedersen

+ Follow
since Apr 24, 2016
Merit badge: bb list bbv list
For More
Denmark
Apples and Likes
Apples
Total received
In last 30 days
0
Forums and Threads

Recent posts by Karen Pedersen

Ned Harr wrote:roof-non-penetration purist zero roof penetrations.

I'm not completely sure what you mean and I might also be biased coming from Velux country.

My roof is made of large (1 sqm-ish) wavy boards that overlap by one wave. The flashing for the windows is installed so it continues the overlapping in the same way which means it doesn't become the weak point you're worried about.

Velux is the brand name for a type of skylight. They have all kinds of cool configurations. Even a balcony flip up with railings type of design. There's also a company called Fakro that does the same style of windows.

Mine were installed i '74 and have only had to have a pane replaced because somebody broke the glass.

If you get a triple paned window then you're well on your to a lovely and isolated exterior.

In the picture you can see the difference in how much heat is lost on an old double paned themo window and a new tripple paned one.

1 year ago

Jay Angler wrote: By tying the comforter in, I can stand on the bed and just shake and the cover will more or less cover the comforter


Maybe we start different. When you take the cover out of the closet is it inside or right side out?

Mine is right side out. I lay the cover on the end of the bed with the opening towards me. Then I stick my arms inside the cover and shimmy them up into the top corners to pull the two sides of the cover apart. Then I take first the one top corner of the duvet a put it up inside the cover so it sits within the top corner of the cover on and then the other. Then I pull my arms out and grab the two top corners of the cover and duvet and lift and shake.
I lay it back down on the bed and put the two bottom duvet corners inside the cover. Close the snaps. Then grab the two bottom corners of the duvet and cover and lift and shake to make sure the sides of the duvet is all the way out to the sides inside the cover.

The last step is only necessary because I have a 95 inch (240cm) wide duvet. With a regular 55 inch (140cm) you can skip it.

My covers are sewn shut about a foot in from both sides so the gap is smaller and it's closed with snaps. It used to be ties that was the norm but now snaps are more common.

I'm Danish but my German friend's has zippers to close the covers.

I find it fascinating how people do every day tasks around the world and how different the same task can be so I hope you don't find my question too ridiculous because I'm genuinely curious to finally solve something that baffles me.
I view it as a wierd and unnecessary step but maybe I've got the wrong end of the stick.
2 years ago

Mercy Pergande wrote:Team down comforter with a washable cover!!!


Me too!

I've even taken it one step further. I live in a temperate climate (14-86 Fahrenheit range) so I have 2 duvets. One very thin for summer and one that's thicker for winter.
Then I have a single sheet, regular cotton -, linnen - and flannel duvet covers and a woolen blanket.
That way I can mix and match depending on the temperature.

I can't sleep unless I have some type of cover so a single sheet for very varm nights as a it gets colder I change to a thin duvet first with a cotton -, then to a linnen -, then to a flannel cover. Repeat but topped with the wollen blanket and repeat once more but with the thick duvet.

I change the covers every 10-14 days. If you leave it any longer your sweat clogs up the fabric and it becomes less comfortable because the fabric isn't as good at wicking your sweat.

Same goes for your bed. The recommendation is a new bed every 10 years. You can prolong your beds lifespan by having it cleaned. Some carpet cleaning machines comes with an attachment for furniture and you can sometimes rent them so you can do it yourself.

It's important to remember that you spend about a third of your life in bed so be kind to your body.

On a sidenote: what's the deal with tying the duvet to the inside of the duvet cover?
Don't worry. Unless you leave it on for a month or more its going to stay in place. However the point of them being removable is to change them regularly.
2 years ago
@Amit Enventres Do you have a reciepe for the babaganoush?
6 years ago
I grow hokkaido pumpkins which have soft skins that can be eaten.
My favourite is baked sesame pumpkin "steaks".
Ingredients:
Hokkaido pumpkin
sesame seeds
oil
salt
peber
Cut in half, remove seeds and gunk. Slice into 2-3 cm thick (1 inch) wedges and place in a roasting pan. Cover in oil - I put a splash of oil in the pan and them rub it all over the slices like you do with soap when washing your hands. This way you use less oil. Sprinkle with salt, peber and a generous layer of sesame seeds. Roast in the oven at 200 degrees celcius for between 20-40 mins depenping on the thickness of the slice - check to see if they're finish by pricking them with a fork like you would do when boiling potatoes. You're looking for the same consistancy.
You can eat it as both a side or a main dish.
6 years ago
Since money is a concern for you have you researched recycled materials? I use my country's equal to the American Craigslist and I have scored some amazing finds - the best one to date being 2 complete double glazed top hung windows at the price of a case of beer.
I also have a limited budget so I have had to be creative to get one that works for me. I'll describe it because I think it might give you some ideas on how to go about getting more for less. The picture at the bottom is the sketch for my greenhouse

The top bit is a conventional greenhouse. The kind you can buy at a DIY store or garden center. It's standing on a foundation of a concrete frame that supports the brick wall the greenhouse sits on.This is to give the house some height so I can have raised beds inside to make working there more comfortable. The square thing on the left and right are also brick walls with double glazed windows sitting on top. The windows is going to be removable so this part can be used as a cold frame at the beginning and end of the season and regular raised beds during summer. The wierd squares on the bottom right is a couple of stairs because the greenhouse came with a sliding door and I can't be bothered to change it to a side hung door. The bottom step is as wide as the greenhouse but the second step is only slightly wider than the door which creates two seats to sit and enjoy the everything.

The cost is the price of the gas used to pick up materials, the cement, mortar, screws, paint and maybe some money for the windows - the cost of a case of beer is roughly 10 pounds here (A little less than the equivalent of one hour of minimum wage before tax) I have been collecting bricks in small batches because most people who live in houses usually have a couple or 10 lying around that they are glad to give away because it saves them a trip to the recycling center and in spring people are giving away greenhouses if you come and take it down so that was also free
I will also need something to use as a barrier between the brick walls and the soil in the beds but that is a problem for later.

It's become fashionable to build greenhouses out of old windows. It's all about the ones with multiple panes because the focus is on the estethics.

These types of windows have become very expensive but their down side is they are also single glazed which is something to take in to consideration if you want to be able to lounge inside during colder days.
However people have started to replace the windows on their 70's bungalow and these windows are double glazed. Perfect for your need to extend the season.

This way of building is not for everyone because working with recycled materials means not always having uniform sizes to work with and also cleaning up the materials before they can be used which can take time. I bought 100 year old pine floor planks that I had to scrabe the dirt varnished/stuck in soap caught in the grooves off before it could be re-layed. It took a considerable amount of time but when building on a budget you can pay either in money and get less or pay in time and get more. My floor cost me 40 hours of hard labour removing and srabing the planks. 60 pounds for gas, 203 pounds for renting a truck big enough to fit them and 120 pounds for the planks.
If I had bought the equivalent spuare meter planks new it would have cost me 2500 pounds for the planks alone.
6 years ago
The thing my research about hugelkultur told me was that one: just the thing for lazy old me but more importantly that there's no mention about the increase in width from log pile to finished bed.

As I couldn't work out where people are getting the soil they put on top of the bed if they build from ground level up so I chose the dig-a-hole method. Maybe someone here can give me an answer as to where people are getting this soil from?
I chose to dig a 1 foot deep hole to get some soil to put on top. I meassured out the hole to the size of the bed I wanted keeping in mind that the width shouldn't be wider than I would be able to reach the middle from either side so I wouldn't have to walk/lean on the soil when planting and picking.
Then I build it and realized once I finished that the width had increased by 2-3 foot because of the layers on top of the logs so just a little tip from one newbie to another: dig the hole/pile the logs narrower than the desired witdth of the bed.

My property spots a narrow strip of pine "forrest" and a wildly overgrown weaving willow patch. So when it came to getting my grubby little hand on some wood I had the choice between willow, pine, elder and a tiny bit of maple and beech since I didn't want to pay for wood when I had some lying around my property and thought I'd just see how that would work. You know because I'm cheap erhm thrifty erhm I mean conscious about the environment.
I only used willow logs that was cut down last winter and absolutely only the ones that had fungi growing on it.

That was enough wood for the 1st bed but I want to build more but the only thing I'm currently left with is willow.
In Paul Wheaton's hugelkultur article thread a gry square comments he chips the wood for the bed and Paul answers "I wouldn't bother with the chipper". I completly agree with the exception of willow  because as we know willow grows as a motherf......
Clearing the willow patch we have been chipping a ton of it to do something with the mountainous amount of willow and this destroys it resprouting so it can be used in a hugelkultur.
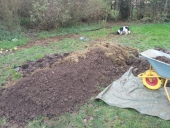
Now a picture of the glorious build. You can see the "forrest" on the right side and the willow on the left - Its about 3 times taller than visable in the picture.


7 years ago

Michael Qulek wrote:I've sprouted my own rootstocks from the seeds in store-bought fruit.


My knowledge is purely teoretical as I have only gotten to the buying of land bit. What I found out so far is that you get far superior rootstock if you grow from native, lokal varieties. The fruit of most wild variety fruit trees are considered inferior to cultured ones but because it's only the rootstock you're interested in this is of no importance. However they have done all the work of adapting to the conditions of your climate for you and you should get amazing rootstock from their seeds

I think this nugget af knowledge comes to you from the documentary about Stefan Sobkowiak's miracle farms. I recommend this documentary to anyone wanting to start an orchard. I would just go watch the hole thing because it's a treasure trove of wisdom. Here's where to get it: http://www.permacultureorchard.com/the-film/. If you're not yet convinced then watch the trailer here:
7 years ago
Eathships aren't a problem in your climate. Try looking into Francis Gendron and his "Greenhouse og the future project". He studied under Michael Reynolds, the earthship pioneer from Taos. He has customized the design for the Canadian climate. That should be more than adequate for your temperature requirements. On his website you can buy building plans for such a project and fright now they're on sale for $35. Here's the link: Greenhouse of the future
And here's a persentation video:
7 years ago
I'm sorry to hear about your situation Travis.

I think the scheme I descibed is smaller than the one you write about.
This scheme covers "minor" improvements like insulating your hot water pipes both for drinking and heating water. A couple of pipes had some of the light grey foamy insulation (the first picture). The rats had had a field day gnawing away at it so it was in a pretty pathetic state - sadly the previous tenants of my new house was not let's say caring about the place and the state of it. I'm getting the new stuff from a brand called Rockwool: http://www.rockwool.co.uk/products/rocklap-hv-pipe-sections/ It's easy to install and the last picture show the idea of how it works.

No matter if you get this kind or another I highly recommend insulating. If you can get your hot water where it needs to go with as little heat loss as possible you save bucks because you need to burn less to heat it.
I think the rockets are very, very cool but my house is too big for one of those to work so I have a pellet burning furnace ( and a couple of solar panels that the house came with ) to heat water to run through the radiators. I also bought some electronic thermostats that you can programme to turn the heat up and down. We don't have that wall thermostat thingy you have other countries just the manuel ones with setting 1-5. These ones has the actual temperature so you don't have to guess. I could have gotten a grant for that too but I didn't know about it when I got them. It's these ones: http://radiatorthermostats.danfoss.com/products/living-by-danfoss/living-eco/#/
7 years ago