Griffin Casey-Miller

+ Follow
since Nov 29, 2020
Merit badge: bb list bbv list
For More
Apples and Likes
Apples
Total received
In last 30 days
1
Forums and Threads

Recent posts by Griffin Casey-Miller

Bayberry (Myrica or Morella Pensylvanica) may be evergreen where you are, and it's an excellent spice, fully replacing bay leaves in my kitchen (even better than bay leaves because in addition to drying the leaves and using them that way, I also use the fresh leaves by chopping them fine, which makes it much more flexible). Where I am in CT, it's more of a semi-evergreen. It's dioecious. If you have enough, a few will probably produce waxy berries, which can be used to make candles (tons of work) and I think can also be added to regular candle wax. The leaves are more than enough reward for me.
1 year ago
I hope your stump works out well! I did email Field and Forest and haven't heard back yet but I think it's a pretty busy season for them -- plus it's honestly a lot of questions for one $26 spawn sale. (I also want to buy their wood blewits and possibly king stropharia, but will probably do that regardless.) I will check out Sepp Holzer's book and see if I can find more information, thank you!

1 year ago
I’d like to grow mushrooms on a very tall stump and I can’t find a lot of reliable, specific information about that. Not sure if it’s because it’s a bad idea. I have a big Norway maple tree in my yard that I would like to cut down, and I’d like to leave a stump about 6 feet tall, with a diameter of about 20 inches. It will get maybe 5-7 hours of sun a day. (A bit too much, which is funny because I live in the woods and my problem is never too much sun.) I’d like to inoculate it with mushrooms that are easy to grow and native to the US, ideally the eastern US.

I would like to know:

If I should girdle the stump?
How long I should wait between cutting and inoculating -- can find lots of info for this on logs but can’t find good info for stumps. 2 weeks?
Do I need to wrap it?
Right now my plan is to use PoHu oyster spawn from Field and Forest: wide range of fruiting temperatures and noted by them to be very prolific and a good one to try on "experimental substrates."

The stump is very close to the house, so I can water it with a hose if needed.
1 year ago
Hi Janice, are you still looking for a spot? I like what you wrote. I started a forest farm last December and am living here with my partner and a friend, still working on forming the nucleus of an intentional community, after some zoning problems squashed our first attempt. Here is a link about my vision for the community. It's long, but skimmable.

https://www.ic.org/directory/hamden-coop-forest-farm/
Thank you!! We're very happy, working hard, and people are coming to live with us bit by bit! I appreciate the congrats We have a hugely overwhelming amount of planning to do -- it will absolutely take the prescribed year -- so if you want to come brainstorm with us you'd be welcome, and I'd also love to come to a meetup wherever it is, although I always seem to be double-scheduled for the coolest things. Where are you at in CT?
Hi! Our closing was delayed, but should now be sometime next week or so. I'd love to come see your place sometime and meet my permie neighbors!
Last year (2021) we had a few butternut squash plants grown from South Anna Butternut Squash seed that was bred in Virginia by Edmund Frost for high yields, sweetness and resistance to downy mildew. We are not very talented annual gardeners and I don't really water but we got something like 33 large and medium butternuts off our plants. I had the privilege of working with Edmund and the Common Wealth Seeds team briefly during my commune touring days and I was so happy to buy the seed from the Experimental Farm Network. It's the only vegetable I've ever grown that was an unqualified success. Don't mean to sound like an ad over here, but I really cannot recommend EFN or Common Wealth Seeds highly enough.

Anyway -- then we needed to USE 33 butternut squash. This is my favorite recipe, and one I haven't seen mentioned in the thread yet: https://40aprons.com/butternut-squash-casserole/

It's not really a lasagna because it's put in all together, not in layers. The pre-cooking on the stovetop then transferring to the oven is a bit fussy for me, but it does turn out amazing. I mostly make it for company, so I haven't dared to experiment very much with just putting it all in the oven right off (after browning just the sausage for food safety), but plan to in the future.

I'm copying the recipe in case the link ever goes dead. Notes in parentheses by me.

Butternut Squash Casserole with Parmesan Breadcrumbs by Jasmine Comer

Rich, savory butternut squash casserole is begging to be part of your holiday dinner. Topped with buttery parmesan breadcrumbs, this mix of butternut squash, sautéed kale, and sweet Italian sausage says autumn in every bite. Make this cozy dish for Thanksgiving dinner or anytime you want to embrace the season.

Prep Time 15 minutes
Cook Time 50 minutes
Total Time 1 hour 5 minutes
Servings 8
Author Jasmine Comer

Equipment

   Large skillet
   2-quart baking dish
   Aluminum Foil

Ingredients
For the Casserole

   ½ pound sweet Italian sausage
   1 tablespoon olive oil (we use a lot more)
   1 medium onion sliced (we use 2)
   2 tablespoons sage chopped (or whatever herbs are available; I've used sage but also bee balm, fresh Pennsylvania bayberry leaf, oregano, and thyme)
   3 cloves garlic minced (we use 4-6)
   2 cups kale chopped (I also substitute thawed and drained spinach, beet greens, violets, nettles, or whatever we have around)
   ¼ cup chicken stock
   4 cups butternut squash cubed, approximately 1 ½ pounds total
   salt to taste
   pepper to taste

For the Breadcrumb Topping

   3 tablespoons butter
   ¾ cup panko breadcrumbs (I've also used regular breadcrumbs I made from stale bread; it doesn't matter)
   ⅓ cup freshly grated parmesan cheese
   1 tablespoon sage chopped
   salt to taste
   pepper to taste
   (I'll also add other fresh herbs we have on hand here like parsley or the others I mentioned above, and if I'm doing that I definitely add the topping to the casserole halfway through instead of at the beginning)

Instructions

   Preheat oven to 350° Fahrenheit. Lightly grease baking dish with butter or non-stick cooking spray and set aside.
   In large skillet over medium-high heat, cook sausage until browned and crumbled. Drain any liquid that's produced. (I don't drain it but if I did, I'd save it to add back in place of some of the chicken broth.)
   Add olive oil to skillet with sausage, then stir in onion slices, cooking 2 to 3 minutes until onions are softened.
   Add sage, garlic, kale, and chicken stock to skillet. Sauté everything 2 to 3 minutes, stirring occasionally.
   While sausage-kale mixture sautés, place butternut squash cubes in baking dish. Pour sausage-kale mixture over butternut squash and toss or stir everything together to combine. Season with salt and pepper to taste.
   Add 3 tablespoons butter to skillet over medium-high heat. Once butter is melted and starts to bubble, stir in panko breadcrumbs and continue stirring until breadcrumbs are golden brown and lightly toasted. (I do NOT bother doing this in the skillet; I microwave the butter and stir it in a bowl. I've also substituted oil. Melting the butter in advance in a hot spot in the kitchen would also work for the microwave-averse.)
   Remove skillet from heat and stir in parmesan, sage, salt, and pepper until cheese has melted and ingredients are well combined.
   Spread breadcrumb mixture over top of sausage-kale mixture in baking dish. Place in oven and bake approximately 20 minutes. After 20 minutes, cover dish with foil so breadcrumbs don't burn, then return dish to oven and bake 20 more minutes, or until squash is tender. Serve warm. (I add the breadcrumb mixture halfway through instead of bothering with the foil, especially if I'm adding fresh herbs to the topping, so they don't overcook.)

Notes

   Make it Vegetarian: Use your favorite meat substitute instead of sausage (or skip the "meat" entirely) and use vegetable stock instead of chicken stock.
   Make it Vegan: Use your favorite meat substitute instead of sausage (or skip the "meat" entirely), use vegetable stock instead of chicken stock, and use dairy-free butter and parmesan cheese.

 
Recipe yields approximately 8 servings. Actual number of servings will depend on your preferred portion sizes.
2 years ago
We are founding a small community on 7.25 acres of wooded, hilly land in Hamden, Connecticut, USA, with a ranch house, a stream, a streamside meadow, and soaring poplars and maples. Although the land is heavily populated with invasive species, we also noticed bloodroot, white wood asters, snakeroot, and several types of goldenrod; we’re excited to see what’s visible there in the spring. Day to day, we will be spending a lot of time together as a community: cooking and eating together; sharing chores; working together on home and land improvement projects; and hanging out. We want to host occasional events like workshops, cookouts, and backyard shows.

We want to manage the forest as a forest-understory farm that provides food for humans, especially mushrooms, shade-tolerant native edible plants like mayapple, honewort, ramps and fiddleheads, and water plants like wapato and cattail. We want the land to provide way more ecosystem services than it does now and support all kinds of wildlife, from turkeys to caterpillars. There is also mown yard near the house that can be converted over time into small garden and orchard areas. We’ll also have small livestock -- definitely chickens, possibly geese and goats, depending on the interests of the community.

We haven’t closed on the land yet, but we’re under contract and hoping to find people to move in with us starting as soon as November 18th (the current planned close date) or on December 1st. It’s at 585 Main St in Hamden, CT, about 15 car-minutes or 30 bike-minutes from central New Haven. The house was expensive, and we’ll likely be looking at a monthly cost of between $700-950 per person, per month (including utilities). You can see pictures of the house on Redfin or your preferred listing service. The listing doesn’t have a lot of pictures of the land, unfortunately, so I’ve made a public album to give a better sense of what it looks like. We want to protect the land so that it can never be sold, but instead is owned in trust by the community, providing everyone who lives there with land security.

If this sounds like your dream living situation, please message us! We’ll be happy to answer any questions and send an application your way.  If the house falls through, we'll still be looking for land and would love to have your contact info. Properties like this seem to come up 1-2 times a year in Hamden.

Link to album: https://photos.app.goo.gl/kuYSJNkQkBfFCEbZ6
I only do low-effort compost but I have some thoughts and ideas.

How much compost are we talking per day/per week? Number of people who eat in your household may be a useful approximation since I definitely couldn't quantify my kitchen scrap production. Can the compostable stuff you have be separated into different levels of "ick"ness -- kitchen scraps vs leaves? Do you need to compost human and/or pet waste?

If you have few enough people (I'm thinking up to four if you don't have a lot of scraps and 2-3 if you do -- for instance we have lots because we get dumpster food and process it, and we don't make stock) and are not composting human waste in addition to kitchen scraps, I want to put in a plug for a compost tumbler for the kitchen scraps + enough browns to keep them odor-free and a neat pile (contained by pallets?) for everything else that is not attractive to critters. I've never liked the idea of tumblers because they seem so puny (not to mention wasteful, with the new plastic) but we had to switch to one at my old place due to a neighborhood-wide rat problem and I was pleasantly surprised at how well it worked. We bought one new due to time and energy constraints, the 37-gallon one available under different brand names all over the place, partly because the double chamber and easy-to-use doors seemed essential and hard to DIY. We had 3 people using it. It just froze all winter and in the summer moved super fast, enough to empty both sides and start fresh for another fall/winter. If we were turning it or emptying it more often we likely could have emptied 3 halves, but just in the summer. It looked intentional and could be kept super close to the house (like seven feet from the back door), and it did drip but it wasn't gross, just led to a flush of growth in that area of the patio between the pavers.

We used wood shavings as the brown because we had a lot with few uses for them, but I imagine other browns could be used with good success. We only went through, ehhhhh, 2-5 loose gallons for the season? (Possibly your neighbors' dried lawn clippings would work?) After my experience with our tumbler, they're my top choice for small-yard composting. It DID smell in late August which could likely have been avoided with more conscientious wood shaving additions. After I added enough shavings it only took a few hours to a few days to return to not really smelling at all.

**Edit: I reread and saw you don't have time or wood to build something, sorry I didn't see that at first, but I will leave the parts I wrote about DIYing for future thread explorers. I put them all together here.** If you have access to 50-gallon drums I've seen them made into tumblers, and you could do 2 for the capability to switch and age plus have much more volume. If you don't want to use a tumbler, or have way too much volume for that to make sense, I'd probably recommend a pallet box guarded with hardware cloth all around, and just cold composting, because it would be such a pain to do hot without easy access. Not sure how essential the hot aspect is to your needs. But I'm sure hot compost is done in those all the time, with lots of effort (not my thing).

I don't have tips for human or pet waste in such a small and surveilled space, but I'm sure it could be done.

Hope this is somewhat helpful!
2 years ago
Update to pickerelweed water barrel:

Everything went great over the summer! As expected, I occasionally had to manually bucket water from the bottom back into the top as the water evaporated. I probably only did this 2 or 3 times the whole summer. The water was shaded, we get a fair bit of summer rain where I am (South-central Connecticut) and pickerelweed is very hardy and can take some drying out. I did not end up harvesting the seeds to eat, as I kept missing them. Maybe next year, and I’m looking forward to trying the shoots this spring if they come back.

I did add the overflow hose so the large pot next to the rain barrel stayed nice and full. I couldn't find good fittings to do it so I just used a spigot, even though it seemed a bit silly because I'll ~never want to close it. I had an old, holey hose with the connector still attached that I used a few feet of to direct the flow into the bottom of the pot. I wonder if old hose pieces would make good pipes for deep-watering fruit trees, actually.

I left everything where it was over the winter. I considered moving some of the pickerelweed into the basement to overwinter there in case the unprotected pots were too cold, but ultimately didn’t. It seemed like a lot of work, and we don’t have a good spot that is unheated but protected. It hasn’t reemerged yet this year, so it might be dead, but I did seem to see a few green shoots when I was messing with the barrel earlier so I am hoping it just isn’t time yet.

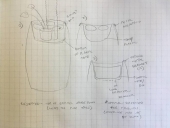
Michelle, you were very right in your concern. The nail that was already bent held fine, but overall, the system for holding the chains in place failed – probably because I had really cheaped out on one of the chain holders because I was out of useless screws and used an old jigsaw blade. Definitely don’t try that, it’s not strong enough. That chain had come out of the side of the barrel, but the other two chains were fine, so the pickerelweed tub was suspended from the sides and all I had to do was lever the tub up onto the side of the barrel, letting as much water out as possible, and then move it over to another barrel I had next to it. The disc was then floating in the water. I tried replacing the screws, but it was not possible because the floating disc would not maintain tension on the other two chains, and I lost a couple screws into the barrel this way. In retrospect, I could have just dropped the water level so that gravity would provide the tension I needed. However, it was a big pain to mess with and I decided just to buy some 2 inch stainless steel (“stainless steel”) carabiners. They are long enough on the unbroken side to span all the holes, so it doesn’t matter how strong the clip itself is, it’s just an insurance policy while doing the setup. I figure it will be worth it because I may eventually want to move, scrub or otherwise mess with the barrel. If I had to do it again, though, I would buy 3-inch carabiners because the rounded edges make them more liable to want to slip through the holes during setup than I had anticipated; probably not an issue during use but we will see.

We use BT dunks in the water, so this also serves a third purpose as a mosquito trap. It’s a very attractive place to lay eggs and then the larvae are eaten. They also provide some small amount of fertilizer for the pickerelweed, although I imagine it’s going to need more feeding eventually. I picked up some organic liquid fertilizer at a yard sale last year for pretty much nothing so I’ll start with that, but for others reading this thread, any ideas for a home-grown fertilizer for a water garden? Comfrey tea, maybe? I definitely don’t want to add manure or urine, my usual easy fertilizers of choice.

Jay: that's a good idea, but the window screen would probably get slimy, like most of the other equipment involved. We didn't notice too much of a problem in the barrel itself last year, and the water that overflows from the pickerelweed tub does have some BT in it as well.

Thanks for all the tips, everyone!