Sherry Willis

pollinator
+ Follow
since Jun 09, 2010
Merit badge: bb list bbv list
Biography
I grew up on a real-life homestead in Wyoming so self-sufficiency is in my blood.  My animals were my best friends and self-reliance has been a way of life.  I have had numerous homesteads in my life ranging in size from 20 acres to a 50' x 50' paddock a block from the local courthouse.  I most enjoyed my little urban homestead due to its efficiency and ease of care.
For More
Farmington Missouri
Apples and Likes
Apples
Total received
In last 30 days
4
Forums and Threads

Recent posts by Sherry Willis

Have you considered whether you even need a degree for what you want to do?  

As someone else said, the practical part of agriculture can't be learned from books.  It has to be experienced.  If you want to own your own farm, a degree isn't going to matter.  Take courses in business (there are tons of free ones) and work in the ag industry to learn the practical side of it.

If you want to work for farmers, they likely aren't going to be impressed with a degree, they are going to want to know what experience you have.  

If you want to work for the Department of Agriculture or some other type of government agency... you will need a degree.


One of the great tragedies of our age is that it's assumed that everyone needs a degree, no matter the path they are planning on taking....
3 weeks ago

Josh Hoffman wrote:Sherry,

Great idea on the little stove. How many sqft are you able to heat with it?

We have one we use for hot tent camping and I use it to heat a portion of the barn.


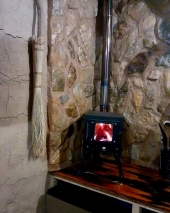
So our little Hovel is only 6'x9'.  It's fairly well insulated and the cob covered walls provide a goodly amount of thermal mass.  We almost always have to have the window open when the stove is going, so I'm sure it would heat a space larger than this one very well.  For the $80 I paid for it, it's surprisingly heavy and well constructed.  We did purchase the damper pipe separately since we wanted a little more control of the flame than just the front vent slide would give us.  The window is okay, but soots up fairly quickly.  Still that's okay because by the end of the day, I want it dark in there anyway.
3 weeks ago

Stephen B. Thomas wrote:Looks good, Sherry!

Question for you about your cob composition... How much straw would you say is mixed into your cob, compared to sand and clay?


Thank you! I use our subsoil as it. I simply screen it through 1/4" hardware cloth first. I did try it without screening during one rainy spell and the decomposed granite sliced my toes like a razor blade while I was mixing it.

For straw, I use the chopped straw for grass planting from Lowe's.  I would say I only have 15% straw by volume. I add three big handfuls to 2 5 gallon buckets of earth.  That's all I can handle at a time.

This does crack a bit if it is applied less than 3" thick or very wet. You can see that from the rough plaster on the wall. For the finish plaster, I'll use 1:1 earth and sand mix and then add that 4 parts to 1 part cow manure.  

Hope this helps!
3 weeks ago

thomas rubino wrote:Very nice looking, Sherry!
That looks like a good spot to build a 4 or5" mini batchbox masonry heater!


The only thing about doing that would be the weight...it's just sitting on the kitchen counter.  We figured that we could take the stove out in summer for more counter space.  ðŸ˜Š
3 weeks ago
We're about halfway through winter in the Ozarks and I've been living in our "Cobin" full time since October.  One of the big experiments was a cob and stone hearth for the little tent stove we have in there.  I wasn't sure how it would hold up to the thermal shock.  It's done really well, no cracks and it holds enough heat that the room stays warm for several hours after the fire goes out.

The real test will be this next week, close to 0 degrees at night.

3 weeks ago

Riona Abhainn wrote:And this is why we couldn't have gumbo for Thanksgiving, because there wasn't any of this harvested/rendered yet for the year, and to buy it online would be crazy expensive (no my friend refuses to make gumbo without sassafras, won't touch that premade gumbo file stuff.  She's waiting for her auntie to send some up here from GA in springtime, and then we can make gumbo for some other meal together.  Thanks for teaching me why sassafras is so hard to come by.


I didn't realize the root extract was used in gumbo.  I know the dehydrated and powdered leaves make a really good thickener (I discovered this when making sassafras leaf tea) with some flavor as well and I know they were traditionally used in file powder.  I didn't harvest and powder leaves this year because my dehydrator was in Wyoming and it's too humid in Missouri to air dehydrate anything.  But I picked it up when we visited my family and I'll probably do some next summer.

So many people think you use the entire root, but it's just the cambrium on the outside that has the good stuff in it.  We have TONS of sassafras trees and they grow from root spread, so when I dig one, others spring up the next year.   In fact, I'm trying to clear where we are building the house so I have an excess.  I'm making another batch right now and I'm not sure what I'm going to do with 8 or 9 bottles of the stuff.  I don't bake THAT much!
4 weeks ago
I got 20 oz of sassafras extract bottled this week.  I LOVE this stuff!

Here's the proceedure:

Dig the roots while the trees are dormant - now is a great time. I like to dig right after a rain. Scrub the roots really well with a stiff brush to get any dirt off. Don't worry if some of the dark bark comes off too, you want the cambrium that lies between the outer bark and inner core anyway. I bring my hand pruners and clip off branches to make peeling easier. Then I use a sharp pocket knife to basically "whittle" the bark off the core. Really small roots can just be cut into small pieces and split in half to expose the sap.

I do my best not to rinse the bark after i have peeled it because you lose some of the flavor. You'll feel it as a slickness on your fingers. I use Everclear for my base because it has a high enough alcohol content to allow me to put the fresh bark in it without worrying about spoilage. I put as much sassafras into the Everclear as it will hold - it won't hurt if some pieces stick out of the liquid. Then I stick it in a dark place for 3-4 weeks, shaking when I remember. The Everclear will turn brown like vanilla and smell strongly of sassafras.

I usually strain out the root and add another batch using the same procedure before I bottle the extract in cleaned out A-1 bottles from Dollar Tree. That's pretty much it! I substitute it for vanilla in pretty much everything. Oh, and it does stain both skin and fabric, so be aware...
4 weeks ago
I agree that there isn't sufficient education on this subject at all!!

I started 5 years ago.  The expected hot flashes sucked, but were bearable.  BUT something NO ONE told me is there are other symptoms and I was hit HARD with joint pain and damage in my hands.  Like, "I can't do what I want" pain, swollen and distorting joints.  

So after digging and digging and discovering that joint pain is one of the major symptoms, I decided to go on hormone replacement therapy.  For me the VERY minor risks (and I don't have any family history for those risks anyway) were worth being able to do the things I need to get done.  So I went online for a doctor.  I figured I'd give it 3 months and see if the joint pain resolved.  It took two weeks to see a major difference in joint pain.  Hot flashes gone in one week.  I'll occasionally have achy hands, but never hot, swollen joints like before and I can do all the projects I want now.

I've been on HRT for 9 months now.  I'm sure not everyone has the same experience, but I plan on staying on HRT for the forseeable future.  It costs me $121 every three months for my estradiol and Progesterone.  I use Alloy.
4 weeks ago
The real problem with working on stuff is that it's hard to find the time to post about it.  I definitely need to do a better job of that!

Anyway the "Hovel" is fully functional, if not completely finished (is any building project?).  Here's a construction video I put on my YouTube Channel:

2 months ago

William Bronson wrote:What a wonderful project!
Can you describe the details of the living roof!


Thank you!

Please understand that we're making this up as we go, so I'm sure there will be failures and adjustments.

We used rough cedar slabs for the decking.  Since they don't meet at the edges, we got some white sheets from the second hand store and made them the next layer. Then we put a thick layer of cardboard to even out the surface and protect the 20 mil pond liner that waterproofs the whole thing. We added +/- 2" of soil and then are harvesting moss from the river nearby.

Before we put the soil on, we checked where the water flowed on the liner. It actually went where we wanted it to!! So we cut a hole and lined it with roof flashing tape to seal it. Then we put 1/4" hardware cloth, a layer of screen and covered it with soil and moss.We were hoping this would be sufficient for a drain, but we had heavy rains yesterday and it isn't draining like we'd hoped. I think we'll pull the soil out and fill over it with gravel to make it more permeable.

We covered the moss we got done with loosely woven burlap landscaping fabric, but we've decided to trade that for black poly bird netting. It will be less obtrusive, still stabilize the moss while it gets established, and we can just leave it up there.

Sorry for the book... hope this helps.
9 months ago