


Collection of 14 Permaculture/Homesteading Cheat-Sheets, Worksheets, and Guides
will be released to subscribers in:
soon!

Jay Angler wrote:Soooo... you don't have to mow artificial turf, but you do have to weed it - seriously! I met a guy on his hands and knees struggling to get tree sprouts out of his artificial lawn without damaging the lawn part.
Is the issue with plants dying that you have too many extremes? Dry, wet, cold, heat? Can you narrow down which of the extremes did in your early attempts?
I'm not convinced that you can't fix the roof problem other ways. Giving us permies a list of what you've tried, and what you think killed those tries, might give us ideas of how you can fix it naturally.
For example, have considered rocky mulch with succulents?
Jay Angler wrote:I'm pretty sure that I've been told that clay tiles are so much heavier than most other roofing, that unless the house was engineered for it, they can't easily be added. Same with many "green roofs."

Catie George wrote:fridge and hot water heaters are huge sources of heat in a house. My grandma used to keep her fridge on a side porch (old summer kitchen) of her AC free farm house. I have always thought having the water heater out of the living area would be super nice. Or maybe insulated around?
Will Meginley wrote:Going forward, we want to build some kind of outdoor kitchen. Cooking a meal on our stovetop raises the temperature in the living area by three to five degrees, and baking anything adds anywhere from five to ten. I figure the easiest way to remove heat is to not add it in the first place. We can grill right now, but I don’t want to be burning propane all the time. A cob baking oven and a J-tube wood burner would be nice. I just need to create a flat spot for them first.
Davis Tyler wrote:I'm surprised to hear so many suggestions related to evaporative cooling. In my experience, it's the humidity that makes summer uncomfortable; adding more humidity just makes the problem worse.
Dale Hodgins wrote:
Burl Smith wrote:Might be interesting to see what the temperature is 3feet down below the surface of the soil there in Cebu, and then figure how much cooled fluid would need to be moved thru a heat exchanger by a solar powered pump to make the idea feasible.
Approximately 80 degrees in places that have plant cover. At least 5 degrees hotter in areas that are completely housing and paving. Nighttime temperatures are in the 70s.
Jay Angler wrote:OK, so it sounds as if the door insulation is doing a fair job of keeping the heat from getting through it, but burning your hand is *not* a good thing!

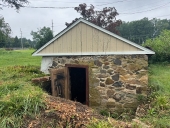
Nancy Reading wrote:If the eaves are open it is not surprising that the temperature varies so much. I suspect that if you blocked gaps and insulated the roof you might find the temperature range was much more suitable for cool food storage - a slightly damp coolish place is ideal for many vegetables and drier shelves for pantry items and seeds perhaps.

Inge Leonora-den Ouden wrote:Most of the time I drink only water. It's from the tap, but boiled first and then cooled down. Not cooled in the fridge, I don't like it that cold. I prefer 'room temperature', or even 'body temperature'. If I don't forget I add a little 'sea' salt (Atlantic ocean, from France).