• Post Reply Bookmark Topic Watch Topic
  • New Topic
permaculture forums growies critters building homesteading energy monies kitchen purity ungarbage community wilderness fiber arts art permaculture artisans regional education skip experiences global resources cider press projects digital market permies.com pie forums private forums all forums
this forum made possible by our volunteer staff, including ...
master stewards:
  • Nancy Reading
  • Carla Burke
  • r ranson
  • John F Dean
  • paul wheaton
  • Pearl Sutton
stewards:
  • Jay Angler
  • Liv Smith
  • Leigh Tate
master gardeners:
  • Christopher Weeks
  • Timothy Norton
gardeners:
  • thomas rubino
  • Jeremy VanGelder
  • Maieshe Ljin

new idea to get 1000x more interest in rocket mass heaters - could use some help

 
steward
Posts: 3707
Location: Pacific North West
1762
cattle foraging books chicken cooking food preservation fiber arts writing homestead
  • Likes 11
  • Mark post as helpful
  • send pies
    Number of slices to send:
    Optional 'thank-you' note:
  • Quote
  • Report post to moderator

Paul and Uncle Mud are writing a book on Rocket Mass Heaters. They're doing it one chapter at a time.

They're working on a chapter "all about how to cut your wood needs in half with a wood stove."

So far they came with these talking points, and we could use your help to find more things and expand on each of them.


 - never operate your 75% efficient wood stove at 3% efficiency

       o make sure your stove is well corked before bed

 - create lots of mass around your stove
       
       o rocks are pretty good
       o cob is better
       o above is better than to the side
       o stacking on the stove is good, but leave an air gap in the middle
           - maybe a slab of granite countertop stuff, up on firebricks (at the edge)
       
 - dry firewood

       o green or wet wood is gonna cause a lot of problems
       o what to do if green wood is all you have an your are cold
           -
           -
           -
           -
           -
           -

 - general things to do around the house to improve heat efficiency

       o
       o
       o
       o
       o
       o
       o
 
pollinator
Posts: 1447
Location: NW California, 1500-1800ft,
439
2
hugelkultur dog forest garden solar wood heat homestead
  • Likes 8
  • Mark post as helpful
  • send pies
    Number of slices to send:
    Optional 'thank-you' note:
  • Quote
  • Report post to moderator
I would emphasize learning your particular stove. Try different fire building methods with an open mind and observe your cowboy tv carefully. I like a blend of different fire building styles I have seen from others. Here is what I have found to be true with multiple stoves in different homes with wood as the primary or only heat source, and as a 10,000mi+ backpacker:

- Get it hot, fast. Use plenty of tinder and kindling. I like a plumber’s torch to forego paper and get a good draw every time. I have been lazy/cold/tired plenty of times and then worked much harder to get a fire started than had I just cut a little kindling, which would also warm me up.

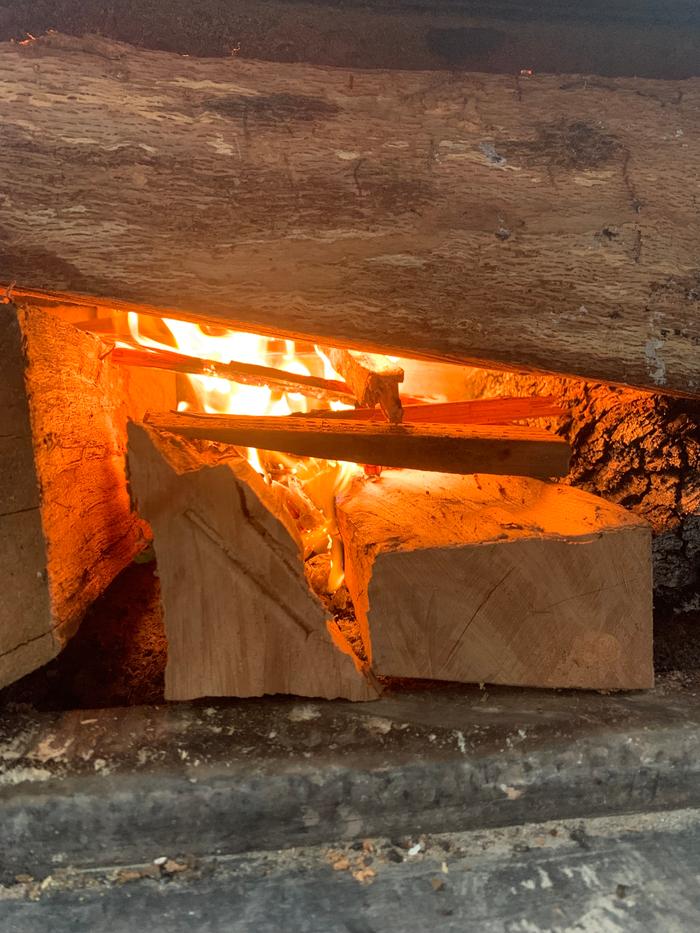
- Build your tinder starter tipi or cabin in the canoe shaped cavity of medium sized pieces, which have larger pieces parallel and outside, with the doorside end perched on the door ledge for airflow. This allows the flame to burn more completely without suffocation caused by larger pieces on top of flame, helping start a draw of air through the chimney. In general, place wood right around the flame, not on top of it for similar reasons.

- To get a bit of a rocket effect, place a wide, flattish piece of wood across the woodstove door side of the top of canoe/cabin of logs. This seems to channel cooler, oxygen rich air into the canoe full of accumulating coals, creating a fire intensifying thermosyphon. It really seems to help get the fire ripping

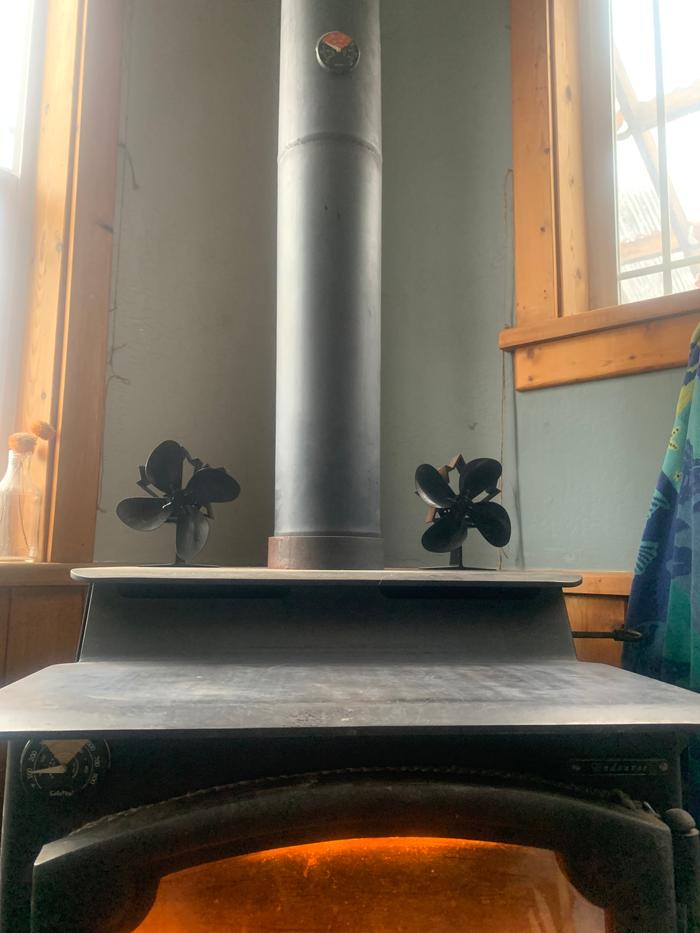
- I use thermometers on my wood stove and stove pipe to gauge when I have gotten the stovepipe hot enough to have cooked off any creosote in the stovepipe at 400-450f+, and then I close the recirculator until the stove itself gets above 450f, and then close the intake damper. This has made only an annual stovepipe and stove sweeping necessary, and even that is just a minimal amount of ash.

- Stovetop fans powered by heat seem to help a bit

- We obviously need more thermal mass. I am trying to convince my wife to let me build a cob hearth, and think our good experience with cob and natural plaster on our outhouse has helped make that more palatable for her. I would love to see any such project you all may have done for adding thermal mass around a woodstove!
IMG_6135.jpeg
Th bottom middle medium sized pieces have a roughly canoe shaped cavity for catching coals and siphoning O2 rich intake air through channel below parallel bottom logs
IMG_6129.jpeg
Crosswise piece across top to further channel intake air through canoe and over coals
IMG_6130.jpeg
thermometers to gauge draw and stove priming before engaging recirculator (upper right) and intake damper (bottom middle)
 
Posts: 533
Location: Iqaluit, Nunavut zone 0 / Mont Sainte-Marie, QC zone 4a
92
2
  • Likes 1
  • Mark post as helpful
  • send pies
    Number of slices to send:
    Optional 'thank-you' note:
  • Quote
  • Report post to moderator

Ben Zumeta wrote:

- Build your tinder starter tipi or cabin in the canoe shaped cavity of medium sized pieces, which have larger pieces parallel and outside, with the doorside end perched on the door ledge for airflow. This allows the flame to burn more completely without suffocation caused by larger pieces on top of flame, helping start a draw of air through the chimney. In general, place wood right around the flame, not on top of it for similar reasons.

- To get a bit of a rocket effect, place a wide, flattish piece of wood across the woodstove door side of the top of canoe/cabin of logs. This seems to channel cooler, oxygen rich air into the canoe full of accumulating coals, creating a fire intensifying thermosyphon. It really seems to help get the fire ripping


Is there any chance you could add a pic or two to demonstrate what you mean? The canoe, the placing of the flat piece? I can't really picture it -- I have a hard time with written and verbal directions, and this advice is too good to miss.

Ben Zumeta wrote:

- I use thermometers on my wood stove and stove pipe to gauge when I have gotten the stovepipe hot enough to have cooked off any creosote in the stovepipe at 400-450f+, and then I close the recirculator until the stove itself gets above 450f, and then close the intake damper. This has made only an annual stovepipe and stove sweeping necessary, and even that is just a minimal amount of ash.

- Stovetop fans powered by heat seem to help a bit


Excellent point. My old Levac wood furnace comes with all that, making it fairly idiot proof: the stove I learned on 20 years ago
 
author and steward
Posts: 52462
Location: missoula, montana (zone 4)
hugelkultur trees chicken wofati bee woodworking
  • Likes 4
  • Mark post as helpful
  • send pies
    Number of slices to send:
    Optional 'thank-you' note:
  • Quote
  • Report post to moderator
For things around the house that you already know:

   - better insulation
   - weather stripping
   - enclosed porch to reduce heat escaping the house with door action
 
Stuff that I want to add:

   - two layers of accordion blinds + window quilt

   - bathroom fan pulls warm air out of the house
            o reduce or eliminate bathroom fan
                     - add a small dehumidifier
            o if you are going to keep using the bathroom fan
                     - set up a fan timer and keep the time short

   - clothes dryer pulls warm air out of the house
            o use drying racks instead
                     - possibly in combination with a dehymidifier

   - kitchen fan pulls warm air out of the house
            o use air cleaners in the kitchen
 
paul wheaton
author and steward
Posts: 52462
Location: missoula, montana (zone 4)
hugelkultur trees chicken wofati bee woodworking
  • Likes 5
  • Mark post as helpful
  • send pies
    Number of slices to send:
    Optional 'thank-you' note:
  • Quote
  • Report post to moderator
Trying to make the best of green wood.

Of course, at the top of the list: NEVER BURN GREEN (or wet) WOOD!  

Supposing that all you have is green wood and you are really, really cold.  So you need some solutions to dry your wood, and dry it FAST.  

If you stacked the wood, in your warm, dry, house, it would still take four to ten months to dry.  But it is going to dry faster than if it was outside in the cold and damp.  

Next, if you cut the wood up into kindling, it will dry faster than if it is in big blocks.  And if you happen to try to burn not-quite-dry kindling, it will burn hotter than not-quite-dry blocks of wood.  And getting the fire hotter is critically important.  

I have not tested this, but it could be worth noting:  if you were to dry your wood standing on end, it will dry faster than if it is on its side.  I have heard that it will dry ten times faster.  

If your wood is closer to the heat of the stove, and closer to the ceiling (which is warmer) it will dry faster.  The air near (and above) the stove is not only warmer, but there is air movement.

If you have a lot of wood in a warm, dry house, you can point a fan on it to help it dry faster.  And you can go a step further by running a dehumidifier near your indoor firewood collection.

Again:  NEVER BURN GREEN (or wet) WOOD!

If you think your wood might be green, and you are not sure, you better get a moisture meter.

And it bears repeating:  NEVER BURN GREEN (or wet) WOOD!

 
steward
Posts: 10768
Location: South Central Kansas
2995
9
kids purity fungi foraging trees tiny house medical herbs building woodworking wood heat homestead
  • Likes 8
  • Mark post as helpful
  • send pies
    Number of slices to send:
    Optional 'thank-you' note:
  • Quote
  • Report post to moderator
De-greening fresh firewood.

In my solar kiln I can dry firewood in 6 weeks (summer) instead of two years.
Granted, that is in summer, and folks are usually resorting to burning green wood in winter, but
I am guessing (a wild, uneducated guess) that even in winter the solar kiln will dry much more effectively than stacked outside, especially on the warmer, sunnier days.
I am uncertain whether it will out-pace stacks of wood near your wood stove in your house, but inside real estate comes at a premium in winter.

The kiln: I built it to Virginia Tech's specifications, but added 10x more insulation.  It is primarily for kiln drying lumber for the market, but I don't use it very much for that.  I have found it much more useful for rapidly seasoning firewood.

I think of it kind of like a wood shed that actively dries.


Another thing about not burning green wood: the heartwood bit.
Heartwood of most species does not retain nearly as much moisture, and will burn much cleaner than the sapwood.  I've made some very clean-burning campfires from heartwood in pretty soggy scenarios.
 
paul wheaton
author and steward
Posts: 52462
Location: missoula, montana (zone 4)
hugelkultur trees chicken wofati bee woodworking
  • Likes 2
  • Mark post as helpful
  • send pies
    Number of slices to send:
    Optional 'thank-you' note:
  • Quote
  • Report post to moderator


- never operate your 75% efficient wood stove at 3% efficiency

      o make sure your stove is well corked before bed


Whenever you are burning, make sure the dampers are wide open and the fire is as roaring as you can get it.  A hot, roaring fire is the most efficient fire - the smoke and creosote are burned as bonus fuels. Smaller, dryer wood will be hotter and everything will be more efficient.

When the fire is finishing and is down to a few coals, you can close the dampers 80%.  And when the fire is out, close the dampers 100%.  Closing the dampers when there is no fire will ensure that your wood stove is not sucking all the warm air out of the house - thus operating your wood stove at negative efficiency.

Never go to bed with the dampers open even a little.  Never run a fire at night.

To be warm at night, run a very hot fire before bed, surrounded by mass, and when the fire is down, close the dampers completely.  The mass around the stove will be warmed by extra heat and will release heat into the room as you sleep.  And if the dampers are closed, that heat is not carried outside via the dampers.
 
Beau M. Davidson
steward
Posts: 10768
Location: South Central Kansas
2995
9
kids purity fungi foraging trees tiny house medical herbs building woodworking wood heat homestead
  • Likes 4
  • Mark post as helpful
  • send pies
    Number of slices to send:
    Optional 'thank-you' note:
  • Quote
  • Report post to moderator

paul wheaton wrote:Never go to bed with the dampers open even a little.  Never run a fire at night.

To be warm at night, run a very hot fire before bed, surrounded by mass, and when the fire is down, close the dampers completely.  The mass around the stove will be warmed by extra heat and will release heat into the room as you sleep.  And if the dampers are closed, that heat is not carried outside via the dampers.


Rearticulating the implications.
This is where people mess up.  The three pathways:
1) dangerous, but warmish (do not do this - although it is what many people do) - Burn your fire low and slow so you can sleep for a few hours at a chunk before feeding it again.  
2) safe, but cold - Wood stove with no thermal mass: shut down your fire before you go to bed and hunker down while the heat escapes, awakening to cold temps.
3) safe and warm - Wood stove with thermal mass: shut down your fire before you go to bed and the house stays warm.  The mass captures the heat of the fire while it's burning and releases it slowly overnight.


It could be a three-circled ven diagram of "safe" "warm" and "sleep."  It seems that RMH, masonry stoves, and similar with thermal mass are the only wood heat source occupying the convergence of all three circles.
 
paul wheaton
author and steward
Posts: 52462
Location: missoula, montana (zone 4)
hugelkultur trees chicken wofati bee woodworking
  • Likes 1
  • Mark post as helpful
  • send pies
    Number of slices to send:
    Optional 'thank-you' note:
  • Quote
  • Report post to moderator
Never have firewood touch the outside of the stove.  All firewood should be at least a foot away from the stove.
 
Beau M. Davidson
steward
Posts: 10768
Location: South Central Kansas
2995
9
kids purity fungi foraging trees tiny house medical herbs building woodworking wood heat homestead
  • Mark post as helpful
  • send pies
    Number of slices to send:
    Optional 'thank-you' note:
  • Quote
  • Report post to moderator

paul wheaton wrote:Never have firewood touch the outside of the stove.  All firewood should be at least a foot away from the stove.


How do you feel about stacking wood on your thermal mass, provided it is 12 inches from all metal?
 
paul wheaton
author and steward
Posts: 52462
Location: missoula, montana (zone 4)
hugelkultur trees chicken wofati bee woodworking
  • Mark post as helpful
  • send pies
    Number of slices to send:
    Optional 'thank-you' note:
  • Quote
  • Report post to moderator

Beau M. Davidson wrote:

paul wheaton wrote:Never go to bed with the dampers open even a little.  Never run a fire at night.

To be warm at night, run a very hot fire before bed, surrounded by mass, and when the fire is down, close the dampers completely.  The mass around the stove will be warmed by extra heat and will release heat into the room as you sleep.  And if the dampers are closed, that heat is not carried outside via the dampers.


Rearticulating the implications.
This is where people mess up.  The three pathways:
1) dangerous, but warmish (do not do this - although it is what many people do) - Burn your fire low and slow so you can sleep for a few hours at a chunk before feeding it again.  
2) safe, but cold - Wood stove with no thermal mass: shut down your fire before you go to bed and hunker down while the heat escapes, awakening to cold temps.
3) safe and warm - Wood stove with thermal mass: shut down your fire before you go to bed and the house stays warm.  The mass captures the heat of the fire while it's burning and releases it slowly overnight.


It could be a three-circled ven diagram of "safe" "warm" and "sleep."  It seems that RMH, masonry stoves, and similar with thermal mass are the only wood heat source occupying the convergence of all three circles.


Yes!  We need some diagrams showing the three sceanrios!

1) it runs very inefficient, so you get very little heat.  And then when the fire goes out, all of your heat gets sucked out the chimney.  

2)  If your home is well insulated, and you get the house plenty hot before bed, it might not be too bad.  

 
paul wheaton
author and steward
Posts: 52462
Location: missoula, montana (zone 4)
hugelkultur trees chicken wofati bee woodworking
  • Likes 2
  • Mark post as helpful
  • send pies
    Number of slices to send:
    Optional 'thank-you' note:
  • Quote
  • Report post to moderator

Beau M. Davidson wrote:

paul wheaton wrote:Never have firewood touch the outside of the stove.  All firewood should be at least a foot away from the stove.


How do you feel about stacking wood on your thermal mass, provided it is 12 inches from all metal?


Not only is that really good, but the wood itself acts as a bit of a mass.
 
Ra Kenworth
Posts: 533
Location: Iqaluit, Nunavut zone 0 / Mont Sainte-Marie, QC zone 4a
92
2
  • Likes 2
  • Mark post as helpful
  • send pies
    Number of slices to send:
    Optional 'thank-you' note:
  • Quote
  • Report post to moderator

paul wheaton wrote:

   - two layers of accordion blinds + window quilt

   - bathroom fan pulls warm air out of the house

            o reduce or eliminate bathroom fan
                     - add a small dehumidifier
            o if you are going to keep using the bathroom fan
                     - set up a fan timer and keep the time short

   - clothes dryer pulls warm air out of the house
            o use drying racks instead
                     - possibly in combination with a dehymidifier


Window quilt: Roman blind (probably same as accordion), I have a friend who does custom blinds...  and magnet strips around it's edges and wall, heavy duty metal grommets, hike up with two bike hangers perhaps, a quilted gasket over the whole top, mounted on a long wide board above the window
   
Heat reclamation units in bathroom/kitchen, reuse those fans somewhere else?
If you're not R2000 separate the humidity parts of the house from the rest and if parts of your house need more humidity put those old fans there?
Replace old insulation around and above kitchens and bathrooms?

On the rare occasion I need to dehumidify, I can use an air conditioner (a/c) without the cooling function on, that is almost new and hasn't been used as an a/c since I left that uninsulated 2nd level apartment 1/4 century ago
Staff note (Nancy Reading) :

"the R-2000 standard is a voluntary standard to exceed building code requirements for energy efficiency, indoor air quality, and environmental responsibility."  https://en.wikipedia.org/wiki/R-2000_program

 
gardener
Posts: 3489
Location: Fraser River Headwaters, Zone3, Lat: 53N, Altitude 2750', Boreal/Temperate Rainforest-transition
689
hugelkultur forest garden fungi trees books food preservation bike solar woodworking
  • Likes 3
  • Mark post as helpful
  • send pies
    Number of slices to send:
    Optional 'thank-you' note:
  • Quote
  • Report post to moderator
Always use dry wood.  No matter how many times this is written it can not be emphasized more.  Use dry wood, and seasoned as long as possible (two years is best for many species, especially in a cool humid climate-where I grew up on Canada's wet northwest coast it was very important). Wasting your BTU's drying wood inside your woodstove (which is what happens as it burns) is a waste of fuel, and it dramatically increases your risk of a chimney fire by having moisture cling flammable creosote to your upper chimney.

Have wood stored off the ground (I have pallets as the floor in the woodshed), with a good wide roof to keep it dry with lots of airflow.  Make sure your stove, chimney and all it's parts are functioning well.  

Sort your wood in your woodpile/shed so that you have some wood available that burns hot quickly.  Quick-Hot burning wood is often lighter thin wood that is not ideal for a long lasting fire, but is perfect for getting a proper draft going quickly.  That, and having more of the wood's resinous cellular tissue exposed is one of the primary reasons why people split wood into thinner pieces. Red cedar, and brush wood like willow, and branches from poplar trees are perfect for this.  Denser/larger wood is good for a long lasting fire which is efficient when the fire is already going and you want the wood to last a bit longer, but not when initiating it. Splitting that denser wood down to smaller bits helps a lot.  If you live in a very humid place, only split wood down to kindling just before you are going to use it.  Exposing kindling to moist air for an extended period is not in your interest.  Knowing your tree/wood species and the type of fire that they produce is very important if you want to have efficient fires in wood stoves.

As a forest fire fighter and as a kid learning about fire, you come to know that fire needs three things:  Temperature, Fuel, and Oxygen.  You can stop a fire by eliminating any of the three.  To get a fire initiated you need to have these things working for you, not against you.
 
As Ben Z mentioned, the key to getting the fire ripping along quickly at the onset is to have smaller kindling.  There is a reason that matchsticks are thin.  Small, dry, resinous, or less dense wood tends to burn up fast, throwing heat.  Mors Kochanski's book Bushcraft; Outdoor Skills And Wilderness Survival, details lighting fires in the bush including tinder and kindling in much greater quantity than most people would ever consider.  Well, consider it.  If you want your fire ripping hot fast, then this is the way.  Breaking wood into smaller bits, splitting it, etc, helps to expose more surface area/mass to the flames/heat.  Ben Z uses a torch when he can to get his fire started.  A lighter is also more effective than a match, but not nearly as much as a torch, clearly.  For emergency camping I have a small butane torch that is about twice the size of a lighter.

A Bellows  turns any flame or coal into a torch if you know how to use it. Paper and cardboard (particularly if shredded) is your friend as is resinous bark like birch bark, and fatwood works very well too.  Get that fire ripping hot right away, and it will be much easier to have it work efficiently to heat in the coming stages.

A tipi shape channels the most heated air and flames to the central point at it's peak and so is generally most efficient, but a cabin shape burns quite well too.

I find that a rectangular cabin (long in the draft direction, filled with fine material is quite an efficient tinder/kindling set up.  Depending on where your stove's air intake is, and on the size of the firebox, a bed of wood pieces laid out under your fire set up all in parallel to one another and in line with your draft direction can be a better place for your coals to land than in a puffy bed of soft ashes (which should be on the inside base of your firebox to protect it's bottom bricks or stove bottom from overheating, and abuse). Once these get involved in the fire you have a large bed of coals much more quickly and efficiently produced.  This is also a good way to have a fire on deep snow.  

Similarly to Ben's post above, when starting a fire in a woodstove, I put a couple of pieces parallel to the draft flow in the fire but on the outside of the kindling.  This does two things.  The first is that it channels more of the air flow from the air intake to the draft/chimney though the kindling zone, exactly where you need it.  The second is that it preheats the wood, preparing it for starting later.  Somewhat contradicting the idea of channeling all the air in that way, I also put some kindling underneath this wood at the door side edge.  This allows the heat and fire to go underneath it.  The benefit is that getting this wood burning early on will throw heat to the sides of the woodstove where the majority of your fire bricks are.  Getting these bricks hot is partly what makes the stove radiate efficiently.  

Another way to get these bricks hot is to make a kindling fire larger and longer lasting in the first place, eliminating the larger pieces for a while.  A couple stokings of the fire with small fast burning material gets the stove hot faster.  Contrary to the purpose of this thread, THIS IS WASTEFUL-but it gets the stove bricks and stove radiating faster.  This is also helpful if the local weather/atmospheric conditions are not helping your draft get established.  

I use this method only getting a sauna ripping fast or when I lived in a small cabin if I had been away for a day or more and the fire had been out for an extended period.  

When I was a little kid my slightly older friend (aged 6 and 8 I think-left alone!) and I completely filled a woodstove at his place with cedar kindling and paper and lit it up.  Parts of the iron were glowing a frightening red hot really super fast.  I do not recommend doing this EVER!  We were very afraid that we might burn his house down.  I think I was close to tears.  

In addition to this little pyromaniac project being generally extremely irresponsible and super stupid on the parts of us boys, his dad was the fire chief and my dad was the assistant chief which would have not been a very good story for the newspaper or the fire department!  Fortunately, the fire died down quickly as rapid kindling always does, so it was all good in the end and nobody was the wiser.  Phew!  What a relief!  We would have had our asses well tanned for that.  

The added expense of burning more kindling in the case of doing something similar on purpose (and not so ridiculous/extreme/dangerous) was made up by the fact that the rest of the cabin was warmed up that much quicker.  This was particularly of benefit when I was wet or cold or both coming home.  This was NEVER a regular method for home heating needs.  The fire is for you.  Figure out what your needs specifically are in the moment or regularly, and make the fire that suits those needs. But always do it safely.

On that point, a really hot fire is not always what is needed.  You may only require that the fire is radiating at it's hottest for a relatively short period in the day, or perhaps twice a day.  Figure out the best times to have the fire at it's maximum will save you fuel in the end.

Isolate your woodstove room from other rooms that do not need as much heating.  If you have multiple rooms, like a pantry, a bathroom, an entrance room, etc, and they do not have doors, then make a door out of curtains, or a blanket.  Even if they have a door, a curtain or a blank will be helpful. Similarly, cover your windows when they are not providing external thermal solar gain.  A bedroom's ideal temperature  Best Temperature for Sleep Based on Age is not the same as your comfortable room temperature where you hang out during the day or evening.  Find out what your ideal sleeping temperature, put a thermometer in your bedroom and don't heat the room beyond this.

Exercise.  If you are just sitting around at home all day, you will not be generating as much heat within yourself as you would if you were moving about.  A bit more moving around helps to keep your body warm.  It actually doesn't take much to do this, and it is a surprisingly efficient way to feel warmer in a colder space.  Even a chair workout (as done by seniors or movement impaired people) can be good for this.  Having a workout routine is of great benefit to your body heating needs.  Just getting up and doing some deep knee bends and touching your toes engages large muscle groups that have been inactive.  This is quite warming with a series of repetitions with little actual effort or strain.  

The previous statement noted, a comfy upholstered chair will act as a thermal mass holding your body heat that has been radiating and conducting into it.  So the longer that you are sitting in one spot that is acting this way, the warmer you will potentially feel (until you reach some kind of equilibrium with it's potential dynamic potential and it's intrinsic heat loss)  A cat or a small dog, knowing this, will often sit in a chair that was recently left unattended.

Winter isn't T-shirt weather, so wearing sweaters or a hat even indoors will keep your body warm and you do not need to have as hot a fire going.

There are legal requirements when placing wood near a woodstove that a person should know, but they would be similar to the building codes for how close a stove can be from an unprotected wall.  The stove has specific requirements for distance to flammable objects.  At any rate, store some of your next wood-to-be-burned at that distance, which will preheat it (when your wood outside is stored well below freezing this makes a big difference).  

When I was a kid, we had an additional woodshed as a room in our basement.  It was about half the size of an average small bedroom.  This wood was thus preheated to something close to room temperature long before it was burned. After I was around 8 or so, it was my chore to have this woodstove filled with split wood, and kindling prepared at all times.  

Sit near the stove.  In my small cabin, my desk was right beside my stove.  There I could read or write in comfort with the least fire going. I also had a hammock that I could hook up at any time and it swung right in front of the stove.

Drink warm drinks.  Coffee, hot chocolate, tea, herbal brews, broths whatever.  I have a mug of hot spiced cider with me right now.  Warm yourself internally.

A large (canning style) pot of water on top of the woodstove acts as a thermal battery.  If you are living off-grid, this water can be used for washing yourself or dishes, etc.  I've seen a large workshop with several barrels of water near the woodstove.  

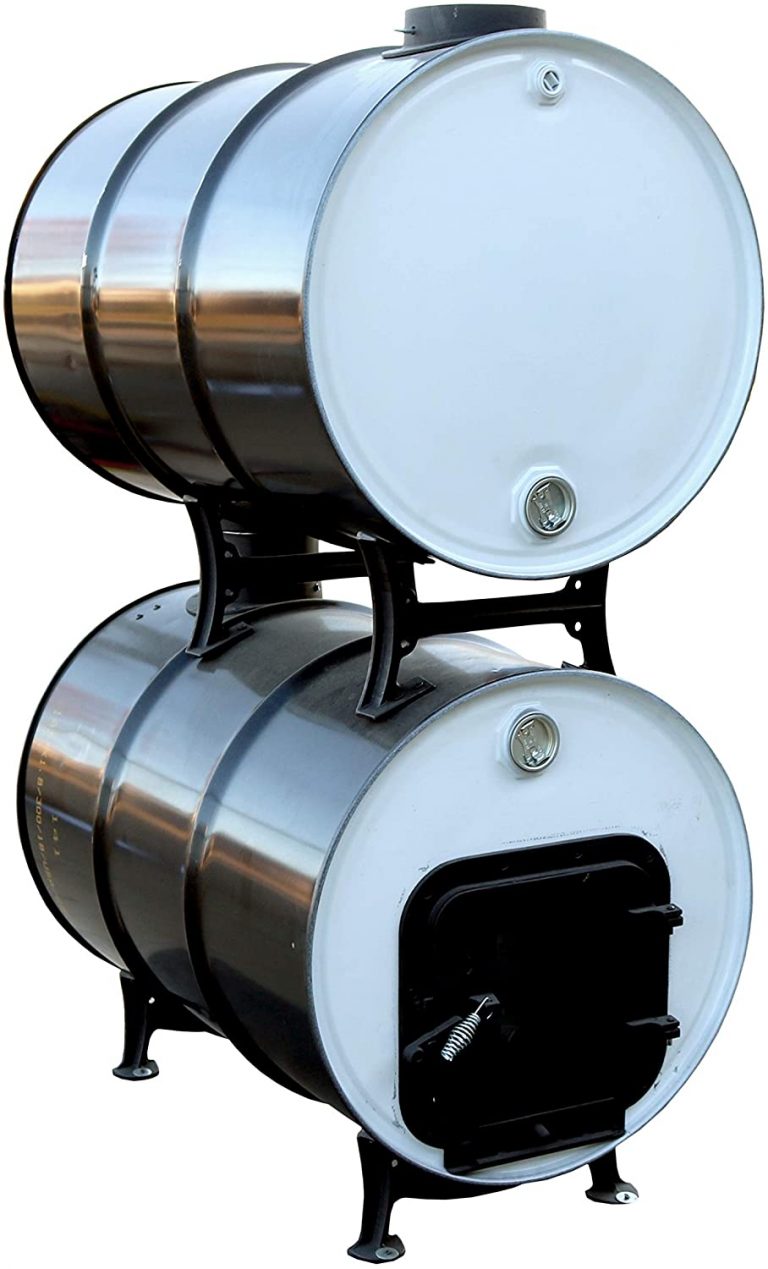
A catalytic barrel as part of the chimney also can increase your efficiency by burning up some of that energy that would normally go up and out your chimney.  This image is a double barrel stove which is surprisingly efficient for radiant heat.  We had one of these homemade in my dad's workshop when I was growing up.      Like with most stove systems, these require that a person have some working woodstove knowledge to install and use safely and efficiently.

Fans.  Although fans are using energy, they are an efficient way to move warm air.  An intake tube with a fan at the ceiling above the woodstove that brings that warmest air to the far side of the room at floor level can make a massive difference on how comfortable your room is.  Any fan will help take warmed air that might otherwise be wasted at ceiling level and move it around.  We had a fan from our basement woodstove that blew air upstairs into the living room above and fans internally in the stove walls that sent air out the front.  Figure out where you want your heat and blow it there.  

Maybe I'm weird but I like thermometers.  Having them in multiple rooms allows me to understand what temperatures I actually want them to be at.

Practice and experiment with your wood stove and get to know it.  Each one is different and needs it's own specific techniques.  
 
master pollinator
Posts: 326
Location: Southern Manitoba...bald(ish) prairie, zone 3ish
137
transportation hugelkultur monies forest garden urban books food preservation cooking writing woodworking
  • Likes 1
  • Mark post as helpful
  • send pies
    Number of slices to send:
    Optional 'thank-you' note:
  • Quote
  • Report post to moderator

Beau M. Davidson wrote:De-greening fresh firewood.

In my solar kiln I can dry firewood in 6 weeks (summer) instead of two years.
Granted, that is in summer, and folks are usually resorting to burning green wood in winter, but
I am guessing (a wild, uneducated guess) that even in winter the solar kiln will dry much more effectively than stacked outside, especially on the warmer, sunnier days.
I am uncertain whether it will out-pace stacks of wood near your wood stove in your house, but inside real estate comes at a premium in winter.

The kiln: I built it to Virginia Tech's specifications, but added 10x more insulation.  It is primarily for kiln drying lumber for the market, but I don't use it very much for that.  I have found it much more useful for rapidly seasoning firewood.

I think of it kind of like a wood shed that actively dries.


Another thing about not burning green wood: the heartwood bit.
Heartwood of most species does not retain nearly as much moisture, and will burn much cleaner than the sapwood.  I've made some very clean-burning campfires from heartwood in pretty soggy scenarios.


Interesting.  I wonder if a variation on the theme, using a solar dehydrator, could assist with this as well.  While it isn't a big space, one could use it particularly in spring and summer before one really has new produce to dehydrate and, even then, if the entire dehydrator isn't in use, having some split wood in there could still aid the drying process...at least it might help you avoid Paul using ALL CAPS in your direction
 
gardener
Posts: 631
Location: Burton, Ohio
289
11
  • Likes 7
  • Mark post as helpful
  • send pies
    Number of slices to send:
    Optional 'thank-you' note:
  • Quote
  • Report post to moderator
Ianto Evans sees his Rocket Heater as part of a system designed not to keep a house at 70 degrees F but more specifically designed to keep  him comfortable. Yes we want our heater to efficiently turning wood into heat, and also feed as much of that heat as possible into the bodies of the people  and keep it there. insulate and seal the everything to keep the heat in, starting with your own body, and rooms that don't need to be as warm, but also close down the heater when you are not actively feeding it.
 
pollinator
Posts: 163
82
  • Likes 4
  • Mark post as helpful
  • send pies
    Number of slices to send:
    Optional 'thank-you' note:
  • Quote
  • Report post to moderator
Regarding stove drying and/or house drying wood...

My father, who is no paragon of wood-burning virtue, has frequently stacked not-so-dry splits on top of some firebricks on top of the crown sheet of his plate steel stove.  Despite my frequent remonstrations that he should under no circumstances stack combustibles on top of his wood stove (fire brick or not), and should in fact, as Paul has suggested, stand up his splits on end around the stove, with a small fan circulating air among them, he does what he does.  And, I pray.

Thankfully the last two years (and again for this coming heating season) he has been able to acquire kiln dried reject lumber - heart rot, waney, warped, checked, sniped, badly edged, wicked spike knots, etc. - from a local mill.  This is mixed northern hardwood - maple, red oak, poplar and basswood, with a rare bit of cedar or spruce/pine.  Cedar gets picked out for kindling.  Any usable boards (i.e. maple, whether birdseye, tiger, crotch or otherwise, or a nice length of basswood) will get picked out to be turned into his projects.  Otherwise, it's destined to become BTUs - and in his case, lots of smoke, since he has, for the last half century, burned his wood as slowly and smokily as humanly possible.  He has been of the opinion that burning a bit of cardboard once a week will atone for any behavior during the course of the week.  Kiln dried lumber firewood means no stacks of splits piled log cabin style on top of the stove (woohoo!), and hopefully less smoke.  Sometimes, you could hear the wood on top of his stove popping and splitting as it dried.  You could also smell the small bits of wood and bark charring and smoldering as they fell on the stove top.  Not at all comforting...

He also has a wood rack about 6 feet long and 3 feet high in his living room near the wood stove - a good bit of a face cord; red neck home decor approved.  For those with more delicate aesthetic sensibilities, a three or four section decorative folding screen might hide the evidence.  This amount of wood will last him between one and two weeks, depending on outdoor temps.  If it's really cold and/or windy, then maybe only 4-5 days, but those stretches are usually pretty rare.  I have tried to convince him that keeping the rack full, and carefully rotating his wood so that he's only burning stuff that's already been in his living room for a week or more is a good idea, but it's not high on his list of priorities.  Allowing a small fan to blow air across the ends of the splits in the rack would also help if the wood is above optimal moisture content.  Humidity is probably below 20% in his house during most of the prime heating season, so is generally conducive to drying.

Of course, I try to convince him that burning his stove hotter, and adding more thermal mass (e.g. stacking more bricks or fire bricks on top would be a start) would be a good idea, too, but to little effect.  I've contemplated trying to improve the combustion efficiency of his stove, but I have to suggest things that comport with his basic stove operating habits.  Consequently, the only thing I have been able to come up with that would be somewhat dad-proof is to add a 6" diameter catalytic element and a stack robber.  I could position the cat just outside the firebox in the stove pipe thimble, where he can't smash "one more piece" into it when stuffing it for the night, or when he goes to town or church.  As long as he gets the cat up to temp (a chimney thermometer may help, here) then the cat will help to burn the smoke, and the stack robber will help to extract the resulting heat.  However, this is far from foolproof, given the operator and his proclivities.  If the cat is too chilly to light, then the stack robber will just become the first stage creosote condenser.  I've racked my brain, trying to come up with some secondary air feed setup which will stand up to his hard use, but so far - nothing.

This year, I suggested - first casually, then more forcefully - that he might need to hire a chimney sweep, since my brother and I are both still really busy this fall, and it wouldn't hurt to have a professional check the condition of the liner, in any case.  The sweep almost had kittens (with mittens on 'em!), seeing how much creosote was in the stack.  The cleanout was totally blocked before he even ran a brush down the flue.  Told him that if he'd had a chimney fire, the only thing that might have saved his house is that the clay liner inside the brick stack is still in good shape, and was installed with enough expansion space that it hasn't cracked due to normal thermal cycling.  He really read my dad the riot act about burning his stove hotter.  So far, my dad acts like he's gotten religion on this.  If he won't listen to me, then maybe he'll listen to the sweep.  And, maybe this is the time to revisit the cat/stack robber combo.  Strike while the iron is hot, and all.  Maybe I should revisit Matt Walker and Peter Berg's P-port designs and see if there isn't some way of adding such a feature to his current setup in a way that stands a better than even chance of lasting the heating season.

There are things a person could do that would help to encourage fairly clean combustion of wet-ish wood - not that it would be thermally efficient, but at least it would burn cleaner.  The Richard Hill stick wood boiler could cleanly burn wet wood (with lots of foregone thermal performance, due to latent heat losses).  Both his own tests and those conducted by Virginia Tech showed that.  I have next to me Bill White's manual for converting an oil burning furnace to auxiliary wood combustion (call it an add-on wood furnace, DIY style).  Both were basically downdrafters, designed under duress during the oil embargo.  Hill's version used a cast-in-place refractory firebox and burn tunnel - not far from a J-tube rocket - with both forced and induced draft, and was burned episodically - heat up a thermal store of water (~500 gallons - two recycled fuel oil tanks), then shut down the stove and circulate the hot water through the baseboard heat system (a radiant floor would pair nicely).  When the water temp drops, repeat.  White's version was site constructed of brick, cement and a steel tension frame, and used intermittent draft (either manually or thermostatically controlled), but as long as the coal bed stayed hot, the volatile gasses would be cracked and combusted fairly cleanly when the draft was opened.  If I had my druthers, I'd pick Hill's design or something conceptually similar.  I don't know if I could trust White's schemes to automate combustion control while I slept.  The closest to Hill's design currently commercially available are some of the HS-Tarm boilers - or were the last time I checked.
 
Posts: 226
Location: S.W. Missouri, Zone 6B
8
  • Likes 5
  • Mark post as helpful
  • send pies
    Number of slices to send:
    Optional 'thank-you' note:
  • Quote
  • Report post to moderator
Test Builds.
I sincerely believe it is extremely important to build at least one or two of these beasts outside, to test the theory and the builder's skills. Mistakes are easy to deal with when made on top of a layer of sand outside, versus in one's living room
 
Erik Weaver
Posts: 226
Location: S.W. Missouri, Zone 6B
8
  • Likes 2
  • Mark post as helpful
  • send pies
    Number of slices to send:
    Optional 'thank-you' note:
  • Quote
  • Report post to moderator
Discuss Rocket J-Design vs. Batch Burn Design.

o Discuss how these approaches differ in terms of burning management. For me, this is a very important item. I have discovered (after the first Winter) I did NOT like tending the sticks every few minutes.
oo Sitting beside it, or on the RMH bench, and reaching over to adjust the fire is one thing;
oo Sitting across the room, trying to write, or responding to an online forum post, or cooking dinner, is another thing.

o (And I think "well, obviously,") Include Plans for at least one iteration of the Batch Burn Design.
oo Discuss the importance of building accurately, and with precision.
ooo Specifically include designs for the port: measurements, materials, replacement, etc.
oo Discuss the greater potential heat at the bottom of the riser, and refractory material options.
oo Discuss the greater head space needed.
oo Include discussion as how to design, and calculate the proper surface area of a Bell Design.
ooo Specifically include which areas are, and are not, to be included in the surface area calculation.

o Aesthetics - "How Purdy Is It?"
oo Design options to enjoy viewing the fire.


For me, this would be an extremely interesting and important section of the book. I love the Batch designs, and they fit my personality. It would be great if this section was more than just an "adder," and was actually a full fledged attempt to provide design plans, complete with details and options. One of the books I have, does offer some nice information in this regard, but compared to the J-style, it feels as if it were just thrown in as an after thought, in that it lacks a lot of detail.
 
pollinator
Posts: 726
Location: Clemson, SC ("new" Zone 8a)
161
10
  • Likes 4
  • Mark post as helpful
  • send pies
    Number of slices to send:
    Optional 'thank-you' note:
  • Quote
  • Report post to moderator

paul wheaton wrote:Never go to bed with the dampers open even a little.  Never run a fire at night.  To be warm at night, run a very hot fire before bed, surrounded by mass, and when the fire is down, close the dampers completely.  The mass around the stove will be warmed by extra heat and will release heat into the room as you sleep.


For most people living in anything but a very small cabin, the woodstove is likely to be in your kitchen or living room, not in your bedroom.  So make at least one portion of your mass portable.  Fill a metal hand-bucket with pea gravel and set atop your woodstove.  At night when the fire is put out, move the bucket full of now-blazing-hot stones into the middle of your bedroom floor to radiate its heat where you will want it overnight.

If your floor is stone or tile or concrete, you're good to go as is.  If your floor is wood or linoleum or carpeted, you'd want something low and heatproof onto which you can place the bucket so as not to burn a ring into your floor.  And probably best to keep toddlers from wandering into your bedroom at night when heating it this way.  Perhaps pets as well, though they are probably smart enough not to burn themselves.
 
gardener
Posts: 5171
Location: Cincinnati, Ohio,Price Hill 45205
1011
forest garden trees urban
  • Likes 2
  • Mark post as helpful
  • send pies
    Number of slices to send:
    Optional 'thank-you' note:
  • Quote
  • Report post to moderator

Kevin Olson wrote:Hill's version used a cast-in-place refractory firebox and burn tunnel - not far from a J-tube rocket - with both forced and induced draft, and was burned episodically - heat up a thermal store of water (~500 gallons - two recycled fuel oil tanks), then shut down the stove and circulate the hot water through the baseboard heat system (a radiant floor would pair nicely).  When the water temp drops, repeat.


Indoor wood stoves rarely seem to have forced draft, the way outdoor boilers do.
Outdoor wood fired boilers are usually smoldered and stoked only when the system calls for heat.
Hydronic systems usually have only a very small buffer tank, for storing hot water.
Hill seems to have brought the forced draft boiler inside, running it all out for a clean burn and storing the btus in  hugh buffer tanks.

This raises a question for me.
The various water heating add-ons that can be used with a wood stove, do they make them burn dirty?
If not, this is another way to store a lot of clean+ish btus using a conventional wood stove.


I've often thought about the relative simplicity of induced draft combustion.
It is a brute force approach compared to the natural draft design of rocket stoves.
These properties makes it attractive to mass production and automation.
I have never seen is a forced draft woodburner that heats a solid thermal mass.
Could be a good compromise for some situations.
 
Posts: 709
149
  • Mark post as helpful
  • send pies
    Number of slices to send:
    Optional 'thank-you' note:
  • Quote
  • Report post to moderator
I think the forced draft, whether under fire, over fire, or a combination of the two really gives the operator control over the fire. With variable speed controls it can barely pull/push air or pack it right into the fire box. Add plcs and you get astonishing control of the fire including heat output and fuel consumption.

But the cost of that control is in the way of monetary cost and overcomplication. Yes the more controls you have the more control of the fire you have, but at some point mechanical and electrical controls fail.

That is not the big question though? Is it really needed?

 
pioneer
Posts: 107
Location: in the Middle Earth of France (18), zone 8a-8b
49
hugelkultur cat dog forest garden tiny house chicken building sheep rocket stoves homestead composting
  • Likes 2
  • Mark post as helpful
  • send pies
    Number of slices to send:
    Optional 'thank-you' note:
  • Quote
  • Report post to moderator
Storing firewood next to the wood stove:

Some years ago I saw a video where a young couple had built an eco-home ( regrettably I don't have the link ).
They had built a fire wood storage...shelf? holder? with a wooden frame and completely covered it with a substantial layer of cob, leaving storage space for firewood open, obviously.

The great benefits of using cob in this wood storage solution are that it moves heat from the wood stove (which is next to it) into the wood storage, and any moisture from the fire wood out.


Posts: 49
Location: SE France
13
fungi trees food preservation medical herbs wood heat composting
  • Likes 2
  • Mark post as helpful
  • send pies
    Number of slices to send:
    Optional 'thank-you' note:
  • Quote
  • Report post to moderator
Hello there,

Sprinkling of snow  a couple of days ago and now sitting on terrace for coffee break, in the sun.

Potential material for FAQs, maybe.

Worst nightmare, having damp wood in winter. Follow all best practice for drying storing wood, yet with the monsoon type rain we have had, the split logs appear to absorb moisture.
I have a rolling system of having at least one or two days supply of wood on the rmh bench. It helps a bit.
Kindling is treated with extra respect.
Old timers do mention storing firewood in an upright position.

The bench  has never been warm; the sides yes but not the top? Possible why?
When the barrel was taken off last year, the chimney was covered in very very very fine ash.
The rmh pipes get regular vacuuming.
There was help with the cob during building the rmh and I suspect that more sand and water were in the mix to make the job easier.
I did show a sample of my cob mix which was certainly trickier to work with than what my mates produced.
They couldn’t understand why I was slower than them. Ah well.

Would an excess of sand affect heat capture and storage?

I am going to make a channel in the bench to replace some of the cob with my clay rich mix.
A Peter panel may also be on the cards.

I have read, with bulemic tendencies, loads of artcles about rmhs looking for solutions.
I have already increased the height of the’internal’ chimney in the barrel and will probably do so again.
(Will definitely use a barrel with a lid or a 2 barrel arrangement to facilitate access for cleaning and inspection, without having to disturb the masonry.)
It seems to have improved efficiency slightly.
It’s still a ways away from the performance expected.
Otherwise, The proportions, surface areas etc have all been respected as per the Wisner book.

A mate informed me that a couple of households reverted to using non rmh heating after mega disappointing experiences. Don’t know the why’s and wherefore’s. Surprising.

Forward and onward, with hope and courage to us all, and thank you,
Blessings from sunny and increasingly windy over here.
 
Posts: 26
Location: Pacific NW - Oregon
14
wheelbarrows and trailers chicken solar wood heat rocket stoves homestead
  • Likes 2
  • Mark post as helpful
  • send pies
    Number of slices to send:
    Optional 'thank-you' note:
  • Quote
  • Report post to moderator
hello all-
trying to respond to the topic in general, not a particular post, but not the best with this internet stuff. want to throw in my two cents.
I am going to be going RMH or masonry heater as soon as we move to our new property.
that being said, I have been a wood heat person all but one year of my life. I grew up with a wood cookstove that was able to heat most of the large house we lived in - which was on a few kind of remote acres, but what we would call a homestead nowadays.
so, current situation I have a reburn EPA stove.  took me a few years to get with it as it is more efficient using it like Paul and others state here in this forum. I struggled to let go of the old "load it up, damp it down and go to bed" concept.
Permies opened my eyes, thankfully - as hitting retirement age and another bad crash have left me trying to figure out how to have less to do with the wood heat.
I started going with correct hot fire or no fire burning - added bricks/rocks/steel and other mass around the stove to retain the heat for later.
but still struggled to heat half of the house - which has a quite open floor plan. bought one of the top of stove heat powered fans. that helped even a few areas out, but not our favorite room.
we got jokingly told to put a fan on the floor - but they were meaning at the stove - but I woke up one morning and put a fan on the floor in the cold room, facing the stove. not really sure why.
we now call that fan "equalizer" - with thermometers in each area, we have gone from a 5 or 6 degree difference to 1 full degree or less. it obviously helps the natural convection bring the warm air down from up at the ceiling as the cold air moves to our stove. small quiet fan, I am deaf enough I cannot hear it. and that has lowered our wood useage - but not to the extent the RMH or masonry would.

currently in the soggy Willamette Valley in Oregon - moving to the high desert. going mostly solar - but redundant systems especially for heat, as it gets cold there.
best to you all!
 
pollinator
Posts: 108
Location: Missouri
20
  • Likes 2
  • Mark post as helpful
  • send pies
    Number of slices to send:
    Optional 'thank-you' note:
  • Quote
  • Report post to moderator
If i was tasked with writing a book on Mass Heaters, the layout and flow of the book would resemble a tree itself. The concept has roots, a main trunk, main branches, side branches and finally small twigs and leaves. Each a chapter unto it's own.

The concept of burning dry wood is universal to any wood burning appliance, not just mass heaters. You never want to waste BTU's of heat evaporating water to make steam. But that chapter is at most a small side branch.

The mass heater concept itself......the main trunk.....is really pretty simple. Wood, in it's natural state, represents a form of energy stored as various compounds. As the wood starts breaking down from the heat, it starts releasing these compounds just as crude oil does in an oil refinery. First as gases, and finally as carbon. If exposed to a form of heat that is hot enough, all of the various compounds that come together to form wood will burn. Put another way, to harvest the maximum BTU's available in wood, requires very intense heat to get those to burn. Mass heaters are designed to burn at extremely hot temperatures to combust first the gases, then carbon fibers. So going from temps well in excess of 1,000*F to get maximum combustion of wood,  but then harvesting and collecting all that heat such that temps at the chimney cap are cooled down to 150*F or less, just enough to keep the gases flowing thru the system. Every aspect of a mass heater is designed as an integral unit......first to generate (and survive) the incredibly intense heat, then harvest it.

I would also go on to mention that in it's basic form, a mass heater is only a space heater, no different than a fireplace, wood stove, etc. Only many times more effective and many times more efficient.

But start with the roots, then flesh out the trunk and all the main branches. Be very careful to keep the small branches, twigs and leaves as chapters unto themselves.
 
Eugene Howard
pollinator
Posts: 108
Location: Missouri
20
  • Likes 7
  • Mark post as helpful
  • send pies
    Number of slices to send:
    Optional 'thank-you' note:
  • Quote
  • Report post to moderator
Another observation about mass heaters.......my take is that regardless of how well they work, there are a limited number of folks willing to accept an appliance that places a steel drum in the living room. For acceptance of mass heaters by the MASSES, the easy sell will be masonry heaters that resemble and replace masonry fireplaces that millions of homes already have.
 
master pollinator
Posts: 4999
Location: Canadian Prairies - Zone 3b
1354
  • Likes 6
  • Mark post as helpful
  • send pies
    Number of slices to send:
    Optional 'thank-you' note:
  • Quote
  • Report post to moderator
Excellent points above! Let me add my 2c on the topic of "how to cut your wood needs in half with a wood stove:"

Get to know your Fire Dragon! Every wood burner has a distinct personality, like a romantic partner. Cozy up and pay attention to those little moods, preferences and quirks. Adjust how you interact and you'll get along famously.

Is your wood dry (enough)? Use a well-dried piece of the same variety for reference. The difference in weight will be obvious. Water is heavy!

Burning wet wood produces steam. Too much steam cools the fire. Instead of all those combustible components producing happy heat BTUs for you, they turn into solids that clog up your chimney. That sets up a big fire hazard, and it doesn't take long.

Okay, worst case scenario: what can you do if green wood is all you have and you are cold?
- FIRST, treat this as a short term emergency. There are hazards to watch out for.
- Green woods burn dirty. Have a plan to inspect and clean your chimney frequently to manage creosote buildup.
- Not all green woods are equal. Green wood in a frozen winter has less moisture than in summer. Soft (coniferous) woods like spruce, pine and fir will burn green because of their volatile sap resins.
- It is possible to burn a percentage of green wood in a hot wood stove if you can mix it with dry wood and build up a good bed of coals.  Try to scrounge scrap pallet wood, dimensional lumber, dead branches. Any dry solid fuel that increases the heat of the burn will make a difference.
- Do everything possible to increase the surface area of the green wood. Logs should become fat kindling or be chunked into cookies; branches should be chunked up with loppers.
- While burning green wood, use the heat to make dry kindling (critical) and to reduce the moisture content of the next batches of wood.
- Don't let coals burn to ash; they will help you build the bed of coals needed for the next burn.
 
Popeye has his spinach. I have this tiny ad:
Rocket Mass Heater Jamboree And Updates
https://permies.com/t/170234/Rocket-Mass-Heater-Jamboree-Updates
reply
    Bookmark Topic Watch Topic
  • New Topic