• Post Reply Bookmark Topic Watch Topic
  • New Topic
permaculture forums growies critters building homesteading energy monies kitchen purity ungarbage community wilderness fiber arts art permaculture artisans regional education skip experiences global resources cider press projects digital market permies.com pie forums private forums all forums
this forum made possible by our volunteer staff, including ...
master stewards:
  • Carla Burke
  • Nancy Reading
  • John F Dean
  • r ranson
  • Jay Angler
  • paul wheaton
stewards:
  • Pearl Sutton
  • Leigh Tate
  • Devaka Cooray
master gardeners:
  • Christopher Weeks
  • Timothy Norton
gardeners:
  • thomas rubino
  • Matt McSpadden
  • Jeremy VanGelder

Idea..... Making a charcoal retort out of a rocket stove....

 
pollinator
Posts: 992
270
5
tiny house food preservation cooking rocket stoves homestead
  • Mark post as helpful
  • send pies
    Number of slices to send:
    Optional 'thank-you' note:
  • Quote
  • Report post to moderator
Here is the idea...


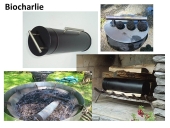
Take Peter's batch box rocket stove,  then....     make charcoal in it with a scaled up version that will fit this pan ->  


One would be able to make biochar and heat the home at the same time.    Also  one could burn sawdust in Peter's batch rocket......


Rocket Scientist
Posts: 1809
Location: Kaslo, BC
525
building solar woodworking rocket stoves wood heat greening the desert
  • Likes 3
  • Mark post as helpful
  • send pies
    Number of slices to send:
    Optional 'thank-you' note:
  • Quote
  • Report post to moderator
Hi Mart,  

I have done this with my Batch Box several times now this winter using the same technique in the video and it worked out quite well.
Since my biochar needs are minimal however, I have decided to stop this process and instead just wait until ash cleanout time and filter out the charcoal with a screen.
My batch naturally leaves enough charcoal behind to suit my needs which saves me from having to fill and empty the retort all the time.
Good luck with your experiments.
 
Mart Hale
pollinator
Posts: 992
270
5
tiny house food preservation cooking rocket stoves homestead
  • Likes 2
  • Mark post as helpful
  • send pies
    Number of slices to send:
    Optional 'thank-you' note:
  • Quote
  • Report post to moderator

Gerry Parent wrote:Hi Mart,  

I have done this with my Batch Box several times now this winter using the same technique in the video and it worked out quite well.
Since my biochar needs are minimal however, I have decided to stop this process and instead just wait until ash cleanout time and filter out the charcoal with a screen.
My batch naturally leaves enough charcoal behind to suit my needs which saves me from having to fill and empty the retort all the time.
Good luck with your experiments.


Thanks for the confirmation.  

I have run my generator off of charcoal, and having a means to extract the energy from the making of the charcoal sounds like a wonderful thing to do...    I am thinking I could I could use wood chips that have been dried in such a pan to heat water as a thermal mass, then use the charcoal to charge my battery via my generator.....


I really like the idea of getting a large load of sawdust and then making biochar, from that sawdust and powering a rocket stove at the same time.....


Posts: 70
Location: Algarve, Portugal
23
duck forest garden tiny house bike wood heat homestead greening the desert
  • Mark post as helpful
  • send pies
    Number of slices to send:
    Optional 'thank-you' note:
  • Quote
  • Report post to moderator
Which scale are you working with and how big are your heating needs?

In my personal experience the best way to make high quality biochar indoors is with TLUD stoves that use syove pellets as the fuel. If you have a good sawdust supply you could consider your own pelletizer to make stove pellets.

A good alternative would be an outdoor retort system where the smoke is condensed, the heat that is extracted during this condensing of the smoke used to feed into a hot water system for the house and then the remaining non condensable gasses are fed into your generator. Then you end up with hot water, biochar and electricity.

If you are not in need of biochar then a traditional wood gasifier such as for example a FEMA gasifier or the designs from the likes of Mr Teslonian or Randominium on youtube will suit your needs when it comes to energy production.

P.s. it's not really biochar if you intend to burn the material down to ashes again ;)
 
Mart Hale
pollinator
Posts: 992
270
5
tiny house food preservation cooking rocket stoves homestead
  • Mark post as helpful
  • send pies
    Number of slices to send:
    Optional 'thank-you' note:
  • Quote
  • Report post to moderator

Martijn Macaopino wrote:Which scale are you working with and how big are your heating needs?

In my personal experience the best way to make high quality biochar indoors is with TLUD stoves that use syove pellets as the fuel. If you have a good sawdust supply you could consider your own pelletizer to make stove pellets.

A good alternative would be an outdoor retort system where the smoke is condensed, the heat that is extracted during this condensing of the smoke used to feed into a hot water system for the house and then the remaining non condensable gasses are fed into your generator. Then you end up with hot water, biochar and electricity.

If you are not in need of biochar then a traditional wood gasifier such as for example a FEMA gasifier or the designs from the likes of Mr Teslonian or Randominium on youtube will suit your needs when it comes to energy production.

P.s. it's not really biochar if you intend to burn the material down to ashes again ;)


Hi,

Thanks for your input.     I have built a TLUD stove, and it has it's place.     For my type of biomass, branches etc the cone method of making biochar is the easiest and the fastest for my needs.

I have built a charcoal gasifier, and it is useful for running my generator.      

The idea is to make the rocket batch box into a retort.   So yes you burn some wood around the Hotel Pan,   and you end up with both the rocket stove heating, and the Hotel Pan with charcoal.
 
Posts: 1
  • Likes 1
  • Mark post as helpful
  • send pies
    Number of slices to send:
    Optional 'thank-you' note:
  • Quote
  • Report post to moderator
Hello!
Not understanding a burn system I built a few years back. Maybe it’s simply makes charcoal. I made a 6”x8” box with door. Inside was a shelf 1” from bottom with a 1” hole in both the shelf and box. I took a 4”x6”x1/2” Steel casing, with bottom, with a 1” hole in center, and a removable top plate with a 1”hole in it. I then took a 1” pipe, placed it in the 4”x6” pipe, standing it up in the bottom hole. I then packed sawdust inside around the 1” pipe until full then removed the 1” pipe, placed the Lid on, placed the 4x6 on the shelf, shut the door and lit from underneath. The 4x6 has a wall it slides back against, the wall extends from the top of the 6x8 box down, leaving a 1” gap at bottom behind the pipe with sawdust for exhaust. We kept looking inside because we never seen flame or smoke, but knew from the heat it was doing something. This thing held maybe 2 cups of sawdust. Day was done and one of the guys reached in to remove the inner pipe with sawdust, with quality welding gloves, it immediately burned him through the gloves, he dropped it. The lid came off and the sawdust was still in its form, yet a black solid mass, that only fell apart after hitting the ground.
 
pollinator
Posts: 186
Location: Alpine southwest USA
95
cat hunting cooking building woodworking
  • Likes 2
  • Mark post as helpful
  • send pies
    Number of slices to send:
    Optional 'thank-you' note:
  • Quote
  • Report post to moderator
I have been making charcoal for a few years now in a modified retort I made out of an old cement mixer barrel. I thought I would share some photos of the equipment and the process with folks in case anyone else is trying to make charcoal with available wood scraps.  First of all, I make charcoal for use in my solid fuel forge. It is much cheaper than coal and works almost as well. (Hey the Viking smiths all used pine charcoal, and the Japanese smiths still do, so why not?) First, I took the barrel of of a small cement mixer and drilled a bunch of 1/2" holes in the bottom. Then I stood it up on a ring cut off of an old barrel. I made the lid from a scrap piece of 1/8" thick sheet metal and welded a handle to it after drilling a bunch of 1/4" holes in it. It's not a *real* retort. A real retort has a way to channel the off-gasses hat come out through the top, back into the burn chamber
1-Retort.JPG
[Thumbnail for 1-Retort.JPG]
2-retort-cover.JPG
[Thumbnail for 2-retort-cover.JPG]
 
Joshua States
pollinator
Posts: 186
Location: Alpine southwest USA
95
cat hunting cooking building woodworking
  • Mark post as helpful
  • send pies
    Number of slices to send:
    Optional 'thank-you' note:
  • Quote
  • Report post to moderator
I had a whole bunch of 2x cut offs from various building projects. You can use anything really and 2x4 scrap is easy to find at almost any building site in the dumpster. I split my boards down to about a 2x2 12-16 inches long. I will break it up into smaller chunks to use in the forge, or in a small brick furnace that I re-melt mild steel down and make high-carbon steel for tools and blades. I pack the barrel with the wood pieces. I have tried different loading methods. All of them on end or smaller (6 inch long) just haphazardly tossed in. Either way works about the same, Your mileage may vary..
I start a small fire under the retort and seal the opening with another curved piece of sheet metal to prevent sparks from coming out. The idea is for the heat and flame below to get through the holes in the bottom of the retort and start the wood to smolder. You do not want it to catch fire, just get hot enough to purge the moisture and oils. The oils create the off-gassing which will produce some flames out of the lid holes. You will know when it is cooking when the smoke and small puffs of flame come out the top. When the fire below burns down, I scoop a shovel of hot coals out, open the lid and dump them on top of the wood pile. This gets the wood smoldering from top to bottom and bottom to top. BE CAREFUL when you do this. The sudden updraft can cause a flame up. Put the lid back down and let it smolder for about 8-10 hours.
3-Filled.JPG
[Thumbnail for 3-Filled.JPG]
4-first-fire.JPG
[Thumbnail for 4-first-fire.JPG]
 
Joshua States
pollinator
Posts: 186
Location: Alpine southwest USA
95
cat hunting cooking building woodworking
  • Likes 1
  • Mark post as helpful
  • send pies
    Number of slices to send:
    Optional 'thank-you' note:
  • Quote
  • Report post to moderator
This is the retort is full burn mode. It's a fairly passive burn and well contained.
Smokin-.JPG
[Thumbnail for Smokin-.JPG]
 
Joshua States
pollinator
Posts: 186
Location: Alpine southwest USA
95
cat hunting cooking building woodworking
  • Likes 2
  • Mark post as helpful
  • send pies
    Number of slices to send:
    Optional 'thank-you' note:
  • Quote
  • Report post to moderator
These photos are all from 2017 when I started this project.  When it stops smoking and the retort is cool to the touch, you are ready to open the lid and extract the charcoal. The lid should be stuck to the barrel with pine tar. It looks like black gunk. Save this. You can mix it with beeswax and some charcoal fines to make cutler's resin. This is a type of glue that was used for centuries to hold handles on all sorts of tools (especially knives and swords hence the name cutler's resin).  You can also use metal filings, sawdust or brick dust in place of the charcoal fines. Really, any aggregate will work. Anyway open the lid and start pulling out the pieces of charcoal and dust them off. You want it stiff and not crumbly. It should make an audible snap when broken. It should also sound slightly metallic with a tinkling when you drop it on a pile of itself.  Any pieces that didn't get charred through can either be used as-is or thrown in the next batch.

Here is a link to a video of the finished project  in 2017: https://youtu.be/esrAhZCnutU
Black-gunk-opt.jpg
[Thumbnail for Black-gunk-opt.jpg]
Day-2-results-2-opt.jpg
[Thumbnail for Day-2-results-2-opt.jpg]
2x2-opt.jpg
[Thumbnail for 2x2-opt.jpg]
 
Posts: 71
Location: Rhode Island, USA
27
  • Likes 2
  • Mark post as helpful
  • send pies
    Number of slices to send:
    Optional 'thank-you' note:
  • Quote
  • Report post to moderator
Interesting design, Joshua. One question - does your system burn off off-gasses from the charred wood? Or are they just escaping through the holes in the top of the lid?
 
Joshua States
pollinator
Posts: 186
Location: Alpine southwest USA
95
cat hunting cooking building woodworking
  • Mark post as helpful
  • send pies
    Number of slices to send:
    Optional 'thank-you' note:
  • Quote
  • Report post to moderator

Mike Farmer wrote:Interesting design, Joshua. One question - does your system burn off off-gasses from the charred wood? Or are they just escaping through the holes in the top of the lid?


No, I do not have this kettle set up as a retort. As I mentioned in the posts above, a true retort has a way to channel the off-gasses back into the burn chamber. They just escape through the holes in the lid. They don't actualy escape into the air. During the burn I have noticed small flames in short bursts out of the holes. These are the hot gasses combining with oxygen and igniting.
 
Mike Farmer
Posts: 71
Location: Rhode Island, USA
27
  • Likes 2
  • Mark post as helpful
  • send pies
    Number of slices to send:
    Optional 'thank-you' note:
  • Quote
  • Report post to moderator

Joshua States wrote:No, I do not have this kettle set up as a retort. As I mentioned in the posts above, a true retort has a way to channel the off-gasses back into the burn chamber. They just escape through the holes in the lid. They don't actualy escape into the air. During the burn I have noticed small flames in short bursts out of the holes. These are the hot gasses combining with oxygen and igniting.


Ah, well, that's good that you're seeing the flames...as you say that means the gasses aren't getting into the environment. I imagine that you're maybe getting a LITTLE "free" heat from the flames, as well.

I wonder if you went with a solid lid but holes in the bottom of the top barrel if you'd get better burn-off of the gasses and  get more heat. The water vapor blowing on your fire may off-set any gains, so you're probably best sticking with what's working for you! Cool system!
 
This tiny ad helped me apply for a passport. Denied.
Rocket Mass Heater Jamboree And Updates
https://permies.com/t/170234/Rocket-Mass-Heater-Jamboree-Updates
reply
    Bookmark Topic Watch Topic
  • New Topic