Yes, the dimensions are for max allowable width and heights for travelling on public roadways. Granted, you probably have a few inches you could fudge out as you would probably have to really be pissing off the sheriff by the time he busts out his tape measure,but also it can be tricky driving a trailer that is full width if you don't trailer much. If you plan on hardly ever moving it you can probably get away with it, but the dimensions are meant to represent the max any part of a trailer can be.
I really like my Bogs brand boots. They are insulated, fully waterproof like galoshes, but flexible and form fitting for better feel. They come in a high and low top version, with different print options. I actually wear the "womens" style because i like the hand cut outs on the sides, easier for pulling on. They are about 80 or 90 bucks versus the 20 for rubber galoshes, but after you use them for a day you will consider them well worth it.
Another brand I have heard about but haven't used is Muck brand. I think they are similar but even more form fitting/insulated/ comfy. Those are especially popular in Alaska.
Like most things, there is more then one way to go about something. Every person you ask will have different answers. Here are my relevant thoughts to your situation:
When your property has a well and septic on it, you can get away with so much more as far as eccentric building styles. There are ways around having them but they will scrutinize other things more so.
Yes, if you ask someone to quote you prices for those things they will give you general figures, usually higher. Wells are harder to get around as far as doing them yourself or for cheaper, but septics yo can do most of the work yourself. You might need an approved installer to do the final connections or to do a final inspection, but you can certainly dig the field and runs yourself, and probably do most of the work yourself.
The cost of wells is dependent on the depth. If you know you have a good shallow water table then a well couple be as little as $5000.00
It is possible to get away with a composting toilet in some places, but again, they will be a bit more leery of other projects you do.
Power is a tricky one as there are monthly charges associated with having power even if its not being used. Also, if you have a well, naturally you need a ready supply of power. Solar of course is an option, depending on resources. As someone said, you can have a "temporary" power pole set up, as if for a construction site, but the issue with that is it has a time limit on it. If you arent actively constructing they might start to question it. On the other hand, if you do have a building that you are actively constructing, you can probably stretch it for many years.
There must be a way to have a power hook up as if you were going to have a mobile home, i just am not personally familiar with the process and requirements.
Where do you live? Do you know much about local restrictions?
I'm having a hard time envisioning your predicament, as well as your vision. It is for stuff like this that the adage "a picture (or drawing in this case) is worth a thousand words". Without being able to fully grasp what you are trying to do I, and perhaps the others on here, advise extreme caution.
In my mind the PSP model is a stand alone design. The posts in it are meant to hold up its own roof, not a whole other story. Unless you know of structures Oehler has used his design as a basement for an upper story, I can't advise using it in such a capacity as you desire. For someone on such a tight budget, experimenting with so many unknowns with no worst case scenario capital just doesn't add up to me. I'm sure a more "conventional" approach would be easier, faster and cheaper, such as incorporating the additional beams as permanent, and using larger posts, lally columns or concrete piers. I think you could do a concrete perimeter and still back fill it so you have an earth berming effect on your root cellar.
I understand the desire to use exciting alternative and natural building practices, but most of them don't incorporate well into remodeling, as they are usually whole house systems. There is something to be said about a seamlessly updated classic house using standard techniques. Being a builder, only you know your capabilities and vision for your structure, so best of luck however you proceed.
While bringing supply in under the house certainly is ideal, its not the only option. I would use PEX from as far down as possible at the well or whatever the point of origin is. I would want a continuous length ideally, so it runs uninterrupted from well to inside the house. Where it comes up out of the ground and goes into the house I would insulate with foam pipe insulation, then box it in with a surrounding of 3" polyiso to be safe.
PEX is purportedly crack proof, but for the main supply in I would go ahead and do what I could.
Have you ran the piping through the house yet? Plumbed fixtures, etc?
I don't have experience with adobe floors yet, but in my experience with concrete, as well as clay plaster, compression is key. I've seen the difference recently in 2 separate rooms between concrete that was only screeded and one that was trowel finished. The trowel finish has no cracks, while the screed only developed long cracks. Same with clay plaster adhering to a wall.
The other thing that I thought of was drying time. Did you allow it to fully cure an all levels? Its possible that if the under layer wasn't fully dried, moisture was migrating up into the top layer and possibly getting trapped under the sealer. How soon did you fire up the radiant floor? What was your mix ratio and ingredients?
While having help and making allowances and compromises to accommodate that help is one thing, doing something you don't or shouldn't do will not make for a happy long term relationship. Remember, YOU have to live with this structure, not him.
It is just not realistic to cut and mill material from your land in the same year you plan to use it. That's asking for all sorts of trouble. I gotta say too, oak studs are just not going to work. Oak is a hard ,dense and brittle wood that doesn't usually have very straight grain, which means checks and cracks that separate the grains will have drastic structural consequences.
I'm really not trying to discourage you from utilizing your own resources, which is awesome that you have. I'm just trying to be realistic. Good luck on your endeavors.
First I want to clarify that most framing lumber is actually douglas fir, not pine. I've only ever built in Oregon but I'm pretty sure that's a national standard.
I agree with White Cloud. The material strength is pretty irrelevant when we are talking stud size. Its only in timber frame dimensions that Oak's strengths become more apparent. I think of timber framing and stud framing as similar, just different spacing. A timber post is like having 5 or more studs in a single unit.
It makes much more sense on almost every level to mill the oak that you have on site into either large timbers (less milling work, less waste, better structure, higher resale) and build a timber frame house, or mill it into a wood floor or maybe cabinet lumber. Or mill it and sell/trade it for the type of building structure you want to do.
I've heard lots of good things about silicate paints, also known as waterglass.
" A waterborne, single component inorganic coating material for masonry wall surfaces. Silicate Mineral Paint penetrates the substrate and cures by an irreversible chemical bonding process, forming a microcrystalline structure which cannot peel or blister."
Its suitable for porous and semi-porous surfaces, and remains breathable. I plan on using it over my exterior lime plaster and any cob/adobe/clay plaster I do. The brand I've heard about is called Keim.
I'm surprised it wasn't mentioned here, or maybe it is elsewhere, but what about wrapping the lower section in thin sheet metal? It seems to me that a metal wrapped pole, with the metal extending up at least a foot or 2 out of the soil, with a circular "puck" footing of concrete, and the hole packed with rubble, would last quite awhile.
I also find it surprising that the structural advantage of a sunken pole versus a piered pole is not so abundantly clear. Compare 2 shovels, one that you stomp on and sink the spade, the other is resting on the soil. Less need for lateral and diagonal bracing.
I also would never drink water from a tar shingled roof, unless we were years into some apocalyptical future. With a choice between drinking water from a known carcinogenic medium (asphalt shingles) or from a highly toxic water source (hydro fracking) I would not live there. Even if I had to walk away from my house.
Clay tiles are probably the best potable rain catchment surface, followed by slate, then maybe one of the faux slates along with concrete, then metal. Cedar shakes, while certainly a green material, are not recommended for rain catchment, unless its just for irrigation.
I wanted to applaud Scott for his concise and well written perspective. I have intuitively felt much the same in regards to human dietary nature. It's hard to find scientific writings that don't have some predisposition to an outcome.
I also wanted to comment on vegetarians using domesticated animals. I think its silly that the same people who might scoff at how pro-vegan movies might claim the only alternative to feedlot meat is going vegan, or trying to argue that having a meat based diet is somehow healthier for the planet then a plant based one ( as if a meat eater doesn't also eat the same veggies as a plant eater!), so to is it silly to claim you cannot use animals if you don't plan on eating them. Do you also eat your horses? What about the birds, voles, and deer that also play a part in permaculture? Do they get eaten as well? No. You can return an animals body back to earth besides eating it yourself. Around here, if a chicken isn't moving, it's likely gone to a bobcat faster then I could even get out there to notice it. Anyway, its late. Till next time.
Oh yeah, and I've been a lacto-vegetarian all my life. I'm 31.
I agree with the above poster, especially about the symbiotic relationship with producing ethanol and high protien feed for livestock, especially since corn is not what cows should eat.
I also wanted to mention that the idea of food scarcity it one of the most perverse ways to manipulate people, as evidenced by the fact that even us permie minded people can fall into the "overpopulation food scarcity" craze. Something like 40% of food produced in the US is wasted, from farm wastes all the way up to packaging and production, food is wasted along the way. Exactly because the true cost of food is hidden through big agri business getting government subsidies, what appears as cheap food is really just hidden. I look forward to the demise of "cheap" "food" that is unnecessarily wasteful.
I would say rocks. Any size or shape would work but i would think golf ball size would be idea. You could do 3/4 minus or 3/4 wash rock. Or if you have access to larger rocks that might help with runoff as well.
I would think pumice would be an excellent cob insulator. It has very good insulating properties AND wouldn't have any issues with water retention or weakening of the mix due to its rough, solid and porous surface.
Sounds pretty ideal actually, but rare to find a perfect situation. Maybe if there was a grove of old trees or someone had planted a row of trees in a line, then you could have 4 in more or less a square. That would be pretty epic. A home build on 4 perfect stumps, made from the wood of those trees. In reality though it would be better to leave the trees growing and either build around them if you wanted to incorporate them, or build so you have a great view of them. I hear you on the concrete/foundation thing, its the one area that it's hard to get away from.
I think it depends on whether you are going for quick and easy, or if you want it to last longer. If I were doing it I would probably put down flagstones under them. Or I might put flagstones under one or two walls and leave the other walls directly on the ground as a type of experiment.
I agree that there is a 100% chance the straw will attract mice, but I also agree that there is slim to none chance that they will mess with your equipment. I've had mice make nests in my lawn tractor and they didn't bother the electrical or fuel lines. Do you not have a cat? A cat will love the cozyness of a bale shed with a free snack bar!
While I don't have experience sourcing these windows, I agree that used sliding glass doors would probably be ideal. Post an ad on craigslist for them, or check out your local Habitat for Humanity ReStore if you have one in your area. I like the Ships that have vertical glass as opposed to the slanted ones. Easier install, no leakage, and no need for shading. While I understand one reason for the slant is it allows the angle of the glass to be perpendicular to the sun in the winter to allow max usable heat/light, I think the benefits of vertical glass far outweigh this modest gain.
If you plan on recycling kitchen greywater, I recommend putting a grease trap and/or sand filter. Both are simple enough devices that go a lot way in keeping grease, oil and particles out of the mulch basin or plant area.
I agree that it is probably possible to not use soap, but you will use more water, and energy to heat that water. Part of that depends on your diet. Being an ovo-lacto vegetarian household, we don't have oily, greasy, fleshy pots and plates to clean up, which is where the soap really comes into play, as was mentioned. I like to stack soak my dishes for 5 or 10 minutes which actually does most of the work, and then give a quick wipe with a lightly soaped sponge. If something is clingy, like peanut butter, I will wipe it with my fingers after it soaks as to keep the sponge clean and longer lasting.
The soap we use is actually all plant based ingredients, the main one being "anionic coconut kernel based surfactant". It foams enough for my liking without being excessively slick. It's called "Ultra Dishmate" from the brand "Earth Friendly Products".
However, I think it would be the actual oil, grease, minute solids and other "stuff" that would be taxing on the greywater system as far as bacteria growth and clogging. I don't think the soap is harmful to soil and plants, as long as it is naturally derived, non-petrochemical and phosphate-free. While my kitchen isn't set up for greywater, I would do a grease/particle trap and/or sand filter. Simple enough devices that would help with soap as well I believe.
My favorite tool for cutting small to medium branches is a thin kerf Japanese pull saw. I have several that I use for building, so I use the smaller double sided one for branches. There is a huge variety of shapes and sizes of these types of saws, even ones designed for pruning and bamboo. Here's one such.
However, for small branches, if loppers aren't practical, I sometimes use my ratcheting plumber's plastic pipe cutter, such as in the photo.
These ones cut up to about 1 1/2 inch pipe, so they would handle probably up to an inch thick branches. There are longer handled ones that can handle pipe up to 2 1/2 inches.
Considering that it is probably only a 2x4 wall, drying of a 3 1/2 inch light straw-clay (LSC) wall from one side wouldn't be a problem at all, since most LSC walls are 12 inches. The problem lies in that by having the siding and sub-siding you lose out one one of the major benefits of a LSC wall, that of its vapor permeability. There would be no way to mitigate the mold that would form on the inside of the sub-siding. Eventually it would dry but it would be a surface that would be prone to moisture, and since its not vented it would tend to stay there longer. As much as I love LSC, I would advise an alternate in this application. You could try just stuffing plain straw in the bays if you can't afford wool batts or blown in.
A clothes washing machine is the easiest to capture in an existing house, rental or not. The machine has a pump for the water discharge, which means you can have an outlet for it at window height. I would run a 1.5 inch PVC pipe out the window and to the tree/ location you want grey watered. You can even have several pipes out the window for different locations, just move the washer discharge to whichever one.
For anything other then a washing machine it will be harder, as the pipes are covered in the walls. I suppose you could remove the p-trap under a sink and rig up a garden hose fitting and run that outside, but you have to make sure you maintain a downward slope, and be careful that nothing but water goes down so it doesn't clog the small line. Also, if you disconnect the p-trap, make sure you properly (temporarily) cap the drain that continues into the wall, so you don't get sewer gas into the house.
I would second the concern with weight. While older solid lumber is certainly stronger then many of the younger lumber of today, I would assume it was likely under built structurally, at least by today's standards. I wouldn't span more then 7 feet with 2x8's on 16" centers, maybe 8 or 9 feet with 12" centers. I would put a girder under the joists centered in the room you are going to put the earthen floor in. The stronger your substrate, the thinner you can make the earthen floor, the lighter it will weigh, etc.
Another recommendation would be to run a layer between the subfloor and the earthen floor. Felt paper works good as well as any of the synthetic roofing underlayments. If you wanted a more natural product then red rosin paper is a good choice. The idea is not only about the waterproofing, which with a solid subfloor would be more about rusting the fasteners prematurely, but to actually seperate the wood from the earth. This "bond breaker" allows the wood and the clay to expand and contract at their own rates, without cracking.
I don't have experience with edge stacked bales, but I'm sure they could be stabilized just as well. It might mean you need to run a chainsaw down their length to even out the straw ends so they stack tighter. If I were doing this I might do a hybrid and put in corner posts to help stabilize the structure and roof.
I'm pretty sure that the insulation factor is better with edge stacked.
I'm from New Mexico, which is a rather well known "mecca" of sorts to unconventional buildings, especially in the northern part where the EarthShips are situated. I've noticed that the places with the lax building codes/restrictions tend to be somewhat featureless and dry. Not that that isn't beautiful in its own ways; I fully miss the high desert of my birth, but here in Oregon for example, when resources are more abundant restrictions tend to be higher.
However, there is a rather large middle area as far as just how unrestricted you need it to be. If you are willing to work with local jurisdictions and have a well thought out design you might be surprised at an areas bureaucratic willingness. Jackson county, OR for instance, while listed on the "pockets of freedom" map on the EarthShip website as a "red" zone, which is true it does tend to have some strict building codes, also has quite a few strawbale, cob, and light clay-straw type structures. But if you wanted to have zero restrictions/meddling then I would suggest northern NM. I guess in the end it depends on the climate you want to live in, and the type of structures you are looking to build.
Not sure if this would work for your post footings, but I've always wanted to use them. They can be used with sonotubes (the cardboard concrete pier form) or without, but they seem like they would be well worth it, especially in possibly unstable conditions. The company is called Bigfoot, I believe.
The insulation value of Light Straw Clay is anywhere from R-2 to R-3.3 per inch, unless you ask someone with a vested interest in downplaying its value. Fiberglas batt insulation is between 3.1 and 4.3 per inch, but the difference here is that a stud wall with batt insulation has thermal bridges every 16 to 24 inches, so the walls total or true R value drops significantly.
Drying is rarely ever an issue. Even with 12 inch walls, anything but temporary surface mold just does not happen unless you try to use this method in a swamp. Surface mold does show up, as well as sprouts, but once the the moisture is gone everything dries up and dies. Because the wall is hygroscopic moisture vapor doesn't get trapped, unlike virtually every single stick built house I've torn into. But its true, to some inexperienced, they see that superficial white mold and write off a building practice that has been in continuous use for many hundreds of years.
Light Straw Clay has been fully permitted in at least 10 homes I know of in Oregon, 4 just in my area. But of course if you ask someone who is trying to sell you on a technique that would be rivaled by said LSC, you will get information to support their claims. Its a shame that it has to be so divided. Cob and straw bale are fantastic building techniques. Light Straw Clay is the perfect marriage of the 2. Light Straw Clay perfectly fits the bill for the thread. Let the mud brothers unite!
Personally I would opt for a light clay-straw house. I took an intensive training with the EcoNest folks and they put up a good sized house (I believe around 1200sq ft) in about 2 weeks. That didn't include the footing or stem wall, but that did include the framing, packing the walls with light clay-straw, and framing up the whole roof. Granted that was with a volunteer crew of about 15 untrained workers, and a couple pros. If you had the finances available to keep things rolling I could see a conservative timeline that looks like this:
2 weeks-Footing prep and pour including excavation
2 weeks- Faswall stem wall stack and pour
2 to 3 weeks-framing sill plate and studs with a minimal crew of 2 or 3
1 to 2 weeks-packing studs using slip forms, with the use of a bobcat, mortar mixer and clay slip-straw tumbler, crew of 3 to 5
1 to 2 weeks-roof framing, depending on style. Less then a week if using pre-made trusses
The only down side with this building style is the drying out time of the walls, which averages 3 months in the summer. There is still plenty of work to be done during that time, you can still finish the inside; partition walls, plumbing/electrical, ceiling, cabinets, flooring, etc. You just have to wait on the interior end exterior plaster.
Another option which I ended up doing for a large addition I did on my house is to build entirely out of faswall blocks, which are a type of ICF made out of recycled wood that you pour concrete into. You dry stack them in lifts of 4 or 5 feet, pour, and then keep stacking, as high as you need to. People have done 2 and 3 story buildings out of it. Super quick, the only wait time is the time to allow the concrete to fully cure, which is maybe a month? You end up with a flat surface that accepts earthen plaster and yet is fully hygroscopic.
There are different kinds of PEX connections, just as there are different proprietary methods to making PEX. All manufacturers have a "crimp" or "cinch" style connection which work, but for me I prefer the best that is available. Wirsbo/Uponor Makes what is known as PEX-a. They have a fitting method knows as "cold expansion" in which a thickened band of the same material is slid over the cut end of the PEX tube in preparation of sliding in a fitting (tee, reducer,bend, etc). The tool expands both the tube and the band, then you slide the fitting in and they immediately recompress back to the original memory of the tube. What I like about this style of fittings is A) the band and the tube are made of the exact same material, so they expand and contract at the exact same rate; and B) by expanding the tube around the fitting, the inside diameter remains the same, so you get no loss of pressure/volume no matter the amount of fittings. This battery powered expansion tool costs about $500. They are rare to find used, which means if you buy one to use for your house, you could turn around and sell it at the end of your job for minimal loss. I think PEX is great.
I also second the advice of adding extra pipes and chases into existing trenches. Also, after you shade the pipes with sand or fines, I like to run some caution tape or high visibility ribbon on top of the sand, over the pipe, the entire length of the trench. That way in the future if you or someone else is digging around, it can save a huge amount of headache/work/cost from not severing a line!
I'm excited about this new legislation. I agree that the fee isn't ideal, but I think once things get rolling it will streamline. I think part of it is to make sure that people are really serious about doing it properly. While making a system "under the table" is fairly easy to do, I'm planning on applying for a permit and going about it "through the books" as a way of showing support for it and letting everyone know that its important even if there is a fee, and a comprehensive outline that basically shows your understanding of how it works.
There are no provisions for a greywater holding tank, unless you treat the water first. Greywater that is stored for more then 24 hours becomes classified as black water. I would not run my shower water to wash my clothes. I like mulch basins as the wood will act like a water battery. I think a greywater fed hugelcultur bed would work well too perhaps. I think the key is directing it to plants that can take steady surges of water, such as trees, or a branched system that spreads the water to many locations. Also, while there are many levels of complexity available such as sand filters and drip dispursers, the simpler the system the more effective it will be, and the less likely to fail.
My statement wasn't directed at you exactly, Tel, it is just such a common statement I felt compelled to respond. I agree that Warre hives are an excellent working hive, a perfect blend of top bar and Langstroth.
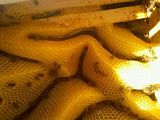
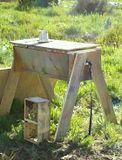
Here are some random photos of my experience.
Not the best shot, but these are some mason bees that are living up in my eave. They "swarm" their home around dusk, as it seems like everyone comes home from a long days work.
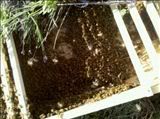
This photo and the one below are shot inside the Warre hive. We had taken out several bars when we dumped the wild swarm that I caught in, and we never replaced the bars, so this is the free form comb that the bees drew.
This photo is the swarm I caught that I transferred to the Warre
Here is the "shoddy" top bar I threw together, just before introducing the bees.
Here is the inside of the well built Top Bar hive I made. I sold it to a guy but I was able to check it out, and even though this hive was in a location that didnt get enough sun and got too wet (there is surface mold on the bottom) it was a very prolific hive.
This is the modified Warre I built that was too big, and below is me transferring the swarm. It was too late in the season and these bees ended up leaving.
Here is the drawn comb on the modified Warre.
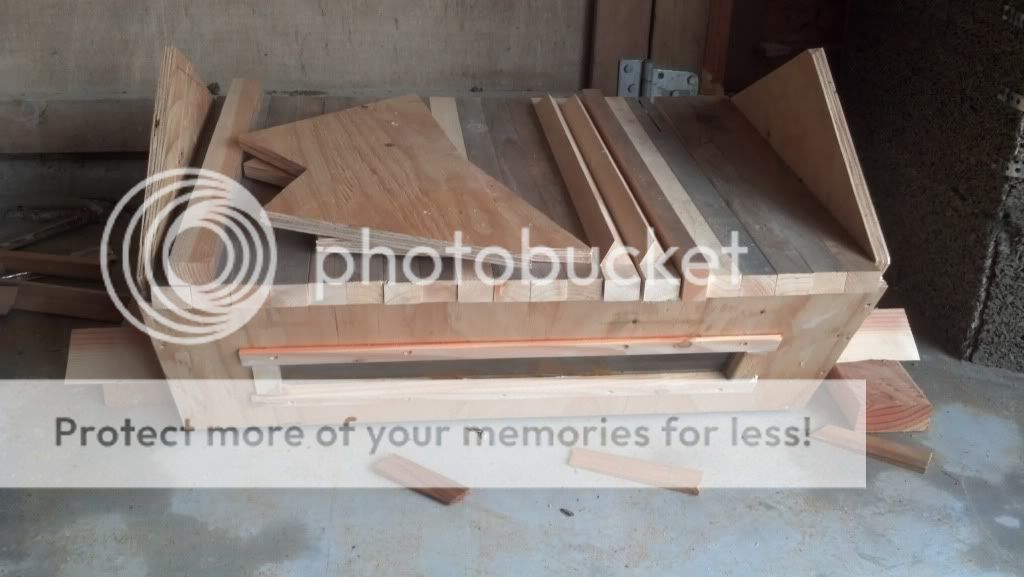
Finally here is next seasons Top Bar. Observation window, custom milled port orford cedar top bars with pointed bottoms. i'll take more pics as I complete it.
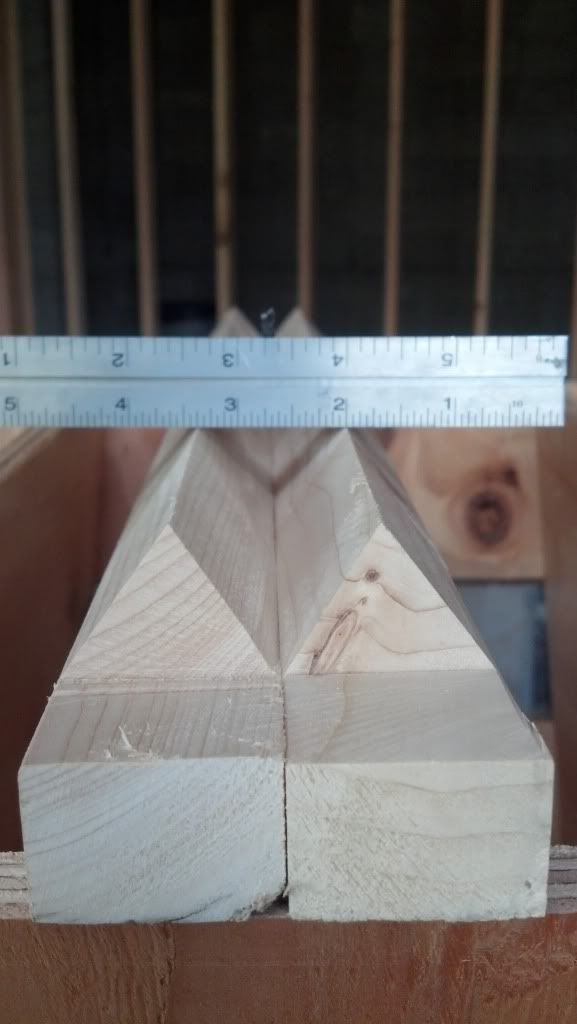
Here is a close up of the top bars, showing the spacing. Just about 1/32nd shy of 1 3/8 inches, the recommended "bee space".
I hear that "perspective" a lot from beekeepers, and I find it somewhat grating. I don't see how anyone who has ever seen a top bar hive with bees in it would come to that conclusion, unless they were trying to reassure themselves. In a lang hive, when you take the lid off or pull off the super, you instantly bathe the lower box in harsh sun, dilute the queen's pheromone, and I'm sure send alarm bells ringing to guard the new entrance. THEN, you remove a frame or 2, slide the others to new locations, etc etc, then replace everything. What beekeep can kid themselves into thinking thats not disturbing??
With a top bar, when you take the roof off nothing has really changed for them. I always start with one of the end bars, slowly pry it up noticing if there is resistance to indicate comb or propolis, the remove it completely. Then I usually remove the next one or 2 bars, which gives me a view down inside further. At this point you can then decide to remove one of the more central bars to note the types of capped comb.
Not that I am against lang hives at all, I totally see the benefit of having a standardized hive that makes it easy to get into bees. I fully recommend beginners to start with a lang, as it allows beginners to be "on the same page" as far as communicating with other keepers. I just think it's disingenuous to pretend like one is using a lang for the benefit of the bees.
Its been a really interesting experience to be able to observe 4 different hives that all live right next to each other. Its amazing to note the ways in which the bees differ just by the type of hive they are in. We have a 2 box lang, a (rather shoddily built) top bar, a warre and a hastily built too large warre type single box. The lang bees are so much more faster and busier, but its almost palpable that its bordering on stressful. they have a higher pitched buzz. I liken them to office workers in a high rise. They efficiently get the work done, but they arent as happy as they could be. They always need smoke when you check them out. The opposite end are the top bar bees, who are so slow and mellow, they remind me of a surfer stoner vibe, just cruising. The warre hive has been doing the best overall. I've noticed from another top bar I built how the bees really respond to quality workmanship in their hives. Seeing the difference in the 2 top bars, even though the better built one was a month later in establishing, larger size, and in a more dank placement, they did way better then the poorly built and too small top bar, that they ended up building comb diagonally. This year's top bar that I'm building, alas too late to occupy it, has an observation port, which I think will benefit everyone involved. Stay tuned for photos!
I wanted to second a couple points made here recently.
Firstly, designing a proper overhang that will shade in the summer and allow sun in the winter is easy with any roof style, and I would say is a must, but it is also a design in conjunction with proper room placement on the south side of the house to maximize where you want that solar gain.
Secondly, I agree with P Thickens that clustering your plumbing is more efficient in many aspects, including minimizing drain runs and leak detection, as well as distance from the hot water heater to each fixture.
Thirdly, regarding greywater. I would up the placement of greywater on the priority list for several reasons. Since no matter where you get your water from (well, rain, city) it still has to drain out somewhere. Why not focus on that first? Also, plumbing for greywater is a piece of cake when you are doing new construction (I'm doing it at my place now, photos when i get organized), but a rightous PITA when trying to retro it in after the fact. Its even fairly easy to do if you are trying to bypass code issues, although I plan on going the extra mile and do it "by the books" to show support for it, since the legislation is so new for it in my area. Here is another area where clustering plumbing fixtures can help consolidate exit pipes for simplicity.
::On a side note, I wanted to clarify something about venting that I recently got clarity on from our local plumbing inspector, as I am doing my own plumbing (the homeowner can pull permit and do his/her own plumbing (= )
The venting that exits the roof, no matter how many vent stacks combine in the building, need only be the same cross sectional area as the drain that exits the same building of the same fixtures. Does that make sense?
Wool seems like an awesome insulation, both for its thermal properties as well as its tough-to-beat sustainable/natural aspect. It seems like it fetches a premium price as well though, but if you can swing it I would say go for it.
I've never heard of it in a blown-in form though. It gets confusing because the fiberglas option of blown-in is often referred to as mineral wool, but it is not the same wool of which we speak. One other thing to consider is blown-in cellulose insulation. Cellulose it recycled paper product, and the beauty of blowing it in is it does an excellent job of filling in odd voids behind electrical outlets, pipes, and any irregular protrusion in the wall cavity. Having a more thorough dispersal of insulation results in a more insulated house.
Another option would be spray in foam, which does a good job of filling in irregularities as well. I'm not a particular fan of foam myself and would probably opt for wool batts or blown cellulose before choosing foam, but it is an option.


.png)