This past weekend I had the opportunity to meet up with Solomon, who built
this fantastic stove. We got a chance to play around with the Testo I purchased last year. A Testo is a fancy gadget that measures, CO (carbon monoxide), %O2 (Oxygen levels), temperature, and in the case of my Testo, NOx (nitrous oxide).
This thread explains some of my journey in successfully purchasing a Testo last year from Ebay.
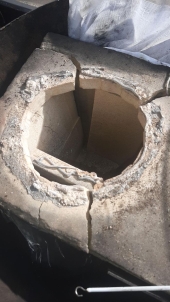
The stove is built on the lower level of a 3000 square foot two story home that he has been remodeling. It is built around an 8" ceramic fiber board J style core (not the one I manufacture but fairly similar). It has been successfully heating his home all winter and the whole family is very pleased with it. It has a fantastic draw and is easy to start up- his children are able to light it.
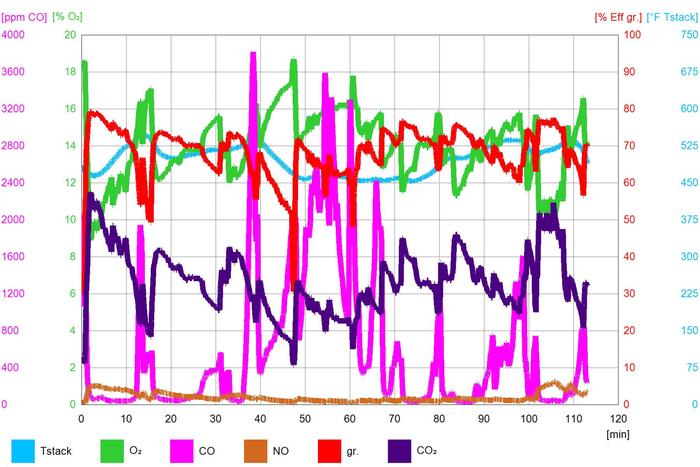
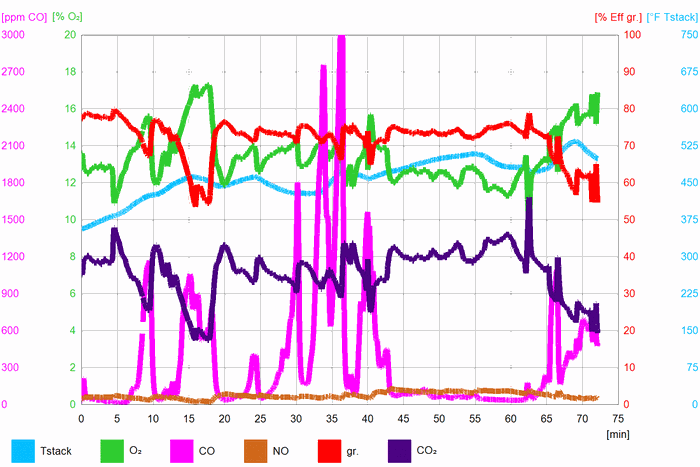
Below are readouts of the results. The Testo was in for the entire time and the fire never went out, but we turned the Testo off briefly to adjust some cables, so the data is broken up into two readings. This was my first time using the Testo and I still have a significant learning curve for interpreting the results. I'm very grateful to Peter Van Den Berg, Matt Walker, 'Vortex' and others who have already figured much of this out and provided helpful feedback.
 Some notes on the burn:
In the graph labeled "First Run", above, the Testo started recording about 4 minutes into the burn (I didn't have it configured correctly at first). You will see a period of particularly clean burning starting around minute 1 (again, this is actually closer to minute five in the actual burn). This is indicated by low levels of CO detected in the chimney. We were burning a load of split pine for this run. The lowest CO level recorded during this period of cleaner burning was in the low 20s. It remained between 20-40 ppm CO for about six minutes before the pine started to burn down a bit. For my untrained eye, nothing would have really indicated that the burn became less clean. All that I could see was that the wood was beginning to burn down a bit in the feed tube. Solomon knocked it around a bit with his fire poker and the CO levels briefly went back down, then started to climb again.
Our second load of wood (around the 20-40 minute mark) was a load of oak which seemed quite dry according to the moisture meter (less than 10%). However, as they began to burn, some moisture started to steam and bubble out from the center of each log (the pine didn't do this). I have noticed that oak usually takes several years to fully cure. As you can see from the chart, the CO level was initially decent but then began to fluctuate up and down, which reflected us poking it a bit. During this time the fire was roaring along just fine, it was only because of the Testo that we knew that it wasn't burning as clean as it could. My suspicion is that the moisture in the wood contributed to the poor numbers in this batch of wood.
I believe that the third load of wood was madrone, from around the 40 minute mark to 65. This load burned fairly clean. Much of it was under 100 ppm CO, though not as low as the load of pine. The madrone seemed to have some moisture as well, but not as much as the oak in the previous run. The CO numbers again began to increase as the load started to burn down (about 2/3s of the way through the logs).

From there we shift to "run two", pictured above. The fire did not go out between runs. We just had turn off the testo and get it plugged in to a power source. Run two began with a load bark. It burned hot and clean, though not any cleaner than the pine.
Next was a load of 'barrel staves', which were sticks from an old oak wine barrel which had been found on the property and was starting to deteriorate. They had been kept inside for a long time and were very dry. They had been used by Solomon in the past to the get the riser temps up over 2000° F. As expected they burned hot and fast and reasonably clean, though not quite as clean as the pine or the bark.
The third load of wood durning 'run two' was four 2"x6" pieces of dry lumber from minute 30 to around minute 60. Solomon had very high hopes for these as he knew they were bone dry. However, they wound up being one of the worst performers. My theory was that because they were so smooth and filled up so much of the burn tunnel there was poor air supply/dynamics.
We finished off with a load of a few 2x4s and a couple pieces of fir, which performed notably better than the 2x6s. The pine and bark still scored the highest marks.
The fire then began to die down a bit until around the 100 minute mark, during which Solomon dumped in some left over kindling scraps and bark, which burned quite well. Then the test was concluded.
Take aways
It was hard to identify with the naked eye when the burn was clean and when it wasn't as clean. Some times when the fire was humming along a piece of wood would shift slightly and the CO numbers would start to climb.
We had the cleanest burns when the feed tube was full of dry, split wood. The slightly irregular shapes of the split wood seemed to allow for a good airflow.
When a batch of wood had burned down approximately 2/3rds, the CO levels would begin to climb.
The exhaust temps were much higher than necessary. They averaged over 450°. Solomon already knew that his mass was undersized. With a larger mass and more heat extracted the 'efficiency %' calculation would improve. I don't know what the actual calculation is to get the efficiency % number. It is based off of 02 %, CO levels, and the temperature. I would be curious to know how it is calculated so that I could simulate what it would be if the temps had been lower. With a larger mass Solomon could cut down on the amount of wood he is currently using to heat the home.
Additional thoughts
I'd like to learn more about interpreting these results. The main thing I know right now is that lower CO is better. I'd like to be able to compare them with an EPA approved stove (I'm sure this information is out there, but my initial search didn't get me the info I wanted).
I'm eager to run more tests. If you have a RMH and live somewhere in Northern Ca, Southern Oregon, or even the Portland area, let me know. Maybe we can find a time to connect. The only caveat it that you'll need to drill a hole in your exit chimney.
Solomon's stove is a beast. We were both overheating by the end of the tests and the bench was far too hot to comfortably sit on. If you are building a J style heater, An 8" stove makes a lot of sense to me for heating a home. It can take larger pieces of wood than a 6" and can throw out plenty of heat when needed. If you want less heat, just don't burn as long.
Thanks again to Solomon for welcoming me into his home and spending the morning nerding out with me. We had a lot of fun. It's fun meeting Permies folks in real life. He of course has loads of other cool projects he is working on around the property.


