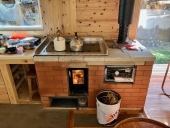
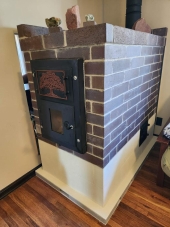
tony uljee

Rocket Scientist
+ Follow
since Jul 04, 2017
Merit badge: bb list bbv list
For More
Apples and Likes
Apples
Total received
In last 30 days
3
Forums and Threads

Recent posts by tony uljee

i used fireclay and builders mortar sand for my stove build in the ratio recommended by Matt ---and others --with a dash of  fire ash ---which made the mortar a bit stickier----i  did have problems with the sand being too coarse --lots of small  stone---and the fireclay had a lot of hard biggish crumbs in it ---had to sieve it for a nice smooth mortar mix---should have bought plasterers sand ---could not source a fine- er fireclay though---there s only one supplier  over here---i did find that the mortar was slow to dry and gave a weak bond---which greatly improved once the stove s bricks got really heated up ---then the mortar colour changed from a dark brown to a light beige /white grey and it set much harder ---which now takes some effort with a steel tool to remove or scratch out a joint ---as compared to when its in the dark brown state and your finger/finger nails can rub it out of the joint----i still have the lowest course of  bricks with a light brown colour mortar joint ---the stove base i can never get above 110 C even after several firings on a warm day---but thats no problem as the above layers of weight keep it all together----but even the hard set joints are easy to erode if a damp cloth or squirt of water is used on them---i have started lately to brush/wipe the stove bricks with a lightly -- raw linseed oiled  paint brush ---picks up the colour of the bricks and dulls down the mortar joint a bit ---which i prefer---might give some water proofing as well----  i dont think the fireclay in the mortar sets up from the stove s heat as this is well below its rated firing temp  -----so any fine clay does work as a component of the mortar
1 week ago
if its the same stuff we find in irelands hardware shops ---the graphite black used on cast iron wood stoves is a paste rubbed on with a cloth---
2 weeks ago
i have only one complaint to make ----i was looking forwards to several weeks of interesting entertainment and the anticipation /expectation ----i could come in after a day/nights work ---fire up my stove and the permies forum ---make coffee and sit down ---each night to read and reread and look at pics several times----but i had only started getting into it and it was over----yes i can do a rerun of sorts but not the same ----so i can only hope that this will be noticed by other interested companies/customers----who can get Peter to build another stove ---or at least under his guidance-----thankyou  Peter.
4 weeks ago
something trivial --- , i cut away a small section of the vermiculite concrete floor pad i had cast for the stove , a friend donated some off cuts of heavy black slate ,just enough to do some trim work around the stove --pics to follow ---but heres the piece ---firm enough to build the stove up on it ---but i can snap bits off it up by hand.
1 month ago
the way i am reading it ,is the shop floor is 30 meters square ---not 30m2 ----so its 30 m x 30m equates to 900m2   which is 9690 sq ft  
1 month ago
heres a pdf brochure showing a lot of detail, and improvements in design ,project doesn t get nearly as much support as it deserves---seems theres issues around  investors wanting the rights to it ---on an open source design ---back to basics i say---build your own ---plenty of detail here to show how. It can be simple or as complex as you wish to make it
1 month ago
yes seen a few similar set ups , used a few of them over the years as well---at some gatherings---thats why i went with  the auger set up ---those are all still just shitting into a bucket style and whilest mostly no smell or problems ----does nt take much to go wrong ---numpty s and staggerer s at these events---its usually fine if yourself is the only user--the auger covers the deposits and moves it along---into a manageable size  drum ---i will re assemble the chute and vented lid set up i was using ---and take some pics ---had a lot more pics of construction and set up ---my old comp system died awhile back --a friend download  the drive onto a cloud----it must have rained away by now
1 month ago
that idea seems to resemble the way a clivas multrum works  , i had looked into these ideas and several others---mostly  all of them are large systems to build and would take up more space , materials and time than i wanted to use, my version of Chuck Henrys  auger has worked well enough for me  , its been out of use now for awhile as the lure of indoor water flushing loo is too strong---my wendy howard system is coming online---but its rugged simple and easy to make with a few handtools---and a small bit of welding---which might need to be done by someone else for some people---but its easy and quick so should nt be expensive----it deposited into a half size plastic drum ---which has a lid with a rubber seal and a retaining clip ring
1 month ago
just finishing off my version of the wendy howard  system , just bought a large bag of bark chippings  and wait for delivery , also in ireland , so it was a good read about your system ,i have been a longtime convert but only recently built up something---part of my slow progression to off grid and taking responsibility for my output and lessen the pollution of groundwater. Did you have to insulate your IBC  ---i have sourced the worms from an old dung heap out in the elements ---they dont seem to be effected by the colder ===although milder ----winters we have mostly ===,,and did your system recover and start up again ,cheers ,tony
1 month ago
i think people have been working out solutions for sometime now judging on this concept from awhile back
1 month ago