|

|
|
|
|

|

|

|

|

|
 17
17


regards, Peter
12
regards, Peter
15
regards, Peter
9
regards, Peter
12
regards, Peter
12
regards, Peter
13
regards, Peter
10
regards, Peter
12
regards, Peter
3
7
8
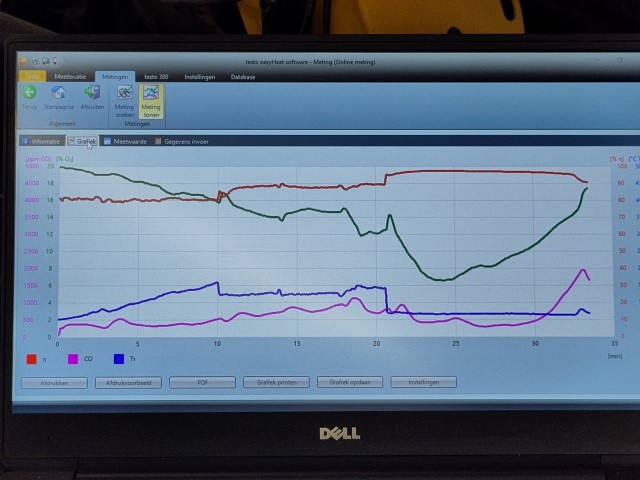
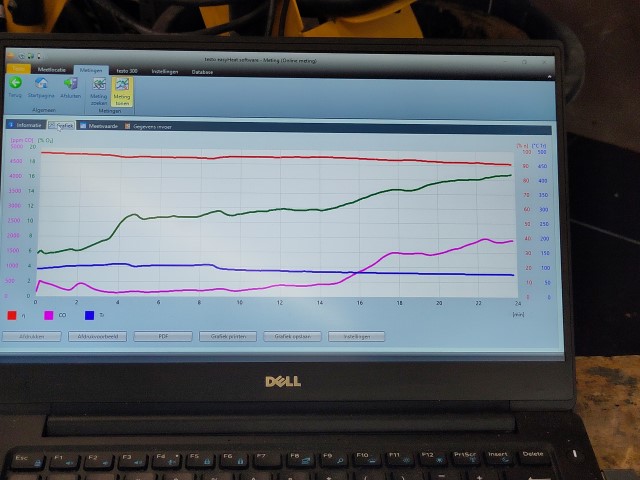
Alex Ronan wrote:Do you have any temperature readings inside the bell?
I am curious if the temperatures are high enough to allow for a modification to add a white oven.
regards, Peter
6
8
Scott Weinberg wrote:Peter-Having all the tools at hand, this intrigues me a great deal, ( Casting hi-frequency vibrator plate- Heavy bending break-lazer- large wet saw- CAD background and all the materials I presume this was considered a success?
Scott Weinberg wrote:Warning- there is more than one question! 1) Can we cast anywhere near the same cost as fire brick itself? Using larger bulk quantities of the castable material.
Scott Weinberg wrote:2) just an example, if I firebrick weights 2 Kg or 4.5 pounds, Will it take roughly the same weight of castable material to achieve the same volume of area? This I guess would answer question #1
Scott Weinberg wrote:3) In this upright "mass" was there a ISA formula that was followed for this sized shorty core?
Scott Weinberg wrote:4) The use of the steel exterior cladding I can see have many benefits on the building ease, does it serve as a quicker heat dissipater?
Scott Weinberg wrote:The stove looks great!
regards, Peter
9
regards, Peter
8
regards, Peter
4
Peter van den Berg wrote: totally agree, I think she's really cute, thank you
3
Peter van den Berg wrote:. The octagonal pepper shaker doesn't seem to be getting any drier now, so today the lid was put back on. .
8
Brandon Hands wrote:So are you going to start selling this flat pack sheet metal kit? Is it already for sale?
Brandon Hands wrote:Also, have you experimented with storing heat in water?
regards, Peter
7
Brandon Hands wrote:You may consider one of those blower fans that are commonly used to dry carpet after a flood. The impeller design allows them to work with high static pressure. Letting it force air though should dry it much faster and reduce possible corrosion
regards, Peter
7
Brandon Hands wrote:Very cool. I was thinking of designing a similar thing. I was considering the idea of using 85 gallon "salvage drums" which have an inner diameter of 26 inches (66cm). (Repainted with a high temp wood stove paint)
I hadn't gotten far enough to solve a method for connecting them together once stacked, but there might be a kind of band that could join them.
regards, Peter
2
Peter van den Berg wrote:
Or simply, fire the heater repeatedly. The inside of the steel panels aren't rust protected in this prototype. But for a business building this type it would be a good thing to have it all powder coated, also the inside.
2
Peter van den Berg wrote:
Brandon Hands wrote:So are you going to start selling this flat pack sheet metal kit? Is it already for sale?
It won't be me, going to sell this flat pack kit. And it isn't for sale at the moment by a third party. It is meant as an open source design, anybody who want to, can take the design and make a business out of it. I did this just to satisfy my own curiosity, could this be done in a reasonable way and with cheap mass? Up til now, it seems to be affirmative.
Brandon Hands wrote:Also, have you experimented with storing heat in water?
.
6
Brandon Hands wrote:
So are you going to start selling this flat pack sheet metal kit? Is it already for sale?
7
![[Thumbnail for forming-scafold.-for-8-side.JPG]](/t/281611/a/267344/forming-scafold.-for-8-side.JPG "Filename: forming-scafold.-for-8-side.JPG
Description:") 9
9
![[Thumbnail for IMG_9843.jpeg]](/t/281611/a/281454/IMG_9843.jpeg "Filename: IMG_9843.jpeg
Description:")
![[Thumbnail for IMG_9397.jpeg]](/t/281611/a/281455/IMG_9397.jpeg "Filename: IMG_9397.jpeg
Description:") 6
6
" All that is gold does not glitter; not all those who wander are lost; the old that is strong does not wither; deep roots are not reached by the frost. " J. R. R. TOLKIEN
8
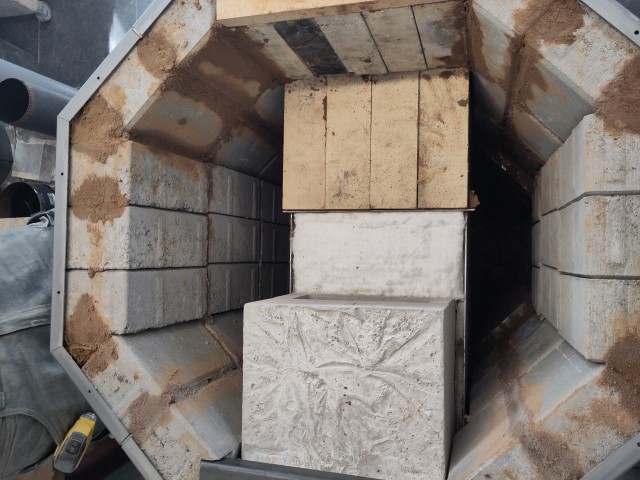
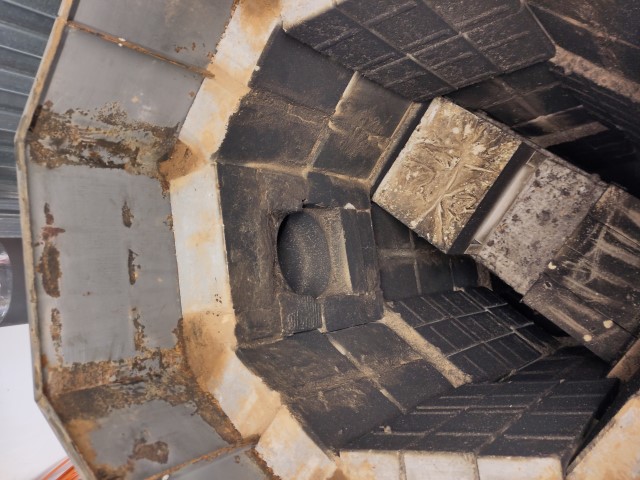
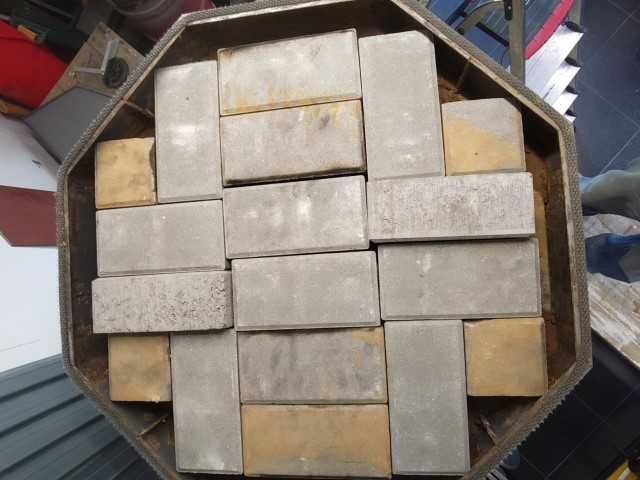
sara ventura wrote:-I was under the impression that concrete should be avoided on areas of highest temperatures, but here the pavers are right into the path of the gases exiting the core. Will this affect its longevity?
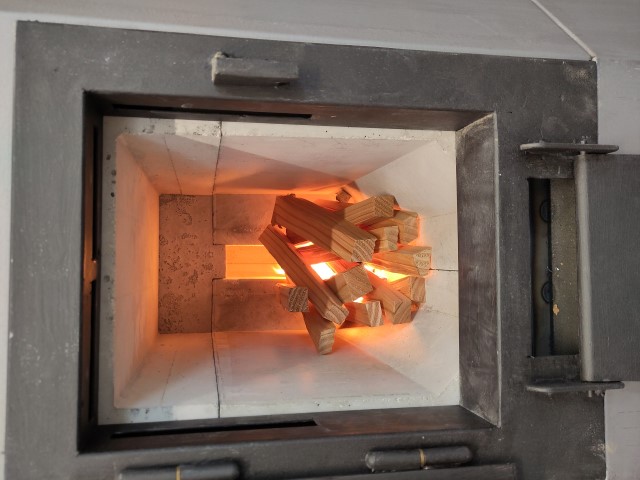
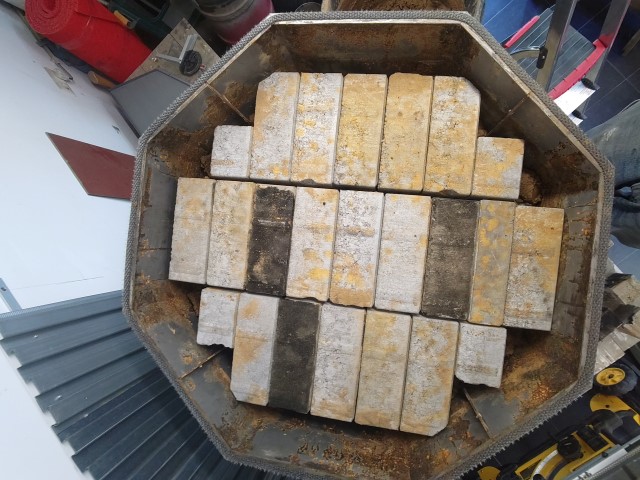
So your question was already answered, please read carefully.Since the core spews the hottest gases forward instead of upward, only a limited number of firebricks are needed directly above the firebox to protect it.
sara ventura wrote:-Have you calculated the minimum area around the core to ensure optimal gas flow?
sara ventura wrote:Do you think this design would allow down scaling? It's great for a workshop, but in my experience around here, space in workshops is always scarce.
regards, Peter
6
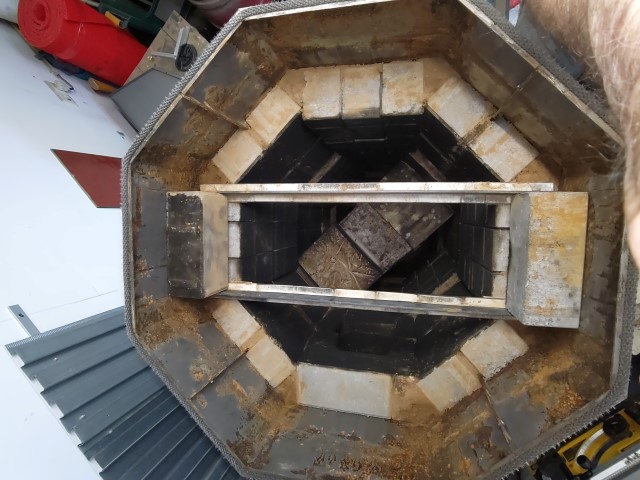
There aren't pavers in the path of the hottest gases, but firebricks instead, five to be precise.
sara ventura wrote:
-Have you calculated the minimum area around the core to ensure optimal gas flow?
Yes, of course I did. Forgot the exact numbers since it's concept but it's sufficient, no doubt about.
" All that is gold does not glitter; not all those who wander are lost; the old that is strong does not wither; deep roots are not reached by the frost. " J. R. R. TOLKIEN
9
sara ventura wrote:I didn't put it right, of course it's calculated, I meant to say If there's an established formula to calculate this transit area around the core.
regards, Peter
4
7
10
T Cool wrote:Maybe for the wall mass of the bell, bricks need to be like in this draw of G. E. Asp
T Cool wrote:In my opinion the purpose of mass is to be like a thermal battery, make a fire for a maximum of 90 minutes, then 8-12 hours discharging in the house.
regards, Peter
5
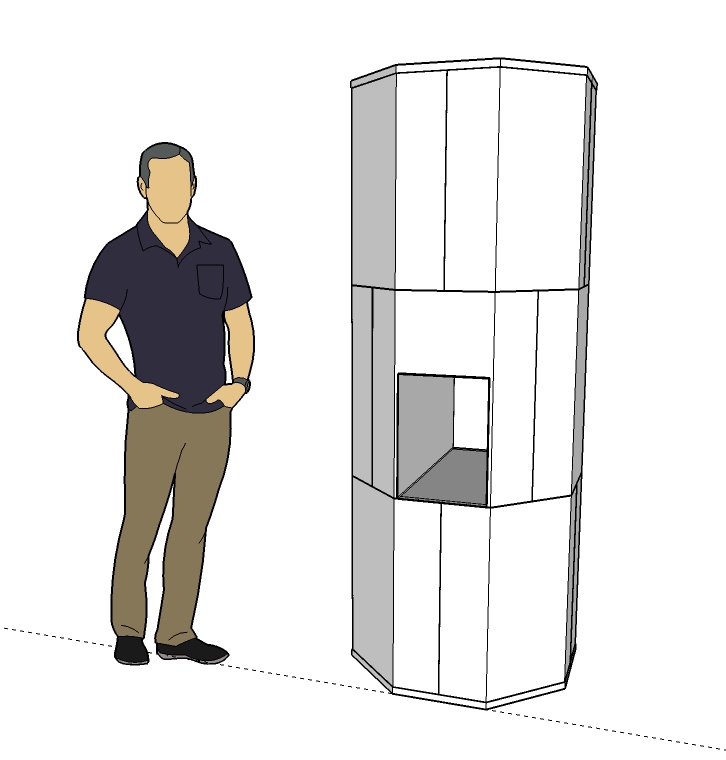
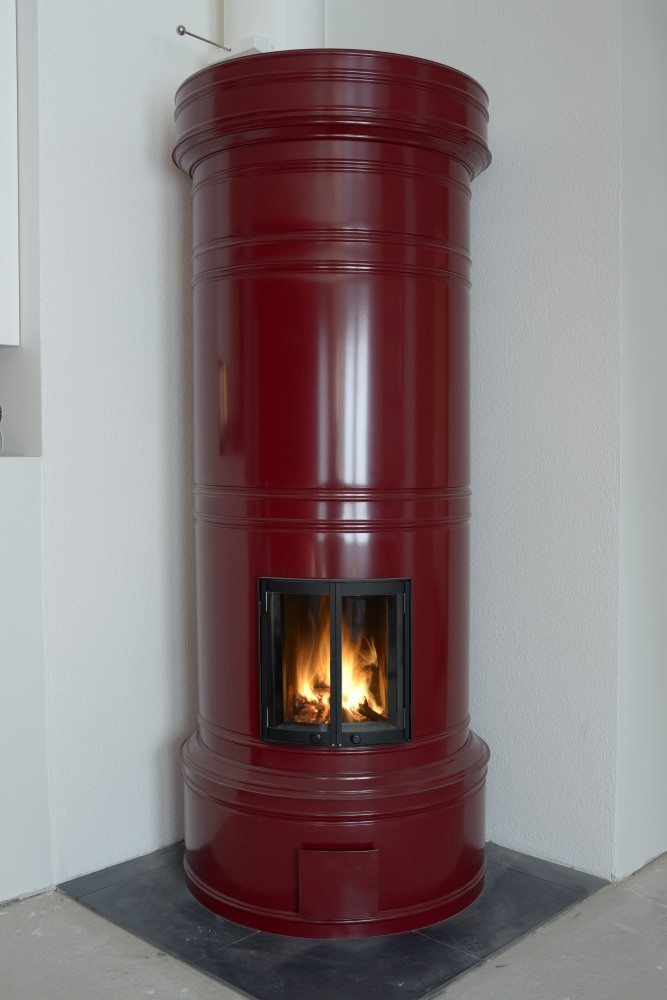
Peter van den Berg wrote:I copied the principle of a metal shell with the mass on the inside from the pönttöuuni, Finnish for "pot stove". A fairly common and relatively cheap solution to build a (small) mass stove. Unfortunately, the manufacturers of those rolled and folded parts are all in Finland and as far as I know they do not export because the stuff is very thin (0.7 mm) (0,00276"), has an awkward shape and is therefore also vulnerable.
If you don't look too closely, they actually look like a classic Swedish tile stove, the kakelugn. Only without tiles but with a kind of luxury oil drum around the mass. Internally they are actually quite conservative things, the combustion quality is actually only moderate in my opinion. But they have developed special materials for this type of stove.
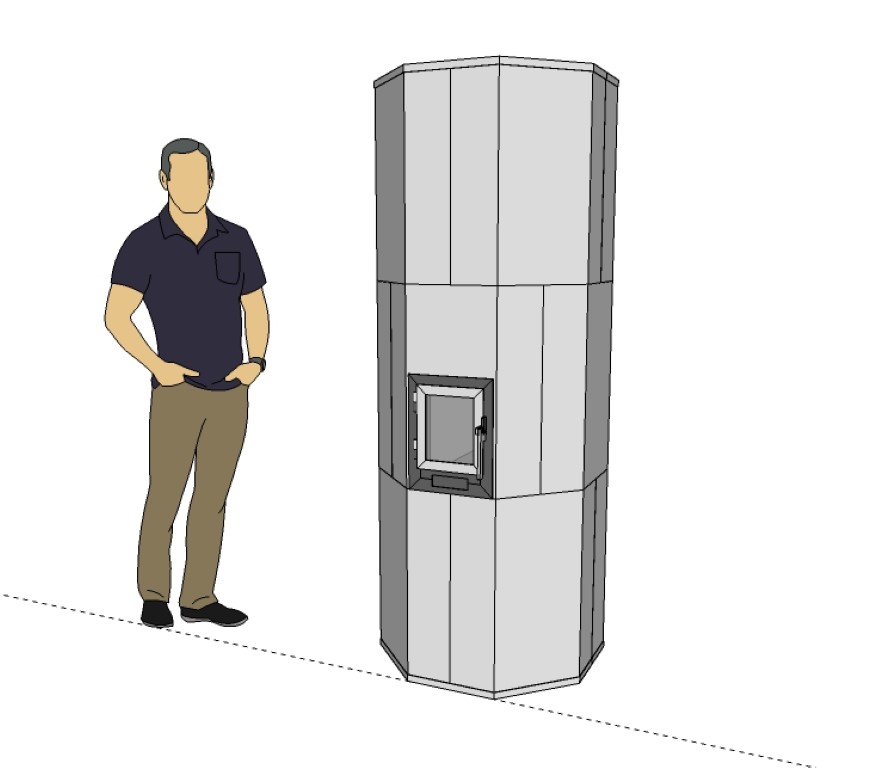
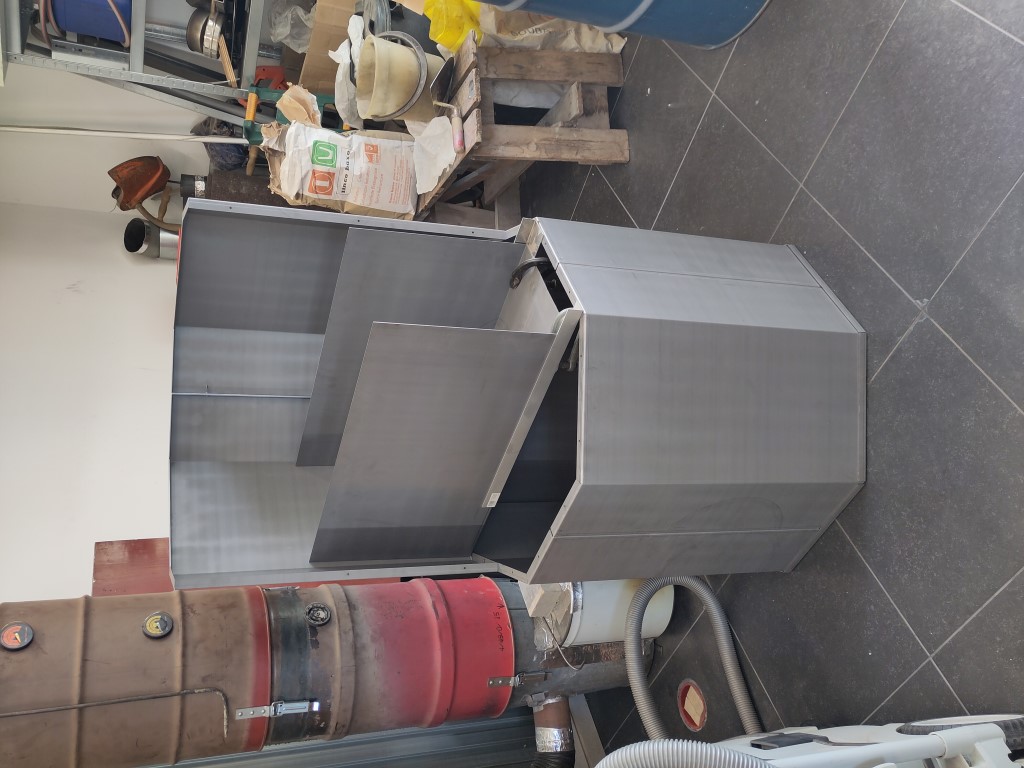
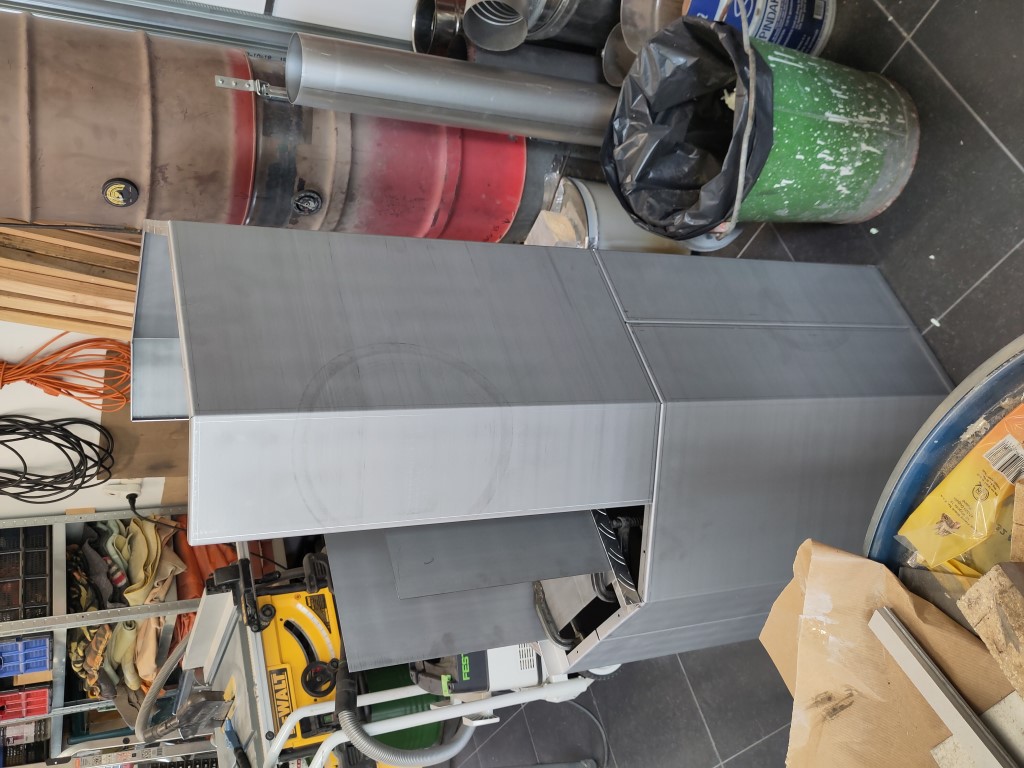
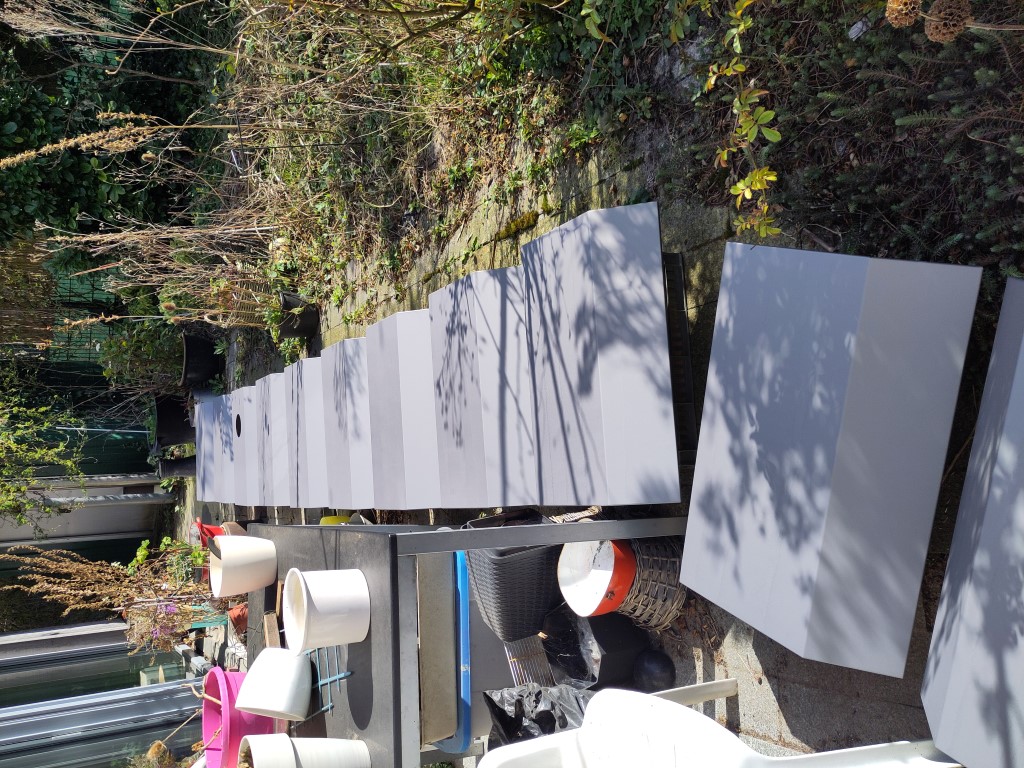
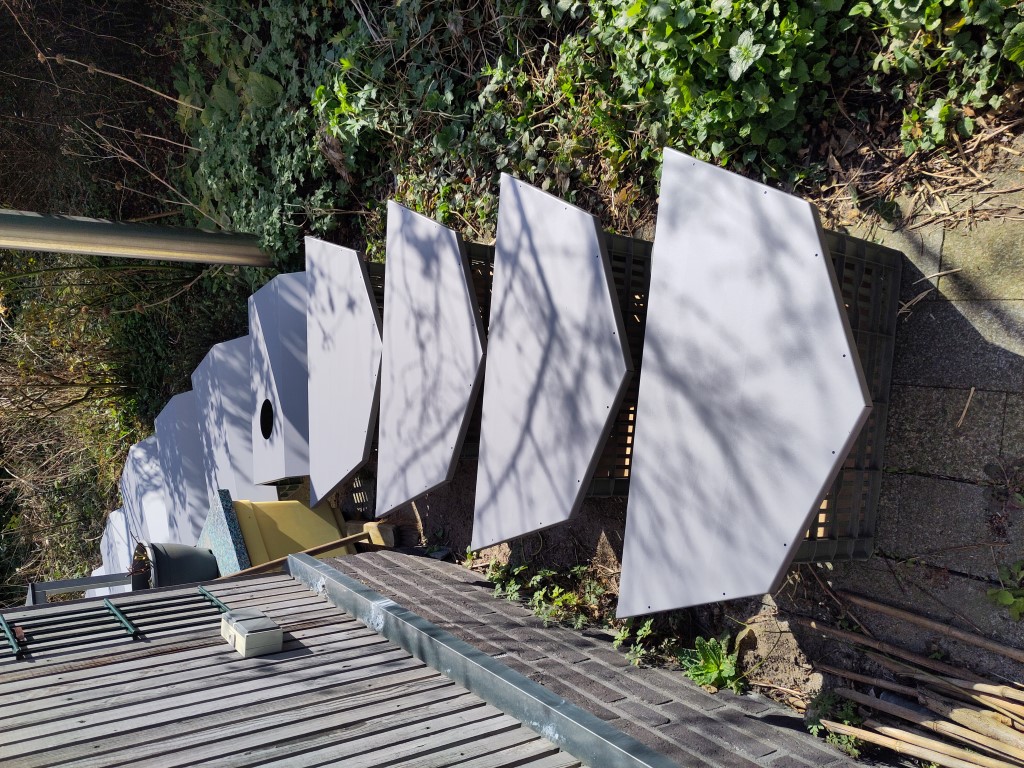
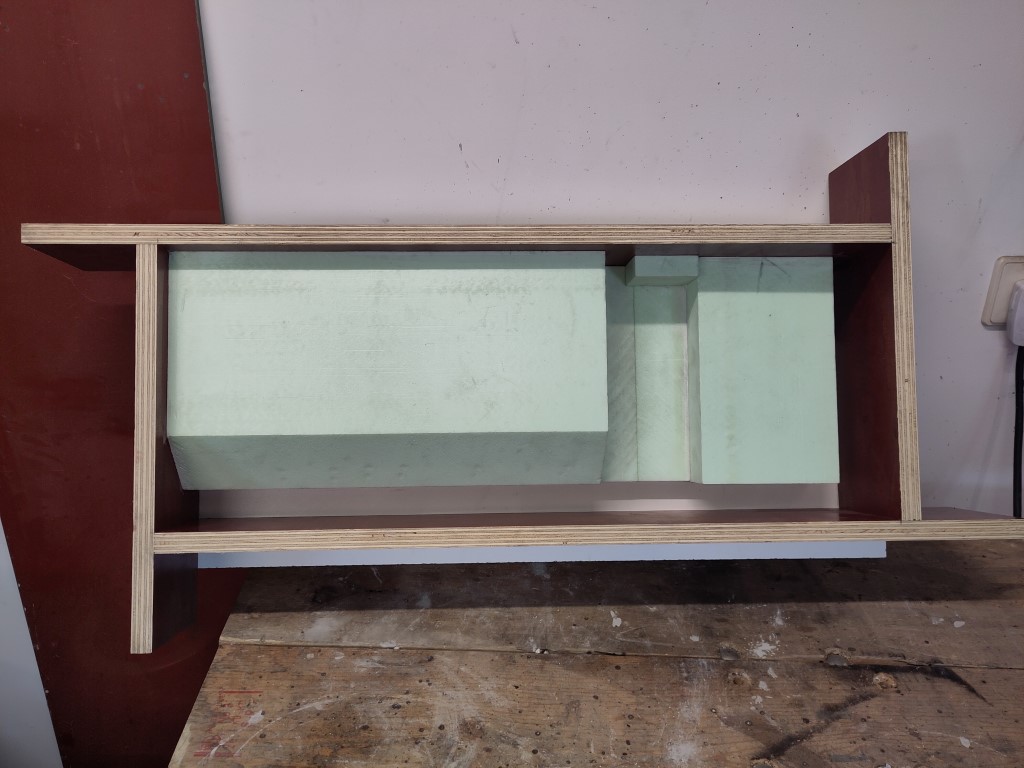
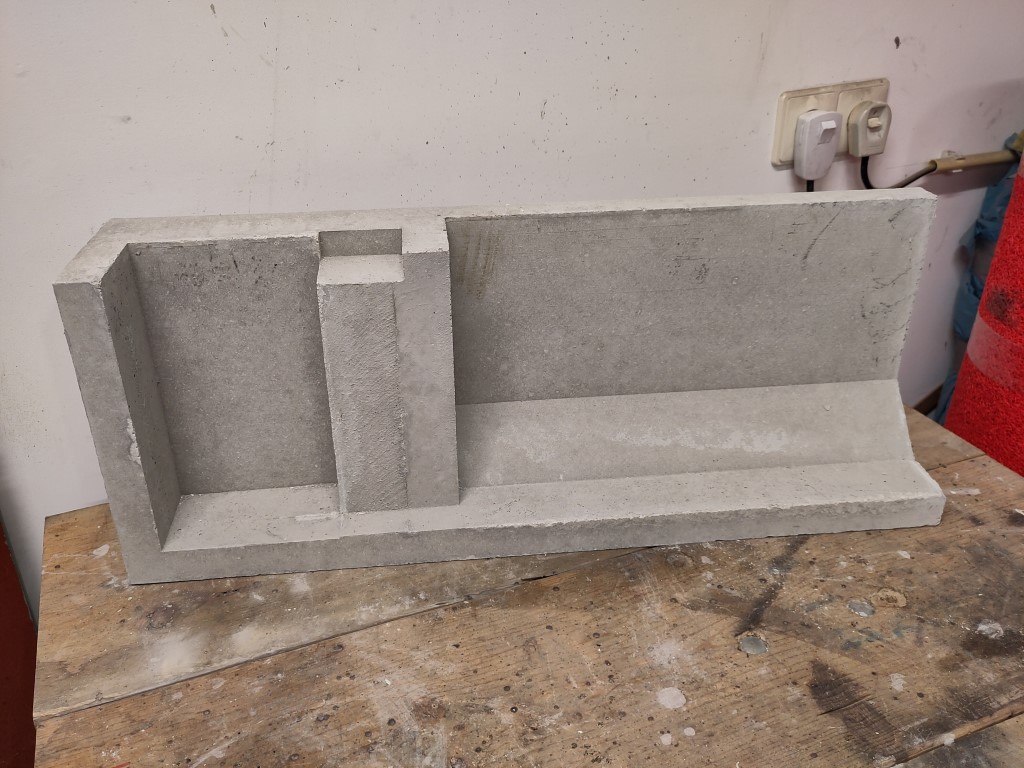
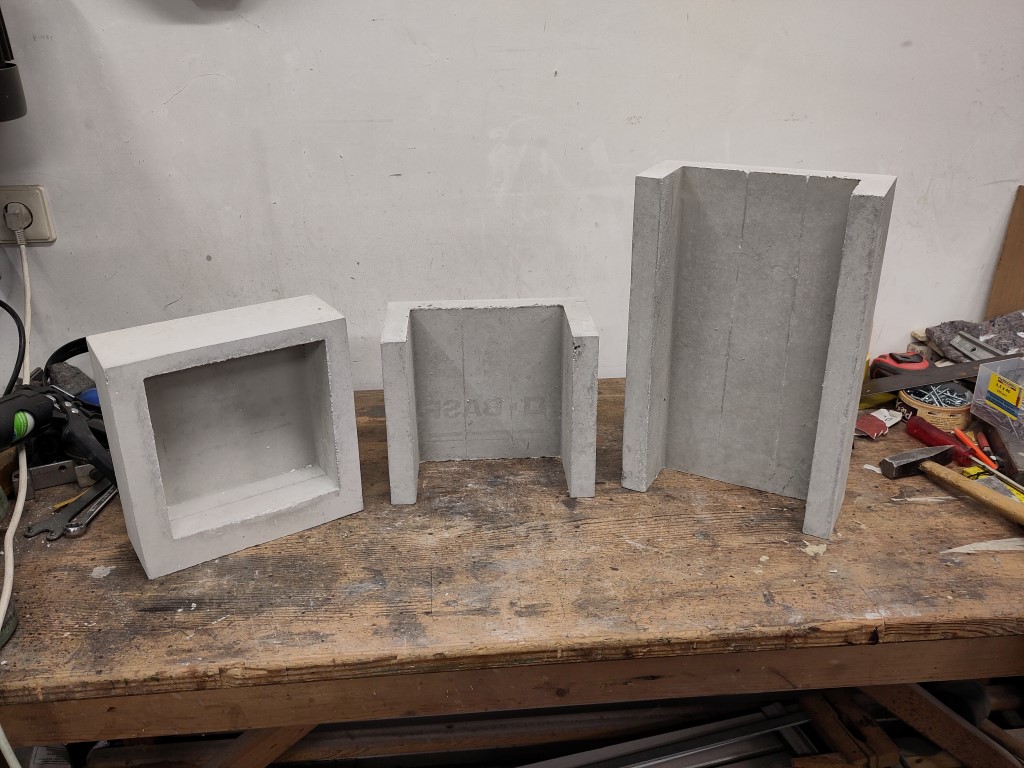
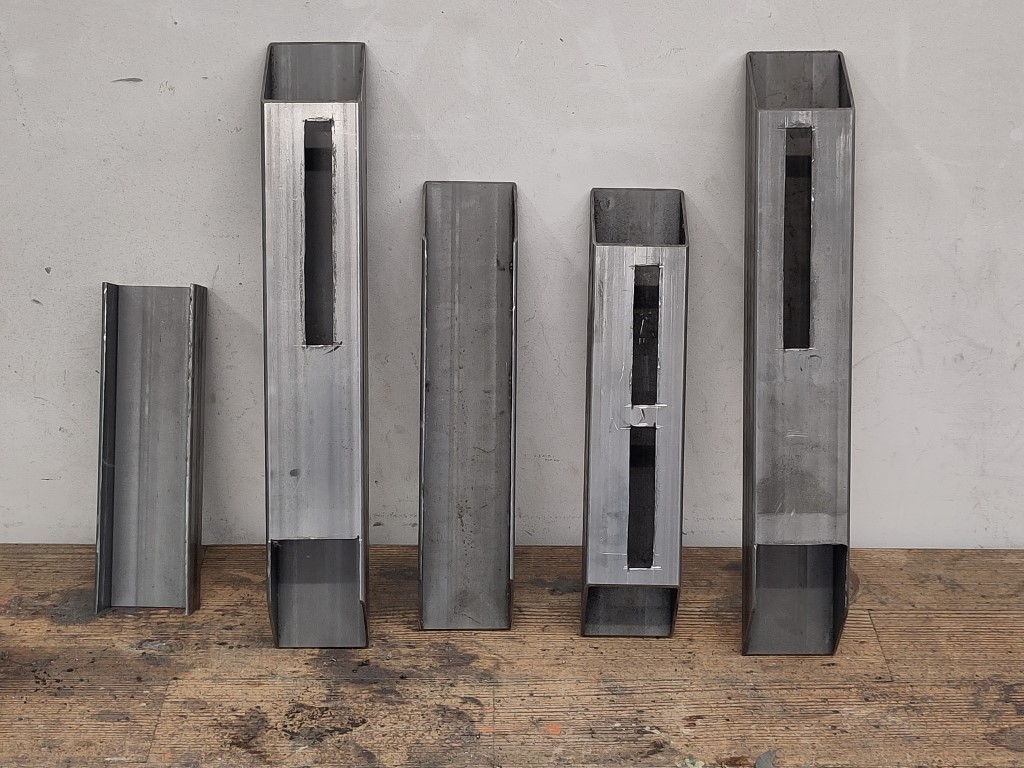
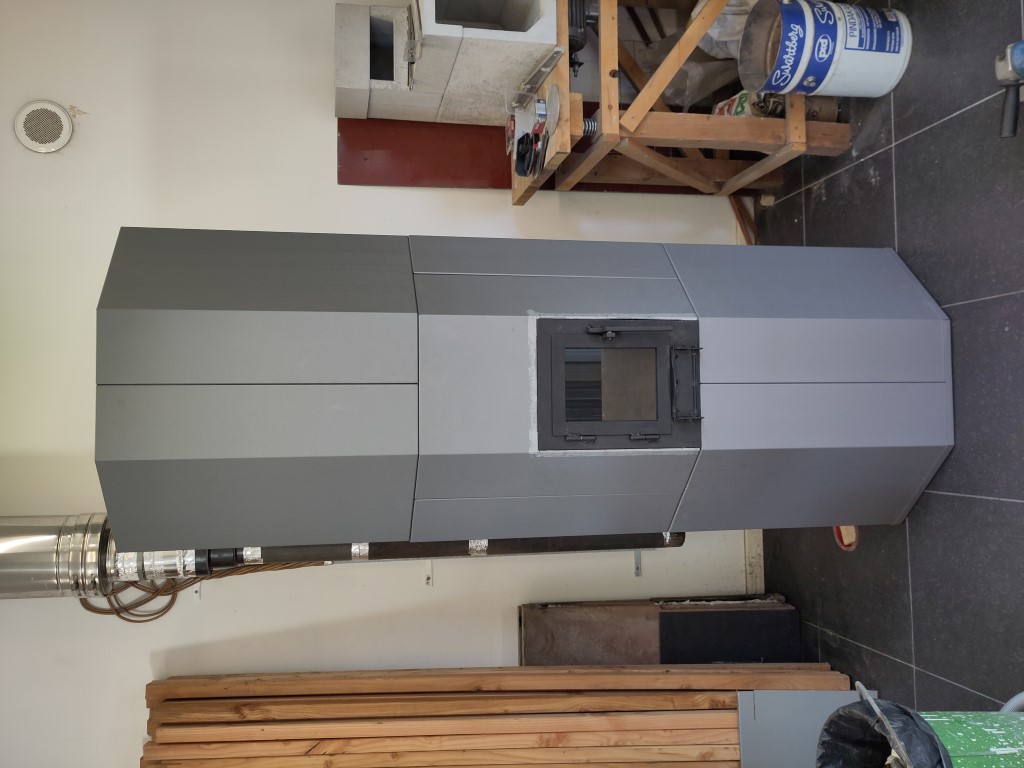
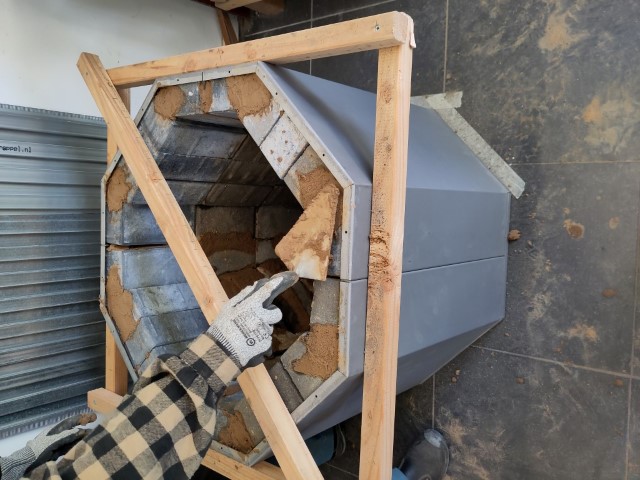
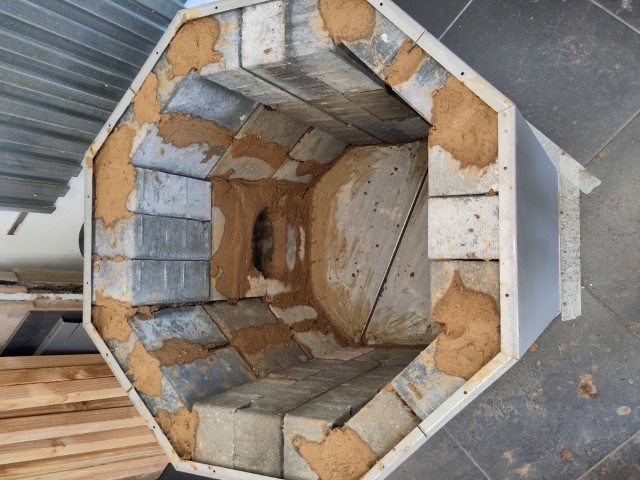
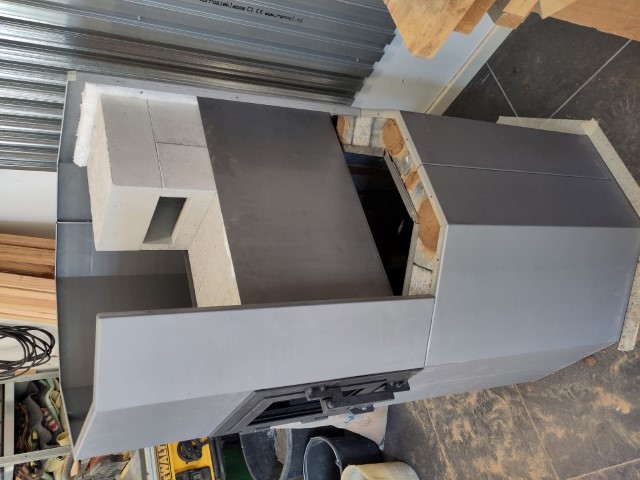
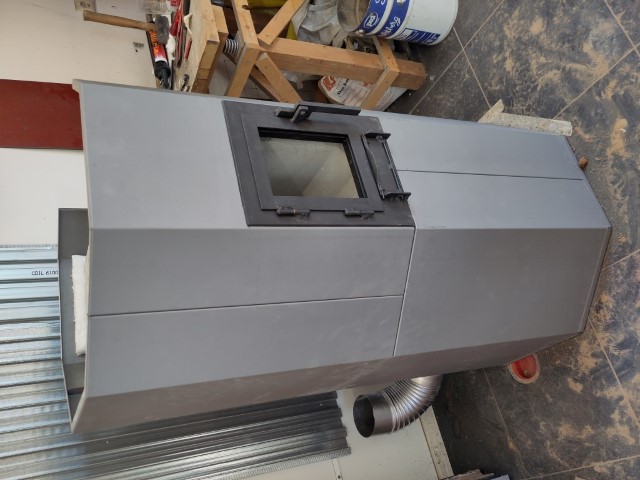
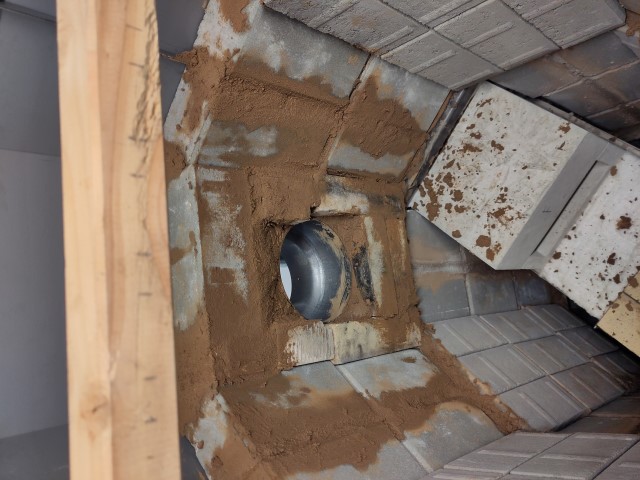
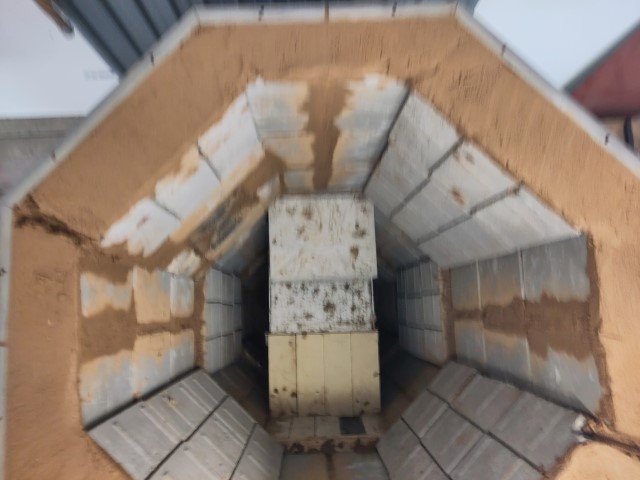
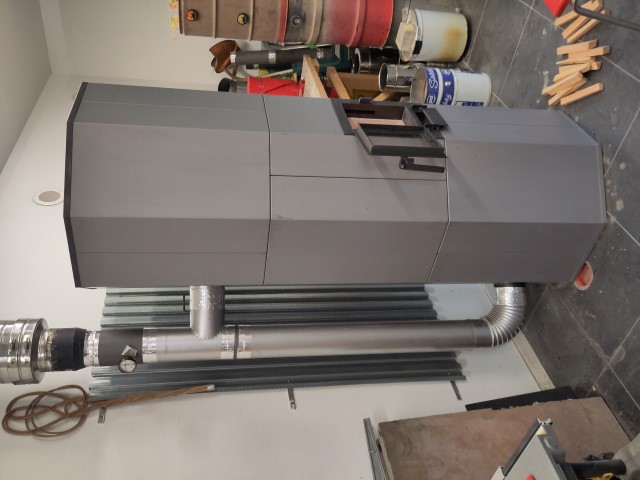
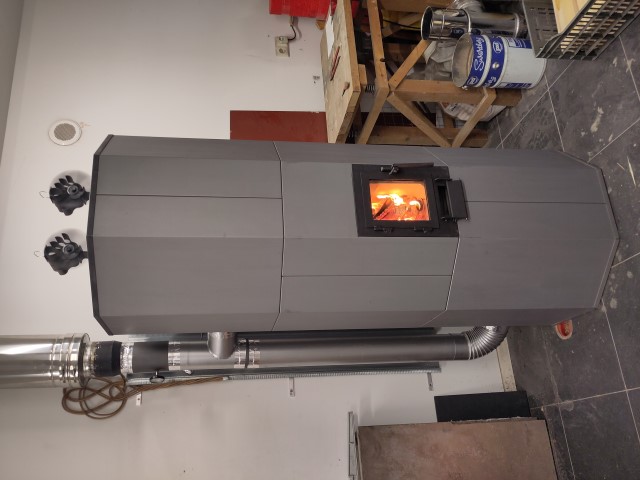
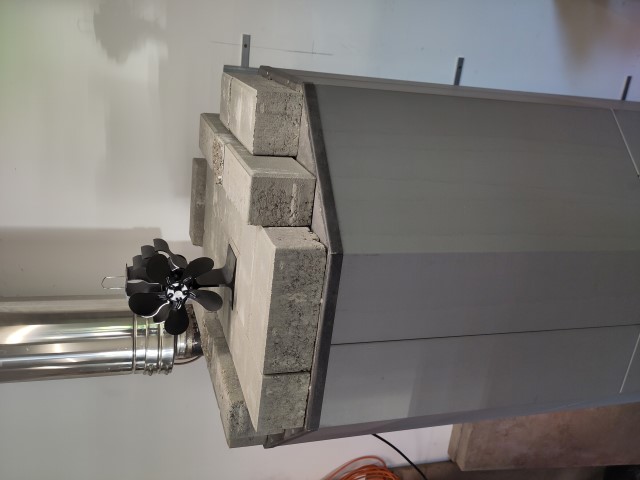
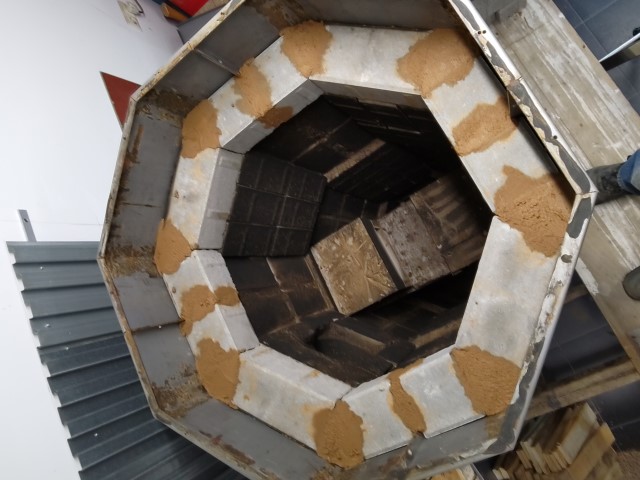
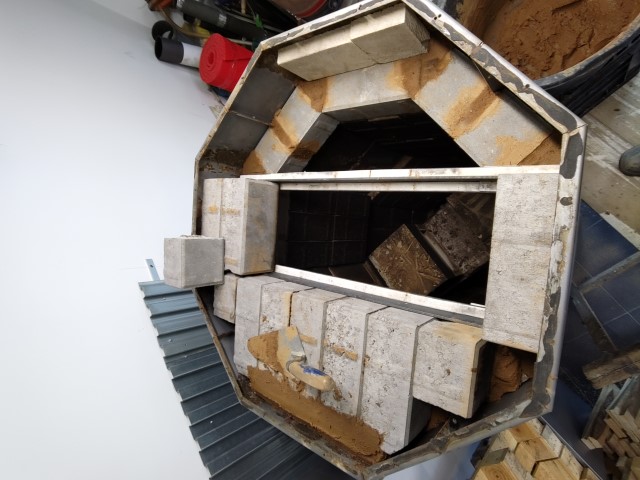
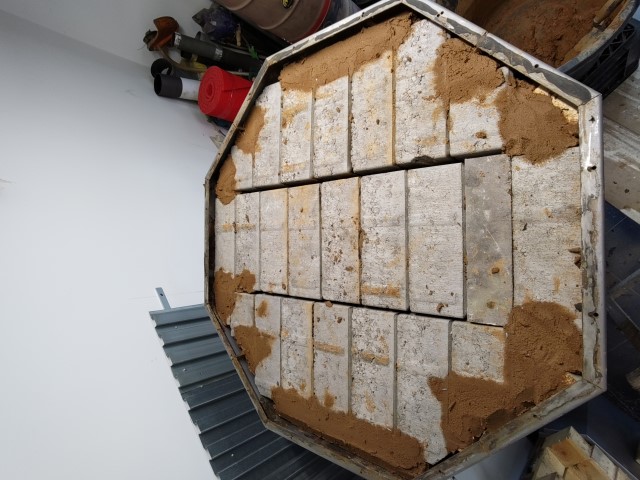
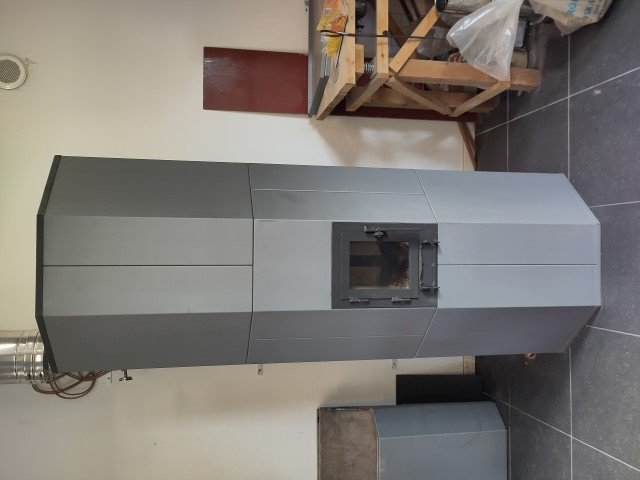
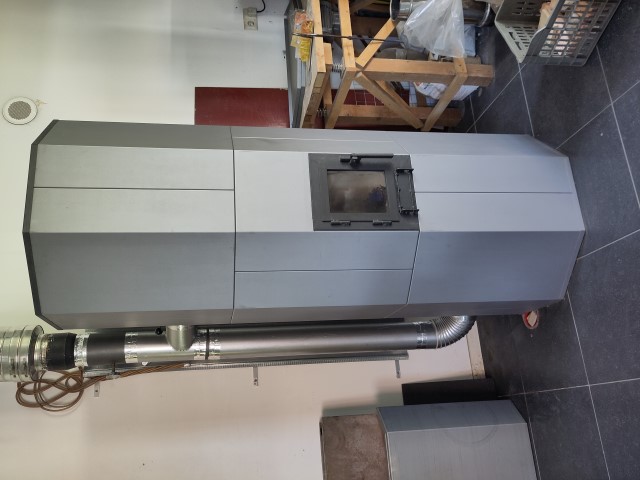
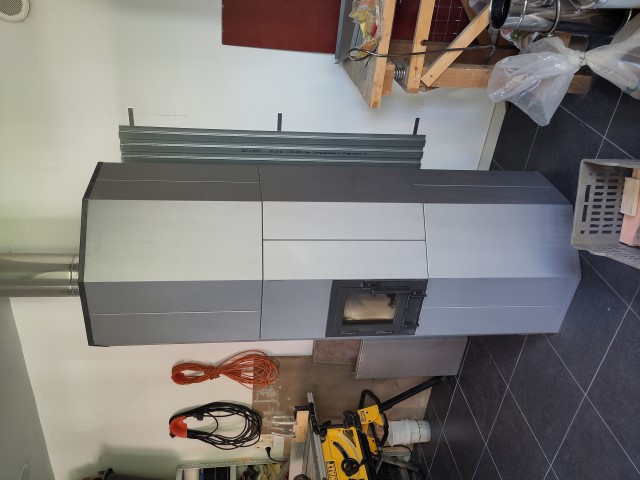
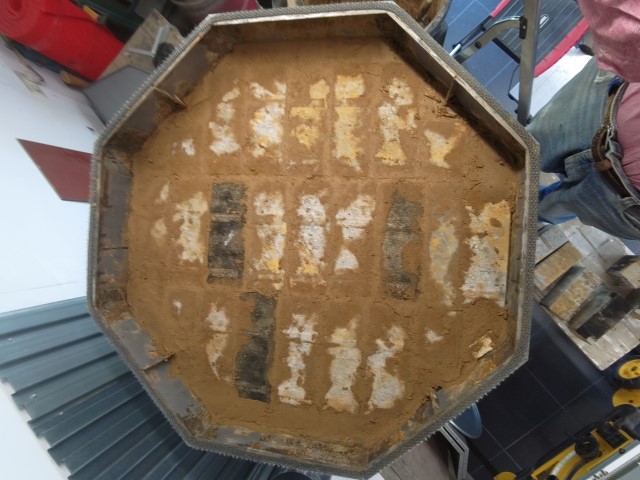
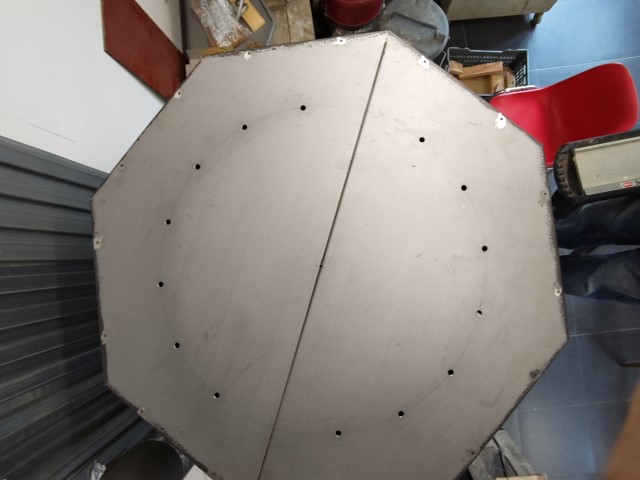
What I'm going to try is to produce a flatpack, much like Ikea, from that octagonal biscuit tin, the concrete bricks can be purchased locally. As you can see in the first picture, there is a steel container inside that can hold the Shorty core. I wanted to assemble that core from ceramic oven plates, with insulation around it so that there are no problems with expansion. Since the core spews the hottest gases forward instead of upward, only a limited number of firebricks are needed directly above the firebox to protect it. The top does not have to handle high temperatures so there is no need to apply stone-like material there (I hope). In addition, a simple stove fan can remove the heat produced at the top. Most of the work will be in the specific parts of the door and air supply.
There are no channels in the thing, only mass along the perimeter, which makes stacking or laying bricks relatively easy. The total mass is in the order of magnitude of about 800 kg (1760 lbs). I also drew another version, which is wider, about 1 meter (3.28'), it can hold a larger core and the weight of that comes to about 1200 kg (2650 lbs). The finish can be anything, from rolling with black fireproof paint (works quite well!) to a RAL color powder coating of choice.
If it doesn't work out, I'll have used up my budget for a year and have been happy experimenting, right?
10
T Cool wrote:In book Finnish Fireplaces: Heart of the Home by Heikki Hyytiänen, Albie Barden, and Aila Rapeli.
available for free, see link below, at page 17 you can see the temperatures in a Finnish ponttouunit.
T Cool wrote:What is your opinion regarding the combustion temperatures?
Seems to be higher than in a classic Swedish tile stove, the kakelugn.
T Cool wrote:Please consider also to view this video https://www.youtube.com/watch?v=znVxrKN0XVs
regards, Peter
4
T Cool wrote:Peter,
According to that article you need to add some pillars inside of Pepper Shakers! More mass practically.
9
T Cool wrote:In my opinion a pönttöuuni is a 2 bell stove with the second bell very inefficient, being too small!
T Cool wrote:I read also an opinion of Vladimir Efimovich Grum-Grzhimailo (Владимир Ефимович Грум-Гржимайло) regarding the transformation of contraflow stove in FMG one, if it is of interest I can post the in link.
According to that article you need to add some pillars inside of Pepper Shakers! More mass practically.
regards, Peter
9
![[Thumbnail for IMG_0083.jpg]](/t/281611/a/286495/IMG_0083.jpg "Filename: IMG_0083.jpg
Description:")
![[Thumbnail for IMG_0107.jpg]](/t/281611/a/286496/IMG_0107.jpg "Filename: IMG_0107.jpg
Description:")
![[Thumbnail for IMG_0109.jpg]](/t/281611/a/286497/IMG_0109.jpg "Filename: IMG_0109.jpg
Description:")