Years of practice, study, and asking lots of questions have finally led to my first indoor RHM build!
She’s a single skin, top-venting bell with bypass powered by a 6 inch Shorty core.
For the core build, see:
https://permies.com/t/368044/Shorty-Core-Oven-Build-Test
The goal is to heat this centralized location in the house. The living room was an addition to the house, so there was an old window hole that I re-opened to pass heat through. A cozy L shaped seating area will be added against the long wall, which is why the firebox faces out of the narrow end.
Sizing
The internal surface area (ISA) is sized for a standard 6 inch batchbox at 8064 sq inches or 56 sq ft (I originally had different core plans.) So technically it’s oversized since Shorty wants 15% less ISA, but knowing I would have a bypass, I proceeded with this size. Exterior is 56 inches long AND high, 32 inches wide.
Materials
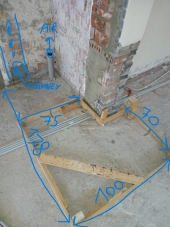
It's around 1800 lbs of bricks, another 1000 in concrete, and 200 in misc mortar other materials. Probably around 3500 lbs including the core. The first step was adding jack-posts and sistering floor joists in this corner of the basement to make extra sure the weight would not be an issue. A single jack-post is rated for over 10,000 lbs, so I feel very confident with support.
The “pad” below is build with air channels. The idea is that the stove will heat the wall heat shields and the air behind them will rise. The air channels provide a source for cool air that will warm, rise, and convect out into the room. Its made of Allura concrete board. Also helps spread out the weight.
My use of concrete block in the walls may cause some controversy. Concrete blocks goes up faster than brick. They’re much cheaper. And this low in the bell does not expose them to any damaging heat. I parge coated the inside of the block layers with refractory mortar, which was likely unnecessary. As you’ll see, bell air temps at the bottom do not get much over 100 dF. All this saved me time, money, and having to over-order bricks.
The clay bricks themselves are “jumbo” from Pacific Clay via Home Depot. We really liked the brown color and the ability to get 2 small pallets delivered greatly reduced handling and hassle.
The chimney system is all Supervent brand from Menards. Double wall black stove pipe converts to stainless steel double wall insulated Class A stove pipe at the ceiling transition. Exterior chimney (not pictured) follows all the height and support rules.
All the insulation is ceramic fiber alternative from Lynn Manufacturing. This is an important point because this material does not have the health risks of standard ceramic fiber. It costs only a bit more. And I have a whole lot of it involved in gasketing the core, surrounding the oven, covering the bell roof, and stuffing around all the ceiling bricks (not pictured.) I considered adding some on the back wall that takes the highest heat from the core exhaust, but with 21 inches of space to dissipate and a stainless steel T blocking the path, I felt safe. If I see any cracking I can always add this later.
8 thermocouples are built in. Chimney, oven, high bell air, low bell air, ceiling mass, and 3 more down the wall mass. I like data. Also why I bought a cheap thermal imager for my phone.
This was NOT a cheap build. I invested heavily in good materials to get it right the first time (hopefully.) I wanted it to look good and work well as a one time investment to lower my especially expensive rural electric co-op bill that usually costs $300 a month in winter (electric-only heat.) Not sure on the return on investment timeline but the furnace did not run at all on burn day so that's a good sign!
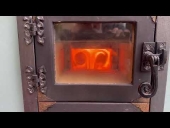
First burn
Yes, it’s mid March. I’m WAY behind the heating season. Partly because of another project and partly because I’m slow at new things. The bell alone took me 5 weeks (I’d never laid a brick before) while the core took me even longer (I’d never welded before.) But with a sudden cold front on the way, I rushed to finish the thing just in time to test it against a blizzard. Conditions were not ideal with 50mph wind gusts. But taking so long to build gave the bell time to dry, and building the chimney with proper materials to the specified height all meant I was able to fight through the wind with only a couple smoke-back moments. Otherwise, no smoke leaks! Hint: if you open a window on the windward side of your house, the increased air pressure blowing in counteracts the wind trying to blow down the chimney. Under normal conditions, start-up should be much easier.
Conclusion
After one burn, I’m sold! 3500 lbs of mass heated to an average of 120 degrees in a short burn with so little wood is a no-brainer. And the infrared heat it puts off is oddly satisfying to feel, even from across a room. The oven reads relatively low on air temp but the oven floor temp is closer to 500. There will be some learning curve and maybe a wire rack or some pizza stone to get used to cooking with it. Over the summer I will build seating and also plan to finish the exposed concrete block with lime wash or cob. There will also be some decorative trim here and there so the ends of the radiation shield are hidden. I’ll do a follow up post after I get more work done. Many thanks to all the builders out there who donate their time to answering questions, especially Peter van den Berg and Thomas Rubio!!!


 21
21


![[Thumbnail for 02-Overall.jpg]](/t/369874/a/285606/02-Overall.jpg "Filename: 02-Overall.jpg
Description: Corner seating will be added along the long bell wall.")
![[Thumbnail for 03-floor-1.jpg]](/t/369874/a/285607/03-floor-1.jpg "Filename: 03-floor-1.jpg
Description: Landscaping felt to pad the floor. HVAC metal to shield the walls.")
![[Thumbnail for 04-floor-2.jpg]](/t/369874/a/285608/04-floor-2.jpg "Filename: 04-floor-2.jpg
Description: Concrete board and concrete block for air channels.")
![[Thumbnail for 05-floor-3.jpg]](/t/369874/a/285609/05-floor-3.jpg "Filename: 05-floor-3.jpg
Description: Another concrete board to build on.")
![[Thumbnail for 06-walls-1.jpg]](/t/369874/a/285610/06-walls-1.jpg "Filename: 06-walls-1.jpg
Description: Block walls set in thick refractory cement.")
![[Thumbnail for 07-walls-2.jpg]](/t/369874/a/285611/07-walls-2.jpg "Filename: 07-walls-2.jpg
Description: Block sealed with a parge coat of refractory mortar.")
![[Thumbnail for 08-walls-3.jpg]](/t/369874/a/285612/08-walls-3.jpg "Filename: 08-walls-3.jpg
Description: Walls coming up with sand clay mortar as figure skating entertains.")
![[Thumbnail for 09-walls-4.jpg]](/t/369874/a/285613/09-walls-4.jpg "Filename: 09-walls-4.jpg
Description: Core frame in place. Two coated concrete blocks inside are the back legs of the core.")
![[Thumbnail for 10-walls-5.jpg]](/t/369874/a/285614/10-walls-5.jpg "Filename: 10-walls-5.jpg
Description: Back wall continues.")
![[Thumbnail for 11-walls-6.jpg]](/t/369874/a/285615/11-walls-6.jpg "Filename: 11-walls-6.jpg
Description: Back wall complete. Core assembly begins.")
![[Thumbnail for 12-walls-7.jpg]](/t/369874/a/285616/12-walls-7.jpg "Filename: 12-walls-7.jpg
Description: Front wall begins. Laser level is a life saver throughout.")
![[Thumbnail for 13-ceiling-1.jpg]](/t/369874/a/285617/13-ceiling-1.jpg "Filename: 13-ceiling-1.jpg
Description: Top course on edge. Added refractory cement to the mortar for extra strength.")
![[Thumbnail for 14-Tube.jpg]](/t/369874/a/285618/14-Tube.jpg "Filename: 14-Tube.jpg
Description: The bypass and inner chimney assembly with adjustable height feet.")
![[Thumbnail for 15-Innards.jpg]](/t/369874/a/285619/15-Innards.jpg "Filename: 15-Innards.jpg
Description: Inner furniture installed.")
![[Thumbnail for 16-ceiling-2.jpg]](/t/369874/a/285620/16-ceiling-2.jpg "Filename: 16-ceiling-2.jpg
Description: Ceiling is sodium silicate stiffened ceramic fiber alternative blanket (and board around the chimney)")
![[Thumbnail for 17-ceiling-3.jpg]](/t/369874/a/285621/17-ceiling-3.jpg "Filename: 17-ceiling-3.jpg
Description: Corner edge notched out of two bricks to overlap the board.")
![[Thumbnail for 18-ceiling-4.jpg]](/t/369874/a/285622/18-ceiling-4.jpg "Filename: 18-ceiling-4.jpg
Description: Blanket an bricks continue to form the ceiling. Blanket edges are blocked from stiffening so they remain soft to be a gasket between bricks and steel.")
![[Thumbnail for 19-ceiling-5.jpg]](/t/369874/a/285623/19-ceiling-5.jpg "Filename: 19-ceiling-5.jpg
Description: Plum-bob up from inner chimney told me where to cut the hole.")
![[Thumbnail for 20-attic.jpg]](/t/369874/a/285624/20-attic.jpg "Filename: 20-attic.jpg
Description: This ring attached to the framed hole holds the weight of the stainless insulated chimney that will go up through the roof.")
![[Thumbnail for 21-Thermocouple-1.jpg]](/t/369874/a/285625/21-Thermocouple-1.jpg "Filename: 21-Thermocouple-1.jpg
Description: Front thermocouples give burn data.")
![[Thumbnail for 22-Thermocouple-2.jpg]](/t/369874/a/285626/22-Thermocouple-2.jpg "Filename: 22-Thermocouple-2.jpg
Description: Rear thermocouples give mass heat data.")
![[Thumbnail for 23-Thermal.jpg]](/t/369874/a/285627/23-Thermal.jpg "Filename: 23-Thermal.jpg
Description: Thermal imager attachment for my phone is loads of fun.")


![[Thumbnail for 15-Innards.jpg]](/t/369874/a/285837/15-Innards.jpg "Filename: 15-Innards.jpg
Description:")

![[Thumbnail for Lime-wash.jpg]](/t/369874/a/286030/Lime-wash.jpg "Filename: Lime-wash.jpg
Description:")