• Post Reply Bookmark Topic Watch Topic
  • New Topic
permaculture forums growies critters building homesteading energy monies kitchen purity ungarbage community wilderness fiber arts art permaculture artisans regional education skip experiences global resources cider press projects digital market permies.com pie forums private forums all forums
this forum made possible by our volunteer staff, including ...
master stewards:
  • Carla Burke
  • Nancy Reading
  • John F Dean
  • r ranson
  • Jay Angler
  • paul wheaton
stewards:
  • Pearl Sutton
  • Leigh Tate
  • Devaka Cooray
master gardeners:
  • Christopher Weeks
  • Timothy Norton
gardeners:
  • thomas rubino
  • Matt McSpadden
  • Jeremy VanGelder

Rocket stoves in Greenhouses , our own forum topic

 
pollinator
Posts: 4154
Location: Northern New York Zone4-5 the OUTER 'RONDACs percip 36''
67
hugelkultur fungi books wofati solar woodworking
  • Likes 13
  • Mark post as helpful
  • send pies
    Number of slices to send:
    Optional 'thank-you' note:
  • Quote
  • Report post to moderator
Hi ! this will be a new topic, Rocket Stoves in Greenhouses , we have at least 20 -25 members who have self - identified themselves as interested in putting Rocket Stoves in Greenhouses but are scattered thru different forum pages , I am trying to get everyone to come to this forum page where we can get together and discuss how to handle our special problems- 1 example is - Rocket Stoves need DRY Wood, most greenhouses are Artificially high humidity areas, wood stored out of the greenhouse will result in high traffic at the start of the greenhouse heating season when we would like to keep the heat in the Greenhouse !!!

All I am asking is that if you come here to view this forum page, consider signing in, and come back here when you see there is a New posting here. Pyro-maticly yours Allen Lumley
 
allen lumley
pollinator
Posts: 4154
Location: Northern New York Zone4-5 the OUTER 'RONDACs percip 36''
67
hugelkultur fungi books wofati solar woodworking
  • Mark post as helpful
  • send pies
    Number of slices to send:
    Optional 'thank-you' note:
  • Quote
  • Report post to moderator
I have seriously over looked a great resource at my finger tips, at the end of this thread Permies is giving you a link to 'threads others have visited'! They do their best to use key words to connect you to threads of similar interest !, if you are interested in these areas leave a question or a message and your name to be connected to like-minded people ! - Pyro Al
 
Posts: 8
  • Mark post as helpful
  • send pies
    Number of slices to send:
    Optional 'thank-you' note:
  • Quote
  • Report post to moderator
Good idea A.L. putting all the greenhouse questions in one thread,looking forward to being educated!!!
 
Posts: 9
  • Likes 1
  • Mark post as helpful
  • send pies
    Number of slices to send:
    Optional 'thank-you' note:
  • Quote
  • Report post to moderator

I have a question.
The gap between the insulated heat riser and the heat riser barrel is dependent on the size of the riser and and barrel. I'm looking at a 8" system for a green house using a 55 gal drum. If i cut the exhaust hole at the bottom of the barrel would it not interfere with the riser insulation, as there is only a 2-3" gap? The 8" exhaust is going to be at least 8 inches in diameter which is a 4" radius.


Thanks


allen lumley
pollinator
Posts: 4154
Location: Northern New York Zone4-5 the OUTER 'RONDACs percip 36''
67
hugelkultur fungi books wofati solar woodworking
  • Likes 3
  • Mark post as helpful
  • send pies
    Number of slices to send:
    Optional 'thank-you' note:
  • Quote
  • Report post to moderator
Fred Lake : We need to get our orientation correct and agreed on , so when I say the bottom of the barrel I am talking about that part of the barrel closest to the ground or in this case the Rocket stove core that we just made, not whether the barrel is right side up, We are going to cut the bottom out of that barrel and remove it, it does not define the exhaust hole. We have to match the Cross Sectional Area of our 8'' heat riser pipe with the Cross Sectional Area defined by the way the bricks are stacked to create a hole to receive our hot exhaust gases, the passageway never narrows below that magical Cross Sectional Area as it 'bends' to mate with the horizontal stove pipe in the Cob Bench and all is good. I cant see why your insulation needs to be more than 4 '' thick, but at 5'' your 'hole' just becomes more oval-ish in shape. This requires you to be a little bit better mason and is one of the reasons you dry stack the bricks as a trial run, and also one of the best reasons for using a sand and clay slip mortar !

I had to re-write that a couple of times to get it to flow ! Just like our exhaust gases !

If I have already established this please forgive a wandering mind! Have you gone to www.rocketstoves.com and got a copy of Ianto Evans' Great book 'Rocket Mass Heaters", $15,00u.s. for the download (all the copies you want),or the paperback $18.00u.s. . Nowhere else is more Rocket stove information to be found in one place, it is the one most used at rocket stove work shops ! keep the questions coming, and check the bottom of the page where it says 'threads others have visited' - Allen L.


1
 
Posts: 3
Location: Clinton, Indiana
  • Mark post as helpful
  • send pies
    Number of slices to send:
    Optional 'thank-you' note:
  • Quote
  • Report post to moderator
Allen,
Been reading about rocketstoves til my eyes lose focus. Ordered Iantos book, not here yet, bought 50 fire brick and been trying to lay out the base for a 8in. stove for my 20X30 hoop greenhouse. What size should the burn chamber be? Going to use pea gravel for mass,has anyone placed Pex tubing in the mass for offsite heating? probably have a hundred more questions before I am finished. Thank in advance for any help. Fred
 
allen lumley
pollinator
Posts: 4154
Location: Northern New York Zone4-5 the OUTER 'RONDACs percip 36''
67
hugelkultur fungi books wofati solar woodworking
  • Mark post as helpful
  • send pies
    Number of slices to send:
    Optional 'thank-you' note:
  • Quote
  • Report post to moderator
fred F. please see comment to Fred L. about Cross Sectional Area C.S.A., this needs to be constant and kept Wholly !

PEX, Most general contractors don't use enough insulation, or ground water barriers, an instant fail. At this time of the year a trip to a site where this is used shows a strip of green grass or no snow.
Remember the contractor had to come up with an estimate that will pry money out of the owners pocket !

For this and other reasons drainage should be considered before starting on foundation work for your Greenhouse ! Allen L.
 
allen lumley
pollinator
Posts: 4154
Location: Northern New York Zone4-5 the OUTER 'RONDACs percip 36''
67
hugelkultur fungi books wofati solar woodworking
  • Likes 1
  • Mark post as helpful
  • send pies
    Number of slices to send:
    Optional 'thank-you' note:
  • Quote
  • Report post to moderator
fred f : Great start, due to local seasonal variations in climate and in local traditional greenhouse use practices its important I have your building site location and altitude, it makes a big difference if you are near the north pacific coast, or at altitude in the rain shadow of the rockies !

Your 8'' Heat Riser will determine size through out, 1/2 of 8'' is 4, 4x4= 16 , 16x pi. = 50 ish , This is Your Cross Sectional Area - C.S.A., so no matter how we twist, and turn, through feed tube, burn tunnel, combustion chamber/zone, heat riser , radiant barrel back into the Rocket Stove base and out horizontally to our thermal mass we have to remember our C.S.A., and keep it constant, if we do that ! plug all leaks, internal and external, and insulate correctly our Rocket stove can not fail !

I know there you are going with pex tubing, please track down some one who is using this your self, most general contractors who try to use pex like this under estimate the amount of insulation, and protection from ground water is needed a visit on site now will show where the ground is warmer - still green grass, areas with no snow, generally its pretty obvious, remember someone had to give a price quote that would pry money out of the owners pocket !

The thermal mass buried into the ground must be keep dry, if your building site is wet - before the greenhouse build the earth most be scrapped off, french drains with soil pipe and landscaping fabric installed with drainage going to daylight at a lower location. the earth brought back and the greenhouse foundation started, see what I mean about local conditions driving your build ?
 
Fred Lake
Posts: 9
  • Mark post as helpful
  • send pies
    Number of slices to send:
    Optional 'thank-you' note:
  • Quote
  • Report post to moderator
Hi Allen,

Probably forgot to remind that the thermal mass heater that I am making will be all steel. So that's a 8" pipe for the burn tunnel using the formula on page 35 and 36 with the heat riser welded on. I will then cover the heat riser with a sleeve and put insulation in it. I'm going to start with 2 to 3 inches of insulation around the heat riser. This should give me plenty of room on the bottom of the drum to cut the 8" exit.

I'm thinking I will bury the barrel a foot or so in the soil/sand and the exhaust can come out at the correct level to go straight into the trench.

I am working on the insulation now and tried to burn cat litter in the current wood burning heater we use in the house. Seems to be holding up fine. Also and I would like your opinion on crushed glass. I checked and glass melts and 1500 degrees F.

If you look at Iantos original design the insulation for the heat riser comes to within 2" or so from the side of the barrel. Thus there would be no room for a 8" hole at the bottom of the barrel.

I mostly want a good draft and heat going down the exhaust and heating my soil. I will put the heater on the end that has the exhaust fan and if it gets too hot in the green house, the fan and kick on and save my polycarbonate

I'm getting the 8" steel pipe this week and the project should kick off by week end. This is the closest thing I could find to what I want to do..http://www.youtube.com/watch?v=M2nlPB_Kq0g Probably because it comes from the steel fabrication point of view.

Problem is its not that cold this year. I would normally be cold with snow on the ground.

Fred
 
allen lumley
pollinator
Posts: 4154
Location: Northern New York Zone4-5 the OUTER 'RONDACs percip 36''
67
hugelkultur fungi books wofati solar woodworking
  • Mark post as helpful
  • send pies
    Number of slices to send:
    Optional 'thank-you' note:
  • Quote
  • Report post to moderator
Fred L :I really cant be much help to you if you want to go with a metal Wood stove !

Glass is not an insulator, why do you ask?

I believe that you will have a smoky burn until you overcome the heat sink that metal to metal contact will give you at the combustion chamber/zone - Heat Riser connection - 10 minutes , probably longer depending, please be sure to have a combination of radiant heat reflector foil, insulation, AND an air gap between your Wood stove and any burnable objects , - Pyro - Al
 
Fred Lake
Posts: 9
  • Mark post as helpful
  • send pies
    Number of slices to send:
    Optional 'thank-you' note:
  • Quote
  • Report post to moderator

allen lumley wrote:Fred L :I really cant be much help to you if you want to go with a metal Wood stove !

Glass is not an insulator, why do you ask?


I just see it everywhere looks like a cheap way to recycle glass.
 
Posts: 60
5
2
  • Mark post as helpful
  • send pies
    Number of slices to send:
    Optional 'thank-you' note:
  • Quote
  • Report post to moderator
Fred, the steel will most likely not survive the blast. 302 stainless is rated slightly higher, but not by much.
 
allen lumley
pollinator
Posts: 4154
Location: Northern New York Zone4-5 the OUTER 'RONDACs percip 36''
67
hugelkultur fungi books wofati solar woodworking
  • Mark post as helpful
  • send pies
    Number of slices to send:
    Optional 'thank-you' note:
  • Quote
  • Report post to moderator
Fred : unless you know some deep dark secret about The Glass Recycling Industry , its my understanding it works about the best of all the recycling, crushing glass say for fill would be avery poor form of recycling more like down-cycling ! Pyro-AL
 
Posts: 23
  • Likes 1
  • Mark post as helpful
  • send pies
    Number of slices to send:
    Optional 'thank-you' note:
  • Quote
  • Report post to moderator

Hello,

Great idea about a new thread for us greenhouse people. Mine is actually a hoop house, and produces without heat all year long. However, I am interested in putting a rocket mass stove in the hoop house to try to extend the warm season veggies. I had tomatoes and peppers still ripening on the vine until right before Thanksgiving, then a string of cold nights did them in.
Greenhouses and hoop houses have different issues, I believe, than other applications. Namely, instant high heat is not important, but longer lower heat is. Basically, what I'm trying to do is keep the temps above freezing for 12 hours at night. Days are usually not a problem.
Another issue is the moisture. Will cob still work in that environment? It's always damp, if not wet, in the hoop house. I was planning on using large rocks around the exhaust pipes for mass, but can I still use the clay/sand/cement mixture for sealing around the barrel??

I'm sending along some pics of the setup. I plan to but the RMA near the door, then run my exhaust pipes alongside the upper beds, then out the far wall. Inside dimensions of hoop house are 12 feet by 24 feet. I would appreciate any ideas/help anyone could offer.


Mike
006.JPG
Hoop house in the distance
011.JPG
Hoop house without film
004.JPG
Solar furnace foreground, hoop house background
 
allen lumley
pollinator
Posts: 4154
Location: Northern New York Zone4-5 the OUTER 'RONDACs percip 36''
67
hugelkultur fungi books wofati solar woodworking
  • Mark post as helpful
  • send pies
    Number of slices to send:
    Optional 'thank-you' note:
  • Quote
  • Report post to moderator
Mike : Do you have the Ianto Evans' book 'Rocket Mass Heaters' - nothing else in print has as much information in one place on Rocket Stoves !

You are more right than you know about moisture being a potential problem with mass heaters, could i have your location and altitude to start !

Cement does not play well with Cob ,and we are really talking about combining three technologies cob/adobe Rocket stoves and greenhouses ! do to the high moisture content some tradeoffs are needed, and I personally would be spreading misinformation if I tried to talk about cob in this environment.

I talked to a man who is at 9000 ft in colorado on the rain shadow of the Rockies and he has no problem with his cob and is heating with pine ! - none of this is any way a patern that you should fallow ! Pyro Al
 
Mike Kimble
Posts: 23
  • Mark post as helpful
  • send pies
    Number of slices to send:
    Optional 'thank-you' note:
  • Quote
  • Report post to moderator

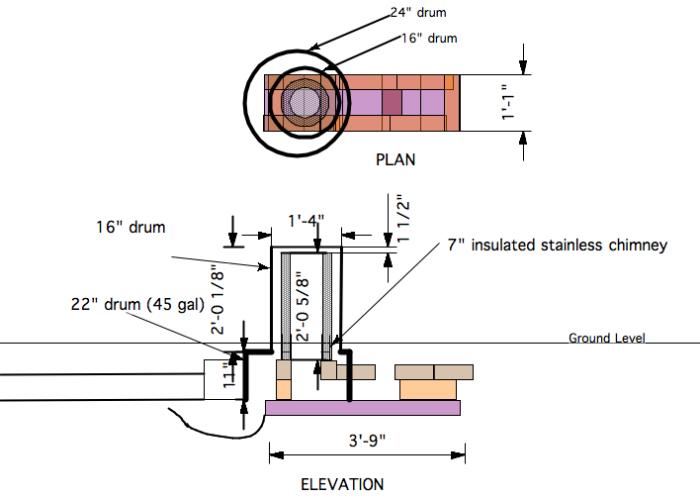
allen lumley wrote:Mike : Do you have the Ianto Evans' book 'Rocket Mass Heaters' - nothing else in print has as much information in one place on Rocket Stoves !

You are more right than you know about moisture being a potential problem with mass heaters, could i have your location and altitude to start !

HI Al,

Yes, I did pick up that book. Lot's of good info. My location is at the top of a hill in West Virginia. Probably a little over 2000 feet. Usually, winters are cold; 10 degrees or below for the lowest of the lows.

Mike

 
ian ballance
Posts: 8
  • Mark post as helpful
  • send pies
    Number of slices to send:
    Optional 'thank-you' note:
  • Quote
  • Report post to moderator
Managed to scrounge some 1/4 steel pipe but its wider at the bottom where another pipe slotted in,i have my barrel also. The pipe is longer than the barrel so what i was considering doing was insulating/cobbing around the wider bit of the riser, enough to give the barrel a base to stand on and giving me a 1 1/2 inch gap between the barrel and the top of the riser.Can i cut a 6" hole in the barrel bottom for the riser and another 6" outlet hole?Then insulate the riser again to give 1 1/2 " clearance down the sides within the barrel? Am i missing any potential pitfalls or snags? the barrel i have has a removable lid so cleaning and maintenance is possible
Any input will be appreciated thanks Ian
 
Fred Farrington
Posts: 3
Location: Clinton, Indiana
  • Likes 2
  • Mark post as helpful
  • send pies
    Number of slices to send:
    Optional 'thank-you' note:
  • Quote
  • Report post to moderator
Mike, What about a bed of sand to lay the exaust on then 2or3 ft. of pea gravel over that for a slow release of heat. Fred F.
 
allen lumley
pollinator
Posts: 4154
Location: Northern New York Zone4-5 the OUTER 'RONDACs percip 36''
67
hugelkultur fungi books wofati solar woodworking
  • Mark post as helpful
  • send pies
    Number of slices to send:
    Optional 'thank-you' note:
  • Quote
  • Report post to moderator
Fred F. : I want to ask you to try a simple experiment, Find some pea gravel, and pack/tamp it down into a metal bucket , coffee can, #10 Food can . I t will not pack very well which is a small part of this test, now - 1) add water to the top of the gravel - 2 ) poor off through a screen to save and measure - 3 ) every drop of water = the same amount of insulating air the water displaced, try it again trying to sprinkle sand between pea stones , this time make note of the additional number of steps you need to make to the adding water job as the water seeks it's own level !

I can accept this done as a mental exercise, though the results should exceed your expectations. The point here was the air as represented by the water and water/sand was insulating. I know that 'other people' have looked at pea gravel in the past as a thermal mass. If their goal was to build something that might be tested and then broken down, or they had a severe drainage problem they needed to solve, I would accept that use as a marginal test bed but building that way when we can do better is a problem that is best avoided Follow below AL


Ian B : I'm working on marginal sleep here, are you saying that your pipe is 1/4'' thick ? approximate other sides? so it has a very narrow cone shape? or is one end crimped to go into or alternately expanded into a slight bell shaped to be a receiver ? How far approximately do they overlap?

The 1st job your barrel has to do is burn off the gunk inside/paint outside. This gives you the chance to make a pocket rocket and should not be missed. It is possible that someone close to you has created their own pocket rocket, IF, you could find them your future barrel options are greatly increased! When you are nearly ready you could try a new forum thread hunting one in your area ! You might find a quiet builder close by !

Ideally you should have scored/scrounged two identical barrels Both with a removable top and held in place with a clamping band and gasket. That is one of those 'but i thought everyone knew that ' mental lapses that occur when someone like me is trying to help at long distance, even when they have had enough sleep !

In a perfect world you would have an extra 'clamp' barrel top to use as the attaching points for the down draft feed tube, and the exhaust chimney of your Pocket Rocket, this will also burn off the galvanizing from the 1st couple of lengths of your stove pipe destined to go into your thermal mass.

As installed, the bottom of the barrel, that end that slips down over the Heat Riser 1st, and mates with the Fire Brick at the top of your Rocket Stove Base should be cut-out/removed to the heavy lip where barrel end and sides are heat crimped together ! This leaves the lip there just like a conventional can opener leaves a lip attached at the sides of the can !

This gives you the maximum Cross Sectional Area - C.S.A. in your barrel to allow your creation/ shaping of the bricks/cob of your Rocket Stove Base to give you a Constant C.S.A. as the exhaust gases are channeled to the horizontal chimney of your thermal mass bench.

The end you did not remove - would be that end of the barrel that is made with the removable top and clamp and gasket. This is so you can later remove your top for cleaning the fly ash that needs attention twice a year until you know your system ! If you can score just one more barrel with a top like that or a barrel and two tops and a band that would be great , we might even get lucky with mating a removable top to the barrel we will be making into a pocket rocket base.

When i do my next rocket stove it will have a Heat Riser Sandwich - 6''heavy black wood stove grade stove pipe / 2'' Perlite / 10'' stove pipe! (Gapped to the top of the barrel a scant ! 1 1/2 inches )

I am researching a refractory product to coat/line the metal of the inside of my 6'' pipe . - ITC - 100 - more as I learn more. In any case there is not much improvement with more insulation. Both sides of the pipe when temps stabilize are hot ! we want the insulation that is there only for the 1st couple of minutes to speed the Creation of High Temps which will be maintained/stabilized by the burn itself !

I expect the creation of a cast-able, ship-able, 1 piece refractory Heat Riser before my - then present heat riser fails , at that time I'll pop the top off of my barrel and replace the old with the new !

Hope this helps a little, - Pyro-AL

Mike K : I have borrowed Ianto Evans' 'other book', the owner shaped home and am reading-up on cob in general and to see what can be learned about cob in wet environments -'till then I need to be quiet! A.L.

I'm sending this out now then this old man is going to take a nap ! A.L.


ian ballance
Posts: 8
  • Mark post as helpful
  • send pies
    Number of slices to send:
    Optional 'thank-you' note:
  • Quote
  • Report post to moderator
Fred ive been thinking about the materials for the mass,i was thinking its going to be damp so cob is probably no good.like you i thought sand and pea gravel with an assortment of urbanite mixed in.I thought a layer of insulation to lay the ducting on (so the heat is deflected up into the mass?) then lay the mix on and around the ducting and kept in place by a retaining wall then topped with paving slabs,Will that work??? ian
 
allen lumley
pollinator
Posts: 4154
Location: Northern New York Zone4-5 the OUTER 'RONDACs percip 36''
67
hugelkultur fungi books wofati solar woodworking
  • Likes 1
  • Mark post as helpful
  • send pies
    Number of slices to send:
    Optional 'thank-you' note:
  • Quote
  • Report post to moderator
Hi All !: More information from the bottom of the page, (as you see it ) I have previously mentioned the '' forum threads others viewed '' .

it will connect to other forum threads similar to the one you were just on , I have posted directions to it at the bottom of my page in the signature lines !

When you look at the bottom of the page, one (1) of the most underused tools is the permies>forums>wood burning stoves line, repeated near the top of the page

When you find the PERMIES >> FORUMS >> WOOD BURNING STOVES line -

'' CLICK '' on the '' WOOD BURNING STOVES'' part - wait for it, changes will happen

Two (2) things will happen , you will be given another chance to '' click '' on it again, and the BANNER at the very top of the page will change !

You are looking for the changed BANNER to Show Paul Wheatons picture, plus a chance to go to his Personal Podcast .

The " Personal Podcast BANNER '' will change, sometimes slowly it will always change, change is good !

It may take several 'clicks' to show this - Personal Podcast BANNER - usually 6, or less, but its worth the work !

" Click " on the - Personal Podcast BANNER - you can now go to podcast 225 there they talk about a Ship-able Rocket Stove Kit !!!

A cast-able, ship-able, 3-piece refractory Rocket Stove core and Heat Riser and how -soon ! Hope this gets lots of hits ! A.L.
 
Mike Kimble
Posts: 23
  • Mark post as helpful
  • send pies
    Number of slices to send:
    Optional 'thank-you' note:
  • Quote
  • Report post to moderator
Hey Al,

Thanks for the help. For thermal mass, I'm contemplating lining the bottom and side of the outside my bed, where the exhaust pipe will run, will dinner plate-size rocks from a stream bed. That should be around 25 feet of 6 inch pipe; surrounded on two sides by 2" thick plate-size rocks. Think that will hold some heat??

Mike
 
allen lumley
pollinator
Posts: 4154
Location: Northern New York Zone4-5 the OUTER 'RONDACs percip 36''
67
hugelkultur fungi books wofati solar woodworking
  • Mark post as helpful
  • send pies
    Number of slices to send:
    Optional 'thank-you' note:
  • Quote
  • Report post to moderator
Mike : which two sides ? You need to pack the spaces between the stones with cob, and you need to pack cob around the stove pipe to make a seal around the pipe and for longevity! It is possible that you could run into problems trying to build a Cob Bench in a wet environment, BUT, good clay/sand and/or clay slip WILL NOT liquify and run-off even if exposed to high moisture, lets not forget our basics, its ''like throwing the baby out with the bath water ''

I have Just started reading Ianto Evans' - other book '' the hand sculpted home '', there is a tremendous amount of useful information ,but the book is 4X the size so it will take 16 Xs longer to digest ! Pyro - AL

Did you follow the instructions in my last post ? would you considering reposting them ?!? A.L.
 
Posts: 9002
Location: Victoria British Columbia-Canada
707
  • Mark post as helpful
  • send pies
    Number of slices to send:
    Optional 'thank-you' note:
  • Quote
  • Report post to moderator

allen lumley wrote: Hi ! this will be a new topic, Rocket Stoves in Greenhouses , we have at least 20 -25 members who have self - identified themselves as interested in putting Rocket Stoves in Greenhouses but are scattered thru different forum pages , I am trying to get everyone to come to this forum page where we can get together and discuss how to handle our special problems

All I am asking is that if you come here to view this forum page, consider signing in, and come back here when you see there is a New posting here. Pyro-maticly yours Allen Lumley


I think that's a great idea Allen. May I also suggest linking this page to all relevant pages that include a RMH inside a greenhouse. I produced two of these yesterday. One concerns using the waste wood gas from bio-char production to run a RMH. This could be done inside the greenhouse. Heat from the retort would be available sooner than heat stored in the thermal mass. Since you will then have mountains of charcoal, some could be burned within the greenhouse for heat and a CO2 boost. Early morning would seem the best time for that, while firing of the retort and RMH would seem like an evening thing. Here's the link Charcoal/Bio-char Production – Utilizing the volatile gasses, reducing pollution and fire risk https://permies.com/t/19523/stoves/Charcoal-Bio-char-Production-Utilizing

The other thread involves running heat from solar collectors through an unfired RMH to store daytime heat for use at night. Solar Powered - Rocket Mass Heater – For Wood Kiln – Greenhouse https://permies.com/t/19518/stoves/Solar-Powered-Rocket-Mass-Heater
 
allen lumley
pollinator
Posts: 4154
Location: Northern New York Zone4-5 the OUTER 'RONDACs percip 36''
67
hugelkultur fungi books wofati solar woodworking
  • Mark post as helpful
  • send pies
    Number of slices to send:
    Optional 'thank-you' note:
  • Quote
  • Report post to moderator
- D. H. : - Thanks but i've already beat my head against that stone wall !
 
Dale Hodgins
Posts: 9002
Location: Victoria British Columbia-Canada
707
  • Mark post as helpful
  • send pies
    Number of slices to send:
    Optional 'thank-you' note:
  • Quote
  • Report post to moderator

allen lumley wrote:- D. H. : - Thanks but i've already beat my head against that stone wall !


Hi Allen, from your personal message, I believe that you would like to link up the various pages, but have others who are more computer savy do it. So, everyone who has a thread related to this, please drop a link here. I'll wait for a week or so and then pour through the threads looking for any good ones that were missed. The beauty of this is that if another thread is just silliness, I can leave it out as the self appointed editor

If you've written anything that's quite bizarre be sure to link it yourself.
 
  • Likes 1
  • Mark post as helpful
  • send pies
    Number of slices to send:
    Optional 'thank-you' note:
  • Quote
  • Report post to moderator
With regards to tubing, does it have to be made out of metal? Could cinder blocks be used? What about the use of cement/concrete/mortar in place of the clay/cob? Our greenhouses are aquaponic in nature. Could the RMH be used to help keep the water warm during the winter? If so, what would be the best suggestion for how to incorporate that?
 
Rob Torcellini
Posts: 60
5
2
  • Likes 2
  • Mark post as helpful
  • send pies
    Number of slices to send:
    Optional 'thank-you' note:
  • Quote
  • Report post to moderator
I just posted a video on how I'm heating my aquaponic system. The simplest way to heat your water is to throw an aliminum radiator on top of the barrel and pump water through it. You would be amazed how much heat it absorbs! Rob's Pimped-out RMH
 
Posts: 13
  • Likes 1
  • Mark post as helpful
  • send pies
    Number of slices to send:
    Optional 'thank-you' note:
  • Quote
  • Report post to moderator
Cool thread

I'm in for the ride
Researching on doing a GH too

I'd like to do 4ft wide mass with grow beds atop it
however long I can get it

I think I'll start with a 20 x 4 bed to try it out, or does that make it a 40 ft run?
maybe I should be starting with a 12 ft thermal battery?

I'd like to set it in the earth about 2 or three feet to keep the overall height down
thinking a floor of sand to insulate
wood sides to separate it from the earth
cob mass
waterproofing the top with a simple 6 or 10 mil plastic tarping before putting the beds on top

I'm shooting for beds that stay about mid 70's

K.I.S.S is my mantra I'm trying to adhere to

I've absorbed alot of key info the last week of reading

One question on my mind

is there a formula that relates the the length of exhaust in the thermal battery to any other part up front in the combustion area?
 
allen lumley
pollinator
Posts: 4154
Location: Northern New York Zone4-5 the OUTER 'RONDACs percip 36''
67
hugelkultur fungi books wofati solar woodworking
  • Mark post as helpful
  • send pies
    Number of slices to send:
    Optional 'thank-you' note:
  • Quote
  • Report post to moderator
bradley ; welcome , have you gone to www.rocketstoves.com and downloaded your copy $15.oo U.S. of I. Evans' book '' Rocket Mass heaters !" ? no other place has more Info specific to Rockets stoves in one place in any language ! With book in hand it is very easy for some one to point you in the right direction ! be safe keep warm !
Pyro Magic-ally Allen L.
 
Mike Kimble
Posts: 23
  • Likes 2
  • Mark post as helpful
  • send pies
    Number of slices to send:
    Optional 'thank-you' note:
  • Quote
  • Report post to moderator
Here's an update on my Hoop House rocket mass stove. This photo shows the 24 feet of exhaust pipe incased in cob and stones.
017.JPG
Exhaust pipe covered in cob and stones...
 
Mike Kimble
Posts: 23
  • Likes 3
  • Mark post as helpful
  • send pies
    Number of slices to send:
    Optional 'thank-you' note:
  • Quote
  • Report post to moderator
Cont. update...

Here's a pic looking down into the fire.
019.JPG
fire in greenhouse RMH
 
Mike Kimble
Posts: 23
  • Mark post as helpful
  • send pies
    Number of slices to send:
    Optional 'thank-you' note:
  • Quote
  • Report post to moderator
Cont. update...

Here's a picture showing the back of the hoop house. I pulled my solar pool cover over the north side of the hoop house to help insulate and retain the heat. It works pretty good too. I don't know if you can see it from this angle, but there is a tee where the exhaust exits the hoop house and a five foot insulated pipe for a chimney. To prime the fire, I open the tee and insert 3 "tea candles". This get's the draft going without the mess of burned up paper ash.
014.JPG
solar pool cover on north side of hoop house
 
Mike Kimble
Posts: 23
  • Mark post as helpful
  • send pies
    Number of slices to send:
    Optional 'thank-you' note:
  • Quote
  • Report post to moderator
Cont update....

I do have a question: Only in hoop houses is there such a tight seal to the outside. Think of it like this: over eighty percent of surface area is sealed plastic. No spaces or cracks for air to enter. I know folks are not keen on adding outside air, but in this case, could it really be necessary for the stove to run at full output?

016.JPG
View into Hoop House from outside...
 
Posts: 50
Location: Utah
  • Mark post as helpful
  • send pies
    Number of slices to send:
    Optional 'thank-you' note:
  • Quote
  • Report post to moderator
Great thread, I will be putting it on my list of "must check".

We are building some walipini greenhouses, and putting RMTS in them. We are above 6000 feet elevation in the Rocky Mountains, so we see winter temps down to as low as 30 below, but 10 below is about as low as it gets most winters. Our experience should be a pretty good torture test, and gauge of what is possible to achieve under fairly extreme conditions. If it works out good, we may try it on some other property up above 8000 ft. I have lived through winters there when it did not get above 30 below for 2-1/2 months.
 
Posts: 47
Location: Italy-Slovenia Border Karst
1
  • Likes 1
  • Mark post as helpful
  • send pies
    Number of slices to send:
    Optional 'thank-you' note:
  • Quote
  • Report post to moderator
we're building a hoop-house too! in our area the temp doesn't drop so much, being close to the sea but last week we worked at a farm in Austria with real low temp...in a few months we will try building one there. ours here is partially standing on a tyre foundation, we're going to make the stove in feb, so its good reading of other experiments.
 
Posts: 1
  • Likes 1
  • Mark post as helpful
  • send pies
    Number of slices to send:
    Optional 'thank-you' note:
  • Quote
  • Report post to moderator
I have an odd question that I have not been able to find the answer for or maybe I have over looked threads with the answer. Does the location of the exhaust exit matter? As in can I put the exit just about any where? For example having the exhaust come out of the side instead directly across from the burn tunnel? I'm not talking about coming out of the side of the barrel. The exhaust will still be located at the base of the unit but coming out at a 45 from the burn tunnel. I hope this makes sense. I'm heating a poly-carb aluminum greenhouse.
 
Mike Kimble
Posts: 23
  • Mark post as helpful
  • send pies
    Number of slices to send:
    Optional 'thank-you' note:
  • Quote
  • Report post to moderator

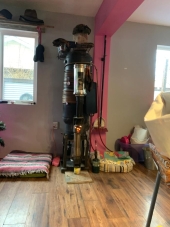
jay moore wrote:I have an odd question that I have not been able to find the answer for or maybe I have over looked threads with the answer. Does the location of the exhaust exit matter? As in can I put the exit just about any where? For example having the exhaust come out of the side instead directly across from the burn tunnel? I'm not talking about coming out of the side of the barrel. The exhaust will still be located at the base of the unit but coming out at a 45 from the burn tunnel. I hope this makes sense. I'm heating a poly-carb aluminum greenhouse.


Hi Jay,

Since nobody has responded, I'll give my educated guess and say no, it will not make that much of a difference. As I picture it, the gasses exiting the heat riser are dispersed in all directions and gradually get pushed to the bottom of the barrel. So, I think as long as your exit manifold is large enough, it should not be an issue. But, like I said, this is only an educated guess.

Mike
 
Shane McKenna
Posts: 50
Location: Utah
  • Mark post as helpful
  • send pies
    Number of slices to send:
    Optional 'thank-you' note:
  • Quote
  • Report post to moderator
Your right Mike. The gases in the heat riser are going straight up, and as long as the barrel is centered on the riser they come down around the riser evenly. The exit of the gases will create a warmer side to your lower heat mass that could have a slight effect on the temperature of the gas on one side of the barrel, but that effect will be insignificant to the effect of the draw. There are plenty of examples of RMH that the exhaust gases are 90 to the burn tube.
 
He's giving us the slip! Quick! Grab this tiny ad!
Rocket Mass Heater Jamboree And Updates
https://permies.com/t/170234/Rocket-Mass-Heater-Jamboree-Updates
reply
    Bookmark Topic Watch Topic
  • New Topic