• Post Reply Bookmark Topic Watch Topic
  • New Topic
permaculture forums growies critters building homesteading energy monies kitchen purity ungarbage community wilderness fiber arts art permaculture artisans regional education skip experiences global resources cider press projects digital market permies.com pie forums private forums all forums
this forum made possible by our volunteer staff, including ...
master stewards:
  • Carla Burke
  • Nancy Reading
  • John F Dean
  • r ranson
  • Jay Angler
  • paul wheaton
stewards:
  • Pearl Sutton
  • Leigh Tate
  • Devaka Cooray
master gardeners:
  • Christopher Weeks
  • Timothy Norton
gardeners:
  • thomas rubino
  • Matt McSpadden
  • Jeremy VanGelder

Rocket stoves in Greenhouses , our own forum topic

 
Posts: 8
  • Likes 1
  • Mark post as helpful
  • send pies
    Number of slices to send:
    Optional 'thank-you' note:
  • Quote
  • Report post to moderator
Rocket Stove Evaporator
 
pollinator
Posts: 175
13
  • Mark post as helpful
  • send pies
    Number of slices to send:
    Optional 'thank-you' note:
  • Quote
  • Report post to moderator
Nick here's one:


We had a much more simple design made out of cinder blocks. Right now I cannot find it, but I'm looking and will post if it shows up.

Thanks for the heads up on Alcohol Can Be a Gas. I was able to get it from the library. Never had heard of David Blume before either. Quite a force. I know exactly where your farm is. When we first bought our farm in NY we would drive up from DC every friggin' weekend. Have eaten at the Rabbit Drive In (I think that's what it's called) a couple of times.
 
Brooks Miller
Posts: 8
  • Mark post as helpful
  • send pies
    Number of slices to send:
    Optional 'thank-you' note:
  • Quote
  • Report post to moderator
no worries - love the concept of the alcohol setup on a farm, but the execution may be a little more involved than blume tends to lead on! i used to make biodiesel and ran my old Benz on SVO, but oil sources have dried up, i hate having methanol and KOH on the property (with 2 kids and one more coming), and it takes lots of energy to make the stuff, and it only works half the year!! horses are in the works for us for draft power, but for other equipment, im checking out the ethanol gig. used to be a brewer in a former career, so i have some experience, and ferment shit for a living (im a farmer:).

mmmm.... the red rabbit. beware the bunny dust, pretty sure its just MSG!!

brooks
 
Posts: 5
Location: Westfield Vermont
  • Mark post as helpful
  • send pies
    Number of slices to send:
    Optional 'thank-you' note:
  • Quote
  • Report post to moderator
Thanks for the links, I let ya know how it ago. It would be nice have a green house attached to the sugar house, to dump excess heat into greenhouse. Could be good for for starts. As sugaring more or less coinsides with when one might start some annuals. Then after sugaring you may not need to heat at all or very little anyway, if earth intergrated.
 
Posts: 32
Location: De Pinte, Belgium
  • Likes 1
  • Mark post as helpful
  • send pies
    Number of slices to send:
    Optional 'thank-you' note:
  • Quote
  • Report post to moderator
I have an idea for a rocket stove for an aquaponics greenhouse which I would like you all to criticise with your expertise:
as water is the best medium for stocking heat,
and as heat transfer to water is very fast and efficient
and as when the sun is out, it easily gets too hot in a greenhouse,

I would suggest not heating the air at all, but heating only and directly the water
which can then slowly transfer it's heat to the air

there are many advantages to this option:
having a carefully adjustable mass is only one of them
heating the fish water to the right temperature for the fish,
warming the growbeds,
buffering solar heat in the same system,
better conservation of an even temperature in the greenhouse during day and night,
... etc ...

If I have understood anything at all from rocket mass heaters,
the most important part is the heat riser,
which must be insulated in order to create adequate draft for optimal combustion
and that the complex "chimney" must always keep the same section

As I do not wish to heat the air,
I think I can completely eliminate the barrel,
which leads to enormous simplification:
gain in width and in weight of the construction:
a truly portable rocket mass heater
you can easily separate the heating part from the buffering part
which is water and can be drained and easily replaced
building an open top water pressureless tank (to avoid any possible steam hazards)
is cheap and easy

as my heat exchanger is in contact with the fish and plant water,
I would opt for stainless steel for both rocket heater and heat exchanger:
off the shelve, not difficult to cut and weld (TIG)

for insulation, I would pick semi-hard rockwool plates (easy to cut to size)

find attached the complete Sketchup 3D drawing
click on the scene tabs on top of the main window to see the upbuild
or click on view, animation, play

for those of you who are not yet familiar with Sketchup:
just download it, it's free, and very intuitive

Frank

Filename: rocket-stove.skp
File size: 467 Kbytes
 
Brooks Miller
Posts: 8
  • Mark post as helpful
  • send pies
    Number of slices to send:
    Optional 'thank-you' note:
  • Quote
  • Report post to moderator
hi frank - thats awesome - looks like you've spent some time with sketchup!

i have a few questions/critiques.

my only immediate concerns with putting the pipe directly into the water would be water tight welds/unions, loss of volume (space for fish to live in considering size of an aquaponics greenhouse), and how you would control the heat.

my idea with heating a tank of water and then moving it was because you'd be able to put the circulation loop in the pond on a thermostat so you don't go overboard on heat....but maybe you kinda can't go overboard?? i think the cool part to me about heating the water is that then whe you use water to irrigte, you're irrigating and spreading that heat out into the whole greenhouse more evenly.

questions:
1. how hard is it to cut rock wool plates, where do you get them, and how good are they at insulating?
2. whats up with leaving the top of the first piece of the heat exchanger uninsulated?
3. how would you make the stainless below the surface watertight? do you have access to a TIG welder onsite? what size pipe wall?
4. are the pipes in the bottom of the water representing your irrigation pipes?

looks great, and thanks for sharing.

an update to my design is that we've done some rough figuring and think that just heating a mass beneath the fodder trays may actually be enough to heat the whole thing....that way our cob mass running through the brooder sections radiates up and warms trays, and the plant water pulls the heat into the pond.

cutting and setting posts today - ill "post" some pics tonight!
 
Ed Waters
pollinator
Posts: 175
13
  • Mark post as helpful
  • send pies
    Number of slices to send:
    Optional 'thank-you' note:
  • Quote
  • Report post to moderator
Great ideas. What's going to happen to all that cob, once you get things fired up? In the winter, you are going to have so much condensation coming off the ceiling, that it will turn the cob into a mud puddle, won't it? Our current greenhouse we don't have a problem with condensation but that's because we have a concrete floor, and no open warm water source.
 
Brooks Miller
Posts: 8
  • Mark post as helpful
  • send pies
    Number of slices to send:
    Optional 'thank-you' note:
  • Quote
  • Report post to moderator
hi ed - the cob is actually all going to be beneath the fodder trays, which is sheet metal roofing - figured any drips would be caught on the metal and run back into the pond.


anyone ever tried lime plaster or any other coatings to waterproof cob? i suppose it wouldn't hurt considering the humidity in there
 
Frank De Block-Burij
Posts: 32
Location: De Pinte, Belgium
  • Mark post as helpful
  • send pies
    Number of slices to send:
    Optional 'thank-you' note:
  • Quote
  • Report post to moderator

Brooks Miller wrote:hi frank - thats awesome - looks like you've spent some time with sketchup!


I actually started this subject on this thread: https://permies.com/t/6216/rocket-stoves/Greenhouse-Rocket-Stove#184494
where I posted some replies and a new drawing
tomorrow I will copy your questions there and try to answer them

Frank
 
Ed Waters
pollinator
Posts: 175
13
  • Mark post as helpful
  • send pies
    Number of slices to send:
    Optional 'thank-you' note:
  • Quote
  • Report post to moderator
I keep thinking that a phase change material (water is an example) may be best for a green house. I cannot feed the rocket stove all day long to get the mass heated to the point where it will generate enough heat to last through the night. If water is heated, and then you close down the greenhouse with shades, berm it in the back and, insulate the roof, then I'm hoping this will be enough. If the water is in a bladder, then condensation shouldn't be a problem???

Thinking that some kind of bladder over the exhaust tubes will be enough.

There are other phase change materials available. Glauber's salt mixed with either peat, or portland cement is one that comes up a lot, as does paraffins. Glauber's salt melts at 90 degrees.

We are getting to the end of sugaring, where we always have more sap than our electric set up can keep up with. We used a 24 brick rocket stove, which worked really well for boiling the sap.
 
Posts: 90
Location: Southeast Michigan, Zone 6a
8
  • Mark post as helpful
  • send pies
    Number of slices to send:
    Optional 'thank-you' note:
  • Quote
  • Report post to moderator

Bradley Ruiz wrote:
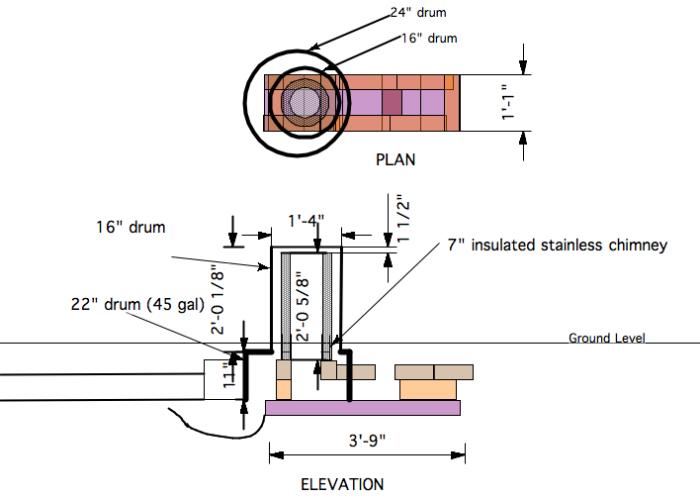
the next step is to insulate the chimney to 1.5 in of the inside diameter of the burn barrel
barrel = 22in
insulated riser will be 18"


Gotcha. What do you plan on using to insulate? Are you using cob all the way up? Or something else? I recently was able to obtain 2 slightly used chimneys from a guy in my area who was redoing his woodstove in his house. They are 9" inner diameter and insulated. I'm going to try to build my first heater using one of these prefabbed deals, since it will be faster. Anyone who has suggestions is welcome to chime in on this. I'll try to post a picture in a bit. Thanks!
 
Posts: 68
Location: NE PA zone 6
6
  • Mark post as helpful
  • send pies
    Number of slices to send:
    Optional 'thank-you' note:
  • Quote
  • Report post to moderator
Hello all, I am building a rmh for my hoop house. I am building the it outside of the actual greenhouse. Using the duct under the greenhouse to act as a thermal mass. Looking for tips on preparing the ground for the rm heater core and the trench for the pipe. Below is a video of my set up.


Would really like to hear any and all feedback!
 
pollinator
Posts: 4154
Location: Northern New York Zone4-5 the OUTER 'RONDACs percip 36''
67
hugelkultur fungi books wofati solar woodworking
  • Mark post as helpful
  • send pies
    Number of slices to send:
    Optional 'thank-you' note:
  • Quote
  • Report post to moderator
Amos V. : You have built a Rocket Stove base with a Heat Riser that looks like it is only sized for a maximum 6'' sized horizontal pipe run thru your thermal battery.
If you have already gathered your 8'' pipe then we will have to rework your Rocket Stove Base. I feel a little guilty about the fact that you are in this mess, I started
the '' Rocket Stoves in green houses, a forum of our own '' and then went off line for most of March/April please let me know how far you have got on your build and
I will work with you to save all we can out of this growing season. Again let me say how sorry i am that you and a few other people were 'left in the lurch !'

You can contact me here, and I will give you all the time I can!

For the good of the Craft! be safe, keep warm! PYRO Logically Big AL - As always, your comments are solicited and are welcome A.L.
 
allen lumley
pollinator
Posts: 4154
Location: Northern New York Zone4-5 the OUTER 'RONDACs percip 36''
67
hugelkultur fungi books wofati solar woodworking
  • Mark post as helpful
  • send pies
    Number of slices to send:
    Optional 'thank-you' note:
  • Quote
  • Report post to moderator
Ed Waters : I have probably done more to 'cast aspersions on' the Rocket Stoves chronic need for attention than any three other people,,, I wanted to be sure that only
people who were ready to make a commitment to the care and feeding of the dragon that lives inside the Rocket Stove were encouraged to make that effort !

To re-state what I have already said, The dragon that lives in your Rocket needs frequent feelings of small dry wood every time the Rocket is started up from cold! After
the Burn Tunnel and the Heat Riser have come up to their very high internal temperature, And you have some good hot coals to work with, the Rocket Stove can be run
successfully by listening to the Roar of the Rocket, Depending on the size of the pieces, and 2-3 or 3-4 pieces at that time are best, you may only need to feed the dragon
once an hour, and during the 6-8 hours that you are there anyway! Every day you will fully charge your thermal battery to carry its designed heat load over the next 20
-25 hours! When the Rocket Stoves internal plumbing is already warm, the burn time needed to get to being able to tend it about once an hour is considerably less.

Again I have been guilty of trying very hard to scare away the type of people who think they can Load it, and Leave it! those people will never be happy with their Rocket
Stove !

For the good of the Craft! be safe, keep warm! PYRO Logical, Big AL - Your comments are solicited and are welcome!

P.S. please share anything you find regarding phase change materials, more people are interested/need to know ! A.L.
 
Amos Valenti
Posts: 68
Location: NE PA zone 6
6
  • Mark post as helpful
  • send pies
    Number of slices to send:
    Optional 'thank-you' note:
  • Quote
  • Report post to moderator

allen lumley wrote:Amos V. : You have built a Rocket Stove base with a Heat Riser that looks like it is only sized for a maximum 6'' sized horizontal pipe run thru your thermal battery.
If you have already gathered your 8'' pipe then we will have to rework your Rocket Stove Base. I feel a little guilty about the fact that you are in this mess, I started
the '' Rocket Stoves in green houses, a forum of our own '' and then went off line for most of March/April please let me know how far you have got on your build and
I will work with you to save all we can out of this growing season. Again let me say how sorry i am that you and a few other people were 'left in the lurch !'

You can contact me here, and I will give you all the time I can!

For the good of the Craft! be safe, keep warm! PYRO Logically Big AL - As always, your comments are solicited and are welcome A.L.


Hello, Thanks for the reply. I should say that the actual build is bigger than what is shown on the video. I have other videos of the final build and subsequent burns. I thought that the cross sectional area needed to be the same throughout the whole system. I already covered the 8" duct work in the ground. The draw on the heater seems to be working just fine. At this point digging up the duct is not really an option. It would set me back too far but if you feel that it is absolutely necessary based on an explanation of where I am going wrong than I will do it. Id rather have a set back now then a useless heater come winter.
 
Amos Valenti
Posts: 68
Location: NE PA zone 6
6
  • Mark post as helpful
  • send pies
    Number of slices to send:
    Optional 'thank-you' note:
  • Quote
  • Report post to moderator
Hello, here is a follow up video with the final version.


allen lumley
pollinator
Posts: 4154
Location: Northern New York Zone4-5 the OUTER 'RONDACs percip 36''
67
hugelkultur fungi books wofati solar woodworking
  • Mark post as helpful
  • send pies
    Number of slices to send:
    Optional 'thank-you' note:
  • Quote
  • Report post to moderator
Amos V. : My Family motto ought to be 'if it ain't broke don't fix it! I do not have any problem with anything I see now, what are the dimensions of your bricks!
I like the area that you left yourself for a clean out, but in order to slow the thermal syphoning of heat continuing after the fire goes out you want to be able to
seal it up to the same height as the top of the feed tube. If it is all one flat plain you should end up with little or no syphoning, and an easier way to cover it up
if there is some.

You have to treat your thermal mass stove pipe as an expendable form, that is why you see other builds with the entire trench packed with cob, it becomes the
tube through the ground and is the best heat transfer medium that we could have after concrete which is so permanent!

I will look at all the videos again if you find that you have a problem !

For the good of the Craft! Be safe, keep warm! PYRO Logically - Big AL - - As always, your comments are solicited, and welcome !
 
Amos Valenti
Posts: 68
Location: NE PA zone 6
6
  • Mark post as helpful
  • send pies
    Number of slices to send:
    Optional 'thank-you' note:
  • Quote
  • Report post to moderator

allen lumley wrote:Amos V. : My Family motto ought to be 'if it ain't broke don't fix it! I do not have any problem with anything I see now, what are the dimensions of your bricks!
I like the area that you left yourself for a clean out, but in order to slow the thermal syphoning of heat continuing after the fire goes out you want to be able to
seal it up to the same height as the top of the feed tube. If it is all one flat plain you should end up with little or no syphoning, and an easier way to cover it up
if there is some.

You have to treat your thermal mass stove pipe as an expendable form, that is why you see other builds with the entire trench packed with cob, it becomes the
tube through the ground and is the best heat transfer medium that we could have after concrete which is so permanent!

I will look at all the videos again if you find that you have a problem !

For the good of the Craft! Be safe, keep warm! PYRO Logically - Big AL - - As always, your comments are solicited, and welcome !


Thanks again for the feedback. I will measure the bricks and get back to you. What would you suggest as far as dimensions for a larger burn tunnel and riser with an 8" exhaust? My set up is 7"x7"x22" burn tunnel and 7x7x49 on the riser. I have more materials and time once the summer gets going to rebuild. Some extra room in the feed side would be nice.
 
allen lumley
pollinator
Posts: 4154
Location: Northern New York Zone4-5 the OUTER 'RONDACs percip 36''
67
hugelkultur fungi books wofati solar woodworking
  • Mark post as helpful
  • send pies
    Number of slices to send:
    Optional 'thank-you' note:
  • Quote
  • Report post to moderator
Amos V.: Usually they say the camera adds 10 lbs ! In your case I don't really have a measuring stick ! Every thing looks small with nothing to measure against!

If you say it's 7x7, then 7x7 it is ! I would wish that I could see your transitional area directly below the barrel, and how generously you have prepared that Area!
Here the exhaust gases need to turn 90 degrees to flow out of the base over the top of an ash pit and funnel down to exit out through your 8" -'Tee', and its clean
out, continuing with the 8'' pipe !

Without any further information, (?) Tell me what is it doing, or not doing now ? For the good of the Craft! Pyro AL - As always all comments are solicited and are
welcome ! A.L.
 
Amos Valenti
Posts: 68
Location: NE PA zone 6
6
  • Mark post as helpful
  • send pies
    Number of slices to send:
    Optional 'thank-you' note:
  • Quote
  • Report post to moderator
Ok great. I will shoot a video of that area tomorrow. I tried to leave sufficient room for the exhaust to pass into the duct work. I will take some measurements during the video to provide as much information as possible. It is definitely 7x7 I was trying to keep the CSA consistent through the feed, burn tunnel, heat riser and exhaust. The exhaust has a slightly larger CSA than everything else.
 
allen lumley
pollinator
Posts: 4154
Location: Northern New York Zone4-5 the OUTER 'RONDACs percip 36''
67
hugelkultur fungi books wofati solar woodworking
  • Mark post as helpful
  • send pies
    Number of slices to send:
    Optional 'thank-you' note:
  • Quote
  • Report post to moderator
Amos V.: Honor, and keep constant YOUR ''Cross Sectional Area " and keep it Wholey that the days of your Dragon may be long !!! Good idea,you are covering your bases nicely!

If you had a folding carpenters ruler, or a busted tape to lay out there for scale (it tricks the mind to see it as it is) and of course a dollar is just over 6'' on its long side !

The more you document this the easier it will be for those who follow behind !

Speaking about following behind, have you gone to You tube and typed in " web4deb '' in You tubes search field ! I have sent people there in the past to scroll down to his
'Rocket Stove playlist', and they generally get lost along the way ! For the Good of the Craft! PYRO AL - As always,your comments are solicited and welcome ! A.L.!
 
Amos Valenti
Posts: 68
Location: NE PA zone 6
6
  • Mark post as helpful
  • send pies
    Number of slices to send:
    Optional 'thank-you' note:
  • Quote
  • Report post to moderator
Great. Yes I have checked out web4deb. I was lucky to get the chance to look at his set up in person. I am in PA and w4d is in CT. Amazing stuff! If you have the chance to see it in real time take it. I definitely took cues from his set up.
 
Amos Valenti
Posts: 68
Location: NE PA zone 6
6
  • Mark post as helpful
  • send pies
    Number of slices to send:
    Optional 'thank-you' note:
  • Quote
  • Report post to moderator

Amos Valenti wrote:Ok great. I will shoot a video of that area tomorrow. I tried to leave sufficient room for the exhaust to pass into the duct work. I will take some measurements during the video to provide as much information as possible. It is definitely 7x7 I was trying to keep the CSA consistent through the feed, burn tunnel, heat riser and exhaust. The exhaust has a slightly larger CSA than everything else.


It looks like my definitely 7x7 is not so definite! I love when that happens The heat riser tapers up towards the top and the burn tunnel is longer than I thought as well. I built so many mock ups and redesigned so many times that I am all mixed up. Note to self: stop being so indecisive! Below is 2 videos with some measurements.

 
allen lumley
pollinator
Posts: 4154
Location: Northern New York Zone4-5 the OUTER 'RONDACs percip 36''
67
hugelkultur fungi books wofati solar woodworking
  • Mark post as helpful
  • send pies
    Number of slices to send:
    Optional 'thank-you' note:
  • Quote
  • Report post to moderator
I went directly to your You Tube Channel and could not find the 'new ones', stayed for the clawhammer!

Damn that is one ugly mud turtle ! Best A.L.
 
Amos Valenti
Posts: 68
Location: NE PA zone 6
6
  • Mark post as helpful
  • send pies
    Number of slices to send:
    Optional 'thank-you' note:
  • Quote
  • Report post to moderator
Sorry they were some how marked unlisted, should be able to see them now.
 
allen lumley
pollinator
Posts: 4154
Location: Northern New York Zone4-5 the OUTER 'RONDACs percip 36''
67
hugelkultur fungi books wofati solar woodworking
  • Mark post as helpful
  • send pies
    Number of slices to send:
    Optional 'thank-you' note:
  • Quote
  • Report post to moderator
Amos V.: Now you've got me guessing! The gap between the top of the Heat Riser and the inside of the top end of the Barrel should be in the range of 2'' - 3''!

I think that you are cheating yourself of some of your Rocket effect, the rapid flow of gas that causes mixing and complete combustion! The easiest way to test
this is hook everything up and run it! A steel probe type thermometer should show you if you are truly getting the heat made by your rocket to the far corners
of your horizontal run. If you don't have a clue what type of probe ask your better 1/2, the old fashioned type stabbed into a big piece of meat ,or thanksgiving
turkey will do if given enough contact time !

Talking about special tools, we need to snip away at the horizontal stove pipe that pokes its way into the Rocket stove base. The entire top edge seen at 2:06, it
would be much better to have that part gone, and have a gentle sweeping transition from the bottom of the barrel into the start of your horizontal run. Rather than
tear everything apart, I want to suggest seeing if you can find, borrow, or buy a Coping saw, thats a hand tool that allows the blade to be set to cut forward or
sideways - you provide all the other angles, cut and remove or cut and fold up and then go in there with a Smooth batch of cob made with clay and fine sand, you
want the gases to sweep thru this area, and out the horizontal pipe, every bit of time you spend working on this will pay you dividends, It should be and stay as
smooth as finished sheet rock This is the last place that the fly ash from your fire can/will settle out ! and you should have planned for a large ash pit and a good
sized clean out at this prime location! If your rocket does not sound all that Rocket-y then I expect that you will get ash build-up there, especially if the walls are
not slick and smooth,with gentle turns !

Oh! and by the way you are teaching yourself a bad habit, the large end of your wood always gets loaded towards the bottom of the Feed Tube, following this rule
will generally prevent the wood being fed into the fire from wedging together and hanging up! This will equal no fire!

- - - ' Other than THAT ! Mrs. Lincoln', 'How did you like the play ? ' For the good of the Craft! B.S.,K.W.! PYRO Big AL Your comments solicited/welcome ! A.L.
 
Amos Valenti
Posts: 68
Location: NE PA zone 6
6
  • Mark post as helpful
  • send pies
    Number of slices to send:
    Optional 'thank-you' note:
  • Quote
  • Report post to moderator

allen lumley wrote:Amos V.: Now you've got me guessing! The gap between the top of the Heat Riser and the inside of the top end of the Barrel should be in the range of 2'' - 3''!

I think that you are cheating yourself of some of your Rocket effect, the rapid flow of gas that causes mixing and complete combustion! The easiest way to test
this is hook everything up and run it! A steel probe type thermometer should show you if you are truly getting the heat made by your rocket to the far corners
of your horizontal run. If you don't have a clue what type of probe ask your better 1/2, the old fashioned type stabbed into a big piece of meat ,or thanksgiving
turkey will do if given enough contact time !

Talking about special tools, we need to snip away at the horizontal stove pipe that pokes its way into the Rocket stove base. The entire top edge seen at 2:06, it
would be much better to have that part gone, and have a gentle sweeping transition from the bottom of the barrel into the start of your horizontal run. Rather than
tear everything apart, I want to suggest seeing if you can find, borrow, or buy a Coping saw, thats a hand tool that allows the blade to be set to cut forward or
sideways - you provide all the other angles, cut and remove or cut and fold up and then go in there with a Smooth batch of cob made with clay and fine sand, you
want the gases to sweep thru this area, and out the horizontal pipe, every bit of time you spend working on this will pay you dividends, It should be and stay as
smooth as finished sheet rock This is the last place that the fly ash from your fire can/will settle out ! and you should have planned for a large ash pit and a good
sized clean out at this prime location! If your rocket does not sound all that Rocket-y then I expect that you will get ash build-up there, especially if the walls are
not slick and smooth,with gentle turns !

Oh! and by the way you are teaching yourself a bad habit, the large end of your wood always gets loaded towards the bottom of the Feed Tube, following this rule
will generally prevent the wood being fed into the fire from wedging together and hanging up! This will equal no fire!

- - - ' Other than THAT ! Mrs. Lincoln', 'How did you like the play ? ' For the good of the Craft! B.S.,K.W.! PYRO Big AL Your comments solicited/welcome ! A.L.


Wow. Thank you for this information. Since I will have the time a rebuild is in the cards. I want to add those extras, especially work on that transitional area, and lower the stack to get it in the 3-4" range. I rushed some of the most important parts in vain to meet a non existent schedule in my head. The duct needed to be in the ground to move on. In any event the experience will be worth it.

I see that you are in up state NY. Any chance you go to Grey Fox? In any event thanks again. I will post some videos of the progress once I get going on it.
 
allen lumley
pollinator
Posts: 4154
Location: Northern New York Zone4-5 the OUTER 'RONDACs percip 36''
67
hugelkultur fungi books wofati solar woodworking
  • Mark post as helpful
  • send pies
    Number of slices to send:
    Optional 'thank-you' note:
  • Quote
  • Report post to moderator
Shane McK.,MikeK.: For a long time I watched a couple of not very different Rocket Stove Builds, before I convinced myself that IF the Transition space
to the horizontal is a generous sweeping channel turning the gas flow 90 degrees and funneling it straight out past the clean out and into the thermal
mass it can affect The Temperature of the sides of the barrel ! Sorry, I don't know a shorter way to say it!

Finally, the Rocket Stove with the more generously shaped Transition space managed through neglect to fill up with Fly ash over 5 months and started
to act like another Rocket with a slightly smaller Transition space with rough sidewalls! So with ONE quibble, I totally agree !

If you check out Page 24 of Jackson's and Evans' Great book 'Rocket Mass Heaters' you will see where they talk about 'offsetting' the barrel from directly
over the Heat Riser to help protect the exposure on one side which promotes more heat on the wider side, if this is planned into the build the transition
space to the horizontal piping should be in the same location as the barrels 'off set' !
 
Amos Valenti
Posts: 68
Location: NE PA zone 6
6
  • Mark post as helpful
  • send pies
    Number of slices to send:
    Optional 'thank-you' note:
  • Quote
  • Report post to moderator
We started our redesign yesterday. Sorry fot the shaky video.

https://www.youtube.com/watch?v=Wk7L8U9ZK4o
 
allen lumley
pollinator
Posts: 4154
Location: Northern New York Zone4-5 the OUTER 'RONDACs percip 36''
67
hugelkultur fungi books wofati solar woodworking
  • Mark post as helpful
  • send pies
    Number of slices to send:
    Optional 'thank-you' note:
  • Quote
  • Report post to moderator
Amos. V.: Every thing looks good, with everything you are doing, AND DOCUMENTING you are growing yourself into tomorrows expert ! Right know it may not
seem that way but the guy who made one stab at building a Rocket and got lucky - doesn't have a clue as to what you have learned, the way you have learned
it!

Now that you are starting from scratch, I would recommend putting in as much insulation as possible! Any heat that goes into the ground there at Your rocket
stove base, is not as much your Friend as the heat that did not go into the ground there and is warming your grow bed !

I would not worry about the slight down hill thing with the slight difference in depth of burn tunnel and Transition space, again make the turn generous, sweeping
and smooth! I guess that 'we' are stuck with the lack of a Fly Ash Pit there but thats O.K., 'we' only need to clean it out more often !

I have to go deal w some family shit right now so! fr th gd Crft, b.s.,k.w.! Pyro AL Talk to me !
 
Frank De Block-Burij
Posts: 32
Location: De Pinte, Belgium
  • Mark post as helpful
  • send pies
    Number of slices to send:
    Optional 'thank-you' note:
  • Quote
  • Report post to moderator
Allen, have you taken a look at my design for a rocket water mass stove?
https://permies.com/t/6216/rocket-stoves/Greenhouse-Rocket-Stove#184494
 
allen lumley
pollinator
Posts: 4154
Location: Northern New York Zone4-5 the OUTER 'RONDACs percip 36''
67
hugelkultur fungi books wofati solar woodworking
  • Mark post as helpful
  • send pies
    Number of slices to send:
    Optional 'thank-you' note:
  • Quote
  • Report post to moderator
Frank : I am looking forward to your experimentations and reports on using Sodium Silicate with Perlite!! Oh! If it could only be that easy to create a Firm Insulating
material capable of being shaped and re-shaped !

Unfortunately my MAC does not play well with others and I do not take instruction well in that field (TBI)! However, I would 'as soon tug on Superman's Cape' as go
against Peter Berg's considered opinion. I am sincerely wishing you good luck with your builds !

For the good of the Craft! Be safe, keep warm! - PYRO LOGICAL AL - as always, all your comments are solicited,and welcome !
 
allen lumley
pollinator
Posts: 4154
Location: Northern New York Zone4-5 the OUTER 'RONDACs percip 36''
67
hugelkultur fungi books wofati solar woodworking
  • Mark post as helpful
  • send pies
    Number of slices to send:
    Optional 'thank-you' note:
  • Quote
  • Report post to moderator
Amos V. just caught your comment on my location. If you Know your collages I'm near St. Lawrence Univ. and Clarkson. Paul Smiths' is over an hour away, but thats
because the roads don't go that way ! Hope to hear see your next post soon - with good news ! ! PYRO AL

Amos - there is the normal amount of stuff in my life - A LOT! If this note gets to you too late I'm sorry, let's just blame my T.B.I.!

If you find that I have not addressed/answered a specific question that you have asked, Just assume that I missed it!

Don't lower the Barrel raise the Heat Riser ! Let Me say that again, any time you have the chance and the materials, " Don't lower the Barrel raise the Heat Tube !''

This will increase the distance that you can 'push' the hot gases, and the amount of heat that you can deliver to the far reaches of Your Thermal Mass ! It could happen
that you start to raise the exhaust gas temps but we have plans for that !

For the good of the Craft! Be safe, keep warm! PYRO Logically Big AL - As always, your questions/comments are solicited and are welcome ! A. L.
 
Posts: 174
Location: Berea, Kentucky
5
  • Mark post as helpful
  • send pies
    Number of slices to send:
    Optional 'thank-you' note:
  • Quote
  • Report post to moderator
I know this is a little off topic. Does anyone have any kind of removable insulated hip walls in your greenhouse. I was thinking of filling some sandbags and building hip walls around the inside to keep the cold from creeping in at ground level. Then I recalled how much filling sandbags sucks and thought I would ask for advise. I was thinking wood chip filled bags would be a lot lighter to take down in summer time.
 
Amos Valenti
Posts: 68
Location: NE PA zone 6
6
  • Mark post as helpful
  • send pies
    Number of slices to send:
    Optional 'thank-you' note:
  • Quote
  • Report post to moderator

allen lumley wrote: Amos V. just caught your comment on my location. If you Know your collages I'm near St. Lawrence Univ. and Clarkson. Paul Smiths' is over an hour away, but thats
because the roads don't go that way ! Hope to hear see your next post soon - with good news ! ! PYRO AL

Amos - there is the normal amount of stuff in my life - A LOT! If this note gets to you too late I'm sorry, let's just blame my T.B.I.!

If you find that I have not addressed/answered a specific question that you have asked, Just assume that I missed it!

Don't lower the Barrel raise the Heat Riser ! Let Me say that again, any time you have the chance and the materials, " Don't lower the Barrel raise the Heat Tube !''

This will increase the distance that you can 'push' the hot gases, and the amount of heat that you can deliver to the far reaches of Your Thermal Mass ! It could happen
that you start to raise the exhaust gas temps but we have plans for that !

For the good of the Craft! Be safe, keep warm! PYRO Logically Big AL - As always, your questions/comments are solicited and are welcome ! A. L.


No worries A.L production did not commence on the redesign. If I keep spending so much time on the RMH the hoophouse may never be completed! Copy that on the heat riser length. I do plan to mock it up maybe this weekend to refine some of details. I will surely post that video. If I did not say it before... THANKYOU. I cannot imagine that you get paid (in dollars) to be on these forums, fielding questions from people and such but your words and advice are not falling on deaf ears.
 
allen lumley
pollinator
Posts: 4154
Location: Northern New York Zone4-5 the OUTER 'RONDACs percip 36''
67
hugelkultur fungi books wofati solar woodworking
  • Mark post as helpful
  • send pies
    Number of slices to send:
    Optional 'thank-you' note:
  • Quote
  • Report post to moderator
Amos V. : Just got back from a 250 mile round trip to see my Dr. Now i can do some meaningful work ! There is that certain piece of folk wisdom that goes-

'' When you are up to your a** in Alligators, its hard to remember that your original reason for being there was to drain the son of a --gun !''

Don't forget that your goal here is to start plants in your greenhouse, and right now you are close to being able to get by with just Row Covers !

For the good of the Craft ! Be safe, keep warm ! PYRO AL - As always your questions and comments are Solicited and Welcome ! A. L.
 
Amos Valenti
Posts: 68
Location: NE PA zone 6
6
  • Mark post as helpful
  • send pies
    Number of slices to send:
    Optional 'thank-you' note:
  • Quote
  • Report post to moderator

Joseph Fields wrote:I know this is a little off topic. Does anyone have any kind of removable insulated hip walls in your greenhouse. I was thinking of filling some sandbags and building hip walls around the inside to keep the cold from creeping in at ground level. Then I recalled how much filling sandbags sucks and thought I would ask for advise. I was thinking wood chip filled bags would be a lot lighter to take down in summer time.


We have used bails of hay/straw in the past and it seems to be effective.
 
allen lumley
pollinator
Posts: 4154
Location: Northern New York Zone4-5 the OUTER 'RONDACs percip 36''
67
hugelkultur fungi books wofati solar woodworking
  • Mark post as helpful
  • send pies
    Number of slices to send:
    Optional 'thank-you' note:
  • Quote
  • Report post to moderator
Joe F.: What Amos said, you will need to cover with plastic to let condensate water that will steadily drip on the bails of hay/straw drain safely away, do not try to
seal the bails up, you will just end up with soggy wet , non-insulating hay bails ! Good Luck ! PYRO AL
 
Posts: 4
Location: Ohio
  • Mark post as helpful
  • send pies
    Number of slices to send:
    Optional 'thank-you' note:
  • Quote
  • Report post to moderator
Hello to all. Been a member and been reading for a while but never posted anything. Sorry if this question has been answered before but I was unable to find what I needed to know. I might be buying a 16'x100' greenhouse and would like to run year round. I want to grow vegetables, duckweed, and 2 to 4 IBC aquaponics. Now heating is my issue. Would double plastic the green house and try the black barrels with water in them, on Northside to heat up during the day. Also wanted to build the RMH for heat. I live in central Ohio so weather is all over the place at times. Now for the question, with the RMH would like to have a number I would need, placement and running the pipe (size pipe as well) to heat. In my mind I thought I would run it underground but that is a long stretch. Any thoughts and help would be great.

Thanks in advance,

Derek
 
Don't sweat petty things, or pet sweaty things. But cuddle this tiny ad:
Rocket Mass Heater Jamboree And Updates
https://permies.com/t/170234/Rocket-Mass-Heater-Jamboree-Updates
reply
    Bookmark Topic Watch Topic
  • New Topic