

|

|

|
.png)
|

|

|
|
|
|
|
|
|
|

|

|

|

|
|
 6
6


![[Thumbnail for stove.jpg]](/t/367431/a/282247/stove.jpg "Filename: stove.jpg
Description:")
![[Thumbnail for stove3.jpg]](/t/367431/a/282248/stove3.jpg "Filename: stove3.jpg
Description:")
![[Thumbnail for stove4.jpg]](/t/367431/a/282249/stove4.jpg "Filename: stove4.jpg
Description:") 4
4
I tried to upscale to a 7"/175mm size.
Using a Base value of 12.66mm, Internal Surface Area (ISA) ideally 7,2m².
My current design has 8,24 m² ISA (excluding the sides that face interior house walls), but by playing with the main bell height I will hope to come closer to the 7,2m².
Questions
#1 Foundation and floor construction:
Do I need an extra slab of concrete and insulation as a base for the RMH?
I guess the primary need would be insulation, since the foundation is already suited for the heavy weight.
As a precaution I will definitely provide extra support in the basement beneath the main bell.
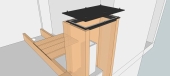
The floor construction (see sketchup) consists of concrete slabs. (steel reinforced), a layer of 6 cm PUR (polyurethane) and finally a layer of 6-8 cm cement base-floor with a ceramic tile as finish.
All floor has this construction except for the odd-shaped area where I planned my RMH, where I now planned my main bell. that area has no PUR, and 12-14cm of cement base-floor that should be well capable of holding the weight.
The rest of the floor contains heat-piping. except for the part below and between the RMH and the chimney.
Should I insulate between the bench bell and the floor? The heat-pipes are about 5 cm deep (1cm tile, 4cm cement basefloor). What temperatures will reach the pipes, could this be an issue without insulating? I I'm not mistaken they can handle 95°C.
#2 Chimney:
2a) The existing chimney is a brick and mortar, lined with cement. internal dimensions are 24x29cm/9,5x11,4”, length 5.5m/18ft. (rough estimate) useful as is for a 7" system? I know a flue pipe would be better but this may be fine? The previous fireplace had a 200mm flue pipe of 1m into this chimney.
2b) Do I need a bypass for cold starts?
#3 Interior wall Insulation
The main bell will be as close as possible up against a interior wall of plastered brick and mortar.
Do i need to insulate between the bell and this wall or just consider it as extra mass?
Perhaps leave a small air gap, place a metal heat shield or insulate some way.
In the design I left a small air gap of 1 cm. I don’t mind some heat to go into this wall since it’s an interior wall and it’s basically a brick and mortar pillar supporting the ceiling. I don’t expect much heat loss here.
#5 Core And Bell
If anyone could check, are the dimensions of the core and bench ok for proper "air/gas" flow to the chimney?
Cedric
2
Kabouter Klus wrote: Hi everyone, greetings from Belgium.
Kabouter Klus wrote:
I assume it's best not to install the RMH in proximity to the underfloor heating pipes as they are at shallow depth +- 40 mm/1,57”.
Kabouter Klus wrote:
[b]#5 Core And Bell
3
I think it's a bit too much, 7.2m2 is the maximum value considering all the internal surfaces excluding the floor and the core
Here you'll find a perfect answer to these questions: https://permies.com/t/280600/Wooden-ladder-rmh#2981470
In your case, you get a useful circular cross-section of 26.26 cm. I think that's a bit too much for a 17 cm system
from the latest constructions it seems that the double skin is necessary only for the front wall at the exit of the core.
I'm not entirely convinced by the current layout, especially the connection between the bench and the main bell. Maybe I would try to consider it all as a single bell but I don't have enough experience to recommend a solution.
The only thing I would try is raising the core off the ground for easier use (one of the best advantages of Shorty) and perhaps rotating it 90 degrees.
I hope I've been helpful. I wish you the best for this new project of yours.
Cedric
7
regards, Peter
6
 4
3
4
4
4
3
4
4

|
Hey! You're stepping on my hand! Help me tiny ad!
Workee-job sucks? Quit and live the permaculture way in Montana
https://wheaton-labs.com/bootcamp
|


![[Download RMH.skp]](https://permies.com/templates/default/betaview/images/download-attachment.gif)


