

|

|

|

|

|

|
|
|
|
|
|
|
|

|

|

|

|

|
 5
5


![[Thumbnail for RMH-y-Bathbox1.jpg]](/t/204327/a/194643/RMH-y-Bathbox1.jpg "Filename: RMH-y-Bathbox1.jpg
Description:")
![[Thumbnail for RMH-y-Bathbox2.jpg]](/t/204327/a/194644/RMH-y-Bathbox2.jpg "Filename: RMH-y-Bathbox2.jpg
Description:")
![[Thumbnail for RMH-y-Bathbox3.jpg]](/t/204327/a/194645/RMH-y-Bathbox3.jpg "Filename: RMH-y-Bathbox3.jpg
Description:")
![[Thumbnail for RMH-y-Bathbox4.jpg]](/t/204327/a/194646/RMH-y-Bathbox4.jpg "Filename: RMH-y-Bathbox4.jpg
Description:")
![[Thumbnail for RMH-y-Bathbox5.jpg]](/t/204327/a/194647/RMH-y-Bathbox5.jpg "Filename: RMH-y-Bathbox5.jpg
Description:") 5
5
Aurelio Ape wrote:
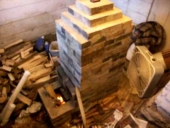
My initial idea was to build a batchbox, for many good reasons. The only drawback that I see is that you need chopped firewood to measure for the firebox; Accustomed to using all kinds of wood formats in the J rocket fire, I don't like the idea of chopping by obligation.
Aurelio Ape wrote:I decided to also include a mass heater with a metal drum, perhaps it is excessive for the dimensions of the house, however in the literature on the matter the concept of oversizing is insisted on and that is what I do when doubling the burners.
Aurelio Ape wrote:As well as the batchbox I have specific data on power and dimensions, in the case of the RMH I do not have them and I make the following assumption. If a 175mm circular chimney batchbox delivers 2.9kw, it is not unreasonable to assume that a J fire with a square chimney (17.5x17.5cm) containing a 175mm circle delivers a similar power.
Aurelio Ape wrote:The 300cm2 area of the rocket travels through three 15cm diameter tubes under the bench, with an overall area of 525cm2.
Adding the 300 cm2 of the rocket to the 176 cm2 of the batchbox, we obtain a maximum area of 476 cm2; I hope they will travel together (if necessary) through a final tube of 25cm in diameter with 490 cm2.
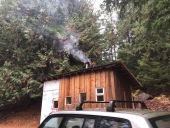
Aurelio Ape wrote:Stone house 65m2 without insulation, the dining room is 20m2, bench measures 0.8x0.4x2.9m, hood 0.86x0.76x1.65m
In the drawings you will see that the final tube goes down to a second level, for two reasons, one to attach another stove in the basement in the future and the other is to remove the cover that will close it from below and place it again with a simple burning paper a current is generated that sucks air from the system starting cold starts with ease.
Aurelio Ape wrote:Specific questions:
Will the smoke be equally distributed in all three tubes of the bank?
Aurelio Ape wrote:Has anyone changed an upper Peter's channel ? After how long of operation?
Aurelio Ape wrote:Any data on the duration of the lower channel?
Aurelio Ape wrote:For the calculation of the internal surface of the hood, I discard the upper cover because I intend to insulate it thermally so that it does not absorb heat. It seems more effective to me that it radiates heat horizontally than directly upwards, correct? For the surface calculation, I did not take it into account.
Aurelio Ape wrote:I separate the hood enough from the side walls to introduce insulation. I am not interested in losing heat to those walls that, on the other hand, are exterior, correct?
Aurelio Ape wrote:I think it's a good idea to isolate the thermal masses from the ground so as not to lose heat in this way. Correct?
Aurelio Ape wrote:In my design, the RMH tubes circulate inside the hood. Do you see any problem with this? Should I insulate them from heat that could be in the hood? Would a hot spot in these ducts affect the circulation of gases?
regards, Peter


 4
4
For all your Montana Masonry Heater parts (also known as) Rocket Mass heater parts.
Visit me at
dragontechrmh.com Once you go brick you will never go back!
3
1
![[Thumbnail for Comedor-batchbox-mod.jpg]](/t/204327/a/195156/Comedor-batchbox-mod.jpg "Filename: Comedor-batchbox-mod.jpg
Description:")
![[Thumbnail for Comedor-batchbox-mod-1.jpg]](/t/204327/a/195157/Comedor-batchbox-mod-1.jpg "Filename: Comedor-batchbox-mod-1.jpg
Description:")
![[Thumbnail for Comedor-batchbox-mod-2.jpg]](/t/204327/a/195158/Comedor-batchbox-mod-2.jpg "Filename: Comedor-batchbox-mod-2.jpg
Description:") 5
5
Aurelio Ape wrote:The bricksidewinder model has a shorter heat riser than other linear models of the same power. Is there a minimum and a maximum in height for each diameter and for each core model?
Aurelio Ape wrote:For the walls very close to the hood, the concept of heat shield has not been clear to me nor with what materials, a sketch would help me a lot. How far from the wall could I do without it?
Aurelio Ape wrote:The bricks in the core and the heat riser, refractory obviously. The rest of the bell and bench I suppose that common brick is enough. In Peter's construction mentioned above, are the bricks in the inner skin at the top of the bell normal or refractory?
Aurelio Ape wrote:In the bell, a gas inlet of the same size as the inside of the bank, and the outlet elongated in width and lowered in height, maintaining the minimum area of 200, to be as low as possible, and opening to connect with the chimney. Correct design?
Aurelio Ape wrote:What mortar do we recommend, refractory or clay and sand. In the case of both, in which places?
My initial intention for the bench and the bell is to do it with exposed brick, with normal cement mortar. The bench tops are made of stone or cement slabs, depending on their value.
Aurelio Ape wrote:My intention is to cover the bench with cushions. The internal dimensions of the bench are 56 cm wide by 25 high plus 10 cm for the top slabs. I have thought of a cushion thickness of 15 cm, with which the total height of the bench is 55 cm, perhaps it is not well sized?
Aurelio Ape wrote:Covering with cushions limits the diffusion of heat. What experience do you have in this regard? What materials are the most appropriate? Should I expect a temperature around 60º on the bench?
Aurelio Ape wrote:I would like to isolate the work from the ground. The core will have a metal bench (a good idea or a bad idea?) that will raise it to isolate it so that the smoke can pass under it towards the chimney. What method and materials do you recommend?
Aurelio Ape wrote:It is not so important to insulate the floor if it seems to be in contact with the less hot gases, however, what do you think about home insulation such as laying a cardboard/plaster sheet on the floor (material in Spain is known by a brand Pladur)?
regards, Peter
 Thanks again.
1
Thanks again.
1
Aurelio Ape wrote:The bricks in the double skin, refractory; Let's not take risks, then. Apparently they don't support a lot of load. Do you think they can be placed dry? In any case, it would not be difficult to ensure that the load exerted by the profiles is on the external skin.
Aurelio Ape wrote:Do you find it inconvenient for me to use it (in authorized places due to the temperatures, of course) without adding cement?
Aurelio Ape wrote:To join the core's bricks, do you consider the best refractory mortar, slip, or clay and sand mortar?
Aurelio Ape wrote:What material do I use to insulate the first course of bench and bell bricks?
Aurelio Ape wrote:What minimum separation do you consider prudent between the internal faces of the bell and the core?
regards, Peter
1
Aurelio Ape wrote:I was referring to the best way to insulate the first row of bench and bell bricks from the ground.
Aurelio Ape wrote:I was asking about the minimum separation between the core and the vertical walls of the bell.
Aurelio Ape wrote:Just now I have discovered your Double Shoebox Rocket, the web in Spanish does not contain it. I shouldn't have, now I don't know if this other design suits me better. A sea of doubts, I will try to navigate carefully.
regards, Peter
1
4
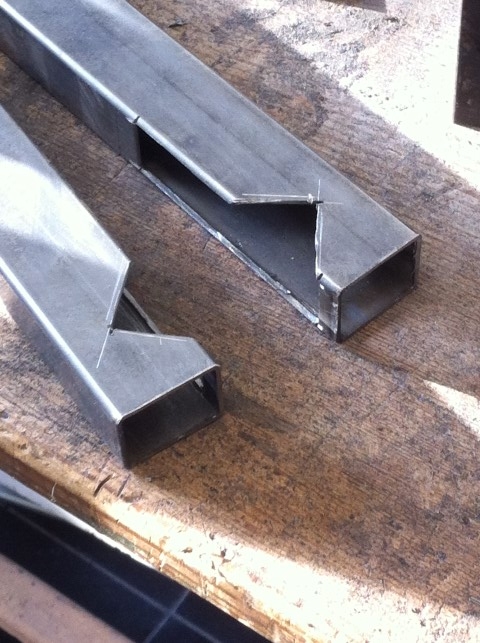
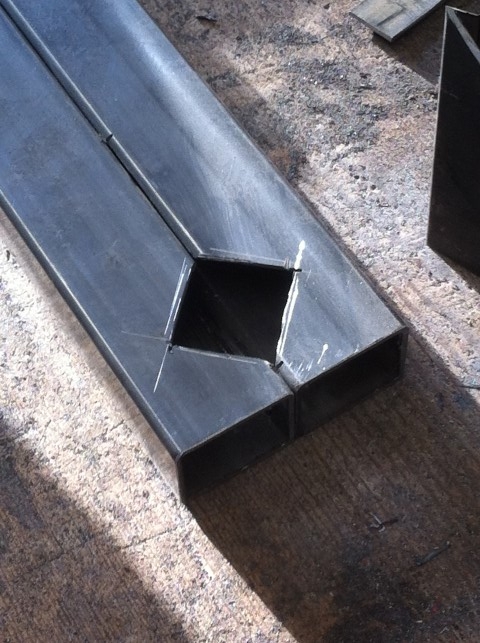
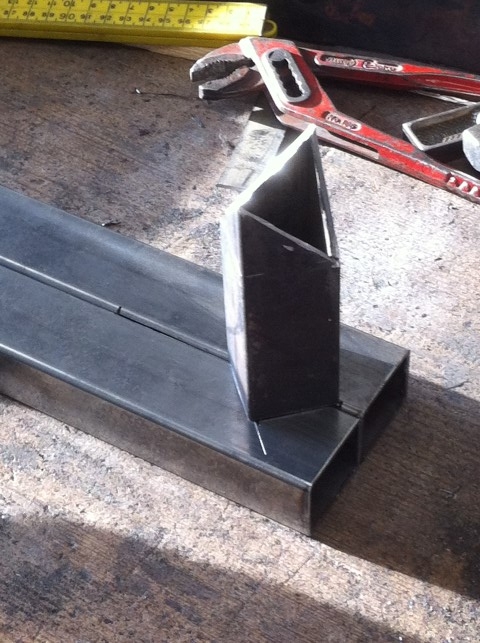
Aurelio Ape wrote:I'm stuck on the secondary channel. If I understand it correctly, the calculation of the dimensions of the floor channel does not work the same as in the upper channel. For a 200mm (314cm2) section, the vertical section must have a section of 16.7cm2 (5.4%) and the horizontal section (8.25%) 25.9cm2, which is 1.5 times the vertical section.
Aurelio Ape wrote:I find a square tube of 45x45mm (internal 41x41) 16.8cm2 for the vertical and 80x40mm (internal 76x36) 27cm2. Is this sections setup ok?
I can't find how the height of the vertical section is calculated.
Aurelio Ape wrote:What materials do you use for the lintel of the firebox?
Aurelio Ape wrote:It is of no importance and surely no one will do so; but I have detected that in the channel of the bricksidewinder model, the vertical section closes the horizontal one.
regards, Peter
3
 4
1
5
4
1
5
Aurelio Ape wrote:I try to find the best balance between the accuracy of the dimensions, according to the spreadsheet, the correct interlocking of the bricks (vertical joints no aligned) and the fewest possible cuts, with the measurements of the bricks. From this will result larger . As much as 3cm more in depth and 1 or 2cm more in height in the firebox. The heat riser and the portal have the recommendation dimensions. I hope that's not critical.
regards, Peter
2
![[Thumbnail for dintel-portal.jpg]](/t/204327/a/196389/dintel-portal.jpg "Filename: dintel-portal.jpg
Description:") 2
2
regards, Peter
7
regards, Peter
4
7
regards, Peter
3
Peter van den Berg wrote:
I am retired and I'll turn 77 years old in three months, deo volente.
1
), I expose my bricksidewinder batchbox model 200 mm in diameter, adjusted for commercial refractory bricks of 22x11x5cm.
3
Aurelio Ape wrote:Browsing in a materials store, I have seen aerated concrete plates, 62.5x50x7 that seem ideal to cover the upper part of the firebox. The question is, is it a suitable material for that location?
regards, Peter
1
2
Aurelio Ape wrote:The refractory base is not included, why is it not necessary or economy of drawing? If it has to be maintained, would the aforementioned blocks of AEC be worth it?
Aurelio Ape wrote:I've put the baffles back on the riser, aren't they necessary?
Aurelio Ape wrote:However, I have allowed myself to move some of the bricks so that the vertical joints do not match, this has forced me to slightly resize some of the others, but everything seems to fit. I am forwarding the file to you so that you can consider whether the changes are appropriate.
Aurelio Ape wrote:The ash retainer plate, I understand, prevents the primary air from passing through the lower part of the firewood directly and going to the upper part first. A wanted effect, I suppose.
Aurelio Ape wrote:If I'm not mistaken, the chimney door must be separated from the box enough to leave a space equivalent to that of the primary air, and that the feed is fed by this same air, in the style of the Mallorcan workshop.
regards, Peter
2
![[Thumbnail for batchbox-Peter.jpg]](/t/204327/a/196843/batchbox-Peter.jpg "Filename: batchbox-Peter.jpg
Description:")
![[Thumbnail for batchbox-Peter2.jpg]](/t/204327/a/196844/batchbox-Peter2.jpg "Filename: batchbox-Peter2.jpg
Description:") 2
4
2
4
Aurelio Ape wrote:The lintels that give way to the smoke on the bench and the exit to the chimney are supported by pillars instead of metal beams. Appropriate option?
Aurelio Ape wrote:For the lintel of the hood over the firebox, he used a 30x30x3mm L-profile and to support the first layer of the hood roof, a 30x30x3mm T-profile. Are the dimensions and thickness adequate?
Aurelio Ape wrote:The door is an adaptation of the Mallorcan design to the dimensions of 200mm. The air inlet in the door is 7,182mm2 and the gap between the door and the anti-ash cover to feed the primary inlet is 7,700mm2. Is this setting correct?
Aurelio Ape wrote:The back of the sofa and the armrests are designed from aerated concrete blocks. Suitable option? The exhaust manifold cover is designed with the same material. Appropriate option?
regards, Peter
1
1
5
Aurelio Ape wrote:Metal profiles. Metal and heat do not combine well, I made a design in which the lintels rest on pillars, it was well within the dimensions of the web; but it is undeniable that they restrict the passage of gases. I made this other one, with beams for the openings. As the joint is 5mm I have opted for a 50x50x5mm L profile. The wings are inserted in place of the joint and the brick rests without mortar on the beam. The expansion of the thickness will be minimal, but not in the length, for which I will leave a 3mm tolerance on each side, I think it will be enough. I use two facing L's to hug the bricks. They are located on the lintels leading to the bench, at the exit to the chimney and on the batchbox. The latter will be wrapped in superwool, the others I have not contemplated. Give me your opinion on all of this.
Aurelio Ape wrote:The internal area of the bell is 5.41m2, that of the bench is 3.53m2; their sum is 8.94m2. It is below the 9.4m2 of the web. To get closer to that figure I have three options. First, raise a brick plus the bell (11cm), it has a height of 2.09m so it would be 2.10m; Keep in mind that the ceiling is lower than usual, it is only 2.38m. Second, lengthen a brick plus the bank (24cm). Both report 0.3 m2, so we are very close to the recommendation. Third, leave it like this to ensure a slight power excess and good draw in all circumstances. Which option do you consider more correct?
Aurelio Ape wrote:I was worried that the fumes that go down the right and rear side of the batchbox would find the exit to the outside before the passage to the bank. I placed some unglued bricks over the lid of the box to cover that gap, is it useful or a waste of time?
Aurelio Ape wrote:I placed three 10cm diameter round logs, please tell me if the number and location are correct.
Aurelio Ape wrote:On the door, I sized the air inlet to 7850mm2, I found that the profile that supports the glass is the one that restricts the passage of primary air upwards, to eliminate this possibility I have chosen to reduce the lower part of the glass by increasing the metallic part, with which we leave enough space for the primary air. Tell me if it seems correct to you.
Aurelio Ape wrote:For the bench I found some cement slabs with 100x100x4 cm, a bit big to handle; I can always cut them in half. I have to ask if they have metal mesh inside, I imagine that this is not advisable for mixing with heat.
regards, Peter
3
1
4
Aurelio Ape wrote:Hello everyone
I have made the corrections indicated by Peter. I think the design is finished. Peter give me your thumbs up if so.
Aurelio Ape wrote:I have two more questions left, I need you to confirm that the slabs on the bench can have an internal metal mesh and that metal expansion does not cause problems.
Aurelio Ape wrote:What material is the right one to close the top of the batchbox?
regards, Peter
2
4
regards, Peter
1

|
You've gotta fight it! Don't give in! Read this tiny ad:
Homesteading and Permaculture Bundle - More than 35 Things
https://permies.com/w/235626/Homesteading-Permaculture-Bundle
|


![[Download Batchbox-bricksidewinder-200mm-brick-22x11x5cm.skp]](https://permies.com/templates/default/betaview/images/download-attachment.gif)