|

|
|
|
|

|

|

|

|

|
 2
2


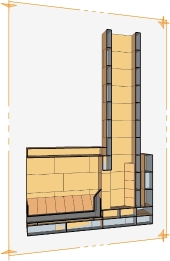
![[Thumbnail for double-bell.jpg]](/t/90336/a/63412/double-bell.jpg "Filename: double-bell.jpg
Description:")
![[Thumbnail for 1532865947466806651141.jpg]](/t/90336/a/63413/1532865947466806651141.jpg "Filename: 1532865947466806651141.jpg
Description:")

God of procrastination https://www.youtube.com/watch?v=q1EoT9sedqY
![[Thumbnail for IMAG0802.jpg]](/t/90336/a/63488/IMAG0802.jpg "Filename: IMAG0802.jpg
Description:")
God of procrastination https://www.youtube.com/watch?v=q1EoT9sedqY
Benen Huntley wrote:Just what I wanted to hear!
God of procrastination https://www.youtube.com/watch?v=q1EoT9sedqY
God of procrastination https://www.youtube.com/watch?v=q1EoT9sedqY
![[Thumbnail for 1533123840805778317842.jpg]](/t/90336/a/63555/1533123840805778317842.jpg "Filename: 1533123840805778317842.jpg
Description:")
![[Thumbnail for 1533123874974470846563.jpg]](/t/90336/a/63556/1533123874974470846563.jpg "Filename: 1533123874974470846563.jpg
Description:")
![[Thumbnail for IMAG0810.jpg]](/t/90336/a/63600/IMAG0810.jpg "Filename: IMAG0810.jpg
Description:")
God of procrastination https://www.youtube.com/watch?v=q1EoT9sedqY
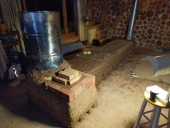
![[Thumbnail for IMAG0812.jpg]](/t/90336/a/63601/IMAG0812.jpg "Filename: IMAG0812.jpg
Description:")
God of procrastination https://www.youtube.com/watch?v=q1EoT9sedqY
God of procrastination https://www.youtube.com/watch?v=q1EoT9sedqY

![[Thumbnail for IMAG0814.jpg]](/t/90336/a/63648/IMAG0814.jpg "Filename: IMAG0814.jpg
Description:")
God of procrastination https://www.youtube.com/watch?v=q1EoT9sedqY
1
regards, Peter
Benen Huntley wrote:
Any suggestions for a budget option if we don't sit on it. We could always replace it later if things are working well.
God of procrastination https://www.youtube.com/watch?v=q1EoT9sedqY
regards, Peter
Satamax Antone wrote:Well, carry on with your idea of covering it with normal concrete. But put a metal plate underneath. A piece of 2mm steel, the right length and width. You could even support the whole complex of metal and concrete with three crosswise T bars. Tho, remember, that theses should not be mortared in. and have expansion space lengthwise. Usually, you fit these in slots cut into the bricks, filled with a bit of superwool or rockwool.
regards, Peter

God of procrastination https://www.youtube.com/watch?v=q1EoT9sedqY
God of procrastination https://www.youtube.com/watch?v=q1EoT9sedqY

![[Thumbnail for IMAG0818.jpg]](/t/90336/a/63791/IMAG0818.jpg "Filename: IMAG0818.jpg
Description:")
![[Thumbnail for IMAG0817.jpg]](/t/90336/a/63792/IMAG0817.jpg "Filename: IMAG0817.jpg
Description:")
![[Thumbnail for IMG-20180807-WA0006.jpeg]](/t/90336/a/63793/IMG-20180807-WA0006.jpeg "Filename: IMG-20180807-WA0006.jpeg
Description:")
God of procrastination https://www.youtube.com/watch?v=q1EoT9sedqY
![[Thumbnail for 1533633319116315097433.jpg]](/t/90336/a/63795/1533633319116315097433.jpg "Filename: 1533633319116315097433.jpg
Description:")
![[Thumbnail for 15336334465501707616938.jpg]](/t/90336/a/63796/15336334465501707616938.jpg "Filename: 15336334465501707616938.jpg
Description:")
God of procrastination https://www.youtube.com/watch?v=q1EoT9sedqY
regards, Peter
![[Thumbnail for IMAG0849.jpg]](/t/90336/a/64090/IMAG0849.jpg "Filename: IMAG0849.jpg
Description:")
![[Thumbnail for IMAG0943.jpg]](/t/90336/a/66153/IMAG0943.jpg "Filename: IMAG0943.jpg
Description:")
![[Thumbnail for IMAG0942.jpg]](/t/90336/a/66154/IMAG0942.jpg "Filename: IMAG0942.jpg
Description:") 1
1
![[Thumbnail for 15394311287881033724859.jpg]](/t/90336/a/66306/15394311287881033724859.jpg "Filename: 15394311287881033724859.jpg
Description:") 1
1
![[Thumbnail for IMG-20190711-WA0000.jpeg]](/t/90336/a/82654/IMG-20190711-WA0000.jpeg "Filename: IMG-20190711-WA0000.jpeg
Description:") 1
1
![[Thumbnail for Webp.net-resizeimage-(2).jpg]](/t/90336/a/83532/Webp.net-resizeimage-(2).jpg "Filename: Webp.net-resizeimage-(2).jpg
Description:")
![[Thumbnail for Webp.net-resizeimage-(1).jpg]](/t/90336/a/83533/Webp.net-resizeimage-(1).jpg "Filename: Webp.net-resizeimage-(1).jpg
Description:")
![[Thumbnail for Webp.net-resizeimage.jpg]](/t/90336/a/83534/Webp.net-resizeimage.jpg "Filename: Webp.net-resizeimage.jpg
Description:")

|
This looks like a job for .... legal tender! It says so right in this tiny ad:
Escape to a permaculture life in Montana
https://wheaton-labs.com/bootcamp
|


![[Download 175mm.skp]](https://permies.com/templates/default/betaview/images/download-attachment.gif)